Knotted batik is found in the culture of many nations. The pattern is obtained by tying knots from the fabric itself, by tying it with strong thread, or by tying small objects into it, such as shells, smooth stones, beads, buttons. The paint does not penetrate into those areas that are under a layer of thread or in a knot. This process can be compared to some extent with redundancy, because the knots prevent staining in the area where they are located.
Knot batik in India
In India, knot dyeing is called bandhani. This designation is used not only for the dyeing method, but also for the name of the finished products.
Cotton and silk are traditionally dyed. The cut is marked on a stencil, and then small knots are tied on it. No knots are removed from the finished product to prove the authenticity of handmade work.
DIY clothes
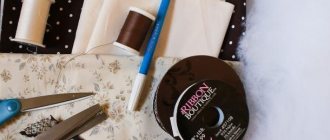
Let's look at some small examples for beginners on how to make knotted batik at home. To do this, we will need a small list of materials and detailed instructions with photos.
Read this: Glass Painting Stencils: Tips and Ideas for Beginners
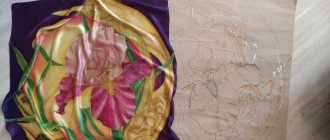
Take an item or fabric and wash it in clean water, spread it on the surface and start tying knots with threads, as shown in the picture.
The product can be cut into parts to paint it in different colors or folded entirely.
Dilute the paint according to the instructions on the package. You can paint in several ways, by dipping the product into a paint solution, soaking it with brushes or syringes, as well as splashing effects with brushes.
Consider knot painting using stamps and stitching on a T-shirt. Prepare strong sewing threads and needle. T-shirt made of natural cotton, dyes in powder.
We draw a sketch on a T-shirt using a pencil and sew the product along the lines.
We dye the fabric knot by knot in boiling dye, then dry the T-shirt, take wooden or cork stamps, and apply acrylic paints to them. Now the product can be steamed and dried.
The process of working using the knotted batik technique
Fabric preparation
The process of painting or dyeing using any batik technique includes a preparatory stage. The material must be degreased and sizing agents removed; to do this, it is washed with a small amount of detergent. This ensures shrinkage, which in any case will occur when fixing with an iron or steam.
So, for example, satin can shrink approximately 5 cm/m, and crepe de Chine 3.5-5 cm/m on the base. For duck, this figure averages 2 cm/m.
Tying knots
Then we move on to the main stage. The knots are tied in any order or in a certain order, which depends on the artist’s intention. But you need to keep in mind that the coloring result cannot be predicted 100%. The final design depends on how tightly the threads are tied and on the color saturation.
It is better to use harsh threads made from natural fibers because, unlike synthetic ones, they do not allow paint to pass through and protect the surface of the material from staining. To ensure that the knots are tied very tightly, after wetting, the thread can be pulled up again, or the knots can be tied on an already damp fabric.
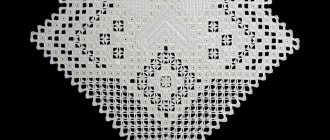
Patterns and effects in knotting technique
This type of batik allows you to get different patterns, from concentric circles to small circles. A star-shaped pattern is created using small objects, and the marble effect is achieved if a randomly crumpled section is tightly wrapped with threads in different directions.
An interesting effect is achieved when using a grid. The fabric placed in the mesh is pulled tightly so that it is pinched on all sides and “squeezed out” through the cells, and then proceed to dyeing.
Fabric dyeing
The knot technique allows staining to be done in different ways:
- Painting with a brush. To do this, the workpiece with the nodes is placed in a shallow container, and then the required amount of dye is applied. You can use several colors, applying them one after another. It should be borne in mind that neighboring colors can mix and give a new shade.
- Immersion dyeing. With this method it is also possible to produce multi-color dyeing.
Multicolor dyeing
- Various stripes, spots, and blots are drawn on the stretched fabric. After drying, knots are tied on it and immersed in a dye of a darker shade than was used before.
- Knots are tied on the cut and immersed in a container with the lightest color. Then, without untying the knots, the workpiece is dried and new knots are tied in the free space.
- After this, the work is again immersed in a dye solution of a more saturated shade or darker color than the previous one.
The procedure can be repeated several times. This way we get the material of the color that we last used, and under the knots we will retain the original colors.
Dye fixation
When using iron-on paints, the work is first dried, then freed from knots and ironed from the wrong side. After which it needs to be rinsed in clean water, removing excess dye.
When using steam-fixed dyes, you also need to free the fabric from knots and fix the painting using steam. After which the product must be rinsed and ironed.
When using aniline in the submersible dyeing method, it can be fixed immediately. To do this, the dye is diluted with hot water (40º-50º C) in a container, which can then be heated. The liquid should completely cover the work even after boiling, so its amount is taken at the rate of 3-4 liters per 100 grams of dry fabric. The workpiece is placed in a container and boiled over low heat.
The cotton needs to be boiled for 20 minutes, after which it is removed, salt is added to the solution (about 50 g per 4-5 liters of solution), and then the workpiece continues to boil for another 30 minutes.
When dyeing silk, the process is not significantly different, but instead of salt I add vinegar (120-150 g for the same volume).
The fabric is left in the solution until its temperature drops to approximately 50º C. Then it is successively washed in warm (about 40º C), then cold water, freed from knots and washed again. The fabric is ironed while still damp to remove wrinkles from knots. This method of staining avoids re-fixation.
LiveInternetLiveInternet
Knotted batik is one of the first ways to decorate fabric. It has been known in Eastern countries since ancient times. In Indochina, the knot technique existed even before the 7th century. And in India, hot batik is widespread to this day. The pattern consists of many white and colored dots. Similar patterns are found on ancient frescoes and sculptures. Wedding and festive clothes are made from such fabrics.
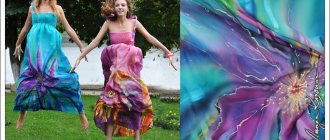
In Europe, the peak of popularity of knotted jewelry was in the 70s of the 20th century. Knotted batik was used in clothing and interior design: for bedspreads, curtains, and was also widely used to decorate clothes in the hippie style.
The essence of the method is that before dyeing, the fabric is folded and tied according to a previously planned pattern. After this, the fabric is dyed. In this way you can get a pattern with a stretch from light to dark shade, a multi-color pattern (by repeating the dyeing 2-3 times with paints of other colors). Reusable dyeing is done from light to dark.
For knotted batik you will need cotton rope and thread number 10. Ropes are used not only to secure the fabric, but also to create a pattern. Ropes must be made from natural fibers, since artificial fibers allow dye to pass through. When knotted batik is used, folding the fabric and fixing the folds with an iron is used; it would also be useful to use peas, beads, stones, buttons, etc. There are various ways to make knots in knotted batik: along a lobe thread, along an oblique thread, wrapping the fabric with a thread or rope (wide or narrow), etc. Using the knotting technique on fabric, you can get concentric circles, small circles (by tightening a loop on the fabric using a thread and a needle), a marble pattern (crumpling the fabric into a ball and wrapping it with rope), rounded star-shaped patterns (when wrapping peas, beads, pebbles, etc. with fabric).
In combination with the techniques of folding, wrapping fabric with threads and ropes, the stitching technique is used. To do this, you need to outline the future design using a simple pencil, and then baste the fabric with thread No. 10. The designs that are obtained when using the stitching technique are very diverse. You can create designs in the form of curved lines, ovals, zigzags, squares and many other shapes.
To dye fabric, you need to dilute the dye and strain it. Then pour it into the container in which you will dye the fabric, and add hot water there, then the dye diluted with water must be heated to a temperature of 40-45 ° C. After this, you can dip the fabric into the paint and continue boiling over low heat. When dyeing cotton fabric, it must be boiled in the solution for 20 minutes. Then pull it out and add table salt to the water with the dye (2-5 liters of water and 2 tablespoons of salt). Then boil the fabric in the resulting solution over low heat for another 30 minutes. When dyeing silk or woolen fabric, do the same thing, but add 1 tbsp rather than salt to the solution. a spoonful of vinegar essence. After dyeing, the fabric must be left in the solution for some time, and then rinsed in warm and then in cold water. Before rinsing again, you need to untie the knots and remove the stitching. And during the final rinse, you need to add a little vinegar to the water in which you will rinse the fabric (1-3 tablespoons of vinegar per 10 liters of water). With knotted batik, partial, multi-color and multiple dyeing can be used.
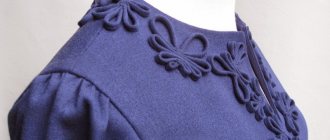
In addition to tying knots, the batik knotting technique also involves folding the fabric. This technique creates geometric patterns on fabric. The type of pattern depends on how many times you fold the fabric and how you pleat it. The fabric can be folded either straight or diagonally. Options for folding fabric and tying knots are presented in the pictures below.
Combination of knotted batik with other techniques
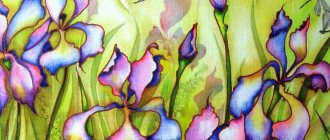
Knotted batik can be combined with other techniques - cold or hot batik. Often the knotted technique is the basis for a floral motif, which is further developed using the cold batik technique.
In this technique, you can paint not the entire cut, but only a part. During the boiling process, you can leave one edge unpainted by securing it above a container with dye. As a result, the transition from the colored part to the uncolored part will be soft. Then, on the unpainted area, you can paint using any technique.
Knot batik. Master Class
Master class on the topic “Knotted batik”.
(Adapted for preschoolers) Author : Kudryashova Olga Valerievna, teacher at State Budgetary Educational Institution Secondary School No. 587, preschool department No. 2, Moscow.
Purpose: the master class is intended for children of any age, provided that the teacher makes the knots for younger preschoolers. Purpose: making a beautiful, unusual painting. Goal: teach children to draw on fabric. Objectives: - create conditions for mastering practical skills of drawing on fabric; - develop fantasy, imagination and sense of color; fine motor skills. — encourage children to creative searches and solutions. Materials and tools. For work you will need the following materials and tools: A square piece of white fabric, preferably lining, but for the first lessons you can use any thin white fabric 30x30 cm; gouache, well diluted with water or watercolors; brush number 5; a glass of water; sewing thread and a napkin to cover the table.
Step-by-step work process. 1. Cut 5-9 pieces of thread (depending on the number of knots you will make) approximately 15-20 cm long.
2. In order to make a knot, take a pinch of fabric and pull it tightly with a thread in several turns; there is no need to tie a knot (then it will be inconvenient to remove the thread). The number of knots depends on your desire. 3. We begin painting. Let's color the knot first. We wet the brush and fabric with water as much as possible; the spreading of the paint and, as a consequence, the beauty of the finished work depends on this.
4. Then we continue to apply paint, covering the entire fabric. We don't spare water. The paint must be mixed with each other. 5. After finishing the work, let the fabric dry for 5 minutes and unwind the threads. Let's look and admire the resulting beauty. Dry the fabric with the pattern.
6. Iron it (through a cloth without using water, steam will not cause damage) and insert it into a frame under glass, since the work cannot be washed. We use it to decorate a group or as an original holiday gift. 7. This is what my kids got.
We recommend watching:
Drawing lesson in the preparatory group. In the winter park
Drawing lesson in the middle group of kindergarten Vase with flowers. Drawing lesson Unconventional ways of drawing in kindergarten for older preschoolers
Similar articles:
DIY gift for Mother's Day using batik technique
Painting on fabric at home for beginners. Master class with step-by-step photos