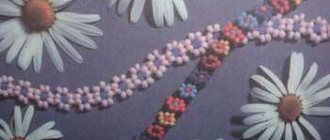
Preparation for work: beads.
Before you start work, you need to prepare everything you need and work through the step-by-step instructions. First of all, you need to decide on the beads. It is easier for beginners to weave butterflies using Czech beads. It is high quality, inexpensive, and comes in a wide variety of colors and sizes.
The best beads are Japanese, but they are expensive. And beads from Taiwan and China are cheap and inconvenient to use.
Step-by-step master class on weaving a butterfly
Necessary materials:
- beads No. 6 and No. 10 in different shades;
- wire - 0.3 millimeters.
Weaving of the torso
We begin to weave the body. We make a segment of sixty centimeters and string 2 beads, move them to the center. We pass one of the ends in the opposite direction through the beads and tighten the weaving. All work must be carried out strictly along the center of the segment. Thus we got the first two rows, as in the photo:
Next we string two more beads and also insert the wire into them. We tighten the weave and form the third line. We use the photo as a guide. We put 2 beads on one end of the wire, and pass the other end of the wire through them in the opposite direction. We tighten the wire. The result is row 3.
Scheme for further weaving:
- 4 – 2;
- 5 — 1;
- 6 — 2;
- 7 — 2;
- 8 — 1;
- 9 — 2;
- 10 – 1.
Read
We learn to weave bows from beads according to diagrams and photo master classes
We will make butterfly antennae from 25 pcs. main material. Holding the first one, we thread the piece in the opposite direction into the remaining 24 and through the top one into the body. We lower the collected material to the body and tighten it. On the second wire you need to make another tendril.
We fasten the segments by passing them through the woven body, bend them and remove what is not needed.
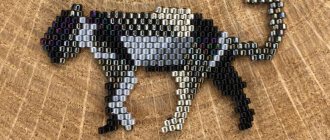
Weaving wings
This beaded butterfly mainly differs from the first option in the way the wings are created.
In order to weave wings, we prepare a wire of about fifty centimeters and string forty pieces of the main material, which we place in the center. We count 18 and thread the other end in the opposite direction through them, as in the photo. We tighten the weaving and make sure that the work needs to be done in the center.
We string the next 19 beads onto the left segment (LO), 4 onto the right segment (PO) and thread it in the opposite direction through 18 pieces and tighten it.
Next, the weaving technique is repeated, only the amount of collected material changes. The scheme is as follows:
- LO – 18 beads, PO – 6. PO pass through 17 on LO and tighten;
- LO – 16 pcs. blue tint, PO – 3 – red. We pass the PO through 15 to the LO and tighten it;
- LO – 13 pcs. blue tint, PO – 5 – red. We pass the PO through 12 to the LO and tighten it.
At the next stage, we string 14 pieces onto PO. red in color and thread the wire through five beads located at the base of the wing and tighten it. Let's look at the process in the photo:
We string 5 more red beads onto a section from the edge of beads and thread the second section through them in the opposite direction, tightening the weaving.
The next step is to take a piece of wire, thread it into the initial red bead and tighten the weave.
From the edge of the red beads we string 3 more beads onto a wire and attach the wing to the body, thread the resulting part through the sixth and seventh rows in the butterfly body. We twist the ends and remove those that are not needed.
We will make the next smaller wing on a segment of 90 centimeters. To begin with, we string 9 pieces. The main material is red. Move them 9 cm from the end of the wire and form a loop. We string 20 pieces onto the longer end. blue beads and form a second loop around the first one. We will weave the next loop in the same way from 31 red beads.
We attach the resulting wing to the body through the fourth row. We twist the ends and remove what is not needed.
The remaining parts need to be woven by analogy with the first ones and attached to the second side of the body.
Read
Learning how to knit with beads
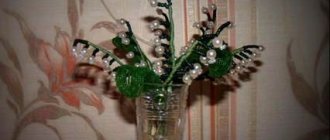
All that remains is to curl the antennae, spread the wings and our little beaded butterfly is ready.
The following videos for beginners will show you how to make butterflies from beads using other weaving techniques.
Preparing for work: tools
Along with the beads, you should prepare:
- wire or transparent fishing line (threads are used extremely rarely in this case) with such a thickness that the wire can be threaded through the hole in the bead several times;
- scissors;
- a needle for conveniently pulling the base through the beads;
- a diagram or a notebook in a box with pencils and a ruler, if you need to copy the diagram onto paper.
Basic weaving techniques
The butterfly can be made in the following ways: brick weaving and mosaic in a circle. In the patterns of brick weaving butterflies, the beads are arranged in one line, the connector goes in loops through the holes. Moreover, each row, as in bricklaying, is shifted by half a bead.
Such a butterfly will not be particularly flexible, but quite durable. And in the mosaic technique, beads are strung in a checkerboard pattern, which gives the butterfly greater flexibility and volume.
Butterfly weaving pattern
The butterfly is very popular among all ages. You can create a bright insect together with your children; it can decorate any hairstyle, bag, hat or dress. Once interested in beadwork, any child will want to make it themselves. And he will be truly pleased if the process of creating a product takes place with one of the adults.
In the process of making simple jewelry, brick weaving or circular mosaics are used. Handicraft patterns differ from each other in the arrangement of beads. In brick weaving technology, they are located in one line, following each other. The connecting wire or monofilament goes through the hole in a loop . This technology is less flexible . But it will be difficult to dissolve the fake after work. In the mosaic technique, the beads are arranged in a checkerboard pattern. At the end of this work, the butterfly is flexible and voluminous.
Additional weaving techniques
For flat parallel weaving you will need one piece of wire. After stringing the beads on different ends, the wire of one row passes through the holes of the beads of the other row and is well tightened.
The technique of volumetric parallel weaving differs from the previous one only in that the product is created on two pieces of wire. Then the rows of beads do not lie on the same plane, but one above the other.
Monastic weaving is interesting with a key element - a cross consisting of 4 beads, which is repeated all the time. Although this technique seems complicated, it is actually simple and quick to implement.
Butterfly made of beads in parallel weaving
Necessary materials:
- multi-colored beads;
- wire.
You can choose the color of the main material at your discretion, because nature has generously rewarded butterflies with wings of various colors. Take a round shape and give preference to size No. 11 - this is the medium option that is best suited for work.
The entire master class will be held according to the presented scheme:
Upper wing Lower wing Assembly of parts
Each of the butterfly wings must be made separately. We prepare sixty centimeters of wire and, based on the diagram, begin to do the work using the parallel weaving technique. If you are not familiar with this basic beading method, watch the video tutorials for beginners, they will demonstrate how to make parallel rows step by step. We string the first three beads, place them in the center and thread one end of the wire through two of them, as in the photo, and tighten the weaving. In this way we formed the first two rows. We repeat these steps until the lower part of the wing is formed, focusing on the color and number of beads in the rows according to the diagram.
A pair of upper wings is woven over a length of eighty centimeters in the same way as a pair of lower ones.
The next stage, the master class begins to weave the body of a butterfly from beads. Please note that upon completion of creating all the details, the wire should be pulled through certain beads from one to a couple of times. To make this possible, do not forget that the beads must have holes sufficient for this action.
Read
The process of creating chic lilies from beads
Diagram for creating a butterfly body:
- 1 row – 1 bead;
- 2 — 2;
- 3 — 2;
- 4 — 1;
- 5 — 2;
- 6 — 2;
- 7 — 1;
- 8 — 2;
- 9 – 1.
At the end of the set, we string one bead onto each of the ends at a distance of about 2.5 centimeters from the body. We insert a piece of paper into it and twist it, thus forming the antennae of a butterfly. We remove excess with nippers.
Having completed the process of weaving the necessary parts, the master class begins to assemble the butterfly. The scheme is as follows: through two beads in the fifth row of the made body, we stretch the upper ends of the wires from the lower wings. The lower ones - through the beads in the fourth row. We thread the upper wire ends from the upper wings into the bead in the seventh row, and the lower ones through a couple of beads in the sixth row. We fix the details.
Using loose segments, it remains to connect several rows of the upper and lower wings of the butterfly.
This fairly simple master class, suitable for beginners, will help you quickly make a colorful butterfly from beads.
Attach a pin to this craft and decorate the tulle with it, or add a magnet and place the fluttering beauty on the refrigerator door.
Advice from experienced needlewomen
Many needlewomen recommend fastening a bright bead with several loops at the beginning of work to secure the end of the wire. This helps preserve the product and prevents it from falling apart.
Note!
- Beaded trees: beautiful and unusual DIY beadwork. Detailed diagram of tree weaving + photo examples of finished work
- Beaded keychain: patterns for beginners with a step-by-step master class. Weaving techniques + photo reviews of the best keychain ideas
- Beadwork for beginners - step-by-step instructions for weaving with beads with your own hands. Tips for beginners + photo reviews
If the wire turns out to be short, you need to select a new piece of the required length and connect it to the short one, trying to make the length of the free ends shorter.
Special needles are selected for working with beads - they do not thicken towards the eye.
It is advisable to take beads of the same size and with a margin.
Instructions on how to make a butterfly from beads
You should start working from the bottom. For the tail, string one bead to the middle of the wire. Bend the ends up, connect them by stringing 3 beads and sliding them down.
Note!
Crafts from beads - TOP-160 original ideas for creating crafts with your own hands. Bead weaving patterns for beginners with photo reviews
Beaded birch: beautiful and original DIY products. Detailed technology of weaving with beads at home + photos of finished works
- Weaving with beads - instructions for making it yourself. Clear weaving patterns and technology reviews + photos of finished work
To create the lower wings, the ends of the base are moved apart and 17 beads are strung on them. Then they thread the ends into the bead closest to the tail and pull them up.
For the abdomen of the butterfly, the edges of the wire are connected, fastened with two beads.
The upper wings are woven in the same way as the lower ones, but not 17, but 23 beads are needed.
The remaining ends of the base are connected and two beads are strung. The ends of the wire are moved apart again to add a dark bead - an eye - to each. Finally, the final bead is placed on the newly connected ends.
Using scissors, remove the excess base, not forgetting to leave a part for the antennae, which moves apart and twists in the opposite direction.
Note!
Beaded bracelets: TOP-120 photos with simple weaving patterns for beginners. Ideas for ready-made beaded jewelry + step-by-step master class
- How to embroider with beads: TOP-200 photos with simple patterns for beginners. Bead embroidery technologies + step-by-step master classes
Having coped with such work, beaded butterflies can serve as inspiration for working with more complex, but no less interesting beaded butterflies.
Multicolored moth
Many people like butterflies that have a large number of colors and are variegated. And that’s why this master class will help you weave an insect using beads.
In order to weave such a butterfly, you need to prepare the following tools:
- beads number 11 of different colors;
- fishing line or wire;
- scissors or nippers.
A diagram of how to weave this product using beads is provided below.
Each wing must be woven separately. You need to start with the bottom wing. You need to take 60 centimeters of wire or fishing line. We look at the diagram and, taking it into account, string a bead onto fishing line and wire and stretch it into the central part - this is the primary row of our butterfly. Then you need to string two more beads onto the tip of the wire or fishing line. Next, we pull the next end of the wire through these beads and tighten it - this will be the second row. Next, we look at the diagram and weave. The second wing is made in the same way as the first.
When the two lower wings are made, you should start knitting those on top. To weave the upper wings, you need to cut a wire or fishing line 80 centimeters long. Weave according to the provided pattern.
Now let's start weaving the body of our beauty. We look at the diagram and weave like this: 1,2,2,1,2,2,1,2,1, do not touch the remaining pieces of wire or fishing line. We put one bead on the ends of the wire to create a distance of 3 centimeters from the beads that were last strung for the body. Now we tie the tip of the wire through the bead - these will be the antennae of the butterfly. Everything is described in detail below using photos.
It is very important to note that to create the body you need to use larger beads. This is due to the fact that some beads will have to be tied with wire or fishing line several times.
Let's start collecting all the parts. You need to pass a wire or fishing line through two beads of the body, which are the upper tips of the lower wings, and through 4 rows of beads - the wire of the wings, which are located below. Through the bead of the 7th row we draw the upper ends of the wings, which are on top. After 2 beads, 6 rows - the lower ends of the wire. All ends must be secured.
Related article: DIY leather phone case
When assembling our product, it is very important to follow the diagram and ensure that the wings are symmetrical to each other.
You can use any colors, because the play of shades is very characteristic of nature. And why don't we play with them. The wings can be made more pointed or decorated in some way - it all depends on the imagination of the needlewoman.
Master class “Butterfly made of beads”
To weave a butterfly from beads using flat parallel weaving you need to prepare:
- beads of any color for wings;
- large beads for the body;
- wire;
- a sheet of paper for recording the diagram.
When starting work, you need to remember that each row increases or decreases by 2 beads.
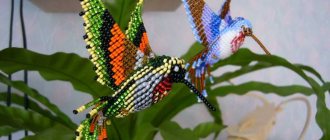
Beaded butterflies
Colorful multi-colored insects made from beads are an exquisite decorative element in interior design. They can be attached to curtains, lampshades, picture and photo frames, or decorate a box, mirror or kitchen items.
Beaded butterflies also find interesting uses in clothing and accessories. These are brooches, pendants, hair clips, decoration of a belt, scarf or bag. Beaded insects look especially elegant and beautiful when they complement women's or children's outfits.
Technique for performing upper wings
The first bead is strung on the wire. It is located in the middle. Holding the wire so that the beads do not roll down to the first one, 3 beads are strung. One end of the wire passes through the holes of the three beads, and the ends of the wire are pulled together.
5 beads are placed on one end, the other end passes through the holes of the five beads, and the ends are pulled together.
The next 4th row contains 7 beads, the 5th row contains 9 beads. On the following rows the beads decrease: 6th row - 7 beads, 7th row - 5 beads, 8th row - 3 beads. Row 9 is slightly different - there should be two beads in it.
The technique for making the lower wings differs from the technique for making the upper ones only in the number of rows and beads in them: 1st row – 1 pc., 2nd row – 3 pcs., 3rd row – 5 pcs., 4th row – 7 pcs., 5th row – 5 pcs. ., 6th row – 3 pcs., 7th row – 1 pc.
The remaining ends of the wire of each wing are twisted. The upper and lower wings are connected to each other by the same twist, where some ends go upward, to the top of the body and antennae, and others to the bottom of the body. Large beads are placed on top and bottom of the wire, creating the illusion of a butterfly's body. Job finished!
In order to create the same butterfly, but with a pattern of multi-colored beads, you can watch a video called “Butterfly made of beads. Parallel weaving."
To make a simple butterfly we will need:
- Wire 30 cm long
- Dark colored beads for eyes (2 pcs),
- Beads of one color for a one-color butterfly, or beads of several colors for a multi-colored one.
For the orange butterfly I used:
- Transparent brown beads for the body,
- Opaque orange beads for wings,
- Beads resembling hematite for the eyes.
I suggest starting to learn beadwork by making one of the most beautiful (if you choose from the simplest ones available for beginners) bead crafts - a butterfly. First, I’ll show you photos of my daughter’s (she’s 7 years old) butterflies, so that it’s clear what should happen as a result of completing the master class from this article.
These are our very first butterflies according to this pattern, the orange one is mine, the red one is my daughter’s.
Photo session with flowers
Master class “Butterfly with mosaic weaving”
You should prepare:
- fishing line;
- beading needle;
- beads of the same or different colors.
How to make a butterfly from beads? The following work items are performed:
To create the body of a butterfly, 10 beads are strung in the middle of the fishing line, then the fishing line is threaded back through the 8th bead, another bead is strung, the fishing line is threaded through the 6th bead; again new beads and threading the fishing line through the 4th and 2nd beads.
The line is threaded through the first bead, and the first two rows in the form of a mosaic are already visible.
7 beads are put on the fishing line, then the end is threaded back through the 6th - 1st beads, forming a butterfly tendril. The line returns to the body of the butterfly and creates a mosaic pattern on the side in the form of wings at the discretion of the embroiderer. The other half of the butterfly is made in the same way.
If you master the principle of weaving, it is enough to use your imagination to make your own unique butterflies.
Mosaic weaving
Many people like butterflies made from beads, but especially products that use mosaic weaving. But not everyone can easily make such a beauty. Therefore, this master class will provide step-by-step instructions that will tell you how you can perform this technique. But another interesting addition is that the wings are not smooth, and the edges are more curly, like those of real butterflies.
In order to make such a butterfly, you need to take beads of the following colors: yellow, black, blue, red, we will weave with the help of a fishing line, and you also need a needle.
Figure number 1 shows the upper half of our butterfly, where you can clearly see the pattern on the wing and body, but in the second drawing you can see the lower wing.
The right wing must be made taking into account the pattern, when the pattern on the body is in the upper part, but the left wing must be made when the pattern is on the bottom.
We make the first row, in which there are 4 beads on a fishing line, and attach them to the body (the body can be made similar to the first version of weaving a butterfly). Now we sew the body into the first upper bead with a needle and assemble the second row. Everything is shown in figure number 4. Now we make the third row - we collect beads and pass the needle through the last bead of the second line of weaving - figure number 5. Next we need to take the 4th bead of the row and now we stretch the fishing line through the next bead of the first row. We look at Figures 5 and 6. Then we insert the fishing line into the 4th bead of the 3rd row - Figure 5c.
Related article: How to make a Christmas wreath with your own hands: step-by-step master class with photos
Now we take 2 beads, in the diagram they are located above the bead with which we already came out, where the first is a bead from the 4th row, also the second is a bead from the second row, look at Figure 6a and again stretch the fishing line into the same bead, as in Figure 6b.
Now we make 4 rows: look at the picture number 7. The green arrow points to a simple set. Now let's move on to row 5. We take four beads, and then two more - this is the usual addition at the end of the row. Now we draw out the fishing line in a figure eight - look at Figure 8 a, the bead where the fishing line should come out is marked in red and so on in subsequent drawings. In the 6th row there are 4 beads, but the fifth is set as shown in the 5th picture, and after 2 with a simple set, look at image 8 b.
Let's proceed to the 7th row: we take 4 beads, and the 5th needs to be cast as indicated in Figure 5, and bring the fishing line into the green bead. And above this bead we make the usual increase. Now draw the line in a figure eight into a blue bead and again the increase is normal. And we go out again as a figure eight into the bead marked in red. Again the usual addition - look at the drawing from the 8th century. And the eighth row is made based on image 8 d, and the ninth - 8 d, the tenth - figure 8 f. Then we look at how everything fits according to the patterns, and increases are made exclusively above or below, not otherwise.
Now let's make the bottom wing. To do this, draw the fishing line over the third bead of the first row.
It is necessary to weave the lower wing under the upper one. The lower wing will be attached to the butterfly's body with two beads. The line is drawn out as shown in the figure. You need to string the bead of the second row and bring it out through the secondary bead of the first row. We collect 5 beads, look at figure 12, then stretch the fishing line into the third bead, take the sixth and bring it to the first - 12a. Then we weave and draw out the fishing line in a figure eight from the very last bead of the row.
Related article: DIY cardboard organizer: master class with patterns
We make another row, taking into account the diagram - three beads, and at the end of the row you need to make the usual increase and draw out the fishing line and the last bead using a figure of eight. In the diagram, this process is indicated in red, increase in Figure 13a. And so we knit the next row and again increase - 13b. And so on, taking into account the scheme.
Already when the first part is woven, we begin to weave the second, look at Figure 16. You need to take out the forest and collect 2 beads - Figure 16 a. Afterwards you need to bring the fishing line back into the same bead and then remove it from beads 1-6, see Figure 16b. Again you need to take 2 beads and remove them as shown in Figure 16c. And again 2 beads, as in Figure 16d. Next, follow Figure 14 and draw out the fishing line, as shown in Figure 16d. You also need one bead and put the fishing line back into the same bead, Figure 16e.
Now the butterfly is ready, all that remains is to make the antennae, which can be made either from beads or using wire.
Master class “Butterfly brooch made of beads”
A DIY beaded butterfly brooch will be a wonderful addition to your everyday clothes. This work is painstaking, but the result is worthy.
Necessary materials:
- red glossy beads;
- beads in translucent red, dark red, black, gray and silver;
- pin or clip;
- sew-on rhinestone;
- thick paper,
- bead thread;
- needle.
For the base of this brooch you will need felt, on which the butterfly will be embroidered with beads.
Work algorithm
You need to draw or print the outline of a butterfly on paper - a template for creating a brooch.
The cut out template is applied to gray or black felt. The contours are outlined, two blanks are cut out.
Work is carried out with one of the blanks. A rhinestone is sewn onto the body of the butterfly in a blank. The rhinestone is trimmed with red beads.
The edges of the butterfly and the lines connecting the upper and lower wings are trimmed with black beads.
For the internal lines (three lines on each of the four wings) you will need beads: black on the outer edge, then silver, and red at the end. These lines do not connect to the inside of the butterfly.
Next, you need to fill the empty space in each wing. From the rhinestone to the outer lines, first dark red and translucent red beads are sewn, then one silver bead is used for separation, and the whole thing ends with black beads.
On the wrong side of the embroidered part, apply a template (reduce the edges by 0.5 cm) and a second blank.
At the junction of felt blanks, the entire product is sheathed along the contour. You will need an overcast stitch with silver beads. The butterfly brooch is ready!
The use of different types of beaded jewelry
To make a fashionable voluminous brooch from a beaded butterfly, you need to attach a clasp to it. You can attach a beaded insect to a simple ready-made hair clip. You can also make a hair tie, decorating it with a colorful and voluminous butterfly made by yourself.
The easiest way to make such decoration for children's clothing or room is available to a child of middle school age. You will need wire 0.2 mm thick, round beads for the wings and antennae, of different colors, and larger flattened beads for the body.
Weaving begins from one end of the body, using a parallel weaving technique. Wire tendrils are attached to it, which is bent in the middle and darker beads are strung on it, then wings are made of several colors of beads, maybe blue and pink with lilac dots, in looped and circular shapes.
A butterfly brooch made of beads and sequins is made on the basis of a dense material, such as felt. French sequins are sewn to fabric either as a base for small beads, or as independent elements that form a scaly pattern overlapping each other.
By sewing sequins in different directions, you can achieve unique iridescent effects.
Bead embroidery and making various objects and jewelry from it can become a serious hobby that helps you realize your creative ideas.
https://youtu.be/vH2jtIXztOEhttps://youtu.be/3iW-CPVFYWo
_
Application of beaded butterflies
Beaded butterflies can decorate anything: curtains, refrigerators, boxes, mirrors, computer monitors, windows, shelf doors, lamp shades, pillows, etc.
Beautifully beaded butterflies are woven into a woman’s hairstyle, creating intricate and bright images. Butterflies on a belt, hat, scarf, clutch, shoes and in the form of a brooch immediately catch the eye.
Small butterflies look great on necklaces, earrings and rings. It’s good to decorate a gift with an exquisite beaded butterfly, or even just give it as a gift.
Step-by-step instruction
Beginning craftswomen, of course, should not attempt overly complex patterns. It is better if the product is simple, but impeccably executed. To do this, we suggest that you familiarize yourself with several options: a simple and openwork variety.
Beaded butterfly for beginners
To work you will need:
- wire (35 cm);
- beads (different colors);
- larger beads for eyes;
- scissors.
The weaving sequence can be seen in the diagram below, as well as a photo of the final result:
@odezhda.guru
@odezhda.guru
@odezhda.gu
@biserok.org
These butterflies can be sewn onto a child’s dress or used to decorate hairpins or elastic bands. If you weave several pieces, you can add them to your kitchen interior by attaching them to curtains or wallpaper.
The benefits of beading
Undoubtedly, bead weaving allows you to create a variety of designer crafts, showing your individuality and developing creative thinking. Needlewomen improve fine motor skills, accuracy and attentiveness.
Weaving can have a beneficial effect on the human nervous system, as this activity forces you to concentrate on the process of work and distracts you from unnecessary thoughts.
Beading classes are also useful for children: they strengthen finger muscles, develop imagination and determination, and develop perseverance, patience and concentration.
Brooch Beetle made of beads - master class
Watch the master class and you will learn how to make a “Beetle Beetle” brooch with your own hands.
Brooch Beetle made of beads
For work we will need:
- felt (item 1021-039);
- leather (1028-059);
- tulle (1035-016);
- Czech beads 10/0 (38000);
- Japanese Toho beads round 15/0 (TR-15-33);
- Japanese Toho Treasure cylindrical beads 11/0 (TT-01-21);
- Czech pearls 6 and 8 mm (70538);
- cabochon 40x30 mm (2012-015);
- brooch base (18-069);
- Rondel beads (501-080 and 506-003);
- monofilament (1032-025);
- wire 0.3 mm silver (1009-090);
- needles (1034-022);
- glue;
- tools (scissors, wire cutters, pen);
- cardboard.
Glue the cabochon onto the felt.
We begin to trim the cabochon with cylindrical beads. Sew on two beads.
Then we start the second row: we string a bead, enter the first row, skip one bead and string the second. So we continue to string the beads in a checkerboard pattern.
We also start the third row in a checkerboard pattern.
We do five rows in total, start the sixth row with size 15 beads - we make two rows.
Next we twist the wing from the wire. We try it on with our cabochon to make sure it fits.
We cut off the rest of the wire and make a ring. Now we grease the edges of the wire with glue and glue it to the tulle, cover it with a second layer and wait until it dries. Cut it out.
Now we trim the edge with size 15 beads.
We sheathe the second wing in the same way.
Then we sew the wings to the cabochon.
The body is ready. Let's start with the head: first we sew on the pearl beads.
Now the rondels: first we collect a large one, then three small ones and one large one. Sew it on.
Now we need to close the space between the cabochon and the beads. We collect Czech beads and stitch them horizontally first. And then we close the space between the beads themselves. We sew beads vertically.
Now we will make the horns. We collect cylindrical beads on the wire, then 3 Czech beads, a small rondel bead, 3 Czech beads, a large rondel, 3 Czech beads. Cut off the rest and twist it into a ring.
We make the legs in the same way.
We cut out a template from felt and mark the locations of the legs and horns.
We sew them on. We cut holes in the felt for the base for the brooch and insert it there.
Cut out a template from cardboard and glue it on.
We cut out a template from leather and make holes for the base for the brooch.
Decorate the wings. We collect: Japanese beads size 15/0, cylindrical, Czech, small rondel, large rondel.
Sew to the wings, checking for symmetry.
Glue all the layers and begin to trim the edge.
Congratulations! Our brooch is ready!
Watch the video tutorial on this page. We wish you pleasant creativity.