Patterns of knit and purl stitches cannot be imagined without the use of crossed knitting techniques. It is considered a very ancient way of knitting. Crossed stitches have several advantages, the main one being that they allow you to create a denser and more even fabric. At the same time, the item becomes less stretchable, that is, it wears better, does not stretch out, and does not change its shape.
To make the loop beautiful and even, you can knit it from a regular purl or knit stitch. However, you can use a combination of LP and IP of different types to diversify the pattern.
The main application of the crossed knitting technique is elastic bands of blouses, sweaters, and jumpers. Although they are often used to form the main pattern. Such loops will stand out against the background of the front surface, so they may well become a decorative finish.
Front crossed loop
Let's remember how LP is performed. She is picked up by the front wall. A crossed front is obtained if a regular LP is picked up not by the front, but by the back wall. Many beginning knitters will not find it convenient to make stitches this way. To prevent this from happening, knit more loosely and do not tighten the loops. Gradually you will learn to hook a loop in any position and crossed loops will no longer be a problem for you.
It looks like this:
The main thread is behind the work. We begin to knit with the right knitting needle, hooking it on the far wall of the loop. Grab the main working thread and pull it into a new loop:
All that remains is to remove the old loop from the left needle. Don't rush, do the drawing carefully, try to ensure that all the loops are the same. Then the pattern of crossed ones will decorate your item.
Read
Choosing mohair yarn for knitting fashion items
LiveInternetLiveInternet
Quote from Kotsur's message
Read in full In your quotation book or community!
How to knit crossed knit and purl stitches. Video.
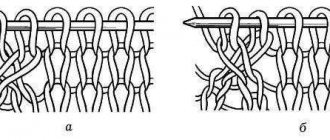
In descriptions of models, especially in Japanese and Chinese magazines, crossed loops are very common . And our needlewomen like to use crossed loops when knitting elastic bands, since in this case they turn out more prominent and more elastic. At first glance, there is nothing difficult in knitting such loops. But the result does not always turn out to be what we would like. Today we will try to figure out why sometimes a column of crossed loops turns out even, and sometimes not.
Take a close look at the loops in the image above: on the right the columns of crossed loops are even, all the loops are turned in one direction, but on the left they are not. Why? Because these loops were knitted differently. And the mystery here lies in knitting the purl loops.
Let's look at how the loops are knitted. First, we purl the stitches. The purl loops are always placed on the knitting needle with the front piece forward, regardless of the method of knitting the front loop, and the purl loops are always knitted behind the front piece, unless, of course, we want to get a crossed purl loop.
If we want to knit a crossed purl loop , then we need to hook the loop to the back wall. Look at the loop - it turns, its walls cross. The purl loop always turns clockwise:
And we knit this purl loop in the first way:
We will knit the other purl loop using the second method:
Now let's look at knitting a knitted crossed loop . After knitting the purl loop in the second way, the front loop is located on the knitting needle with the front wall forward and a regular front loop is knitted in this case behind the front wall:
We want to get a crossed front loop , so in this case we need to grab the loop by the back wall. Look carefully at the image: the front loop turns clockwise, its walls cross. Pay attention to the underlying loop, which we knitted purl in the second way, it is also turned clockwise:
Now let’s move on to the column of loops where we purled in the previous row using the first method. The knit stitch is located on the knitting needle with the back wall forward and a regular knit stitch is knitted behind the back wall:
In this case, to knit a crossed knit stitch, you need to grab it by the front wall so that the loop turns:
Pay attention to the lower loop, which in the previous row we knitted purl in the first way, it is turned clockwise. And the loop that we just knitted turned counterclockwise.
Let's summarize: when knitting purl loops in any way, they always turn in one direction - clockwise, no matter how we knit them. But the choice of knitting method for the purl crossed loop affects how we knit the knit stitch in the next row. When knitting a purl loop in the first way, turn clockwise, the crossed knit stitch in the next row is knitted behind the front wall - turn counterclockwise. And such a seemingly insignificant detail, in which direction the loop turned, gives us a column of “dancing” crossed loops:
When knitting a purl loop in the second way, turn clockwise, the crossed knit stitch in the next row is knitted behind the back wall - turn clockwise. The columns of crossed loops are even, all loops are turned in one direction:
So when using crossed loops, take into account this nuance, which way to knit a crossed purl loop - the first way (granny loop) or the second way (classic purl loop).
Source https://knitting-pro.ru
Adding stitches to crossed stitches
When knitting bevels with knitting needles, unnecessary holes may appear. To prevent this from happening, craftswomen use the technique of adding loops using crossed LP or IP (S LP, SIP).
To add C LP, use a transverse thread located between adjacent loops. With a deft movement from yourself, you need to pick it up with your left knitting needle. Then, moving from right to left, grabbing the back wall, we pick it up with the right knitting needle and get a C LP:
You can watch the formation of the SLP in more detail in the video on our website. If the increase is one-sided, then the result should be something like this:
Sometimes it is necessary to add stitches on both sides. The usual use of such designs is finishing the edges of products and other design techniques. Knitting it is not much more difficult. We need to designate a central place from which we will make increments in both directions. We form a C LP, then a regular LP along the row marked as central, then again with a LP. As a result, you will get a drawing like this:
The purl loop is added in the same way. A cross thread is used again. We pick it up with the left needle moving away from ourselves.
Then, from left to right, use another needle to pick up the broach again by the back wall:
Knitting methods
We figured out what a crossed loop is, now we’ll look at how to connect them. First, let's get ready for work:
- take a woolen or half-woolen thread;
- straight knitting needles, preferably No. 3.
Method No. 1 - from a transverse thread or broach:
- Cast on a small number of stitches and knit several rows in garter stitch.
- We begin to knit the crossed loops from the purl row: under the broach between the knitted loop and the next loop we bring the working knitting needle, which is still on the left knitting needle.
- We put a broach on the left knitting needle and cross it with a working knitting needle behind the right leg. From the resulting crossed loop, pull out a purl loop to the adjacent loop.
- We make the next loop in the classical way. The hole between the loops in this case will be completely invisible.
Related article: Handmade knitted bags - ideas for inspiration
The broach is often called a cross thread, so in some descriptions this method of knitting a crossed purl loop is called knitting from a cross thread. Sometimes the name "gap knitting" is also used. This is the same knitting method.
Method No. 2 - from a yarn over:
- We cast on a small number of stitches with knitting needles and knit several rows of garter stitch in the usual way.
- In one of the purl rows we begin to knit crossed loops. To do this, we form one yarn over by throwing the working thread on the right knitting needle.
- We transfer the yarn over to the left knitting needle, turning the resulting loop clockwise, that is, crossing it. We knit a purl loop from the yarn over by analogy with the broach.
Knitting method No. 2 is used to expand the knitted fabric. If increases are not needed, you need to knit two adjacent loops after the yarn over together.
Crossed loop patterns
Beginning needlewomen love patterns made from knit and purl stitches, as they are very simple. It is enough to master the knitting technique with LP and SIP and you can already knit a very impressive pattern on the surface. This video will help you on how to do this.
Read
Let's learn everything about knitting a hood
“Pigtail” of crossed loops
The pattern consists of two intersecting loops. The drawing can be schematically represented as follows: 1Kr, 2IP, 2S LP, 2IP, 2S LP. Such a pattern can be formed from either two or four intersecting ones. The main thing is that their number is always even.
"Rhombus" of crossed loops
A very beautiful pattern made with knitting needles will serve to decorate a sweater or hat. Against the background of the purl loops, C LP forms a pattern of diamonds. We cast on the number of loops divisible by 8, and add another 10 stitches and 2 for the edge to make the pattern symmetrical. You can always find a description of the drawing on our website:
The crossed loops are very interesting in this pattern. You will need to dial an even number, including two edge ones.
1p.: 1Kr, (Rp) 1p is removed, placing its working thread at the back, 1LP, 1Hk. We drag the next two loops into the missing loop. (Rp).
2p.: all individual entrepreneurs.
We knit the pattern to the required height:
Elastic band made of crossed loops. The crossed elastic band looks very impressive, it is dense and fits the body well:
The design of such an elastic band is extremely simple. It is enough to alternately perform S LP and SIP. Rapport will consist of only 2p+2Kr.
1R.: (Rp) 1 S LP, 1SIP (Rp)
2R.: (Rp) 1 S LP, 1SIP (Rp)
Types of drawing
Now that we have figured out what crossed purls are, we can talk about crossed stitch patterns. This type of knitting is usually used for winter clothes; they are alternated with classic loops, this is done for neatness.
“Granny” elastic is elastic that is usually used for socks and is knitted with crossed stitches. They are elastic and warm, but, unfortunately, not as neat as classic loops. Unfortunately, granny purls in hand knitting are only used in certain cases, and this is usually specified. In the literature on knitting, they are called differently: a straight loop, a purl loop, knitted at the bottom segment, and the like - all these names are conventional.
- We cast on an odd number of loops plus two edge loops - for a 2*2 elastic band.
- We knit the first row, the first and second loops with “grandmother’s” knit stitches crossed, and the third and fourth loops with purl stitches.
- We knit even rows of knit stitches and purl stitches in the classic way, due to which the elastic bands take the shape of a “Christmas tree”.
Related article: DIY hand-made tag for handmade products
In the same way you can knit elastic bands 3*3 loops.
Creating reliefs from crossed loops
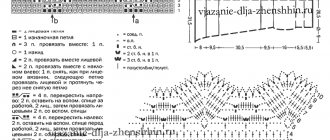
SPs can form a wide variety of reliefs. On a regular stockinette stitch, a knitter will be able to invent any designs, she just needs to use a little imagination. These waves can be used for children's blouses:
The pattern is somewhat more complicated than the previous ones. However, even an inexperienced craftswoman can do it:
- Odd rows from 1 to 9: (Rp) 1 SP, 3IP, 1 SP, P1, k1, 1SP (Rp).
- Even rows from 2 to 10: (Rp) P1, k1, slip 1p, k1, Slip 1 (Rp).
- Odd rows from 11 to 19: (Rp) 1 RS, p1, k1, 1IP, 1 RS, 3IP(Rp).
- Even numbers from 12 to 20 rubles: (Rp) 3p, 1 slip, P1, k1, P1, 1 slip (Rp).
Read
Learn to knit socks and slippers for the home
Like other knitting techniques, making crossed stitches requires skill from the craftswoman. There is no need to rush, there is nothing complicated about them. With a little practice, you will learn this simple technique.