What to do during quarantine? In fact, there are a lot of ideas, especially if you have an interesting hobby. For example, you are passionate about knitting, and you definitely have many, many significantly depleted balls of thread in your house. And now they can be adapted for something, as long as we all follow the recommendations for self-isolation - #betterathome. So don’t throw away your old yarn—we’ve collected ideas for its useful use in this material. It turns out that so many useful things for the home can be created from leftover threads!
No. 1 - Country rug
One of the options for a rug for the dacha
This is one of the most difficult ideas for using leftover yarn, but for an experienced needlewoman, implementing it will not be a problem. A rug for your cottage or home, made from threads, will add coziness, can become an excellent bed for your pet, or can turn into a bedside rug, and you won’t have to put your feet on the cold floor in the morning. In short, you can easily find a use for it. Let's see how you can make such a rug!
Soft mat for you and your pets
Step 1. For work, take not only old knitting threads, but also pieces of fabric. If you don't have any, you can take an old, unwanted T-shirt and use it. Use fabric to make a base for the rug. Cut the material into long (preferably) strips 2-3 cm wide and weave many braids from them. You need to weave tightly. And from the finished braids, assemble a round (square) base. Just sew them together or crochet them.
These are the braids you should get
Alternatively, you can combine the braids into a base by simply tying them
Step 2. The finished base needs to be designed. But first, make a small border with a width of about 10 loops from knitting threads. It will help to shape the edges of the future rug.
Make a border for the rug
Step 3. Sew the finished border to the fabric base along the edge.
Sew a border along the edge of the rug
Step 4. Now start decorating the future rug. It's best to start in the middle. In the center you can make original circles, in which the base will be made of plastic rings. For a small ring, use a regular ring from a plastic bottle, which secures the cork to it. Wrap the ring with thread and secure it.
Start shaping the core
Step 5. Next, tie the ring in a circle with a post. To make the work go faster, you can use thick threads. The finished core can be tied with a contrasting color thread for beauty.
Tie a ring
This is how you can do it
Step 6. Using the same principle, make a second ring, but with a larger diameter. You can take a ring from a plastic jar.
Tie a larger ring with a post
Step 7. Using the same principle - tying plastic rings from cans and bottles - prepare other decorative elements. Just use a different colored yarn for each. It is desirable that the elements be more or less the same in thickness - then the rug will not have gross differences in height.
Prepare other decorative elements
Step 8. Distribute the finished decorative elements throughout the base to create a beautiful pattern. Sew them to the surface. Additionally, you can decorate the rug with bows, ribbons and other elements.
Sew the circles to the base
On a note! Using the same principle, you can knit an overlay for a chair or stool. Another way to waste leftover yarn.
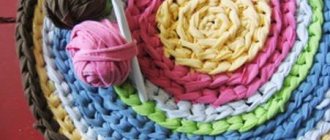
Knitted round rugs made of fabric and yarn, using a hook: ideas, description, photos
Knitted round rugs made of fabric and yarn
Read an article on our website about how you can knit socks for a woman, man, or child on 2 knitting needles . The diagrams are simple, the descriptions are clear, there are videos with master classes.
The idea is quite complex to execute, but for an experienced craftswoman, complexity only spurs interest. This rug is suitable for a cottage or apartment as:
- Places for a cat or dog
- As a base for cushions for chairs, benches, stools
- Foot mat by the bed, etc.
Here are the description instructions for making such a knitted round rug from fabric and yarn using a hook, as in the photo above:
- For the base you will need old remnants of fabric; if you don’t have them, you can use something from old knitwear: children’s T-shirts that have become small, adult worn knitted T-shirts, etc.
- Cut things into thin strips longer (or whatever happens) 2-3 cm wide .
Knitted round rugs made of fabric and yarn - the creation process
- Weave more tight braids from these ribbons. These braids need to be gathered into a round or square base (according to the shape of the carpet). To do this, sew or crochet the resulting braids.
Tie a braid of yarn for a rug
- We begin to draw up the resulting base. To do this, knit a binding with a width of 10 loops using the stockinette stitch from the remnants of the threads (you can crochet 10 loops with a regular knitting stitch, whichever you prefer).
- Sew the resulting piping to the base along the edge.
Sew a piping along the edge of the rug
- For decoration you need to prepare the details. Take plastic rings of different diameters. From water in plastic bottles, the ring holds the lid, it comes in a regular size and larger on bottles with iced tea, juices, etc., from cans the rings will be large.
Tie the rings with yarn
- Wrap the ring in a circle with thread, tie it with a regular stitch (it is better to use thick threads, then the rings will turn out larger), for beauty, you can run a thread of a contrasting color along the edge.
Sew on the rings
- Prepare more of these elements of the future carpet, let the width of the rings be different, but stick to the same thickness. Then the carpet will not have height differences. The more colors of yarn you use, the brighter and more colorful the carpet will be.
It will turn out beautiful if you arrange the rings like this - one small in another large
- Distribute the rings over the base, ideally filling it without gaps, and sew decorative elements to the base.
DIY rug
- For beauty, you can additionally decorate the carpet with ribbons, beautiful laces, beautiful beads, etc. Your masterpiece is ready.
Here's another idea on how to knit such a rug:
You can knit such a rug
No. 2 - Hot pads
Such coasters will make any tea party more comfortable.
This idea is only suitable for knitters who know how to crochet. Of course, you can’t knit a large napkin from leftover yarn, but cute little coasters for hot mugs are ok.
Just choose the pattern that suits you, take a hook and start knitting. Very soon you will have small, bright and cute mini-napkins on your table, which are so convenient to place cups of tea during friendly conversations.
Advice! To prevent cups from falling, it is worth making such stands as even and smooth as possible. We do not recommend using knitting patterns with lace.
Video - Master class on knitting a hot coaster for a cup
Blankets made from leftover yarn
We came to bigger things. A blanket made from leftover yarn? Why not?
Some of my readers said that after knitting something, any thing, they immediately knit a square motif from the remnants of yarn and gradually assemble them into a blanket. I wonder if this work has already been completed or not?
Blankets with squares always look very interesting; you can even knit squares in different patterns and combine knitting and crochet in one blanket.
Of course, to knit a blanket from the very beginning as a separate piece of work, you will need quite a lot of leftover yarn, and the most difficult thing is to choose them according to the color and thickness of the thread. But over the years of knitting, a lot of these can accumulate, this is in principle possible. In addition, you can unwind old pullovers and sweaters.
I present ideas for blankets made from leftover yarn in the photo.
One bright blanket is knitted in a patchwork style using short row knitting.
For another plaid, you need to knit individual colored stripes and then sew them together.
We have a diagram and description of knitting a similar blanket in blue tones.
There has already been a story about crocheted blankets with a zigzag pattern.
Another bright plaid is crocheted in rows of simple single crochets: two rows of single crochets, in the third row - several single crochets at the base of the previous row and several double crochets, when knitting which the hook is inserted into the columns on the row below.
From leftover yarn you can make patchwork-style blankets by knitting at the corner and crocheted blankets from multi-colored squares, and from new ideas you can create an unusual, cheerful blanket with hats and blankets made from diamonds. You will find diagrams and descriptions by following the appropriate links, and I will post the video here again.
Or this bright “Rainbow” blanket, in which you can use almost all colors at once. How to knit a pattern to it with embossed diagonal columns, see the video.
No. 3 – Sitting on a pompom chair
Sitting on a chair from pompoms
You can make an original, and most importantly, soft seat from yarn. To do this, however, you will again have to work with your hands and make a lot of pompoms from threads.
Step 1: First, twist the pom poms. To do this, start winding the knitting threads on two fingers of your left hand - index and middle, folded together.
Wrapping pompoms around your fingers is very convenient
Step 2 . When a “ball” has formed on your fingers, cut the thread from the main ball, and tie the resulting skein in the middle (between two fingers) with thread of the same color (it is better to prepare such a piece of thread in advance). Make a larger piece of thread for dressing - its ends will be useful to us later.
Tie the skein in the middle
Step 3. Cut the threads in the resulting ball in the middle of the folds.
Cut the threads at the folds
Step 4 . You have your first pompom. Make many of these pompoms using different colored threads by repeating steps 1-3.
Make lots of colorful pompoms
Step 5. Take a base - a rug that is often used in the bathroom or kitchen. It has many holes.
You can buy such a rug at a hardware store.
Step 6: Using scissors, carefully pull the pom pom threads through the holes in the mat. Each thread goes through its own hole. For one pompom, the threads should pass through adjacent holes.
Carefully thread the threads through the holes in the rug
Step 7. Tie the ends of the threads of one pompom on the wrong side of the rug.
Secure the pompom by tying the threads
Step 8. Using this principle, decorate the entire surface of the rug with pom-poms.
Decorate the entire rug with pompoms
No. 4 – Mobile for a crib
Mobile for a crib
Those who will soon have a baby in their family will definitely like this master class. From leftover yarn you can make a bright and safe mobile for your baby. And for those who don’t know what it is, we’ll tell you: a mobile is a structure with toys that is suspended above a child’s crib. Children love to watch the dangling figures. So, how to make a yarn mobile?
Step 1. To create a toy you will need a piece of cardboard, an embroidery hoop, scissors, a needle and, of course, the yarn itself. Prepare everything at once.
Prepare everything you need for work
Step 2. Remember how in the previous master class we made pom-poms. Now do them too, but instead of using your fingers to wind the threads, use a piece of cardboard.
Start making pompoms
Step 3. Also in the middle, tie the resulting skeins with thread in the same color.
Drag the future pom-pom with thread
Step 4. Then cut the threads on the folds in the middle.
Cut the edges of the skein
Step 5. Make many, many of these pompoms.
Make enough pompoms
Step 6. Take the hoop and wrap it with knitting threads.
Wrap the hoop with thread
Step 7. This is what the hoop should look like. Now prepare three long threads and tie them together.
Prepare threads for attaching pompoms
Step 8. Sew the pompoms to the threads, and attach a larger pompom to the place where they are tied. Make a loop on top of it.
Sew pompoms to threads
Step 9. Attach the threads with pompoms to the hoop ring so that the central pompom is on one side of the circle plane, and the threads with small pompoms are on the other. The mobile is ready. Due to the loop, it can be easily hung over the crib using a special device.
Hoop the pompoms
No. 5 – Mosaic of micro-balls
An original mosaic made from balls of yarn.
Another original way to use leftover yarn to good use is to make a children's mosaic from small balls of balls or micro-pompoms. Under it you can fit a “container” with a frame, inside of which you can paint sections of the base with different colors. The color should match the selected yarn.
We won’t tell you how to make pompoms or balls - there are examples above. Here you need to act in exactly the same way, but make very small elements. The number of balls or pompoms of the desired color should be such that when they are placed tightly inside the frame on an area of the same color, it is completely covered by them.
Mosaic is absolutely safe for children over three years old. Children are excited to sort items by color.
Advice! Children should not be given such a yarn mosaic, as the balls are too small and can pose a danger. But for little ones, it’s quite possible to make an option with larger elements.
No. 6 – Flower pot
Original flower pots decorated with yarn
You can make interesting decor for flower pots from leftover yarn. If you have a lot of green plants at home, then why not decorate their habitats with colorful threads? And yes, you don’t need to know how to knit! In this case, everything is much simpler.
Step 1. To create such a “thread” decor, in addition to leftover yarn, you will need PVA glue and the flower pot itself. Keep everything at hand.
Prepare everything you need
Step 2. Take the glue and apply it under the rim of the pot in a thin strip.
Regular PVA is suitable for gluing threads.
Step 3. Next, take the selected yarn option and start gluing the thread onto the glue.
Glue the yarn in a circle
Step 4. Systematically wrap the pot with thread, gluing it to PVA. As you work, add glue to the surface of the pot.
Wrap yarn around the pot
Step 5. Every few turns, press the threads together so that they sit tightly on the pot.
Press the threads so they fit snugly
Step 6. Cut the thread at about a third of the height of the pot and glue the remaining tail with glue.
Cut the thread when you're done with one color.
Step 7. Using the same principle, start gluing the pot again, but with threads of a different color.
Use threads of different colors for decoration
Step 8. And then wrap the pot with thread of the third color.
You can use different color combinations
Step 9. Also be sure to glue the tail of the last thread well with glue.
Fix the tails of the threads with glue
Step 10. To make the pot less dirty and easier to clean, coat the yarn with varnish.
Coat the pot with varnish
Step 11. Further strengthen the places where the threads were cut: glue the beads to these areas using a glue gun.
Additionally, secure the tails of the threads with beads
Advice! Use different colored yarn on one pot. Then it will look brighter and more cheerful.
Cushions and rugs made from leftover yarn
You can make pillows and rugs with your own hands from leftover yarn.
First, knit, of course. Use bright leftover yarn and knit a pillow from motifs, maybe a square one, or a pillow with a zigzag pattern, or like the one in the photo - with volumetric knitting. And you can even knit a fashionable pouf!
I have a pillow made from leftover yarn and knitted using the intarsia technique.
And I also like this bright one from tiny squares. I recorded a video of how to knit the motif:
A rug made from leftover yarn can be knitted round using any simple pattern, decorated with tassels or not decorated.
I really like pillows and rugs made from pom-poms and knitted flowers from various leftovers.
First you need to tie on a bunch of flowers or wind pompoms, and then sew them tightly together onto some kind of fabric base.
And we have patterns for knitted roses.
In addition to knitting, you can use another method of making pillows and rugs: cut the yarn into pieces and attach them with a crochet hook to a mesh base. For pillows, it can be knitted using the fillet technique. And for rugs you will need to find a special type of burlap, even construction mesh will do.
A detailed description of this technology is in the article about fluffy pillows with diagrams.
See patterns for rugs here>>.
Maybe someone will feel sorry for cutting the yarn, but it turns out such fluffy beauty, and even with a pattern! I once decided and did not regret that I made a pillow from threads. And I didn’t spend that much time.
Another great idea from leftovers is bright, fashionable mandalas; they can be knitted in the form of napkins, rugs, potholders, pillows, and round blankets. Schemes here>>.
No. 7 – Sweater for wall clock
An original clock in a sweater will look perfect in a bright kitchen.
If you like unusual bright things, then decorate a wall clock with leftover yarn. Many of them have a fairly wide bezel around the dial. And now you can just tie it/wrap it with the rest of the yarn, choosing it according to the colors.
This solution is suitable for those who love something unusual. Of course, such a “sweater” for a watch will not fit into every interior. But on the other hand, playing with colors, you can figure out how to implement the idea in almost any conditions.
Advice! Remember how in the master class on pots we covered the threads with varnish? You can do the same with a watch! Then the yarn will be much easier to clean from dust during cleaning.
Granny square blanket
We suggest you look into your yarn box and pull out everything you have. Add a large hook, take a little patience, don’t forget a little time - and suddenly you have a big grandma’s blanket ready. You should not strive to ensure that the full “circle” of the square is knitted with the same thread. Out of yarn? Just switch to the next color. And then another one. And so on - until you get a blanket of the size you need.
How to knit a giant blanket from a granny square - description from Planetcarina
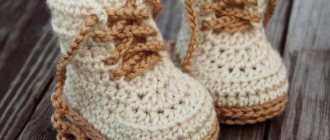
No. 8 – Socks for chairs
Cute and funny chair socks
If you have a very delicate floor covering or you move your chairs too loudly, then using this idea you will solve both problems. Chairs with such socks on legs will move as quietly as possible, without disturbing the sleep of household members in the morning, and the floors will remain intact and without scratches.
One such sock requires very little yarn. So the leftover threads are quite suitable for this work. It is best to crochet and you can use the simplest knitting techniques. A master class on creating such products is presented in the video below.
Advice! To prevent the socks from falling off, secure them to the legs with rubber bands sewn into the upper part of the sock.