Kids like this cute night bird with its huge eyes, funny ears with tassels, and soft fluffy plumage. Owls and eagle owls are one of the popular themes for children's night lights. Poems and lullabies have been written about owls for the little ones. Therefore, the “Owl” hat will become a favorite headdress for the baby, especially if you add some imagination to it. This is accessible even to beginner knitters: the hat patterns are simple. They vary from model to model in color, configuration of ears or beak, and type of ties. You can also experiment with the eyes to make the model exclusive.
Children's hat “Owl” – photo idea
The “Owl” hat is crocheted. It is not difficult: it is an ordinary helmet. Its charm is given by separately connected decorations, which form the face of a night soothsayer. The eyes are tied separately and the pupils are attached to them. If you plan to place the pupils in the center, then each eye can be made as a single piece. But if the pupils need to be moved, then they will have to be knitted separately. Another detail is the beak. Some craftswomen make it from a circle slightly elongated at the bottom, others simply knit a triangle. It’s a good idea to knit the ears directly from the “body” of the helmet, or you can make them as separate elements and sew them on.
The children's "Owl" hat should fit well on the baby's head, so it is necessary to make strings for it. It is good to weave them from threads in the form of a braid or use special techniques for weaving strands. Instead, you can tie a bow on one side that goes under the chin, making a loop on it, and sew a button on the opposite side of the hat. If you provide several loops on the bow, then you don’t have to worry that such a hat will quickly become too small even for a child in his first year of life, who is growing very quickly.
For older children, you don’t have to make any strings on the “Owl” hat at all, but simply let down two mischievous tails with tassels at the ends. It is advisable to make the tassels the same as on the owl ears.
How to crochet an “Owl” hat step by step
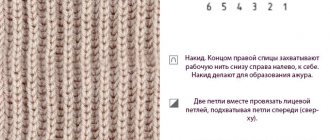
You need to start crocheting the “Owl” hat from the middle. The classic version is a closed chain of 9 loops. You can also roll a ring of thread and immediately tie it with nine double crochets. In the second row the number of similar columns doubles. Since the pattern is knitted with double crochets, do not forget to make two lifting loops on each row. To get a spherical surface and not a flat circle, in the third row you need to knit three from every two columns. There should be 27 pieces in total. We continue to round off the “dome” by knitting 36 loops in the next row. We continue to knit in the same way, making increases after every second stitch, until we reach the 9th row, where the bottom ends.
If you choose a small hook and a thin thread, then the bottom of 8 rows may turn out to be small. After all, the “Owl” hat is not only for babies. Therefore, it is worth trying the resulting hemisphere on the child’s head. You may have to knit in increments further, because the rest of the hat is knitted straight, without additional stitches.
Let's do another fitting. The resulting hat fits perfectly on the child, but the ears are left open? Then it’s time to start knitting the ears (flaps) of the helmet. We start making the first eyelet with a turning row, which is also done with double crochets. You need to measure the baby's ear and add a few bars so that the valve covers the ear completely. Knit in turning rows until the piece reaches the earlobe. Here you need to start decreasing by one and a half times (every third stitch is not knitted) until the last loop, which needs to be secured at the end of the work.
The fitting determines the place for knitting the second flap, performed similarly to the first.
When the helmet is ready, you need to start creating the owl's eyes: knit circles. It is good to immediately tie the pupil located in the center with black thread. Let's say it takes up two rows. If the pupil is made of a button, then the eye is completely knitted with white threads. In the first row we knit 9 double crochets. In the 2nd - we double the number, in the third - we knit 3 from 2 columns, in the 4th - from 3 we get 4, etc. If the workpiece is puffy, then you can increase the increments, since you need to get a flat one circle. To make the eyes more expressive, you can tie them with a thread of a different color, for example, gray.
The beak is knitted from a straight chain using rotating rows of single crochets. In every second row, decreases are made to the last stitch. To make the beak sharper, decreases should be made every third or fourth row.
Owl ears are knitted in similar triangles, then sewn to the helmet. Brushes are made at the ends.
For girl
An “Owl” hat for a girl can be decorated not only with the face of a night bird, but also with a knitted flower. The colors for such a hat are traditionally selected from bright warm tones - red, pink, light green, yellow, orange. Their cold ones are blue and turquoise. The owl's pupils can be made from fancy buttons:
- mother-of-pearl;
- with rhinestone (it will look like a highlight);
- convex shiny.
It’s a good idea to make the tassels on the owl’s ears long, similar to girls’ hair ponytails.
For boy
The boy’s “Owl” hat needs to be made less pretentious. It is better not to have flowers or long tails on the ears. The tassels on the owl's ears are made short and provocatively bristling.
It is good to knit the pupils or make them from velvety or smooth glossy buttons. It is preferable to choose cold tones - green, blue, light blue, sea wave. Warm colors include grey-beige, purple and brown, as well as dark burgundy.
Knitted hat for a doll
When crocheting an “Owl” hat for a doll, you should use a small tool and a thin thread. Since warmth and hypoallergenicity do not matter here, you can safely use “Iris” embroidery threads and any synthetics. The doll variety of headdress is a good way to master the technique and practice before doing a big job.
LiveInternetLiveInternet
Quote from Tanya_Odessa's message
Read in full In your quotation book or community!
Owl hats.
MK 1. Hat from Lyudmila
I would like to offer you such a beautiful and unusual owl hat. Your child will love it, I assure you! Moreover, now children love the characters of angry birds Angry Birds. This means that with a little imagination, you can knit your boy a hat with his favorite bird.
Knitting pattern
The manual provides a diagram and description. So you can take up knitting. I wish you all the best and of course a spring mood! It will pass so quickly and worries will begin and so on, it’s not for me to explain to you. Winter has passed, which means that soon we will be harnessed to household, gardening and country affairs and there will be absolutely no time to knit...
Description of knitting
https://vyazanie-dlya-detey.com/krasivaya-shapochka-sova-kryuchkom-dlya-rebenka/ 2. Hat from Alfiya
So let's begin, for the owl
I needed THREAD yarn art (Turkey) JEANS
, color 03 (natural) 55% cotton 45% polyacrylic.
50 gr.. 160 m. (I order from an online store, if necessary I’ll give you a link), and there were brown threads Mood
; 100% merino wool, 270m/50g, hook NUMBER No. 2.
Since the “MOOD” yarn is thin, I took a double yarn. Yarns are of completely different quality. Therefore, I advise you to knit from JEANS, a very soft, pleasant and dense yarn!
Let's begin.
First we knit the hat itself
:
1)
according to this scheme. DON'T FORGET EACH ROW STARTS WITH 2 LIFTING LOOPS AND ENDS WITH A CONNECTING LOOP WITH THE FIRST LOOP!!!
, when knitting, insert a hook under the loops of the bottom row so that holes do not form!
SECRET #1!
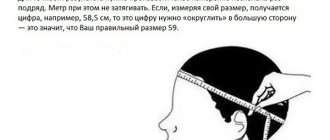
we measure the volume of the child’s head (for example, 46) and divide it by PI (3.14) = the diameter of the circle is obtained, which we need to connect with the additions.
46 \ 3.14 = 14.6 (if the threads stretch well, then you can reduce the circle by 1-2 cm)
SECRET #2!
Divide the volume of the child’s head (46) by 3 and add 1-2 cm (depending on the depth of the hat) = depth of the hat from the top of the head to the ears.
46\3 + 2 cm= 17.3
2)
we knitted the circle with additions, then we knit without additions to the desired depth of the hat. That is, we knit the loops into the loop of the previous row!
since I got tired of knitting for a long time, I switched (where there are no more additions) from single crochets to double crochets.
We finished knitting and secured the thread.
Knitting EARS!!!
1) I have double ears, that is, I knitted them in the round:
cast on 26 loops, close it in a circle...
1st row: 3 chain loops (hereinafter v.p.) and 25 double crochets (hereinafter treble crochets) (25 treble crochets + 3 ch (as the first treble crochet) = 26 stitches)
2nd row.
3 ch, decrease a loop, then knit 8 dc.s\n, 1 decrease of loops, 1 decrease of loops, 8 dc.s\h, 1 decrease of loops.
In the picture above I depicted it as best I could (the arcs indicate where to decrease the loops)
insert the hook into the second loop, pull out the thread, WITHOUT knitting, insert the hook into the third loop and pull the thread out from there - this is called crocheting!
We grab the thread with a crochet, as if we were crocheting a double crochet and pass the thread through 2 loops that are on the hook, then we finish with a double crochet.
the decrease looks like this:
4th row: 3 v.p. 1 decrease
at the beginning of the front row. ST C\N (7 like), 1 decrease at the end of the front row. Dec 1 at the beginning of the back side, 7 dc, 1 decrease at the end of the row.
and so on until the row runs out of loops.
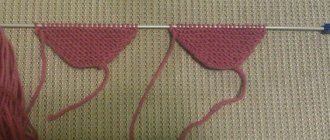
it turns out to be a triangle.
tie the other ear in the same way!
____________________
I tied the ears, made a loop of 2 double stitches and closed the knitting. I did not cut the thread. Then I cut the beige and brown thread to the required length, threaded it into a loop and tied it with the thread that was left (which I did not break)
LET'S KNIT THE NOSE!
1 rub. cast on 13 loops, knit a double crochet into the 3rd loop from the beginning (hereinafter st s\n), knit to the end of the row
2 rub. 3 lifting air loops, decreasing loops
, to the end of the row, st s\n, the last 2 loops
decrease loops
.
3p and the last rows are similar to the previous one!
LET'S KNIT YOUR EYES!
We knit the eyes according to the hat pattern.
1r. ch 6
2 rub. 3 ch * 11 stitch stitch * knit from* to* to the end of the row
3p 3 ch *2 stitch connections (in one loop), 1 stitch connection* knit from* to* to the end of the row
4p 3 ch *2 stitches connected (in one loop), 2 stitches connected* knit from* to* to the end of the row
5p 3 ch *2 stitches connected (in one loop), 3 stitches connected* knit from* to* to the end of the row
6p 3 ch *2 stitches connected (in one loop), 4 stitches connected* knit from* to* to the end of the row
7p 3 ch *2 stitch connections (in one loop), 5 stitch connections* knit from* to* to the end of the row
8p 3 ch *2 stitch connections (in one loop), 6 stitch stitch connections* knit from* to* to the end of the row
9p 3 ch* 2 stitches (in one loop), 7 sed stitches, 2 stitches (in one loop)\, 2 stitches (in one loop) 1 single crochet, 5 double crochets. 1 single crochet, 2 stitches (in one loop)\ 2 stitches (in one loop), 7 single crochets, 2 stitches (in one loop)* knit from* to* twice.
This way they won't be round. and oval eyes. https://www.babyblog.ru/community/post/rukodelie/1653604
3. Owl hat from yulka198585 https://www.stranamam.ru/post/2586729/ And another MK from the Country of Mothers from Alena_orlova, first we knit a circle. we use the following schemes
or knit like this
if we knit with double crochets and so on
if we knit with single crochets. There are several secrets that I hasten to share. In order to correctly relate the size of the circle with increases to the required volume of the head, we use the following formulas: No. 1 : measure the volume of the child’s head (for example, 46) and divide it by PI (3.14) = the diameter of the circle is obtained. which we need to associate with additions. 46 \ 3.14 = 14.6 (if the threads stretch well, you can reduce the circle by 1-2 cm) No. 2 : divide the volume of the child’s head (46) by 3 and add 1-2 cm (depending on the depth of the hat) = depth of the hat from the top of the head to the ears. 46 \ 3 + 2 cm = 17.3 When you have knitted the circle with additions, then we knit without additions to the desired depth of the hat. That is, we knit the loops into the loop of the previous row! for the OWL hat , I found one Chinese diagram and one description without a diagram. Knit according to whoever is comfortable. Here they are:
Ears. Cast on 24 loops (or another number, depending on how thick your yarn is, to get the desired width), close it in a circle. 1p: 3 air loops, 2 tbsp. s/n together, 7 tbsp. s/n, 2 tbsp. s/n together, 1 tbsp. s/n, 2 tbsp. s/n together, 7 tbsp. s/n, 2 tbsp. s/n together. 2p: 3 air loops, 2 tbsp. s/n together, 5 tbsp. s/n, 2 tbsp. s/n together, 1 tbsp. s/n, 2 tbsp. s/n together, 5 tbsp. s/n, 2 tbsp. s/n together. 3p: 3 air loops, 2 tbsp. s/n together, 3 tbsp. s/n, 2 tbsp. s/n together, 1 tbsp. s/n, 2 tbsp. s/n together, 3 tbsp. s/n, 2 tbsp. s/n together. 4p: 3 air loops, 2 tbsp. s/n together., 1 tbsp. s/n, 2 tbsp. s/n together, 1 tbsp. s/n, 2 tbsp. s/n together, 1 tbsp. s/n, 2 tbsp. s/n together. 5p: 2 tbsp. s/n together to the end of the row. Thread the threads in exactly the same way, only immediately behind 4 arcs of opposite columns, so that there is no hole, to form a tassel. Braids are made very simply, take the required length of thread in 3-6 folds (depending on how thick the braid you want to achieve) in 3 colors, thread threads of each color through both arcs of the 3rd middle posts of the binding, bend it in half, and just braid a regular braid . Here is a small collage collected from the Internet for your inspiration. But you can imagine better yourself. That's more interesting
https://www.stranamam.ru/post/3774450/ 4. Owl from MonikaPetrovna
And it was easy to knit. The hat itself was crocheted using double crochets. More details in previous posts (https://www.stranamam.ru/post/1208950/). I chose the colors according to the color of the outerwear. The main color is 2/3 of the height of the cap, we knit the bottom with ears in a different color. Using a contrasting color, we divide the stitching with single crochets. And... we knit the details: eyes, beak, ears (all in single crochets). The owl's ears are knitted according to the pattern
I knitted the beak, as they say, “by eye.” I started with 6 sc, decreasing a stitch in each row. This is what happened
Eyes. We knit in the round, shifting increments each time so that there is no hexagon. If you are a beginner and can’t improvise like this, knit according to this pattern
The new color is also knitted with an offset so that the transition to another row is not visible, threading the previous and new threads. I got 2 rows in black, 2 rows in green, 3 rows in white. Somehow like this.
Let's decorate! We sew on all the details (preferably not with a crochet hook, but with a needle and thread). It was experimentally verified that the ears are sewn 1) along the fold line of the cap, spreading it out so that the front edge is higher than the back, as far as the cap will lie (I got it like the first photo) 2) the distance between the ears of the owlet is about the same length as ears, otherwise it won’t be an owl, but a dog or a pig)))) The eyes are sewn on - along the line of the bottom color, the beak, of course in the middle))))). Tassels on the ears, ties - inserted with a loop, tied in a knot, braid the threads along the ears, carefully cut the ends of the tassels. However, who am I telling this to, you are already a pro!!!
https://www.stranamam.ru/post/1859351/
5. Sovunya hats from Anastasia_74
These Sovunyas contacted me and decided to make a mini MK for beginners. Of course, there are many different ones on the Internet, but still! Maybe mine will be useful to someone. And so, let's go!
And so we will need Nako Bambino threads and hook No. 3.5 I have blue and brown colors
We need to decide on the size of the bottom and the height of the cap. My OG is 47 cm. To calculate the diameter of the bottom you need 47:3.14 = 14.9 cm. And we take the height of the cap from the table. My age is 18 months - 3 years.
Make 1 VP and knit 12 S/N into it
Here are some practical tips on how to knit in the round correctly https://radikal.ru/F/i078.radikal.ru/1008/94/c3d86255db6f.jpg.html
https://radikal.ru/F/s002.radikal.ru/i198/1008/b0/96461cc26360.jpg.html
Next we knit according to the pattern up to a diameter of 14.9 cm
after that, ceasing to make increases, we knit until the height of the cap is 15 cm, then we attach a brown thread and knit with B/N to the required height.
We knit ears according to this pattern
Here's a larger diagram
10.
Next we knit everything else we did.
LET'S KNIT THE NOSE! 1 rub. cast on 13 loops, knit a double crochet into the 3rd loop from the beginning (hereinafter st s\n), knit 2p to the end of the row. 3 air loops, decrease loops, until the end of the row, st s\n, last 2 loops, decrease loops. 3p and the last rows are similar to the previous one!
LET'S KNIT YOUR EYES! We knit the eyes according to the hat pattern. 1r. 6 ch 2p. 3 ch *11 stitch connection * knit from* to* to the end of the row 3p 3 ch *2 stitch connection (in one loop), 1 stitch connection* knit from* to* to the end of the row 4p 3 ch *2 stitch connection (in one loop), 2 stitches connected* knit from* to* to the end of the row 5p 3 ch *2 stitches connected (in one loop), 3 stitches connected* knit from* to* to the end of the row 6p 3 ch *2 stitches connected (in one loop), 4 stitch connections* knit from* to* to the end of the row 7p 3 ch *2 stitch stitch connections (in one loop), 5 stitch stitch connections* knit from* to* to the end of the row 8p 3 ch *2 stitch stitch connections (in one loop), 6 stitch stitches* knit from* to* to the end of the row 9p 3 ch* 2 stitch stitches (in one loop), 7 stitch stitches, 2 stitch stitches (in one loop)\, 2 stitch stitches (in one loop) 1 single crochet, 5 double crochets. 1 single crochet, 2 stitches (in one loop)\ 2 stitches (in one loop), 7 single crochets, 2 stitches (in one loop)* knit from* to* twice.
KNITING EARS Cast on 24 loops (or another number, depending on how thick your yarn is, to get the desired width), close in a circle. 1p: 3 air loops, 2 tbsp. s/n together, 7 tbsp. s/n, 2 tbsp. s/n together, 1 tbsp. s/n, 2 tbsp. s/n together, 7 tbsp. s/n, 2 tbsp. s/n together. 2p: 3 air loops, 2 tbsp. s/n together, 5 tbsp. s/n, 2 tbsp. s/n together, 1 tbsp. s/n, 2 tbsp. s/n together, 5 tbsp. s/n, 2 tbsp. s/n together. 3p: 3 air loops, 2 tbsp. s/n together, 3 tbsp. s/n, 2 tbsp. s/n together, 1 tbsp. s/n, 2 tbsp. s/n together, 3 tbsp. s/n, 2 tbsp. s/n together. 4p: 3 air loops, 2 tbsp. s/n together., 1 tbsp. s/n, 2 tbsp. s/n together, 1 tbsp. s/n, 2 tbsp. s/n together, 1 tbsp. s/n, 2 tbsp. s/n together. 5p: 2 tbsp. s/n together to the end of the row. I threaded the threads in exactly the same way, only immediately behind 4 arcs of opposite columns, so that there was no hole to form a tassel.
Sew on all the details and the hat is ready!
https://stranamasterov.ru/node/388559
6. Owl from Elena Ponomareva for newborns
detailed MK here https://novorozhdennyj.ru/shem-veshhi-dlya-detej/detskaya-shapka-sova-kryuchkom-master-klass/
7. Winter hat
Children's owl hats are actively knitted on many handicraft forums. The principle of knitting hats is the same, and their differences are only in the decor. I would like to offer you another design option for a children’s hat, which, I am sure, would be worn with no less pleasure by a good half of the youth. Thanks to the warm inner layer, this hat will protect you from the harshest cold. To knit the inner part I used Happy yarn from Yarnart. One skein was enough for me to knit a hat for a 6-7 year old child. The yarn contains a small percentage of Lurex, and a non-shine alternative can be found among yarns from other manufacturers. For the top of the hat I used 100% baby acrylic. The outer and inner layers are knitted separately. Having placed the fluffy lining into the base, we fasten their edges using single crochets. Now is the time to start decorating. My beak is a triangular motif knitted in the round. The stages of knitting eyes are shown in the photo. The ears are cones decorated with tassels. I used hand-woven yarn braids as ties. The owl hat delights everyone, young and old. I wish you success!
https://482ua.com/index.php/kefir4ik/482entertaimentsforthebrain/830-1
8. Owl from Alizej
The hat is knitted for a child with a head circumference of 48 cm. The height of the headdress on the front is 18 cm, on the back – 20 cm. The hat will fit a child 1.5-3 years old.
For work we will need: yarn of 4 colors - gray, white, peach and pink (I used threads 360 m/100 g in 3 folds), hooks No. 4 (for knitting the hat itself) and No. 3.5 (for knitting flower), scissors, needle.
Description: Rows 1 to 8 are knitted with gray threads, row 9 – white, row 10 – peach, row 11 – pink, row 12 – peach, row 13 – white, 14th row - with gray threads. We knit the 15th incomplete row and ears with gray threads.
We cast on 5 chain stitches (usually they start with 6 chain stitches, but I deliberately reduced their number to make the hole at the top smaller). Using a half-column we connect our chain into a ring. Next we knit in a circle. To climb to the next row of single crochets, do not forget to knit 3 chain stitches.
1st row: knit 12 double crochets. In this case, you can stick the hook directly into the air loops, or you can simply into the middle of the ring (I chose the second option). 2nd row: from the tops of the previous 12 columns we knit 24 double crochets, i.e., from each column we knit 2 new ones. Please note that we use the so-called “deep insertion” method: we insert the hook not into the half-loops of the column of the bottom row, but a little lower - into its upper part. This method will prevent the pattern in our hat from becoming distorted. 3rd row: 36 double crochets, i.e., knit 2 stitches from every second stitch of the bottom row.
4th row: 48 double crochets (increase every third stitch of the bottom row). 5th row: without increases - 48 double crochets. 6th row: without increases - 48 double crochets. 7th row: 54 double crochets, i.e. we add 6 columns (in this case we make an increase in every 8th column). I advise you to periodically recalculate the number of your columns in order to avoid mistakes.
Starting from the 8th row, we do not add any more columns; until the end of the work we have a constant number of them - 54. We knit rows from the 8th to the 14th, not forgetting to change the colors of the threads.
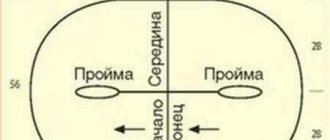
Next, we conditionally divide our hat into parts: 22 double crochets for the front part, 10 double crochets for the ears, 12 double crochets for the back part. The beginning of one of the ears will be located at the junction of the rows (where we constantly tied out the lifting air loops).
We knit the last incomplete row of double crochets: from the beginning of one ear along the back to the beginning of the other eye, i.e. We do not knit the front 22 stitches. Thus, it turns out that the back part will be longer by one row - just to cover the neck. Turn the knitting and proceed directly to the ears. Then we knit not in circles, but in rotating rows with single crochets. We do not use the “deep injection” method. One ear - 10 columns.
We knit the eyelet like this: 1st row: 10 single crochets. 2nd row: 10 single crochets. 3rd row: 8 single crochets. 4th row: 8 single crochets. 5th row: 6 single crochets. 6th row: 4 single crochets. 7th row: 2 single crochets. Cut the thread and pull it out of the loop. We knit the second eye in the same way.
Next, we tie the hat: using pink threads we knit single crochets along the edge. When we reach the tip of the eye, without breaking the thread, we proceed to knitting ties: we knitted 43 air loops and came back with single crochets. We continue tying. After finishing the work, carefully hide the excess threads.
To decorate the hat, we knit any flower you like. We place the flower at the junction of the rows: firstly, it will add a “zest” to the hat, and, secondly, it will hide possible knitting flaws in this place. The hat is ready. All you have to do is wash it, and you can go for a walk in your new clothes! https://vrukodelii.com/master-klass-po-vyazaniyu-shapochki-kryuchkom/
How to crochet an “Owl” hat for a baby - diagram and description
An option on how to crochet an “Owl” hat for a baby is done in a circular manner without lifting loops. We choose a 3.5 mm hook. When knitting this way, be sure to use markers or, as markers, a thread of a contrasting color. The bottom is similarly knitted from a ring containing 8 single crochets. This ring is often called “amigurumi” after the Japanese technique of knitting soft toys, where the element is traditionally used. The second row is knitted with single crochets - two from one. On the third round we make 1 stitch from one, and from the next one we knit two, and so on until the end of the row. We knit two columns from the previous row with single crochets, and we knit two from the third. In the fifth row we knit a stitch in a stitch three times, and on the fourth we double. On the sixth row, four columns are made without increasing, doubling is performed on every fifth column.
How to crochet an “Owl” hat for a baby
Next, the knitting pattern for the “Owl” hat depends on the size of the child’s head. If the baby is no more than three months old, then in the 7th row there will be no need for increases. We continue to knit the 48 stitches obtained directly. A child over 3 months may need a larger hat. Then in the 7th row we add a column after every fifth. In a similar way, you can make an increase in the 8th row if the dome still turns out to be small. Next, we continue the rows without increments until we reach the level of the forehead. Here you can move on to knitting the hat ears. This is done in turning rows with the loops halved in each row. On the back of the head, you can knit an additional row or two if you want to make a deeper hat. The “Owl” hat is decorated in the same way as discussed above.
Owl hat knitting pattern with description and video master class
Do you want to knit an original item for a child? Then you have come to the right address! We dedicate this master class to an extremely popular accessory in the coming season - an owl hat, a knitting diagram with a description will help you bring an unusual idea to life! Stylish, bright and warm, a knitted hat is ideal for the cold season.
Read about how to calculate the number of loops on a hat in this article.
The content of the article:
Owl hat for baby
Ideal for cool autumn!
Such a funny, voluminous hat with bright colors will inevitably attract the attention of others. It is not only beautiful, but also practical - depending on the yarn you choose, it is suitable for the off-season or extreme cold. We will need:
- yarn (100% medium wool, or at least 50% wool, 50% acrylic) – 1 skein;
- circular sp. No. 5, length 40 cm;
- markers;
- two buttons.
The hat is designed for a head circumference of 44-46 cm.
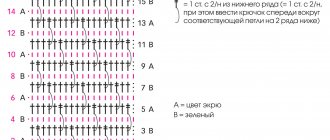
As a basis, we take the purl stitch with the “Owl” pattern (the diagram is below, read it from right to left).
Description
We start knitting with a set of knitting needles 82 sts per crochet. sp., then place a marker at the beginning of the r. and connect them in a circle. Then, 6 cr. – l. p., after – 24 and. p., marker, 24 p. pattern according to diagram, marker, etc. p. until the end of the cr. r..Continue knitting according to cx. (all 32 rubles), and then - 12 rubles. purl loops. Without closing them, we fold the knitting so that the pattern (owl) is in the center, transfer the loops equally across two sp., turn the product inside out and close the loops of the additional sp.. Then we proceed to the “tassels” - cut the yarn 10 cm long , we form tassels and sew them into the corners, sew on button eyes and our Sew buttons like owl eyes. Your exclusive DIY hat is ready!
Video master class
https://youtu.be/4bBlDvcrx8I
https://youtu.be/KjqV5Swgi4w
https://youtu.be/XowkTJeYymk
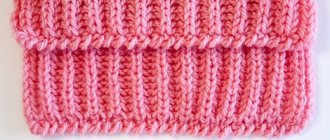
Owl hat for a newborn
This hat looks very bright, it is warm and has great stretch! If your baby is born during the cold season, a hat knitted with love will come in handy more than ever.
We will need:
- yarn (100% wool, 135 m. per 50 g.) – 1 skein;
- sp. No. 2.
The product is designed for a circumference of 36 cm.
The edges will be knitted using the puffy rib technique. At first it may seem to you that the product will be small, but this is not at all the case - the hat is suitable even for a two-year-old child!
Description
We cast on with knitting needles 37 sts + 2 cr. p.. Next - according to the instructions. 1 p.: i. p..2 p.: remove the cr. p, 2 i.p., then we use knitting needles to make the so-called “braid of 6 loops”: remove 3 sts for additional. sp., next 3 sts. knit., then – 3 sts. with additional sp.;
Next is the “elastic band”: 2 and. p., 2l. p., 2 i. p..— “Braid of 9 p.”: 9 l. p..— “elastic band”: 2 i. p., 2 l. p., 2 i. p., - “braid of 6 p.”: sn. 3 p. for extra sp. at work, follow. Knit 3, then knit 3. with additional sp., 3 i. p.. 3 r.: according to the drawing. 4 r.: remove with knitting needles. p, 2 i. p.. “Braid of 6 p.”: 6 l. p., “elastic band”: 2 i. p., 2 l. p., 2 i. p., “braid of 9 p.”: sn. 3 p. for extra sp. before work, next 3 stitches, then 3 stitches. with additional sp., 3 l. p.. Then “rubber band”: 2 and. p., 2 l. p., 2 i. p., “braid of 6 p.”: 6 l. p., 3 i. p.5 p.: according to the drawing. 6 p.: as 2nd p. 7 p.: according to the drawing. 8 p.: remove the cr. p., 2 i. p., "k. from 6 p.”: 6 l. p. “Elastic band”: 2 i. p., 2 l. p., 2 i. PC. from 9 p.”: 3 l. p., remove 3 p. for extra. sp. at work, follow. Knit 3, then knit 3. with additional sp.. Again “elastic band”: 2 and. p., 2 l. p., 2 i. p.. “K. from 6 p": 6 l. p., 3 i. p..9 p.: according to the drawing.
Etc., we repeat from the second row. When knitting, we see that the braids are braided one by one. We make the side parts with a “lush elastic” pattern: we collect 2 stitches in each edge along the edges of the “pattern with braids”. p. to the middle of the strip. In the upper part of the highway, in the 5th last. chrome p. cast on 3 p. in each, then 2x2 elastic band and “lush”: i. n. – purl., faces. p. – l. n. sp. insert into the st next below and pull out a new st, discarding the top one.
To keep the ears closed, you can add 4 cm using the diagram.
Next, if you wish, you can tie a sh. crochet using the crab step technique. We crochet the eyes and nose and sew them on. The hat is ready!
Knitted owl hat
Simple to make, but no less original, this hat is for children from two to ten years old. Ideal for beginner craftswomen.
We will need:
- red yarn (50% polyamide, 25% worsted wool, 25% acrylic, 66 m per 50 g) – 2-3 skeins;
- brown yarn - 1 skein;
- some red yarn for the beak;
- sp. No. 3.5, No. 3 and No. 4;
- hook number 4.
Sizes: a) 2 years, b) 4-6 years, c) 8-10 years.
Knitting is done using stockinette stitch and garter stitch.
Decrease 1 p. from the edge (on sheet of work)
Right: 1 p. and make 1 simple broach with knitting needles. (sn. 1 st. l., next st. l.., throw the removed st. onto the knitted st.).
Left: all points except. last 3, do 2 sts. persons and last p. persons. Double decrease l ..: sn. 1 p.l., knitting 2 next p.vm. persons and transfer the removed st to the received st. Decrease 1 st from the edge (on the front side of the work).
Right: c. knitting 1 st and make 1 simple knit stitch. (slip 1 stitch, knit the next stitch, transfer the removed stitch to the knitted stitch).
Left: knit all stitches except the last 3, knit 2 stitches together. and the last p. knit. Double decrease k.: remove 1 p. l., 2 next. p. vm l. and transfer the removed st to the received st.
Embroidery with eyelet stitch and chain stitch. 10 cm l.. Ch., sp. No. 4 = 19 p. and 28 r. 10 cm boards. uz, sp. No. 3.5 = 21 p. and 40 r.
Description
Front part: cast on a) 44 sts, b) 46 sts, c) 48 sts on sp. No. 4, red color, working l. Ch.. At a height of a) 17 cm (48 r.), b) 18 cm (50 r.), c) 20 cm (58 r.) from the beginning, close all sts.. Back part: cast on a) 44 sts ., b) 46 p., c) 48 p. on sp. No. 4, red color, l.. gl.. At a height of a) 17 cm (48 r.), b) 18 cm (50 r.), c) 21 cm (58 r.) from the beginning, close the center. a) 26 p., b) 28 p., c) 30 p., then end. each side separately.
We knit directly on 9 sts on the left, 26 p. high, then close on both sides in each 2 p.: 3 times 1 p. and close the remaining 3 sts. Do the same with 9 sts on the right.
Let's grab the wings. We dial 20 p. on sp. No. 3.5, scarf stitch.. At a height of 3 cm (14 r.) from the beginning, close on both sides: 1 time for 1 p., then in each 6 p.: 3 times for 1 p., in each 4 r.: 2 times 1 p., each 2 p.: 1 time 1 p. and 1 time 2 p. At a height of 11 cm (46 r.) from the beginning, closed. the remaining 2 sts. We do the second wing in the same way.
Making a beak: cast on 15 stitches on the sp. No. 3, l. Ch., doing on both sides 1 p. from the edge in each 2 p.: 5 times, 1 decrease. We have 5 p..1 p. left: 1 l. p., 1 double broach l., 1 l. p.. Then 1 r. and., before closing the remaining 3 sts. Cast on 15 sts on the dial. and work in the same way for the second part of the beak.
Assembly
We make seams on the sides and top of the product, leaving free corners - we will tie them. Next 1 rub. Sc with crochet number 4, around the base. We embroider in gray or black using a loop stitch and a chain stitch on the front part, 4 cm from the bottom. Sew the wings on the side seams, placing them 2 cm from the bottom of the w. and typesetting r. beak to the cap 2.5 cm from the bottom.
Double hat with a pompom with an owl pattern: video master class
Happy knitting and smooth stitches to you!
Video: crochet “Owl” hat – master class
Watch a video of how to crochet the “Owl” hat - the preferred option for beginner knitters. Making such a thing is simple and quick. In addition, you can master basic crochet techniques in order to use them in the future, in more complex patterns. At the same time, you can practice making laces and tassels, because they will be needed to make this hat. If you need a flower for decoration, then you can take advantage of master classes on knitting voluminous napkins: a similar element is often used there.