Previously, the houses of our grandmothers and great-grandmothers were often decorated with unusual rugs knitted from scraps. The technique of such weaving was passed on from generation to generation, while each woman tried to add something of her own to the products made in order to give them individuality. They turned out incredibly beautiful and bright. Any craftswoman can learn this, because today many people try to knit rugs with their own hands from rags, scraps of unnecessary fabric and even yarn. In this article we will tell you how to make such wonderful decorative elements for your home yourself.
Features of weaving rugs from shreds
Knitting circles for the floor from old rags for beginners may seem difficult at first glance, but in fact everything is easy. Today, there are several options for weaving such rugs; you can use a hook for this or do without it. But the most important thing is to decide before starting work what size knitted rug you need, what design and color it will have.
Wickerwork consisting of multi-colored braids is very simple to make:
- they are made voluminous due to the partial attachment of fabric flaps to the base;
- Loose ends give them a lush look.
Important! You can make a rug from rags with your own hands in any shape, round, oval, or even rectangular.
Multicolored grandma's heritage in round shape
As a child, most of you probably had so-called “grandmother’s rugs” in your room. These are multi-colored round floor mats crocheted from strips of fabric.
In order to knit a “grandmother’s” rug from scraps, you will need a No. 10 hook and scraps of fabric. The flaps need to be cut into strips and sewn (or tied) together, rolled into a ball.
We knit in a circle with single crochets. To do this, you need to know the “rule of the circle” developed by knitters: cast on 3 ch. and connect them into a ring. Next, into a ring of 3 vp. knit 6 tbsp. b/n. Now divide the circle into 6 wedges and evenly add 6 tbsp in each row. b/n. on a circular row. In other words, it should look like this: 1 row – 6 tbsp. b/n., 2nd row – 12 tbsp. b/n., 3rd row – 24 tbsp. b/n. etc.
The crochet pattern for a round rug looks like this:
If you knit the product according to this pattern, but only knit single crochets behind the back wall of the loop, then the rug will turn out to be more embossed. The photo below shows how to knit st. b/n. behind the back wall of the loop.
This accessory can be laid on the floor and covered with it on a chair or armchair.
For more details on the work process, watch the video tutorial.
Making rugs from scraps without using a hook
To weave such a rug, you will need:
- threads;
- needle;
- patchwork fabric;
- a large number of pins.
The mugs are made using a braid twisted in a spiral shape, which is made from three pieces of fabric of different shades.
Important! The rigidity of the product itself directly depends on how tightly the braid is woven.
Features:
- Before weaving, you need to cut the ribbon to the desired width.
- You should also decide the question: if the flap runs out, but the knots will not be tied, then how to weave it. Everything here is very simple, you need to make small cuts at the ends of the ribbons and cut through others to match to form loops. Thanks to this move, the braid will be the desired length.
- In the center of the weave, you need to carefully and loosely lay the tape in a spiral, while intercepting it in two parts with thread to achieve the desired diameter.
The most popular techniques for weaving rugs without a hook
Do-it-yourself rag rugs without a hook are woven using the two simplest techniques, namely:
- “Cobweb.” To weave a rug using this technique, you need to connect about 8-12 ribbons in the shape of a snowflake. Then secure them on a round cardboard base. You need to start from the center, and weave the bases of the ribbons and stripes between the threads in a circle. All elements need to be pressed together as tightly as possible. Then you should intertwine the braids to make a rug. It can be secured along the edge with an original decorative strip.
- “Chess”. This technique involves weaving fabric strips in a checkerboard pattern, and not in a circle as in the previous version. Dense material is more suitable for making such a rug.
Step-by-step instructions with photos
Decorate your home with a stunning hand-knitted loop heart rug! You will love him forever! A special knitting technique gives this rug a unique plush-like texture that will add extra coziness and warmth to your interior!
Finished rug size: 106 x 72 cm (41¾ x 28 inches).
Special abbreviations:
- V.p. - air loop;
- treble s/n – double crochet;
- dc/n2vm - (insert the hook as needed, then place the yarn over the hook and tie a loop) twice, again place the yarn over the hook and pass through all 3 loops;
- P1 - insert the hook into the next loop, wind the loop around the first finger of your left hand (this cycle will be approximately 4 cm). Next, pull both strands of yarn through this loop, place the yarn over the hook, and pass through all 3 loops on the hook.
Attention: the amount of yarn is indicated based on the size of the rug that you see in the photo. If you want a longer (or shorter) rug, you may need more (or less) yarn.
Knitting a rug from elongated loops - diagram
Step 1: Start Knitting
- Start: Using a 7 mm hook, make 3 ch.
- Work 1 treble crochet into the 2nd ch. from the hook, 1 dc in the next ch, turn. (2 loops).
Proceed as follows:
- Row 1: ch 1 (do not count as a loop), 2 treble s/n in the 1st treble s/n, 2 treble s/n in the last treble s/n, turn. 4 loops.
- Row 2: ch 1 (do not count as a loop), (1 treble s/n and P1) in the 1st treble s/n, P1 in each treble s/n until the last loop, (P1 and 1 treble s/n) in the last st.s/n, turn. 6 loops.
- Row 3: 2 ch, 1 dc in 2nd ch. from the hook, 2 treble s/n into the 1st treble s/n (adding 2 loops), 1 treble s/n in each loop to the last treble s/n, 2 treble s/n in the last st. .s/n (adding 1 loop), turn. 9 loops.
Step 2: Weave the main part
- Row 4: 2 ch, 1 dc in 2nd ch. from the hook, P1 twice in the first treble s/n (adding 2 loops), P1 in each treble s/n to the last treble s/n, P1 and 1 treble s/n in the last treble s/n ( approx. 1 loop), turn. 12 loops.
- Rows 5-20: Repeat rows 3 and 4, 8 times. 60 loops.
- Row 21: ch 1 (do not count as a loop), 2 treble s/n in the 1st treble s/n (adding 1 loop), 1 treble s/n in each loop to the last treble s/n, 2 treble s/n in the last loop (adding 1 loop), turn. 62 loops.
- Row 22: ch 1 (do not count as a loop), (1 treble s/n and P1) in the first treble s/n (approx. 1 loop), P1 in each treble s/n to the last loop, (P1 and treble s/n ) in the last treble crochet (approx. 1 loop), turn. 64 loops.
- Rows 23-36: Repeat rows 21 and 22 alternately, 7 times. 92 loops.
- Row 37: ch 1 (do not count as a loop), 2 treble s/n in the 1st treble s/n (approx. 1 loop), 1 treble s/n in each loop to the last treble s/n, 2 treble s/n n in the last dc/n (approx. 1 loop), turn. 94 loops.
- Row 38: ch 1 (do not count as a loop), 1 treble s/n in the 1st treble s/n, P1 in each treble s/n until the last treble s/n, 1 treble s/n in the last treble s/n n, turn.
- Rows 39-48: Repeat rows 37 and 38 alternately 5 times. 104 loops.
- Row 49: ch 1 (do not count as a loop), 1 dc in the first dc, 1 dc in each loop to the last dc, 1 dc in the last dc , reversal.
- Row 50: ch 1 (do not count as a loop), 1 treble s/n in the first treble s/n, P1 in each treble s/n to the last loop, 1 treble s/n in the last loop, turn.
- Rows 51-62: Repeat rows 49 and 50 alternately 6 times.
Step 3: Weave the top on one side
Next, divide the top into two parts:
- Row 63: (knit) ch 1 (do not count as a loop), dc/n2vm for the first loop (decrease 1 loop), 1 dc/n in each next 48 loops, dc/n2vm for the next 2 loops, turn, leave the last loop unworked.
Make this set of 50 stitches for just the first side of the top.
- Row 64: ch 1 (do not count as a loop), 1 treble s/n in the first treble s/n, P1 in each treble s/n to the last treble s/n, 1 treble s/n in the last treble s/n, turn.
- Row 65: ch 1 (do not count as loops), treble s/n2vm for the first 2 loops (1 decrease in loops), 1 treble s/n in each loop until the last 2 loops, treble s/n2vm for the last 2 loops (1 decrease in loops), reversal 48 loops.
- rows 66 and 67 like rows 64 and 65. 46 stitches.
- row 68 like 64.
- Row 69 : ch 1 (do not count as a loop), treble s/n2vm for the first 2 loops (1 decrease in loops), 1 treble s/n in each loop to the last 2 loops, treble s/n2vm for the last 2 loops (1 decrease in loops), turn. 44 loops.
- Row 70: ch 1 (do not count as a loop), dc/n2vm for the first 2 loops (1 decrease in loops), P1 in each loop until the last 2 loops, dc/n2vm in the last 2 loops (1 decrease in loops), turn. 42 loops.
- Work rows 71-74 as 69 and 70 alternately. 2 times. 34 loops.
- Row 75 : ch 1 (do not count as a loop), dc/n2vm for the first 2 loops (1 decrease in loops), 1 dc/n in each loop to the last 3 loops, dc/n2vm for the last 2 loops and turn, leave the last loop raw (2 decrease stitches). 31 loops.
- Row 76: ch 1 (do not count as a loop), treble s/n2vm for the first 2 loops (1 decrease in loops), P1 in each treble s/n until the last 3 treble s/n, treble s/n2vm for the last 2 loops and turn, leave the last stitch unworked. 28 loops.
- Rows 77-80 work like 75 and 76 alternately, twice. 16 loops.
Secure.
Step 4: Finish the Top on the Other Side
Return to the last complete row before dividing, join the yarn to the next dc and proceed as follows:
- Row 63 (knit stitch) ch 1 (do not count as loops), dc/n2vm for the first 2 loops (this is the loop where the yarn was attached and the next loops), (1 decrease in loops), 1 dc/n in each loop to the last 2 loops, st .s/n2vm for the last 2 loops (1 decrease in loops), turn. 50 loops.
- Next, fill the second side from the top, repeating rows 64-80. Fasten off.
Step 5: Weave the Edging
From the right side, attach the yarn to the outer edge of the rug, ch 1. (do not count as a loop), make 1 row of dc evenly around the entire perimeter. At the base angle point, weave 3 treble crochets and finish in the first treble crochet.
Secure.
Knitting a rug from elongated loops is finished! We hope you liked our master class, and the diagram and description made your work easier. And if you still have questions, write to us in the comments, and we will be happy to answer them. We wish you good luck!
Nika All posts by the author (34)
Useful tips from experts on weaving rugs from scraps
When you first decide to weave rugs from rags with your own hands, either crocheted or without it, it is better to familiarize yourself with the recommendations and advice of experienced craftswomen so that you don’t have any problems during the work process:
- If you are worried that your product will shrink after the first wash, then take appropriate preventive measures. For example, if you are making shreds from new fabric, you can wash and steam them before starting work so that they shrink immediately, and then you will not have any problems with the finished rug.
- Using pieces of fabric from different things, you need to steam and starch them before you start weaving.
- If you plan to actively use the products, then you need to first place the flaps on a padding polyester lining.
- To ensure that the elements used are the same, it is better to use ready-made cardboard templates for work. In this case, the product is of high quality.
- Don’t rush to throw away your old clothes, because you can use them to create an original and beautiful rug with your own hands. It will look stylish and unusual in any home. Moreover, handmade items are very popular today.
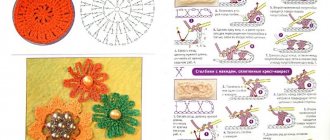
How to crochet a rug from scraps?
Now let’s take a closer look at how to knit a rug from scraps of fabric using a hook.
Materials for work
You will need:
- a piece of fabric;
- special narrow ribbons;
- crochet hook No. 10.
Important! Naturally, it is not at all necessary to buy fabric; you probably have a lot of unnecessary things in your home. You can even cut strips from an old T-shirt or T-shirt. The thinner the fabric you choose, the wider the ribbons should be. And by the way, it is recommended to cut them in a spiral to make them look longer.
Master Class
So, let's get started:
- First, stretch the fabric you will be cutting in different directions. Be sure to pay attention to the specific direction in which the fabric curls when stretched.
- Cut the strips, collect them into balls and distribute them by color.
- Using a crochet hook, pick up enough chain stitches to match the width of the strip. Continue knitting stitches and constantly check the number of loops so that there are the same number of stitches in all rows.
- Connect the ends of the ribbons with stitches, knit the rug to the desired length.
- Align it around the perimeter so that it takes on an aesthetic and neat appearance.
- When knitting with stitches, do not yarn over, but simply add 2-3 light loops at each corner. Due to this, the strips will last much longer and will not curl.
The rug will turn out to be quite bright, homely and warm.
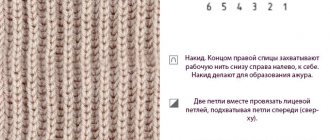
The best crochet rug for beginners
Even the most inexperienced knitters will be able to easily cope with making a rug thanks to a master class for beginners. It is recommended to start with a square rug on the floor. In the photo you see an example of such a product.
To knit this pattern you will need thick cotton yarn, which knitters call “spaghetti”.
Choose yarn colors to suit your taste. Step-by-step master class with description:
- Cast on a chain of v.p. the length you need.
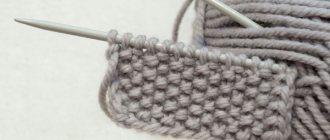
- 1 row. Knit all stitches st. s/n. Turn the knitting to the wrong side.
- 2nd row. Knit all stitches st. b/n. under the front wall of the loop. Turn the knitting over to the right side.
- 3rd row. Knit st. b/n. under both walls of the loop.
- 4 row. Knit the same as 2nd.
- 5 row. Columns s/n. knit under the back wall of the loop.
- Row 6 and all subsequent rows are knitted in a pattern repeated from the 2nd to the 5th row.
See the video for an example of such work.
Weaving a simple rug from yarn
In this section we will learn how to weave a carpet from knitted yarn with our own hands. A rather nice rug can be made if you make just a few rows of the same color, and then change the shade and return to the first one. Here it all depends on the imagination of the craftswoman and the availability of material of different colors.
Step-by-step instructions for weaving a knitted rug look like this:
- To make such a rug, you will need an unnecessary photo frame, or you can make your own frame measuring 30 by 45 cm and fill it with nails with small smooth heads along the long sides. In this case, the distance between the nails should not exceed 2.5 cm.
- The threads need to be pulled in pairs onto the nails. And the base itself can be of any color. If you pull the rows tightly together, it will completely disappear behind them.
- Take the working thread in your hand and slowly pass it first under the warp thread and then over it.
- As soon as the first row ends, the thread will need to be passed through the last thread of the warp and directed in the opposite direction. The number of rows can be whatever you want, you need to do it at your own discretion.
- When changing the color of the working thread, it must be cut and tied to the end of a thread of a different shade.
- From time to time, pull the already woven rows towards the first row so that the weaving comes out tight.
- Hide all seams and knots on the wrong side and remove the finished product from the frame.
The rug is ready!