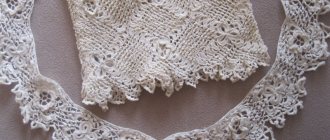
In the cold season you can’t do without warm mittens. Knitting women's mittens is easier if you know knitting patterns. Mittens can be knitted with satin stitch, relief, or jacquard pattern. In this article you will find many lovely jacquard patterns.
There are several ways to knit a thumb:
- The usual method (no additions).
- Wedge finger (with additions).
- Indian wedge finger (anatomical finger).
- Finger from raised loops.
We start working with the cuff, which we make with a simple or figured elastic band. A regular cuff should be at least 10 cm long. The easiest way to knit a finger (1) is with a straight edge, or without additions. The finger is also simply made from raised loops (4). The most comfortable options to wear are the wedge finger (2) and the Indian wedge finger (3). In the last two, adding loops is necessary.
What to do when starting out
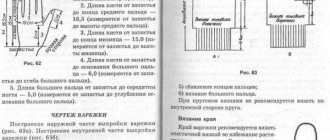
First of all, we need to take measurements with a centimeter:
- Circumference of the hand.
- Distance from wrist to thumb.
- Distance from wrist to little finger.
- Length from wrist to top.
In order to know how many loops to cast on for a mitten, it is advisable to knit a “tester” of a 10/10 cm pattern and look at the density of the resulting sample. For example, in 10 cm of the “tester” there were 20 loops and 28 rows, which means in 1 cm = 2 p./2.8 r. That is, if the volume of the brush = 19 cm, then the initial set = 19*2=38 loops. If you want to knit mittens for a certain size, but cannot take measurements, use this table for knitting mittens with and without a wedge:
If you are doing work according to the description, and you do not get the desired density, for example:
There are more loops than in the instructions - take thicker knitting needles.
There are fewer loops than indicated - we take thinner knitting needles.
Abbreviations: loop - p., knit - knit, purl - purl, knit 2 together - 2 vm. faces., 2 together with a tilt to the left - 2 vm. to the left, without decrease - without decrease., Marker - MK.
Mittens with finger made from raised loops
We begin with a description of knitting mittens with simple knitting needles - on stocking needles with a finger from raised loops. We offer the simplest version of mittens with a description. The model is interesting because a cord is connected to it (optional) so as not to lose the mittens. The fastest way is to knit a whole fabric on two knitting needles, reach the height of the little finger, switch to 4 knitting needles and finish the product. These mittens can be knitted from threads of different colors. At the end of the work, sew the side side with a needle.
Model for a girl with Volume (hand circumference) – A-15 cm, B-17 and C-19 cm. The mittens are made of yarn of two colors. Mittens width – 21 cm, length from the beginning of knitting to the top – 24 cm. Knitting density:
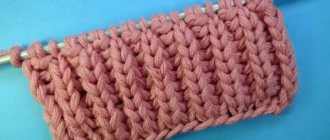
- Rib 1/1 – 18 stitches/37 rows using 3.5mm knitting needles.
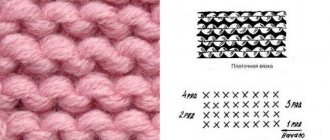
- Garter stitch (single stitch), 2 rows - white thread, 2 rows - brown - 20 p. / 28 r. knitting needles 4 mm.
For women's mittens you will need:
- Medium thickness yarn - natural wool or wool with additives 115-125 m/50 g, for example, LERKE type yarn, 53% merino wool, 47% cotton, 50 g/115 m.
- (40 g brown and 20-40 g white)
- Stocking knitting needles 3.5 mm thick. for elastic and 4 mm. for main work.
- Thick needle, markers.
Right mitten
Cuff. By casting on 2 knitting needles 3.5 mm. We knit 42 loops 6 cm (20 r.) with an elastic band 1 knit/1 purl.
In the 21st r: For size A - decrease 4 p. (remaining 38 p) For size. B - decrease 2 p (40) For C - do not decrease anything (42)
We start with turning rows in garter stitch, 2 rows - white yarn, 2 rows. – brown. Knit only knit rows, changing yarn every 2 rows. – (see diagram No. 1). In the diagram, all loops are knit. We advise you not to pay attention to the checkmarks indicated in the diagram.
Knit 12 r. A), 14 rub. B), C) and hang a marker (we will mark the place of the finger). Next, 3 cm or 8 rubles. A), 11 rub. B), 10 rub. C), and again a marker. This will be the width of your finger.
We continue to work in height, not counting the cuff (6 cm), with two colors of yarn. You will get a height of 20 cm from the set row for all sizes. That's it, we finished the work on 2 knitting needles.
We distribute all stitches onto 4 knitting needles:
C) 11+11+9+11 loops, A) 10+10+8+10 sts, B) 10+10+10+10 sts. We begin to make the toe.
For size C (volume 19 cm):
From the cast-on edge – 20 cm (60 rows).
61st row: 2 vm. persons, 2 vm. faces with a tilt to the left, 7 faces, 7 faces, 2 vm. faces, with incl. right, k2, v2. persons with switch left, knit 7, knit 7, vm 2. with switch to the right, 2 vm. persons (36 ost). 62nd r: no decreases. 63rd row: k1, v2. with switch left, knit 6, knit 6, vm 2. with switch right, k2, v2. with switch left, knit 6, knit 6, vm 2. with switch right, knit 1 (remaining 32 p). 64th: same as 62nd 65th: k1, v2. with switch left, knit 5, knit 5, vm 2. with switch right, k2, v2. with switch left, knit 5, knit 5, vm 2. with switch right, k1 (28). 66th: same as 62nd 67th: k1, v2. left, k4, k4, v2. right, k2, v2. left, k4, k4, v2. right, k1 (24). 68th: same as 62nd 69th: k1, v2. left, k3, k3, v2. right, k2, v2. left, k3, k3, v2. right, k1 (20) 70th: same as 62nd 71st: k1, k2 left, k2, k2, k2. right, k2, v2. left, k2, k2, v2. right, k1 (16). Pull the top together and secure the thread (make a knot on the opposite side).
For size A (volume 15 cm):
61st r (20 cm) from the initial set of stitches: 2 inm, 2 inm. left, knit 6, knit 6, vm 2. right, k2, v2. left, knit 6, knit 6, vm 2. to the right, 2 vm. (32) 62nd: no decreases. 63rd: k1, v2. left, knit 5, knit 5, vm 2. right, k2, v2. left, knit 5, knit 5, vm 2. right, knit 1 (28) 64th: same as 62nd. And so we continue to decrease by 4 points, leaving 2 persons between decreases. until it stops. 12 p. Tighten and secure.
For size B (volume 17 cm):
61st p from the initial set of p: 2 vm, 2 vm. left, knit 6, knit 6, vm 2. right, k2, v2. left, knit 7, knit 7, vm 2. to the right, 2 vm. (34). 62nd: no decrease. 63rd: k1, v2. left, knit 5, knit 5, vm 2. vpr, 2 persons, 2 vm. left, knit 6, knit 6, vm 2. vpr, 1 persons. (thirty). 64th: like 62nd.
We continue to decrease 4 stitches every other row until 8 stitches remain. Tighten and secure the end of the thread.
Mitten finger
All that remains is to sew the side panel and make the thumb. We marked the place for the finger with two markers. We turn the work inside out and, using a large needle and native thread, sew up the side of the product, leaving a space for the finger unsewn. Next, take 3 knitting needles 4 mm. and raise 14 loops in a circle onto the knitting needles. Finger length, for sizes: A) 20 rubles, B) 26 rubles. C) 24 rub. Tie, pull the top
Knit the left mitten in the same way as the right one, thumb on the left. Cord length 115 cm, 208 Air. crocheted or knitted.
In the video - mittens for women with a description, knitted from top to bottom from thick yarn:
MITTENS WITH FINGERS anatomical knitting needles
Knitting the thumb on 2 knitting needles. 2nd method
This method, like the one above, is useful when knitting an ornament or a relief pattern on the finger itself. It is more convenient to knit an ornament on 2 knitting needles than on 4 knitting needles with a small number of stitches.
After knitting the mitten cuff, cast on additional stitches evenly so that the mitten fits your palm well.
The finger is knitted in height. In our case, for the thumb, knit 10 stitches on the 1st needle.
Turn the knitting and purl these 10 stitches.
We continue knitting in height to the middle of the thumbnail (higher is possible).
Next, we decrease one loop at the beginning from the front side and one loop at the beginning of the wrong side (that is, from the reverse side). Decrease to 4 loops.
Then we restore the number of loops to 10 in our case and add loops, making 2 crossed yarn overs at the beginning and at the end of the row. Repeat through the row. Then we knit the finger to the desired height.
After knitting the finger, we continue knitting the mittens in the round. That is, on the first knitting needle we knit the first 10 loops that fall on the thumb, and continue to knit the remaining three loops. Next we knit in the round on 4 knitting needles. Fold the finger in half and sew along the sides.
Lovely mittens with aran patterns - master class and diagram
In order to knit these beautiful mittens with knitting needles, you will need medium-thick yarn and 2.5 mm stocking needles. The master class is suitable for palm volume = 19 cm. Wrist circumference – 16 cm, from wrist to thumb – 8 cm, thumb – 6 cm. If you have frosts greater than -15', then you need to knit a lining. We use thin knitting needles to make the mittens warmer. The finger is made in the usual way.
To work you will need:
- Yarn ALASKA (Nako), color 7117 (100 g/200 m, 15% camel hair, 25% wool, 60% acrylic) – you need 1 skein of yarn per thread.
- Double needles 2.5 mm. - 5 pieces.
- 2 auxiliary short knitting needles
- Markers.
- Auxiliary thread.
Knitting density – 10/10 cm. = 2.5 p./3 rows.
The aran pattern is repeated.
Left mitten
We start with the left mitten, since it will be in a mirror image, and we have a diagram for the right one. We knit the right one exactly according to the pattern.
Left. We start with the cuff. Our cuff is 8 cm high (27 r). Made with an elastic band with a star pattern. Cast on 2 needles 2.5 mm. 41 sts. Distribute on 4 knitting needles, close all sts in a circle.
Drawings: elastic band and (out of three loops - 3). Done this way:
Arana pattern for the back of the mittens. The photo shows the pattern for the right mitten! The pattern for the left is knitting in a mirror image.
Legend: [-] light square – purl in even rows, faces. in odd numbers, black square – front in even numbers, purl. - odd (for circular knitting).
1st r. : Close the cast-on row into a ring by throwing it onto the previous knitting needle and knitting one extra stitch. Hang it at the beginning of the r. – marker. The entire row is purl behind the front wall. 2nd : same as 1st, purl.” 3rd : rib 3/2: *P2, k3* – repeat until the end of the r. (total 8 repetitions). 4th : same as 3rd. Note! Only 2 r. rubber bands! 5th : purl 2, make an asterisk “from three loops - 3” (see diagram at the beginning), * purl 2, “from three - 3” * - repeat until the end of the row. (to the marker). 7th : *P2, k3* – repeat 8 times. 8th : like 7th. 9th : like 7th. 10th : *P2, again “from three loops - 3”* – repeat from *to* to the end of the p. 11th , 12th, 13th: same as 7th. And then, we alternate 3 rows of elastic (p2, k3), and 1 row of “stars”, 3 rows of elastic and 1 r. “stars”, and so on. As a result, we will get 6 “star” figures. 28th row : purl the entire row, all 40 p.: purl. - behind the back wall of p., faces. - behind the front. 29th r .: also, the whole r. – purl. Next, you need to decide on the back side and palm. On the back side. we will have arans, faces on our palms. smooth surface Track. R. we add 8 sts to the palm, and 8 sts to the pattern. We switch to 3 knitting needles: 2 knitting needles - pattern + 1 knitting needle - palm. RUR 30 : individuals only! K3, increase, *K2, increase* – repeat 7 times (total – 28) on one needle, and also + 8 inc. on the second knitting needle (28).
1st r. pattern : Distribute stitches on the back side, where the arans are: Marker, p2, k1, 22 sts of the pattern (see diagram of the pattern with aran - *p2, k3* - repeat 4 times and p2), knits, 2 purl Marker. Palm knit faces. satin stitch 2nd r . pattern: MK, P2, yarn over (slip crocheted), [22 stitches of pattern: (*P2, K3* – repeat 4 times, P2)], slip again. double crochet, 2 p. MK. Palm - faces. Ch. 3rd r : MK. P2, knit. with double crochet, knit together, [22 stitches of pattern], knit. with double crochet - knit together, purl 2. MK. Persons smooth surface
So, we already have 4 braids emerging from faces. n. Please note: faces should go vertically on the sides of the braids. double crochet, marked with a tick (in the next row - just knit). Continue knitting, make 6 rows.
7th r : here we will do the crossing. Let's look at the diagram: the diagram shows the crossing under No. 1, but we are knitting the left mitten, therefore, we use the crossing. No. 2. So, purl 2, knit. with double crochet, knit together, [p2, k3, p2, 8 stitches crossed