Bracelet
Women pay special attention to their hands and how best to decorate them. The most popular in this regard is the bracelet. You can wear it when going for a walk or to any social event. Bracelets made of beads and seed beads, made by hand, are especially valued, because... are considered exclusive jewelry.
In order for your attempts to make original weaving to be successful, you must follow a number of rules.
We study step-by-step beading: patterns of chokers and necklaces
Every bride wants to be the most elegant and flawless on her wedding day. Needlewomen complement their outfits with accessories using the beading technique. Let's look at the weaving pattern for a wedding necklace. Its complexity is also accessible to beginning craftswomen.
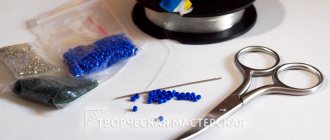
For weaving you will need beads and beads of different sizes, thread or thin fishing line, and fastening elements.
- At the end of the row, take only one working thread and continue working. To do this, the end must be passed through 4 beads and brought out through the fifth. Then put beads and beads on the thread in the following sequence: 3 beads – bead – 2 beads – bead – 2 beads – bead – 3 beads. Pull the second ring through the fifth bead, thereby securing the arc of elements. We make the set again in the same sequence and continue working until the end of the row.
- A series of the largest circles are performed first. To do this, we collect one bead of a larger size than seed beads in the middle of the thread. Then we string 10 beads on each end of the thread and another bead, through which we make a crossing movement of the threads. Again we collect 10 beads on both ends and continue working to the desired length.
- We introduce new sizes of beads into the work; for this we use the second non-working end of the thread left at the end of the first row. We make a return through the bead into the inner diameter of the ring. We collect one medium bead, one large one, then a medium one again, and pass the thread through the bead of the first row. We set again and so on until the end of the row. Fasten and cut the thread.
We get to work again with the first working thread. We make a return movement through the adjacent bead from the bead, collect two types of beads, then one of medium size, again two types of beads in a mirror image. We pass the thread through the beads at the junction of the two arcs, again making a set of beads. We continue working until the end of the row, fasten and cut the end of the thread.
Now we attach the fastening elements to the necklace. The decoration is ready. The master class is over.
We present a set made of beads, which is one of the new items of the season.
The set consists of charming earrings, a delicate necklace and an original bracelet. To create such sets, you can use one weaving pattern. The bracelets are woven according to a pattern consisting of two mirrored patterns of the necklace.
An original necklace is not always created using complex weaving. This can be seen in the photo.
For this decoration you will need:
- waxed thread or fishing line;
- beads;
- pliers;
- fastening elements;
- glue;
- scissors;
- beading needle;
- scotch.
The thread needs to be cut into 0.75m pieces. In total you will need 12 pieces. We string beads on them using a bead needle. We get 6 threads of two colors. Then we lay out the beaded threads on the table and secure them with tape. Alternation sequence: 3 of the same color, 3 of the second color, repeat the alternation again.
Take the first group of the second color on the right, lay it on top of the second group of the first color. We stretch it under the third group of the second color. After this, we again lay it out on the fourth group at a right angle. We pull out the bead threads.
Work continues on the left side with the first color group. The threads also need to be pulled out in a checkerboard pattern to the right side. The following stages of work duplicate the first two steps.
We weave to the desired length, after which we tie the ends of the threads with beads using additional thread or wire. Several turns are required. If there are beads left on the working threads, and the length is already suitable, then simply cut off the extra centimeters, carefully removing the beads. We tie the ends into a tight knot.
We put the caps on the ends of the necklace and attach the clasp to them.
The same necklace can be made using a tourniquet made according to the scheme:
An exquisite bracelet will attract interested glances from everyone around you.
To create it you need to purchase:
- beaded rice – 2 bags;
- black beads – 1 bag;
- white and mother-of-pearl beads - one bag each;
- carabiner and ring;
- thread for weaving;
- scissors.
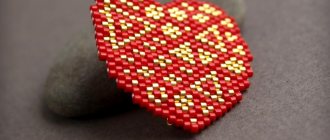
Cut the thread 2 meters long. On one edge we string 1 rice bead, 1 black bead, 1 rice bead, 1 black bead. We pull the thread through the first seed bead.
On the working end we string 4 white beads, 3 beads-rice, one by one, and pull the thread through the beads-rice of the previous step. *String 2 white beads and pull them through the next bead-fig. We string 1 black, 1 rice beads, 1 black. We pull the thread through the rice beads of the previous step.*
Repeat twice**. Pull the thread through the black bead and beads so that it comes out of the circle. We get a square. To give it the correct shape, you need to pass the thread through all the upper rice beads and beads.
Next, we repeat the steps of stringing 1 black, 1 rice beads, 1 black. At the end of the work, attach the carabiner and ring.
Necessary materials
You need to start by selecting the necessary elements:
- bases (fishing line, strong thread, thin and flexible wire);
- beads and seed beads;
- scissors;
- clasps or carabiners;
- needles with a long eye.
It is extremely important to follow the advice of experienced craftsmen and follow the patterns according to which you make your own jewelry from beads and seed beads.
Step-by-step weaving instructions
Thanks to the use of high quality faceted beads, this elegant beaded and bicone pendant looks like an expensive piece of jewelry.
Step 1: form a circle of beads
The work, as always, begins with the fact that we cut off a piece of a length convenient for weaving from a common skein of fishing line. We string 4 mm faceted beads (4 pieces) and beads on it, alternating with each other. We cross both tails of the fishing line in 4 strung beads.
The formed circle should be located towards the edge of one of the ponytails, since the weaving will go in one thread.
Step 2: weaving halves of petals
On the longest tail, which comes out of the beads of the first row, we string a bicone, 3 beads and another bicone. We send all this to the next bead of the first circle. This is how we arrange all the beads in a circle.
Step 3: completing the weaving of the petals
Next, the thread should again come out of the beads of the first row. We string a bicone of a different color (already 3 mm), a bead, another identical bicone onto it, and send it to the next bead of the same first circle. Again, we move in a circle, forming such halves of flowers.
Step 4: finishing the weaving
For the next step, the thread should come out of the bead between the small bicone. We string the same bicone onto it, and send the needle to the three beads. we go through them completely and string another bicone, which we send through the bead with which it all began. We pull the thread through the work to the next bead between the small bicone to complete the flower.
Step 5: make an openwork edge from beads
When all the flowers in the circle are completely decorated, we send the thread to the bicone of the second row (ours is larger), string a faceted bead on it, another bead and send it to the next bicone. After that, we send the thread to the second bead of the three, and form a cross of 3 beads above it.
Once you go around the circle, the pendant will be completely finished. All that remains is to form a small loop in any part of it, by which it will hold on to a tight cord.
Having created a pendant from beads and bicones according to our scheme, you can use the same master class to make earrings to go with it.
8862 Christina March 22, 2015
12
Christina All posts by the author (1132)
Selection of materials
The main detail for any decoration on a woman’s hand is beads. If you want to make an elegant and beautiful product, you should not skimp when buying beads. Chinese products are cheap, but their quality is extremely low. There may be cracks on the beads; they are not always the same size and may differ in color.
It is advisable to purchase high-quality Czech beads, especially since the choice of color, texture and shape is almost unlimited.
Workplace organization
Proper planning of the process will allow you to achieve comfort and pleasure from work. Stock up on small containers and arrange beads in them according to color, shape and size. Remember, the weaving process is not only creative work, but also painstaking work that requires perseverance, attention and patience.
By following our tips, you will soon be able to weave the bracelet you have been dreaming about for a long time.
Lebed MK
To make a swan, we need white mother-of-pearl beads, pink small beads, two brown beads, black beads, fishing line, thick wire and a piece of cotton wool.
Weaving beak, head and neck. The swan's beak, head and neck are woven together. The beak is woven from small light pink beads, and the head and neck are made from white mother-of-pearl beads. We weave the entire part (beak, head and neck) in a circle, passing the needle into the protruding beads.
To move to the next row, you need to go through the beads of the previous row and the beginning of this row at the end of this row. We begin to weave with light pink beads. 1st row: collect 3 beads and connect them into a ring, that is, stretch the fishing line through the first bead (Fig. a). 2nd row: pick up one 4th bead and go through the 3rd bead.
We collect one 5th bead and pass through the 2nd bead. We collect the 6th bead and go through the 1st and 4th beads (Fig. b).
3rd row: pick up one 7th bead and go through the 5th bead. We collect one 8th bead and pass through the 6th bead. We collect one 9th bead and go through the 4th and 7th beads and so on until the 11th row.
Next we weave according to the table.
17th row: collect 3 white beads and pass through 3 beads of the previous row. Then we collect the 2nd white beads and go through the 3 beads of the previous row...
The beak, head and neck are ready.
Now let's take a wire and bend it in half...
... and insert it into the finished product, giving the neck a curved shape.
Now we will weave 2 identical parts of the body.
The body is woven from fishing line and white mother-of-pearl beads. We put the 31st bead on the fishing line and pass through the 29th bead. Then we collect one bead at a time and after one we go to the left until the end of the row. Coming out of the first bead, we collect one 46th bead and go through the 45th bead. Then, in a checkerboard pattern, we go to the right to the end of the row.
Coming out of the outermost 31st bead, we pick up the 61st bead and in a checkerboard pattern we go left to the end of the row. Coming out of the 46th bead, we pick up the 76th bead, pass through the 75th and in a checkerboard pattern we go to the right to the end of the row. Coming out of the 61st bead, without picking up anything, we pass through the 90th bead and in a checkerboard pattern we go left to the end of the row.
Coming out of the 76th bead, without typing anything, we pass into the 104th bead and go to the right in a checkerboard pattern. Coming out of the 91st bead, without typing anything, we pass through the 117th bead and go left in a checkerboard pattern. Next we weave according to the pattern in a checkerboard pattern, paying attention to the edges of the product.
When leaving the outermost beads, pick up or not pick up beads.
In Fig. a diagram of weaving the lower part of the body is shown.
Now we weave the upper part of the body. We will attach a small piece of fishing line to the lower part of the body. And we will take the fishing line out of the first bead of the lower part of the body. Then we pick up one bead and pass through the 2nd bead of the lower part of the body. The lower part of the body is circles with black numbers.
Next, we weave in a checkerboard pattern, picking up one bead at a time and passing through the protruding beads according to the pattern in the figure, paying attention to the edges of the product. From the left edge we collect one bead at a time, and from the right we collect nothing except the first row.
When leaving the 30th bead of the lower part of the body, we pick up the 17th bead and pass through the 16th bead. Then we weave the next 8 rows as indicated above. Coming out of the 137th bead, we collect the 136th and 137th beads and pass through the 136th bead.
We collect the 138th bead and in a checkerboard pattern we go to the right until the 131st bead.
Coming out of the 131st bead, without typing anything, we pass through the 142nd bead. Next we weave in a checkerboard pattern, picking up one bead at a time on the left, and picking up nothing on the right.
Then we sew both parts of the body together with fishing line. First the top part...
... then the bottom one. Let's stuff it with cotton wool into the hole left in the front of the body.
Wing weaving. The swan's wing is woven from white mother-of-pearl beads using fishing line using the mosaic weaving technique.
We put 34 beads on the fishing line and return the needle to the 27th bead.
Now we go with the needle through one bead, picking up one bead at a time, until the end of the row.
Next we weave according to the pattern shown in the figure below.
The figure shows a diagram of half of the wing.
The second half follows the same pattern. We start weaving with 48 beads.
The wing is almost ready.
Now let's decorate the wing with beaded feathers. To do this, we will trim it with beaded loops. Starting from the top, we make loops from five and seven beads, then from three.
The wing is ready. You need to weave 2 such wings.
For reliability, we will stretch a thick wire coming out of the neck through the body.
Now let’s attach the neck to the body, passing the needle in a circle first into the bead of the neck, then into the bead of the hole of the body.
Now let's attach the wings to the body.
Swan assembly diagram.
Source: https://stranamasterov.ru/node/285145
The simplest bracelet
The basic pattern is considered to be the so-called monastery cross. The work algorithm is as follows:
Do-it-yourself bead brooch - 105 photos and video description of how to quickly and easily weave a brooch- DIY bird feeder - step-by-step master class and ideas for beginners and schoolchildren (155 photos)
- Do-it-yourself dolls made of fabric - 145 photos and video description of how to sew a beautiful doll quickly and easily
- string 4 beads onto a fishing line. To get a cross, pass the needle through 1, 2 and 3 beads and fasten;
- to obtain the next cross, we string three beads, and insert the needle into the last bead of the previous cross;
- similar actions are carried out until the required length of the first row of the bracelet is achieved.
Weaving the second row should begin with the side bead of the first link, adding three elements and forming a cross.
Further actions are performed in a similar way until the second row is obtained. The work is completed by securing the fasteners to the ends.
Having mastered the basic work, you can move on to creating bracelets with names, logos or original patterns.
Necklace made of rope
Beautiful decorations are made from a rope. Bright and delicate strands can complement your everyday wardrobe. Such necklaces look great either as a simple braid or as a braid-shaped necklace made from it.
The infinity necklace made from rope looks incredibly stylish and original. Both the usual weave of strands and the more ornate ones look beautiful.
Making a crochet tourniquet is quite difficult. This work is painstaking and requires attention and time, but the result is worth the effort. For knitting you will need thin threads and a hook. It is better to learn using multi-colored beads.
Beads are strung on a thread in the sequence shown in the diagram. They begin to weave a tourniquet with air loops. The simplest option will consist of six loops. After each loop we move a bead. After knitting all six loops, we connect them into a ring as shown in the photo.
We knit the next row according to the same pattern. We pass the hook between the beads and grab the thread. Pull the thread and make a loop. We move the bead to this loop. We do the same with the next loops.
We knit all the rows in the same way.
Related article: Master class on knitting hedgehog mittens for children with photos and videos
To understand the sequence of stringing beads, you need to learn to read diagrams. Let's look at three different schemes as an example. The number of beads is indicated at the top. There are six in the first diagram, fifteen in the second, and twenty-five in the third.
The set of beads per thread is indicated in the right column. Opposite each color is the number of beads. The more complex the pattern, the greater the number of columns. Each column indicates the required quantity and order of stringing beads to knit one stitch.
The tourniquet can be made without fasteners. To make it continuous, you need to learn how to sew its edges. The picture shows very clearly how to do this.
For a beautiful, neat pattern, you need to start and end the harness with fully knitted pattern reports. Then the drawing will be continuous.
Rings
Beautiful jewelry is an excellent alternative to expensive jewelry for women's fingers. Rings made of beads and beads, made by yourself, look great.
The availability and low cost of materials will allow representatives of the fair half of humanity to replenish their jewelry boxes. If desired, any woman can weave an incredibly beautiful ring.
- How to sew curtains for the kitchen - a detailed description of how and what to sew curtains for the kitchen from (video + 135 photos)
Do-it-yourself felt toys: ideas, patterns, templates and felt patterns (135 photos and videos)
- DIY decorative pillows - 120 photos of different patterns and options for decorating pillows
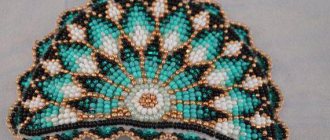
For special occasions
Openwork and delicate necklaces are obtained by weaving using the wave technique. This decoration will look great with evening dresses. The weaving method allows you to create waves not only from beads, but also from glass beads.
The weaving pattern in the photo below will help you make waves from beads.
Necklaces woven using the zigzag technique look incredible. Weaving such a decoration is not very difficult. With the right combination of bead colors and adding different beads and stones, the necklace will turn out very beautiful.
Related article: Weaving from rubber bands: animals for beginners on a slingshot with video
To weave zigzags, use the patterns.
Necklaces woven using the coral technique look charming and cute as an evening decoration. Externally, such jewelry resembles thin and graceful corals. Such jewelry using freshwater pearls and stones looks especially beautiful.
You can make such corals using these weaving patterns.
A chic and incredibly beautiful necklace can be made using the lace weaving technique. Such decorations are called “countess”. They are made in different lengths. Necklaces that decorate the décolleté area look very attractive. They also weave a necklace in the form of a lace stand-up collar. Decorate with large stones, cameos and beads.
Ring
A decoration made from beads and bicones looks especially elegant, one might say exclusive, on a woman’s finger. To create a chic ring, you will need to stock up on:
- bicones of the desired color, size 4 ml (16 pieces);
- Czech golden beads, size 10;
- fishing line;
- clamp.
Bicone beads are the most popular crystal beads. Look great in weaving. One point must be taken into account: they have sharp edges, so jewelry wire or cable should be used as the basis for jewelry with them. The technique of weaving jewelry from beads and beads with your own hands is quite simple. Even a beginner can handle it. Two operations are performed - weaving rings and bicones.
Volumetric king of birds
To weave a swan we will need the following materials:
- thin paper;
- cardboard;
- scissors;
- plasticine;
- copper wire (2-3 mm);
- transparent threads;
- needle;
- PVA and super glue;
- beads in red, white and black.
The master class begins with the formation of the body of the future bird. To do this, you need to take a piece of plasticine and mold it into a body of the same shape as in the photo below. Then you need to cover the figure with paper and set it aside for about a day.
Hem the resulting shape, first sew on the belt, and then everything else.
Related article: Do-it-yourself things for dolls made of plasticine and paper with photos and videos
It is worth paying attention that you need to leave a little free space in front so that you can insert the bird’s neck there later.
Next, you need to start making a layout diagram, onto which you will then need to sew feathers to make the swan look more natural. First, you will need to draw a sketch of the wing on thick cardboard.
Make markings for the feathers.
For one wing, 25 feathers will be enough. They can be made like daffodil petals using the wire weaving technique.
The weaving pattern looks like this:
These are the feathers of different lengths you should get:
Having finished weaving, sew them to the cardboard blank.
Now you need to glue the wing to the swan's body.
The neck and head can be made in several ways:
- Form a bird's neck from a thick wire and trim it with beads. It is worth remembering that towards the end of such weaving the number of beads should decrease;
- Weave the neck and head according to a pattern that has several nuances.
Use a cross and number 1 to mark those rows that need to be skipped for a beautiful curve of the neck. The arrow shows the places where the wire needs to be drawn twice. The number 7 means that this row must be repeated 7 times.
In the end, all that remains is to glue the neck to the body, and the graceful swan is ready!
Beads
Having acquired the skills of weaving bracelets, you can move on to making beaded beads with your own hands. To create simple beads you will need beads of two colors, a base and a clasp. First, cast on a bead of one color, secure it, continue the cast with several beads of a different color, and so on until the desired length.
Remember that after each action the line must be tightened!
Necklace made of openwork flowers
This master class will tell you how to make an airy and light, but very impressive bead necklace with your own hands called “openwork flowers”.
To do this, stock up on the necessary materials:
- fishing line (0.2) and monofilament;
- scissors;
- several beading needles.
The mesh base of a necklace made of beads and beads will require:
- beads No. 11 white or transparent (50 grams for the entire product) symbol BB;
- You can choose from nylon thread or fishing line.
Beading pendants that will decorate an airy necklace with beads will require:
- white Czech beads No. 11;
- the same transparent beads (100 g) symbol PB;
- rock crystal, or rather its chips;
- transparent cut beads ranging in size from 6 to 8 mm;
- pearls of the same size (6-8 mm);
- cut beads, transparent, drop-shaped (air-suspension) - 30 or 40 pieces.
Remember that if you wish, you can always replace both the color of the beads and its shape. All this will help to radically change the appearance of the product, although the weaving pattern will remain unchanged.
To make flowers, stock up on:
- It is best to take monofilament, it will help maintain the desired shape;
- several bead needles No. 12;
- beads for finishing are transparent and white, No. 15, our product took about 200 grams, but it all depends on the number of colors you want to weave.
- pearls or mother-of-pearl beads with a diameter of 6 to 8 mm, round (50-60 pieces);
- In order to fix the monofilament you will need a colorless varnish.
You can embroider the mesh in the spaces between the flowers:
- chipped crystal (strand 90 cm long);
- faceted transparent beads (50 pieces);
- pearls
It is difficult to name the exact amount of material, since it all depends on the degree to which you fill the base with colors; there is no one scheme for everyone. We leave this moment at your discretion. The numbers in brackets indicate the total amount spent on the entire necklace with beads.
We weave the base mesh
We start the master class with the base - the grid. Weaving pattern in the photo below:
We weave the base on a fishing line made of translucent beads No. 11. You can take the thread. The weave length is considered sufficient when it can be wrapped around the neck. Perhaps some of you would like to make it a little longer.
Next we proceed to creating the pendants. An airy necklace will have a more expensive and luxurious look. Weaving technique - corals (or leaves). The final type of beading will be like this:
The air suspension is attached in accordance with the diagrams:
The red lines indicate the places where the suspensions are attached:
Thread pattern:
It should be noted that the air suspension will be shorter the closer it is attached to the neck. We divided the length into three groups: 27 beads - the longest, then 20 beads and the shortest 13 pieces.
When creating pendants, you can safely choose the shape, color, and size yourself. Whether it is pearls or beads, crystal or drop-shaped beads is up to you. Although you can repeat the pendants in accordance with the photo or video material on our website.
Creating a central flower
To bead the largest flower you will need:
- white beads, 20 g;
- cylindrical beads, 20 g;
- transparent color beads 40 gr.;
- large mother-of-pearl bead with a diameter of 4 mm.
First you need to make an inner flower from transparent beads according to the diagram:
The beadwork consists of eight petals that close into a ring, pulling the corner beads towards the center.
Next we weave the second part of the flower, the lower part, from white beads. Scheme:
We complete the beading by connecting both parts of the flower and attaching a mother-of-pearl bead to the center.
We weave small flowers
The rest of the flowers for the necklace are woven using the “mosaic weaving” technique. It’s very good to watch a video on the basics of teaching this technique if you don’t have enough experience.
Weaving pattern for the part of the flower that is on top:
Place six BBs on the needle, then three BBs and one BB. The tip of the monofilament can be left about 25 cm. In the future, we will use it to sew flowers to the base.
Insert the needle into the fifth bead from the beginning in the opposite direction.
Holding the monofilament, we pull it through.
Having previously strung the BB, insert the needle into the third bead.
Having strung the BB again, we insert the needle into the first bead.
We collect 1 PB and 1 BB. We insert this pair into the last strung bead (previous photo).
Tighten the thread. In the following photo, monofilament is highlighted and places for further addition of beads are marked with checkmarks:
Next, you need to thread 1 BB on a needle and insert it into the bead, which protrudes from the entire mass. To do this, gather the work together by pulling the thread.
We insert a needle with 1 BB through the last BB in the row.
Carefully tighten the thread on the product and collect 2 BB, 1 PB and 1 BB.
Let's thread the needle through the first one.
Thus we continue our necklace weaving using the mosaic weaving technique.
We notice when there are 2 BB left until the end of the row. We string 1 PB, 1 BB and insert a needle into the fourth BB from the bottom.
The finished colors on a beaded necklace will be more accurate if you do not forget to adjust the thread tension. It's important not to forget this. Openwork weaving involves a simple average thread tension. This will add lightness and prevent you from losing shape.
Adding 1 BB to the needle, we will pass through the protruding beads.
At the end of the row, repeat the set: 2 BB, 3 BB, 1 BB. We insert the needle into the first bead of those that we just collected.
Let's continue beading according to the diagram, after tightening the thread.
Attention! Difficult moment. At the point where the weaving transitions to descent, in the very center of the petal. The beginning is no different, but if before we stopped two BBs from the edge, now we need to go to the end of the row.
Let's enter the second BB from the beginning, having previously collected 1 PB and 1 BB
We take 1 BB and insert the needle into the next BB, which protrudes from the total mass.
Let's repeat our steps again: 1 BB and inserting the needle into the protruding beads on the necklace.
Then take: 3 PB, 1 BB
Counting from above, insert the needle into the fourth BB.
By highlighting the places where beads were added in the photo of the necklace, we hope that we have made the task easier for you. And so on until the end of the row.
We take 2 BB, 1 PB, 1 BB and make a needle pass through the first bead of those that we collected.
Tighten carefully.
Add 1 BB twice while passing through the protruding beads from the previous row. As before, we do not complete the two BBs.
Take again: 3 PB, 1 BB and insert the needle into the fourth BB from the beginning
We continue to weave according to this principle until both parts of the petal become identical.
Symmetry is calculated by the number of PBs. Remember that you need to make four of them inside the petal on both sides. We marked the photo with blue dots. We carefully make transitions from petal to petal. I wouldn't want you to have to cut half the work because of a small mistake at the time of transition. An openwork necklace should bring aesthetic pleasure while weaving.
We lower: 2 BB, 1 PB, 1 BB. This is done while finishing the final row of the petal. Let's insert the needle into the outermost bead of those that were just strung. This will be the fifth repetition of such an action.
We take 1 BB and insert the needle into the fourth BB of the new row. At this point we will consider the series complete.
Let's continue the master class: 4 BB, 3 PB, 1 BB.
We will insert a needle into the outermost BB from those that we collected.
Insert a needle into the fourth BB in the new row, having previously dialed 1 BB.
1 BB and insert the needle into the 6th BB from the top.
Now count the fourth BB from below and insert the needle, stringing: 1 PB, 1 BB. This is done when there are 2 BB left before weaving is completed.
We begin a new petal, leaving difficult moments behind.
Learning to build up monofilament
At this stage of beading, we think it's time to talk about how to properly extend monofilament. Every craftswoman will have to do this. After going through several types of extensions and looking at photos and video materials, we chose to go with multi-knot extensions.
Tip: remember or sketch where the weaving stops. Then you can easily find the place where the monofilament exits and continue working without error. Then bring the needle between the beads, as in the photo.
Make a loop and insert the needle into it. Tighten the twisted and slightly tangled monofilament thread.
Insert the needle into two beads located diagonally. The main condition is that they must lie horizontally with the thread exit point. We marked it in the photo with a blue stripe.
Then make a loop again and pass the needle through it until you get a new knot. All these manipulations will not be noticeable to the eye, because they will successfully hide between the beads. The transparency of the monofilament will enhance the effect.
Once again we draw the corner into the beads located diagonally.
We tie the knot again and continue our master class.
Using scissors, very carefully trim the ends of the thread. For additional durability, you can use clear varnish. After this type of procedure, you need to pause for a few minutes before continuing. However, keep in mind that if you are using matte rather than glossy beads, then it is better not to use colorless varnish.
Let's go through two beads, making a knot. This is how we begin to introduce a new thread.
To consolidate the effect, repeat this action again.
We do this until we find ourselves in the place where we finished weaving (it was originally marked by you).
And now our flower is finished. You should have six petals.
The next step will be connecting the ends. Visually assess where the needle will go.
Insert the needle into the lower 2 BBs.
And let's go back to 2 BB of the other connected part. The photo clearly demonstrates this process. Let's make a second pass to secure it. Let's bring the thread into the upper PB. We knit knots through one bead for final fastening.
Having straightened the product, we lower 6 central PBs.
We make several passes in a circle and finish with a knot (or better, several). The tip can be hidden, or you can leave 20 centimeters for attaching to the base of the necklace in the future. Please note that from the beginning of weaving you will have one more thread left. You can use it to sew on a pearl bead.
The lower part of the flower is woven according to the same pattern, taking into account the increase in each row by 2 BB. The diagram is shown below:
Collecting a flower
Let's continue our master class by combining the upper and lower parts of the flower.
The union occurs by stitching together the central transparent beads, after superimposing one element on another.
We bring the needle to the front side through the back. We string a pearl bead and 1 PB.
We again enter the pearls and the central part of our flower.
The thread is attached from the inside out. The tip, as we already remember, is left for further securing the element to the base. Now it remains to decide on the number of small flowers. A necklace of the same length as in our example required ten pieces. Without taking into account the central one. I would like to advise you not to use beads that are too large for weaving flowers, for example No. 11 is already beginning to visually weigh down the product. The larger the beads, the more bulky the necklace made of beads and beads looks. But this is only in the case of a necklace. Perhaps the pendants or earrings woven by you using this technique would look more appropriate made from large beads. The color and shape of the material play a big role.
Necklace assembly
On a grid spread out on a flat surface, place the flowers in the order in which you want to see them on the necklace. You can secure it with a pin or grab it with a needle. To prevent the petals from sticking out, you can grab with threads not only the center of the flower, but also in several other places. The fastening process should start from the large flower in the center and gradually move to the edges. You can go through the sides one by one. Take a good look at the spacing and evenness of the flowers. Usually there are three places for firmware on each element: petal - center - petal. But after finishing the work, we would advise you to try on the finished necklace with beads on a mannequin or girlfriend and visually evaluate the uniformity of all elements. If anything stands out from the overall picture, don’t be lazy to make a few extra stitches. This will serve you well and will make your work unique and impeccable!
The final stage will be decorating the base in places where there are voids with chips of crystal, pearls or beads. Here everything will depend on your imagination.
Now let's sew a lock on both sides of the base. And the chic and incredibly airy necklace made of beads and stones is ready!
Fast and easy way
The most elegant decoration will turn out if you use a pair of air loops in a row, and place only two beads in the cells with beads. Visually, the beads will appear more magnificent if you use transparent glass beads.
Amazing patterns for weaving an airy beaded necklace
Using various patterns, you can create a necklace that will suit almost any style of clothing.
Square and pentagonal “donuts”
To make squares from beads, we string one purple, two blue, one purple, one blue, four purple, one blue beads onto a fishing line, which should be closed in a ring. Next, weaving is carried out similarly to the steps shown in the photo.
In total, it is necessary to form seven rows, each of which will use a different shade. Using a needle we return to creating the second half. To do this, we weave two rows of purple beads, stringing one piece at a time, adding blue beads in the corners.
The photo shows the first row of purple beads of the first half, above it there will be two purple and blue rows of the second half.
We weave to row No. 7, forming a connecting row with white beads.
Photo source: https://biserok.org/kvadratnyie-i-pyatiugolnyie-bubliki-iz-bisera/
We connect the halves to each other and get one earring or element for a necklace.
Pentagonal “donuts” are woven in a similar pattern and can become part of an unusual necklace.
Necklace “Spiral Staircase”
To weave the central strand, take a fishing line with a diameter of 3 mm and collect four black beads, one orange and one purple. The diagram shows how the beading process is carried out.
The “ribs” will start with two beads, the number of which increases to the desired thickness of the strand. It is better if the number of beads does not exceed 15 pieces.
The order of stringing beads:
- 1 black bead (B), 1 orange (O), 1 purple (F);
- 1 H, 2 O, 1 large bead (B), 2 F;
- 1 H, 3 O, 1 B, 3 F;
- 1 H, 4 O, 1 B, 4 F, etc.
When the “ribs” are formed, we begin to reduce the number of beads.
To get the desired shape of the necklace, take a fishing line with a diameter of 0.2 mm and, using it, connect the central beads in the “ribs”, alternating them with black beads.
It remains to make two twisted strands of the required length, which should be attached to the formed spiral on both sides; we separate the elements with large beads, decorating the ends with caps and beads using pins for jewelry. You also need to attach the jump rings and clasp.
"Air"
You can make a chic beaded necklace using master classes from various needlewomen. Step-by-step photo instructions will make it easier for you to get acquainted with this beading technique.
Photo source: https://biserok.org/vyazhem-vozdushnoe-kole-iz-bisera/
Gems
To make a beautiful and elegant airy necklace from beads, it can be decorated with natural stones of different sizes and colors; craftswomen also use stone chips as decoration.
Heavenly
This beaded necklace can be made using the same pattern as shown in the master class. To obtain a voluminous accessory, the length of the beaded necklace should be 6-7 meters. You can use any shades of blue and cyan; beads decorated with pearls and transparent beads, larger than the rest of the beads, will also look very beautiful.
An airy necklace is very easy to make; in a couple of free evenings you can create a wonderful accessory.
DIY photo of beads
Tell your friends