There are never too many socks in a wardrobe; while wearing, accessories are subject to significant friction, and therefore quickly become unusable. You can increase the lifespan of socks by making them yourself. You have the right to choose which thread to use in especially rubbing areas - on the toe and heel. You can add synthetic thread to wool or down thread, and then the socks will last much longer. Learning how to knit regular socks with knitting needles is easy.
In the old days, a set of five knitting needles was used for circular projects. Four of them were folded into a “well”, and the fifth spoke was a working one. This method is still relevant today. An alternative is to use circular knitting needles to knit a closed product.
How to learn to knit socks
You need to start with simple models. But even for beginners there is a great opportunity to knit striped socks. You just need to change the color of the thread at certain intervals. The greatest difficulty is tying the heel and toe. If you do these “difficult” places in a different color and don’t forget to add nylon thread to the main thread for strength, you will get quite nice socks. Even if you choose leftover yarn to work with, you can create a fun accessory. But before that, you need to divide the remaining yarn of each color in half - for a pair of identical socks.
Preparation, selection of yarn and tools
If you plan to use a set of five knitting needles, it is more convenient to use aluminum or wooden tools, since the thread will not jump off them. When knitting with two knitting needles, it is much easier to control the stitches, so polished steel knitting needles are great. In a number of schemes, a rough cotton thread is used to cast on loops, which then has to be unraveled to release the loops.
Yarn must be selected according to several parameters. Let's take a closer look at them.
How to choose yarn for knitting socks
The choice of yarn is determined by the season when the socks will be worn. For winter models, choose down thread or wool thread. Cotton or synthetic thread is good for summer, and linen for hot weather. If the work uses leftover yarn of different colors, then they should all be the same thickness, the same strength and elasticity.
To learn more about how to choose yarn, watch the video instructions:
Choosing a knitting pattern and method
We decide how we will knit socks with knitting needles: in the old fashioned way, on five knitting needles, or in a new way, on two. There are options for knitting socks that don’t even require circular knitting needles. These socks are made seamless by using small tricks. One of them is a set of loops at the beginning of work on two threads - cotton and wool.
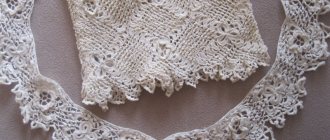
Pictures of beautiful socks
Having mastered the basic technique, a knitter can decorate socks with frills, openwork patterns, and jacquard patterns. Adding these elements is easy, and the socks turn out elegant. Fantasy socks look especially good for little children. The World Wide Web contains a large collection of photographs and patterns of elegant socks, both for babies and for young girls and ladies of advanced age. But no matter how fancy the sock is, it must fit well on the foot, otherwise the whole impression of the work will be ruined.
How to take leg measurements to guess sock size
In order not to make a mistake with the number of loops and rows, you need to measure your legs. Not only the length of the foot, which determines the size of the shoe, plays a role, but also the height of the instep and the girth of the shin. During the knitting process, you can adjust the size if, for example, a person has a high instep and a thin ankle. This is done by decreasing or adding loops. If you choose wool or wool blend yarn, then it is better to slightly increase the number of loops - by 1-2, otherwise after washing the product will shrink and it will be impossible to wear it.
20+ options for heels for knitted socks... Protecting the heels of socks!
To knit a straight classic heel, you will need 5 stocking needles, four of which form a square, and the fifth is a working one, on which the loops are cast on. Having knitted the leg with a cuff of the required length, proceed to the most difficult stage. Having mastered the skills of knitting in a straight line, it will be easier for you to learn how to work with other patterns.
To knit the heel wall, using knitting needles No. 1 and No. 4, you need to knit the fabric - the required number of rows in satin stitch with knit stitches. There should be two fewer stitches than the cast-on stitches (the total on two knitting needles is 28, there should be 26 rows). In order to correctly knit the lower part, you need to count the number of loops and divide by a multiple of three. If the number n is divisible, then the middle part will be larger (11+12+11). The middle part is knitted in satin stitch: the front side is knitted, the back side is purled. The side stitches should decrease with each row, as the outer loops are knitted together. The lower part is performed as follows: 1st - knitted, in the middle part the last loop is knitted together with the crossed knit stitch, the work is unfolded; The 2nd purl is started by removing the outermost loop as a purl, knitting the middle with a purl, the outermost one with the next one also purling, turning it over; 3rd - knit according to the pattern, like 1st. Next, the pattern is repeated until only the middle part remains after assembly. Detailed master class Method of knitting socks on knitting needles with a “Boomerang” heel Having knitted a shin in a circle on four knitting needles, you can proceed to the “Boomerang” heel. It is a little shorter than the traditional one. For the heel you will need another additional spoke. Double loops are not knitted.
According to the “Boomerang” pattern, the heel is knitted only with knit stitches. If the shin is knitted with an elastic band, then before starting the rounding you need to switch to satin stitch, making decreases along the entire row by 2 loops. Divide the total number of loops into three equal parts, or add 1-2 extra ones to the central part, which ended up in the remainder after division. The 1st is knitted with all knit stitches. 2nd - turning the knitting over, make a double loop once. It is important that both the loop and the thread are pulled tight so that large holes will not form. To do this, insert the knitting needle into the loop and grab the thread located in front of it. Remove together, pulling the thread back tightly. Knit purlwise. Having completed the row, you need to turn the work over. 3rd - pull through a double loop. Next, everything is facial. Double loop. Turn over. 4th - repeat as 2nd. Continue according to the pattern until the loops remain only on the middle part.
Method of knitting a stepped heel at the toe
The stepped heel is knitted in the same way as in previous cases, using the first and fourth knitting needles, leaving the second and third ones temporarily aside. For the back wall, transfer the loops from the first and fourth needles to one and knit with stockinette stitch. Using reinforced knitting, we begin to create a stepped heel in several stages. 1st - facial. We remove one loop as a purl, pull the thread back, knit a front loop. Turn over. 2nd - purl. Turn over. 3rd - alternating one front loop, remove one purl. 4th - purl. Next, repeat from the first to the fourth row. The second step is knitted as follows: the last cast-on stitch of the edge and the first set aside are knitted together with a knit stitch. Turning the knitting needles and thread over, remove the first stitch as a purl, then knit purlwise. Continue in this pattern until all the loops of the first and second steps are connected along the seam.
You can increase the wear resistance of knitted socks not only by adding an additional thread, but by putting into practice a special method of knitting a double heel, increasing its thickness. As in all cases, knit the back wall in satin stitch in reverse and straight rows. Having created the desired height, stop on the front row and begin to form a cup. Divide all the loops into three parts equally or more on the central one. On the wrong side: the left loop, the middle, the last from the center are knitted purl together with the first loop on the right side. Turn over. Front row: the middle, edge and last loops are knitted together with the side one located nearby. After each row the work must be turned over. By knitting all the side loops, you will close the formed cup. Next, you can begin knitting the wedge of the instep and foot.
Source
Schemes with descriptions for beginners
Today there are many patterns available for beginners, they are described step by step, which will allow you to quickly master the technique of knitting socks on knitting needles. On two knitting needles you can knit a sock from either an elastic band or a toe. On five knitting needles, the product is made from top to bottom, that is, it ends at the toe.
Socks on two knitting needles without seam
An interesting way to knit socks without a seam has appeared in different versions. The most practical one is with a set of open loops. The loops are cast on two knitting needles alternately, then knitted from one knitting needle to the end, then the work is turned over and all the loops are knitted from the other knitting needle. The method resembles a double hollow elastic band. Only on the toe, at the beginning of work, you will have to make increases until the size of the foot is reached; increases are made by knitting the first and last loops of each row in the following way: one loop is knitted behind the front wall of the loop on a non-working needle, and the second - behind the back. When the increases are completed, the “pipe” for the foot is knitted. If the instep is high, then before moving to the heel it is worth making a small increase.
The heel formation occurs only on one side of the knitting, so you need to separate the even and odd stitches on different knitting needles. You can transfer stitches from one needle to a pin or leave them on an additional needle. They are not participating in the work yet. On the other side, the heel is knitted with broaches. Pulling is done like this: two loops are removed. The far one is knitted, and the near one is put on it. This removal is done at the beginning of the row. At the end, just two loops are knitted together. You need to close a third of the heel loops like this. Decrements are performed only in the front rows. When a third of the loops remain, you need to move on to increases. You need to add by knitting one loop from the edge of the heel at the end of each row until the previous number of loops on the knitting needle is reached. Now you can combine the loops on one needle again and continue knitting using the hollow elastic method. You need to finish the sock with a 2 x 2 elastic band.
Knitting socks on 5 knitting needles
Knitting on five needles is also easy. Let's look at the diagram step by step. The set of loops is performed in the usual way - on two knitting needles. Next, the loops are divided into four equal parts and distributed over four knitting needles. In a circle (actually in a square), socks are knitted continuously, in a spiral, from top to bottom. As soon as the length of the boot reaches the bone on the leg, you need to start knitting the heel. Five spokes have a square heel, which is highly durable. It should be reinforced with cotton or synthetic thread. Let's look at how to knit a heel separately. The foot is performed “well” to the point where it decreases to the toe. It is better to perform them using a “propeller”: we knit two loops together on each knitting needle at the beginning or at the end of each row. When there are only four loops left, they need to be pulled together.
Step-by-step photo of a sock on 5 knitting needles
Knitting on 5 needles - master class
To knit socks correctly on 5 knitting needles, you need to follow the instructions step by step.
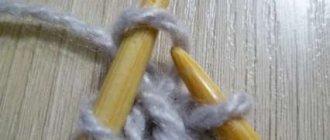
- We cast on the required number of loops (see table), distribute them evenly onto 4 knitting needles. We knit 5 cm with 1*1 rib, then continue with stockinette stitch.
- Having knitted another 5 cm in height (if these rows are not knitted, you will get half-socks), set aside the loops from the 2nd and 3rd needles, and continue to knit the straight part of the heel on the 1st and 4th. We knit as many rows in height as there are loops together on the 1st and 4th knitting needles.
- Let's start forming the heel (cap). Let's look at how to knit a heel step by step. To do this, divide all the loops of the straight part of the heel into 3 equal parts. It turns out two sides and a middle. We continue to knit the central part without changes, and on the side parts in each front row we decrease one loop, knitting them together with the outer loops of the central knitting needle. The formation of the heel will be completed when all the loops on the side knitting needles are completed.
- We pick up loops from the sides, restoring their original number, and continue knitting in the round. In this way we knit up to the little finger.
- From the little finger we form a sock, knitting two loops together at the beginning of the 1st and at the end of the 2nd, at the beginning of the 3rd and at the end of the 4th needle. We pull the working thread through the last 2 loops and fasten it on the wrong side.
Master class on knitting a sock on 5 knitting needles on video:
How to knit the heel of a sock on knitting needles
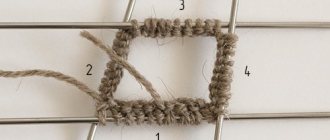
It is often difficult for beginners to perform the heel. You need to start it on two knitting needles, while the remaining two are not involved in the work. Let’s say there are 10 loops on two knitting needles. Total - 20. Let's imagine this number as 6+8+6. 12 turning rows are knitted on two knitting needles. In the 13th row, 13 loops are knitted, and the 14th is knitted together with the 15th, after which the knitting is turned. We knit 7 loops in the other direction, and knit the 8th together with the 9th. We turn the knitting, knit 7 loops again, knit the 8th together with the 9th. This is how the heel is formed until there are 8 loops left on the knitting needle. To complete the row, you need to pick up the missing heel stitches from the edge stitches in two steps - when knitting the front and back rows. Now you can again make a “well” of 4 knitting needles and knit further.
Step-by-step instructions with diagrams and job descriptions
The heel of the toe is the area that is most susceptible to wear and tear. To increase strength, add a thin elastic thread of acrylic or cotton for sewing No. 30 or No. 40 to the prepared wool or wool blend yarn (you can use a different color, which will only decorate the product). Increase the wear resistance of the heel - and the socks will delight you with their warmth much longer. The leg is knitted with an elastic band so that it fits tightly to the leg.
Sometimes the elastic band is made low, only on the cuff, and the leg itself is decorated with a pattern in the form of braids or plaits. This style is well suited for female representatives of any age. A bright mix of different colors looks beautiful on your feet, which you can easily create from leftover yarn accumulated from previous projects. This will not only save your budget, but also give you pleasure, because any family member will be happy to wear such fun new clothes.
Master class on knitting socks with straight heels
To knit a straight classic heel, you will need 5 stocking needles, four of which form a square, and the fifth is a working one, on which the stitches are cast on. Having knitted the leg with a cuff of the required length, proceed to the most difficult stage. Having mastered the skills of knitting in a straight line, it will be easier for you to learn how to work with other patterns.
- To knit the heel wall, using knitting needles No. 1 and No. 4, you need to knit the fabric - the required number of rows in satin stitch with knit stitches. There should be two fewer stitches than the cast-on stitches (the total on two knitting needles is 28, there should be 26 rows).
- In order to correctly knit the lower part, you need to count the number of loops and divide by a multiple of three. If the number n is divisible, then the middle part will be larger (11+12+11).
- The middle part is knitted in satin stitch: the front side is knitted, the back side is purled. The side stitches should decrease with each row, as the outer loops are knitted together.
- The lower part is performed as follows: 1st - knitted, in the middle part the last loop is knitted together with the crossed knit stitch, the work is unfolded; The 2nd purl is started by removing the outermost loop as a purl, knitting the middle with a purl, the outermost one with the next one also purling, turning it over; 3rd - knit according to the pattern, like 1st. Next, the pattern is repeated until only the middle part remains after assembly.
Method of knitting socks with knitting needles with a “Boomerang” heel
Having knitted the shin in a circle on four knitting needles, you can proceed to the “Boomerang” type heel. It is a little shorter than the traditional one. For the heel you will need another additional spoke. Double loops are not knitted.
- According to the “Boomerang” pattern, the heel is knitted only with knit stitches. If the shin is knitted with an elastic band, then before starting the rounding you need to switch to satin stitch, making decreases along the entire row by 2 loops.
- Divide the total number of loops into three equal parts, or add 1-2 extra ones to the central part, which ended up in the remainder after division.
- The 1st is knitted with all knit stitches.
- 2nd - turning the knitting over, perform a double loop once. It is important that both the loop and the thread are pulled tight so that large holes will not form. To do this, insert the knitting needle into the loop and grab the thread located in front of it. Remove together, pulling the thread back tightly. Knit purlwise. Having completed the row, you need to turn the work over.
- 3rd – pull through a double loop. Next, everything is facial. Double loop. Turn over.
- 4th – repeat as 2nd. Continue according to the pattern until the loops remain only on the middle part.
Method of knitting a stepped heel at the toe
The stepped heel is knitted in the same way as in previous cases, using the first and fourth knitting needles, leaving the second and third ones temporarily aside.
- For the back wall, transfer the loops from the first and fourth needles to one and knit with stockinette stitch.
- Using reinforced knitting, we begin to create a stepped heel in several stages.
- 1st - facial. We remove one loop as a purl, pull the thread back, knit a front loop. Turn over.
- 2nd – purl. Turn over.
- 3rd – alternating one knit stitch and purling one.
- 4th – purl. Next, repeat from the first to the fourth row.
- The second step is knitted as follows: the last cast-on stitch of the edge and the first set aside are knitted together with a knit stitch. Turning the knitting needles and thread over, remove the first stitch as a purl, then knit purlwise. Continue in this pattern until all the loops of the first and second steps are connected along the seam.
Double knit heel knitting
- Pasta with chicken - step-by-step recipes with photos. How to deliciously cook pasta with chicken and sauce
- Mushroom pie: recipes with photos
- Greek surnames for women and men
You can increase the wear resistance of knitted socks not only by adding an additional thread, but by putting into practice a special method of knitting a double heel, increasing its thickness.
- As in all cases, knit the back wall in satin stitch in reverse and straight rows. Having created the desired height, stop on the front row and begin to form a cup.
- Divide all the loops into three parts equally or more on the central one.
- On the wrong side: the left loop, the middle, the last from the center are knitted purl together with the first loop on the right side. Turn over.
- Front row: the middle, edge and last loops are knitted together with the side one located nearby. After each row the work must be turned over.
- By knitting all the side loops, you will close the formed cup. Next, you can begin knitting the wedge of the instep and foot.
Find out how to knit a cap for newborns - diagrams and descriptions are included.
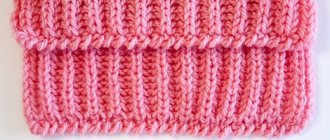
Elastic sock cuff - master class
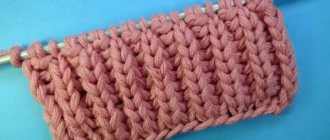
When we knit socks, we usually work in the round. When making elastic, you need to pay close attention to the type of loops so that you don’t end up with a “millet” pattern instead. To make the elastic look beautiful, it is better to knit the front loops behind the front wall. The purl loops fade into the background, so it is not so critical whether they turn out twisted or not. A knitted elastic band cannot always hold a sock on the foot well, so it is better to add a thin elastic thread to it. This will save the product and give it the necessary elasticity.
Knitting socks with knitting patterns - step-by-step instructions
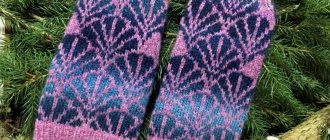
Women's socks with Norwegian pattern
Patterned socks can be knitted well by experienced knitters. For beginners, it is better to choose striped patterns if you want to knit something in two or more colors. The rest are recommended to use jacquard patterns. The secret is that the loose thread (non-working color) must be hidden directly in the knitting, otherwise the resulting sock will be difficult to put on: your fingers will cling to the threads. “Lazy jacquards” are ideal in this regard, because they do not have long broaches.
The elastic band of the sock is made in one color. Next, we proceed to the implementation of the selected jacquard pattern. As soon as we reach the heel, we use the warp thread, because it is difficult to make decreases and increases on jacquards. After finishing the heel, we move to the foot, where we resume knitting jacquards until we reach the toe. It needs to be made monochromatic.
How to knit baby socks
Knitting socks for a child is even easier and faster than for an adult. They require less thread, so there is more room for imagination. From leftover threads you can make fun decorations in the form of pompoms, tassels, knitted bells or flowers. The sock can be made on two or five knitting needles, and the decorations can be crocheted. Instead, it’s a good idea to knit an elegant frill.
Knitted booties for newborns
Using the same principle as socks, you can knit booties for a baby. For the product you need to choose a thick, strong thread. The top of the booties is very short; you can knit an elastic band of 4–5 rows. Next, a transition is made to the heel, after which the foot and toe are performed. The lower part of the foot can be reinforced with additional thread. If you take it in a different color, you get the effect of melange yarn. It’s good to finish the work by threading the colored thread into the elastic band using a hook and tying it with a bow. If you provide holes in the elastic in advance, you can thread a crocheted chain instead of a thread.