There are a lot of things you can do to stay warm outside in the cold. Well, for example, run. Or drink hot tea. Stand near the fire or go indoors. Jump rope, go ice skating, play snowballs. Or you can simply put on a warm knitted hooded hat and feel in it as if in a cozy house, with a fireplace and pleasant music. Well, ok, it’s probably too much about the fireplace, but you can dream? In any case, a hand-knitted hooded hat is a thing of unreal beauty and cuteness! It’s nice to even look at it, you’ll agree, and even more so to wear it. What’s especially cool is that such a voluminous thing like a hood allows you to look different depending on how you want to wear it today - deeper, barely covering your hair, wrapped up with your chin, opening your neck. In general, there are a lot of options for experimentation with obvious benefits and functionality. Knitting? Let's knit!
How to knit a hooded hat with your own hands - 5 master classes:
Hood-collar
You know, they say that in recent years there has been a tendency to use a hood instead of a bag - they say, when your hands are busy, it is very convenient to put a loaf of wheat bread or strawberry yogurt in it for breakfast. We won't argue. It may actually work as described, but we're just suggesting that you look at the hood from an aesthetic point of view. Agree, it's really beautiful!
How to knit a cowl-collar - diagram from gina-michele
Model for girls
This model for girls is very interesting because it can be used independently, or it can be sewn onto an item: cardigan, pullover, sweater. The main design of the proposed headdress is a rectangular figure. So let's get started.
Related article: Crochet beach bag: master class with description and knitting patterns
Pick up stitches from the edge of the neckline by lifting them onto a knitting needle. It is necessary to lift the loops along the front side, so the product will look much neater. Next, knit all rows in knit stitch (garter stitch). You need to knit a rectangular fabric. For a baby, it will be enough to make 65 rows (if you want for an adult, then measurements are needed. On average, this is 75-80 rows). Now bind off all the stitches of the last row and sew the two edges together using a knit stitch using a crochet hook. Finish the ears. The hat can be decorated with large buttons, thermal stickers or pompoms.
Children's hat-hood
Hoods are relevant not only when it comes to accessories for adults. Children are cold too, children also want to look beautiful, children also need hoods! It’s no easier to knit them than adults, but it’s definitely faster - so maybe you should start with small hooded hats? You’ll get good at it, and then when you knit a masterpiece, how you create a work of art, you’ll envy yourself!
How to knit a hooded hat for a child - pattern from gina-michele
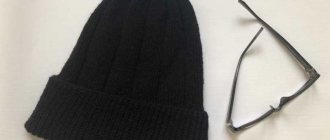
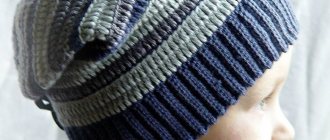
Spectacular snood made of gray yarn
For knitting you will need:
- Knitting needles No. 8 circular;
- 3 skeins of Adriafl Scozia yarn. Its composition: 60% wool, 20% viscose, 20% polyamide. There are 62 meters of thread in 50 grams of yarn;
- Pin for marking the start of knitting.
This pattern is knitted simply and quickly, because its pattern consists only of knit and purl stitches. The height of the finished snood will be 31 cm and the width will be 60 cm.
Knitting density: square 18x18 loops = 15x10 cm.
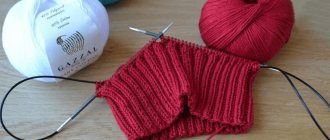
Let's get started:
- We cast on 72 loops on the knitting needles, purl 1 row, connect the last and first loops into a ring, mark the beginning of the row with a pin. We knit the next 2 rows with a 1x1 elastic band.
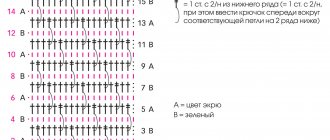
- We begin to knit the pattern according to the pattern. The repeat of the pattern is 18 loops; we repeat it 4 times over the course of one row. Please note that both odd and even rows are knitted according to the pattern!
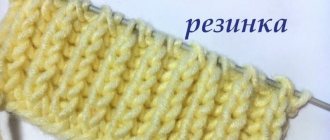
This is how the pattern turns out:
- We knit 54 rows in height. After this stage, the product should reach 30 cm. We finish knitting with 2 rows of 1x1 elastic, then close the loops, trying not to pull the thread too much.
Plaid hood
An absolutely wonderful idea. Yes, this is not a headdress, however, for long walks in the forest, when you want to sit on a tree stump and watch the birds frolicking by the lake, for park weekends, when the children don’t want to leave the playground, and you just have to sit on a bench in waiting for the end of important games, such a blanket is irreplaceable. Beautiful, stylish and very warm. And with a hood!
How to knit a blanket hood - diagram from gina-michele
Knitting a women's bonnet from mohair
Among Russian traditional headdresses, the kapor is presented in the form of a warm cap that extends into a wide mantle. Any home needlewoman can knit such a magnificent model with knitting needles with a detailed description.
The work scheme is presented in the form of parts that smoothly transform into each other. Knitting progress in the following several points:
- Using knitting needles No. 3, cast on 31 sts from a skein of chocolate fluffy yarn (consumption 400 g). We knit openwork strip A according to the presented pattern, where the circle is a yarn over, the triangle is 2 stitches, along with a slope to the left or right side. The length of the transverse strip is 110 cm. Advice! To ensure that the frill along the bottom edge has pointed ends, you can start with 3 stitches and increase the fabric to the desired width, adding 2 stitches in each face. R. The second pointed end is made by decreasing the loops.
- From the edge of the frill we cast on 180 stitches and knit strip B with garter stitch.
- In the next front row. decrease every 3 stitches by 2 together. Thus, we reduce the width of the canvas 2 more times. The width of part B is 5 cm.
- Next we move on to the dense neck part of the hood. We knit 2 stitches, 2 crossed stitches. It turns out a beautiful elastic band (part B) 5 cm wide. For beginners! Crossed knits are knitted like this, first the second knit behind the front wall, then the first - behind the back wall, both are removed on the right needle!
- The upper part of the hood (part D) is knitted with even stitches added to the sides. There should be a total of 90 stitches and the height of the fabric should be 17 cm.
- Next, the part is divided into 3 parts, the central 30 stitches are highlighted. They are knitted back and forth, grabbing the outer loops 2 together. Important! To understand how the upper part of the hood decreases, it is enough to remember knitting the heel of the toe. The central loops are knitted in the forward and reverse directions, with the last loop being knitted 2 together with the first loop of the outer part.
- When the main part of the hood is ready, all that remains is to decorate the lapel with an additional frill. The knitting pattern for the openwork part is represented by diagonal tracks, where the circles are yarn overs, and the triangles are 2, along with a tilt to the left. The width of the frill is approximately 20-25 cm, length 100-110 cm. Scheme 2 and 3.
- The edges of all parts can be beautifully decorated with a contrasting thread to emphasize the airiness and grace of the headdress. Crochet according to the pattern or decorate with a knitted frill; if desired, use ready-made lace and ribbons.
- As a fastener, you can use the frill ears and tie them with a knot, or skip the braid and decorate the ties with a beautiful bow.
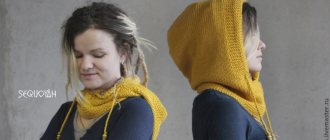
Hood with scarf
A hood that seems like you could even live in - it’s so cozy and cool, beautiful and comfortable. A long scarf is something you can happily wrap yourself in, something that warms you and gives you a feeling of security, that simply looks stylish and adds a “zest” to any look. Be sure to stock up on enough yarn - this scarf must be long, very, very long!
How to knit a hooded hat with a scarf - pattern from gina-michele
Types of bibs
Knitted. They are a woolen wardrobe element that perform an important function. They are used instead of a scarf to keep the neck covered and warm in cold weather. You can often see such an element on young mothers, since they do not have much time when getting ready to go out.
Made from fleece and velvet. The main difference from knitted bibs is the material and the fact that some models can be connected to a hood. In this case, the top will look like a sweatshirt or bomber jacket.
With clasp. Such shirtfronts are not one-piece, unlike other models. They usually have a clasp at the back, which is very convenient.
Dickies that look like a scarf-collar. Models of this type are very voluminous; they do not lie flat on the shoulders.
Modesty. Usually they are worn not on some element of the wardrobe, but on the naked body.
Chemisette. The most elongated of all types, it can cover the back and arms. Some models may have a length below the middle of the torso.
Knitted shirtfronts are especially popular because they look very feminine and elegant, and also keep you warm. Many needlewomen do not want to buy such an accessory, but prefer to make it with their own hands.
You can find many articles on the Internet about how to knit a shirtfront with knitting needles, so you won’t have any difficulties finding the necessary information.
Note!
Knitted raglan - step-by-step instructions, patterns, recommendations. Photo review of the best works and new products from craftswomen
Knitting a shawl - step-by-step instructions for making a shawl with your own hands. Tips for beginners on knitting + photo reviews
Amigurumi ring ⭕: features of the amigurumi technique. Step-by-step DIY master class with simple knitting patterns + 180 photos