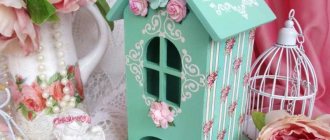
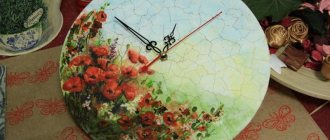
Features of decoupage for metal
Working with metal is one of the most exciting things. This section presents lessons on metal decoupage for both beginners and already practicing craftsmen. You can create beautiful interior details with your own hands. Step-by-step master classes with photos will help you decorate a box, watering can or other item yourself.
General rules for decoupage for metal
- If there is rust on the workpiece, it must be removed. It may be necessary to remove corrosion in several stages. If this is not done, the image will soon begin to peel off.
- Before starting work, be sure to sand the product. An exception can only be made for polished surfaces, such as stainless steel.
- The surface must be degreased. You can use regular alcohol for this purpose.
- The product must be primed. There is a special primer for metal.
- If the item is expected to heat up (for example, a kettle, lamp), then only heat-resistant paints and varnishes should be used.
- Motifs can be glued to urethane varnish. In this case, the decor will adhere well to a smooth surface.
- When you need to complete a drawing or create a background, prepare the primer by mixing rust enamel with gouache or acrylic paints.
- To achieve a strong decor, you don’t need to use water-based products. It should be remembered that such coatings have a slightly yellow tint. This is especially good for vintage items. If such an effect is not needed, you should not apply several layers of varnish at the final stage.
- Alkyd-urethane varnishes spread and level well, so there will be no drips or streaks.
You can purchase all the necessary materials for metal decoupage in our online store.
For the work I needed the following materials and tools:
- zero sandpaper
- acrylic primer
- acrylic paint white
- acrylic paint blue/blue
- napkins
- PVA glue
- construction brush for paint and brush for glue
- acrylic lacquer
More details about the materials I use were described in the master class Decoupage of a Bread Box.
The whole process took place in the kitchen:
All materials were purchased from the construction department, except for the napkin. I got the napkin through an exchange of decoupage napkins (all the details here) from Irina Onofriychuk, who is also famous for her excellent ability to embroider pictures with beads. In general, an ordinary “decoupage” set, nothing supernatural.
Features of decoupage on iron and aluminum dishes
After viewing our master classes, you will be able to perform decoupage on aluminum products with your own hands. Many people have a metal watering can from Ikea that can be quickly and effectively decorated. The use of technology involves several successive stages:
- sanding;
- degreasing;
- applying primer;
- gluing the pattern to the surface;
- background application and drawing;
- sanding;
- applying the finishing coat.
Using step-by-step instructions for metal decoupage for beginners, anyone will be able to create an interesting and beautiful product.
If you have to work with painted metal: cookie or tea boxes, trays, thermoses, tin jars for spices, the paint can be applied not with a brush, but with a swab or foam sponge. To transform the product, it is worth completely painting over the old coating. At the same time, you need to not overdo it and avoid drips from excess paint. After the first layer has dried, apply the second.
We have a range of master classes on our website so that you can try yourself in various metal decorating techniques. We sell all materials necessary for work at reasonable prices, and provide advice from qualified specialists. With us you will not go wrong in choosing paints, glue, decoupage paper.
Abstract “Decoupage boxes” for participation in the competition “Golden Hands 2018”
Municipal government educational institution of additional education, house of children's creativity of the municipal formation Yeisk district of the village of Kamyshevatskaya
Master Class
"Decoupage boxes"
Additional education teacher: Krivonogova Elena Nikolaevna
Year of development - 2021
Master class summary
Topic: “Decoupage boxes”
Teacher: Krivonogova Elena Nikolaevna
Relevance of the topic:
In this master class lesson I will tell you and show you how to make such an original box. This interior box will become your favorite place to store household items. Working using the Decoupage technique is not only spectacular, but also incredibly easy to do.
Target audience: students
Target:
Mastery of the basics of decorating various objects, development and formation of self-expression abilities.
Tasks:
Educational-
Introduce the Decoupage technique.
Developmental-
Develop imagination and artistic taste, broaden your horizons.
Educational-
To cultivate aesthetic taste and a sense of beauty.
Expected results of the master class:
Students can independently decorate shoe boxes with napkins. The resulting original box can be safely used in the interior of your home or as a gift to family and friends.
Methodological equipment
: interactive whiteboard, projector, personal computer, lesson notes, visual material.
Methods:
interactive (verbal, visual, practical).
Techniques:
story, demonstration of practical actions.
Using visuals:
sample of finished work,
Materials, equipment, tools: shoe box, scissors, PVA glue.
Progress of the master class
1. Introductory part.
Good afternoon. Today we will learn and independently do the work of decorating a shoe box. I will introduce you to the “Decoupage” technique.
2. Theoretical part.
Decoupage is a fascinating and uncomplicated activity that has many techniques and is accessible to even the youngest craftsmen and craftswomen. With its help, you can make exclusive interior items that will decorate your home and become a gift for family and friends. Old furniture, dishes, shoe boxes and many other things will find new life in your home. Using this technique you can decorate books, dishes, flower pots, bottles, furniture, and photo frames. In general, literally everything that is in your home. Don't worry that things won't work out, it's actually very simple.
Pictures can be used from special decoupage cards and napkins. In addition, drawings on fabric, old newspapers, and magazine clippings are used for this purpose.
First of all, let's understand the definitions.
Decoupage is gluing a design onto a surface. The picture can be placed on wood, leather, fabric, cardboard, glass and almost any other product.
Reverse decoupage is the same process, but has only one feature - the picture is glued under the material. This application can only be done on transparent surfaces: glass and plastic. Of course, in this case the picture is pasted face up.
Next, I introduce students to the tools for work.
You can use regular nail scissors or a special tool that is sold in craft stores. The main thing is that the edges of the blades are very sharp. This is the only way to carefully cut out the desired image on a thin napkin.
You will need flat soft brushes. The pile in them should be tightly fixed. Lost lint can be a serious problem. It is better to have several brushes of different widths for smoothing and applying glue and varnish.
It is best to use regular household PVA. You can buy a specialized composition, but it will cost more.
Among varnishes, it is better to give preference to acrylic. It does not emit toxic substances and is easy to use.
To decorate your work, you may need acrylic-based paints, sponges, primer, sandpaper, and craquelure.
3. Practical part.
I provide safety instructions, showing methodological and technological techniques for gluing a napkin to the surface of a box. The participants of the lesson begin, under the guidance of the teacher, to decorate the box.
Technological map for decorating shoe boxes using the Decoupage technique.
1
Surface preparation
The corners of the box need to be strengthened with pieces of masking adhesive tape, and then the surface should be primed with acrylic primer or paint. After drying, the primer should be lightly sanded with fine sandpaper. You may need to repeat the procedure if the layer does not lie flat enough. Then you need to paint the box with the color chosen for the background.
2
Drawing
The place for the drawing is covered with decoupage glue or PVA glue. After the layer has completely dried, a pattern is placed on top and smoothed with a hot iron through a sheet of paper. Afterwards the napkin is covered with a thin layer of varnish. A layer that is too thick will cause the design to become blistered. This procedure is repeated over the entire surface of the box.
3
Decoration and finishing
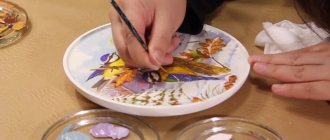
Using a foam sponge, apply background paint and other shades to match the image. Small details are drawn with a brush. To add some casualness, you can squirt white paint on top using the bristles of a toothbrush. Afterwards the final varnish coating is applied.
4. Commentary part:
I explain those elements of my work that are most important and original; I provide consultations, provide theoretical and practical explanations, and provide individual assistance to students to ensure high-quality completion of the assignment.
5. The culmination of the creative process.
Exhibition of works, photographs of the works of all participants in the lesson.
6. Reflection.
Participants exchange experiences and engage in self-assessment.
7. Summing up.
I summarize the results, recommend literature, Internet sites for additional information on this issue, and inform where you can purchase materials and tools for work.
8. References:
S. Yucel. Decoupage is the most complete encyclopedia.
Anne Pieper.Decoupage. Napkin technology.
9.Internet resources: Development taken 20% from the Internet
Decoupage of boxes. Tips and tricks for bringing creative ideas to life
A shoebox is a practical and useless
simultaneously.
You can store not only shoes in it, but also other items : combs, brooches, hairpins, papers, chargers. Knowledge of decoupage technology will allow you to bring to the fore not only practical qualities, but also aesthetic ones. The main thing is to follow the instructions
. With the help of our tips and recommendations, we will help you create truly creative and memorable objects of decorative art.
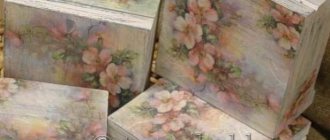
Decoupage of cardboard boxes of different sizes in the same color scheme and in the same style is the best option
for a classic interior. And boxes with different stylistic solutions will fit perfectly into the decor of a children's room, hallway and dressing room.
The master class on decoupage of a cardboard box includes a rather complex set of works. You will need items such as:
- High quality shoe box;
- Three-layer napkins with a pattern;
- Glue for decoupage;
- Good sponge;
- Acrylic lacquer;
- A hard brush for gluing and a soft brush for varnishing.
Remember that when choosing napkins you should pay attention to the size of the box
. For a large box - a large drawing. And for a little one - small.
Decoupage a box of napkins includes the following steps :
- If the box has a glossy surface, then the gloss should be removed with sandpaper. Ordinary cardboard does not require any extra steps;
- Cover the outside of the box with acrylic paint using a sponge. Do not forget that the paint must dry well;
- At the third stage, glue the napkin using a brush. Use only the top colorful layer of the napkin
. Be sure to glue from the edge; - Fragments of the picture need to be glued both to the lid and to the sides of the box. After the fragments are glued, give the box time to dry;
- We fix the design with acrylic varnish, which should be applied in several layers. Glossy acrylic varnish will make the product shiny
, and matte will make the product “vintage”; - Carefully calculate the layers of varnish. After applying the next layer and drying, be sure to check whether the box closes well;
- Don't forget to decorate the inside of the box using napkins or acrylic paint. Experienced craftsmen install special dividers inside the product for maximum ergonomics
.
Another useless item at first glance is a tea box.
. With a skillful approach, you can decorate it too. To decoupage a tea box, you will need the following tools:
- PVA glue;
- Wooden blank box for tea bags;
- Toothpick;
- White acrylic paint;
- Brush;
- Sponge;
- White acrylic paint;
- Brush;
- Outline for decoupage;
- Sponge;
- Decoupage varnish;
- Napkins for decoupage;
- File;
- Scissors.
First stage - finishing
. For painting, use regular white paint, which can be purchased at any hardware store. You can use a sponge as a brush. With its help, the painting will be more even, and the work process itself will go much faster.
We carefully paint the surface of the product. After painting we wait a while. When the workpiece dries, paint the bottom of the box. After this, we wait until the product dries completely.
The next stage is decorating the lid with eggshells
. The shell should be thoroughly washed and the inner film removed from it. Otherwise, problems may arise with gluing. The shells should be dried on a towel or dry cloth.
Next, apply PVA glue to the surface of the product. After this, carefully glue the shell. A toothpick will help you even out the elements. Remember that each particle must be located separately from each other.
Then select the appropriate fragment
in a decoupage napkin. Carefully cut it out or tear it off and cover it with glue. Using a brush, carefully remove air bubbles from under the napkin, drawing cracks between the shells. But don't overdo it. Otherwise, you risk tearing the napkin.
The walls of the box should be covered with the cut file. Take a torn fragment of a napkin. It should be placed face down on the file. Then carefully spray it with water from a spray bottle so that it is not completely wet. We cover the bottom of the box with PVC glue and glue the fragment of napkin we have using a file. We glue the other sides of the product in the same way. We wait for the box to dry and prepare the acrylic varnish and outline. We cover the product with the first layer of special acrylic varnish for decoupage and let the box dry again. After complete drying, coat the box with a second layer of varnish. Then we apply the outline and let the product dry completely.
If the decoupage of the box is done correctly, then in the end you will get the result - an aesthetic and inspired piece of furniture
. You can give a small masterpiece of art, made with your own hands, to a loved one. He will definitely appreciate it!
Decoupage of a tin can for sweets
If you have a metal candy jar lying around , don’t rush to throw it away, try updating it with your own hands using the decoupage technique. I'm sure there will be a worthy use for such a cute little thing. For example, you can store bobbins for a sewing machine or beads for needlework in it. Or you can use it for its intended purpose - for sweets, if you want to take them with you to work, such a jar will take up very little space in your purse. Master class from Milena.
Decoupage tin can
Materials and tools:
- metal jar,
- window cleaner,
- sandpaper No. 100, No. 400,
- latex putty,
- putty knife,
- napkin,
- primer – white rust enamel,
- brushes and foam sponges,
- office file,
- decoupage glue,
- glossy acrylic varnish,
- titanium white,
- red acrylic paint,
- cosmetic sponges (triangular shape),
- gold acrylic paint,
- yellow acrylic paint.
Procedure: I found a very old metal jar, worn in places, bent in places and quite peeling. I'll try to make something decent out of it. First, the jar needs to be rinsed and dried thoroughly, then degreased by wiping with an alcohol-containing product (I used window cleaner).
Now you need to remove all the old paint using coarse sandpaper (no. 100). The bottom part of the jar, on which there was no paint, also needs to be sanded.
All dents need to be filled with putty, level the surface with a spatula and dry.
When the putty is completely dry, cover the jar with primer - rust enamel. I applied the first layer of enamel with a brush. Dry the first layer. Enamel primer takes much longer to dry than water-based acrylic primer; it will take 6–7 hours for the jar to dry completely.
After this, treat the surface with finer sandpaper (No. 400), it will even out small irregularities.
Apply the second layer of primer-enamel not with a brush, but with a piece of foam sponge. To avoid getting your hands dirty, hold the sponge not with your hands, but with a clothespin or a paper clip.
Leave the jar to dry again for 7 - 8 hours. Then polish the surface again with polishing paper. Don't forget to also paint the inside of the jar.
The next stage of our work will be gluing the napkin. I chose a cupcake motif on a soft creamy, slightly pinkish background.
Cut the napkin to the shape of the lid. Peel off the top ink layer of the napkin. Don’t throw away the bottom two layers, they will come in handy later.
Place the napkin face down on the file and pour water over it. In the water, the napkin will wrinkle and begin to bubble; carefully touching the edges of the napkin, stretch it, trying to smooth out the wrinkles.
Using a brush with a beveled edge, smooth the napkin from the center to the edges, expelling air bubbles from under the napkin. When the napkin is nice and flat, fold the napkin and drain the excess water from the file.
Pass the dry cloth (those two layers that you separated) over the damp cloth with blotting movements, and all remaining small air bubbles will disappear.
Turn the file over and place the napkin on the lid of the jar. Without removing the file, use a spatula from the center to the edges, driving out any remaining bubbles, smoothing out any remaining wrinkles and ensuring that the napkin adheres well to the jar.
Cover the napkin with decoupage glue and dry.
When the glue dries, polish the surface with fine sandpaper and coat it with glossy acrylic varnish.
When the varnish has dried well, polish the surface again with fine sandpaper, and walk along the edge with stiffer sandpaper, tearing off the protruding edges of the napkin.
Since the background of the napkin is not white, but cream, the entire jar will have to be painted the same color. To find the right shade, I mixed titanium white with a drop of red acrylic paint.
Apply the paint with a soft cosmetic sponge, carefully working around the design. Paint the jar in as many layers as needed so that the background of the jar completely blends with the background of the design on the napkin. After each paint job (I had three coats), be sure to polish the surface with fine sandpaper.
To draw peas, mix gold paint with yellow, achieving a complete match with the paint used to paint the peas on the napkin.
Draw peas with any available tool. I used a manicure tool that makes dots on your nails.
Dry the paint and coat the jar on all sides with several layers of glossy acrylic varnish, drying it each time and polishing the surface. I ended up with at least five layers of varnish. Well, the jar updated using decoupage is ready. It's impossible to recognize her!
It’s not a shame to even give such a jar as a gift!
In order not to forget the page address and share with friends, add to your social networks:
More interesting:
Tags: Crafts for home, Gift wrapping