Which material to choose
Among the huge assortment of beads offered by manufacturers, there are products of very different quality. Some types are characterized by high strength of plastic or glass, color fastness and, most importantly, the same shape and size of all elements. Their price is quite high, but many craftswomen recognize it as justified.
Other types are uneven and unequal beads, the cost of which is significantly lower. However, their use for the manufacture of products with clear contours is not recommended. Such items are usually based on geometrically regular shapes, and a certain number of beads are required to weave them. Using dissimilar elements will make it impossible to create clear lines and silhouettes.
Crocheting with beads in a spiral falls precisely into the category of work for which compliance with the specified parameters is extremely important. It is impossible to allow the diameter of the rope to be uneven and the pattern to be distorted, so the optimal choice is Czech calibrated beads. The size can vary, for example 8/0 fits very well. This parameter indicates how many beads strung on a thread are one centimeter long.
Directly crocheting will require the use of strong cotton thread (iris or other thin mercerized cotton) and a No. 1 or No. 1.5 hook.
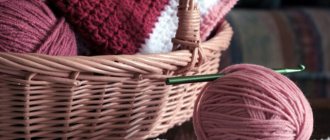
Bead set
In order to make a rope, you need to string beads onto a thread. For training, 30-40 centimeters may be enough, but to create full-fledged products, the length of the thread for casting must be calculated. The bead size indicated on the package helps with this. For example, to make a rope 50 cm long from 8\0 beads, you need to put beads on a thread 50x8 = 400 cm long.
If you work on a monochromatic product, there will be no difficulties with the set. However, if crocheting with beads is used to make a braid with an ornament, the correct set is of decisive importance for the successful implementation of the craftswoman’s ideas.
The sequence of stringed beads is recognized by special patterns. Compliance with them guarantees the formation of the planned pattern.
Secrets of easy typing
Threading a relatively thick knitting thread into the narrow eye of a beading needle is quite problematic. There are two ways to solve this issue:
- Thread both ends of a small piece of thin fishing line into the eye of the needle, leaving a loop on the other side. You should thread a crochet thread into this loop, and then pull the fishing line through the eye along with the thread folded in half and then continue crocheting with beads according to the pattern. If this method does not work, you should use the next one.
- Tie the end of the crochet thread to the end of a very thin thread or fishing line. However, you should tie it in such a way that the knot is formed only with a thin thread, otherwise it will not fit into the eye. Also effective is the method of forming loops from both threads, as shown in the figure.
By stringing beads on a thin thread, it can be easily moved to a thicker one.
Further instructions for creating a rope of beads will be illustrated in a knitting master class.
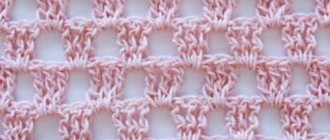
Knitting straight fabric
Russian and English methods
If you decide to learn how to knit with beads in order to make unique bags, phone cases, handbags, etc., first of all you need to learn how to knit the product in parts. In this type of work, different methods of knitting with beads using straight fabric are used. This master class in its first part will tell you about the “Russian” and “English” method, which is based on crocheting with beads. In addition to a step-by-step description of the process, watch a video that clearly demonstrates this technique.
So, first of all, we will learn how to knit straight fabric using stitches. In order to start the master class, prepare the following materials and tools that we will need during the work process:
- beads number 10;
- threads No. 20 (you can use sewing threads from lavsan No. 40 in several folds);
- crochet hook measuring 1.5 - 2.5 millimeters.
We begin to weave a row with air loops, without using beads. We knit a chain of a certain length and start knitting single crochets on it, as in the photo:
Next, we knit an air loop to lift it to the next line and unfold the knitting. We proceed to knitting columns with beads in all loops in the previous row, starting with the initial one. You need to first pull out the loop of the upcoming column and, moving the beads, knit it until the end of the row. You can see how this bead knitting happens in a photo or video.
The next line begins in the same way by knitting an air loop for lifting, without using beads. After that, you need to turn the knitting over to the front side.
Next, in the master class we will demonstrate how the following action diagrams look in the photo. You need to move the bead and grab the thread:
Pull the loop from the front side to the wrong side and knit two loops that are on the hook.
The next column needs to be knitted in a similar way. Let's use a hook and insert it from the wrong side. We move one bead from the bottom to the knitting process. Now, you need to pull the loop from the front to the wrong side and knit a column.
Thus, we continue the master class and crocheting with beads until the end of the row in all the loops of the previous one.
Read
Training master class on weaving a horse from beads
As a result, we get a column knitted using the Russian method, only on the wrong side. First, the bead is moved in, after which a loop of a new column is pulled out, which is subsequently knitted with a loop that is already on the hook. Because of this, on the right side of the knitting it looks similar to the English beading method.
The next line is knitted similarly to the first one using beads.
At the beginning there is an air loop for lifting without the use of beads. After that, bead knitting continues. In all the loops in the previous row, we knit columns with beads using the English method, in the usual way. Let's see how these actions look in the photo.
The fourth line is knitted similarly to the second with beads and so on. It turns out that one of the rows is knitted using the English method, and the next one is crocheted by introducing it from the inside out using the Russian method. According to this scheme of actions, we get the front side of a knitted product, which resembles English knitting.
We resume the process of weaving the product. Now, you need to knit an air loop to lift it to the next row. Columns are knitted with beads in all loops in the previous row from the very first using the Russian technique. To do this, at the initial stage, you need to move one piece of beads, pull out the loop of a new column and knit a column. Let's look at the photo to see how this stage goes:
Thus, we continue knitting with beads until the end of the row.
The next line begins in the air loop for lifting without beads. After that, the knitting must be turned over to the front side and the hook must be inserted into the initial loop of the previous line from the wrong side.
The next step is to grab the thread and pull the loop from the face to the back. Now you need to move the bead and knit the two elements that are on the hook.
Crochet the next column with beads in the same way.
Read
Original crafts made from beads for March 8
The hook is inserted from the wrong side, after which the loop is pulled out. Now, you need to move the bead and knit a column.
According to this scheme of actions, we continue knitting with beads in all the loops of the previous line.
As a result, we get a column that is knitted using the English method, only on the wrong side. At the first stage, you need to pull out the loop for the next column. And then move the beads and knit two elements together. According to this scheme of actions, the front side of the knitting is similar to the Russian method.
The next line is knitted again using the Russian technique. We make an air element for lifting without beads.
Following this, we unfold the product and continue knitting stitches with beads in all elements of the previous line, using the Russian method. Photos illustrate the described process:
Next comes a series of knitting using the English method, by introducing a hook from the wrong side and so on.
We get an alternating alternation of rows using the usual Russian method and the English method - introducing a hook from the inside out. The front side of the knitting looks like a fabric woven using the Russian technique.
Tunisian technique
The next master class will show you another process - Tunisian knitting with beads.
Set of beads on a string
We take a beading needle and thread a thin nylon thread into it, on which a knot is tied. We get a loop from the thread on the needle. We thread a knitting thread into this element. We begin to thread the beads onto the needle, which are subsequently moved to the nylon loop and then onto the knitting thread.
Step-by-step knitting process
Let's start the master class. Knitting is carried out with threads No. 10, beads of 2.5 millimeters and a special crochet hook (it’s called Tunisian) with No. 2 (or 2 millimeters). If you do not have such a tool, knit a narrow-shaped product (twenty loops wide) using a short hook. Such a hook should have equal thickness over the entire surface (it should neither expand nor contract anywhere).
We carry out a set of beads on a thread for knitting from the left side to the right, according to the diagram, from the row that is at the top. Each line is strung from the left to the right side.
The process begins from a row with air loops. The diagram shows nine cells, so we need to knit nine air elements. Nine are knitted with beads, and the remaining one is knitted without them for lifting as you start each of the reverse rows.
The hook is inserted into the air element of the chain (through one on the left side of the final air loop located on the tool). Next, you need to grab the thread and pull the loop onto the hook. The next step is to insert the hook into the next air element. Similar actions are repeated until the end of the row. We have a line of loops on the hook.
Read
Step-by-step master class on how to weave lilies of the valley from beads
At the beginning of each of the reverse rows, it is necessary to grab the thread and pull it into one element on the hook. After this, you need to grab the thread and pull it through two elements on the hook. We repeat these steps until the row ends. At the end of the row, the remaining element will become the starting element in the next row.
Having knitted the reverse row, it is necessary to knit from the right side to the left with elongated elements (similar to knitting it from a chain with air loops). The hook passes from the right side to the left under the element in a vertical position.
Next, the master class begins knitting with beads. We knit the initial element in the reverse row without beads and only in a single loop on the hook; it is not taken into account in the bead pattern report.
The thread needs to be grabbed behind the bead and pulled into the two elements on the hook. We repeat these steps until the row is completed.
We continue knitting from the right to the left side and pull out a row of loops onto the tool without beads. The next row of the reverse type is knitted with beads from the left to the right side. The knitted fabric is placed with the wrong side facing us, and the beads lie on the front part.
The ending line can often move away from the product, therefore, at the end of the process, such a row is knitted without the use of beads.
The master class on Tunisian knitting is completed. As a result, you should have the following blank:
Having learned such an interesting needlework as knitting with beads. You can create beautiful and unique products with your own hands.
At the end of this lesson, visual videos on knitting with beads will help you visually study this interesting process. The process of knitting using beads, beads, using a hook or knitting needles requires endurance, perseverance and diligence from the craftswomen. This will require the ability to work with several techniques simultaneously. But, having spent some time on this, the resulting product will delight both you and those around you. You can find confirmation of this on the World Wide Web, where craftswomen around the world share their knowledge and skills. Therefore, improve yourself, study new technologies and methods to create your future original masterpieces.
First row education
In general, knitting a rope is the same as simple knitting in the round with single crochets or half crochets. Only here you need to pick up the bead and knit each column so that it remains outside the strand.
First of all, you need to make the first air loop and fix it on the hook, then you should move the bead to the hook and for the next air loop, grab the thread behind the bead. In this way, the number of air loops required to form one row is collected; this number is usually indicated in the upper right corner of the diagram.
For example, you need six loops, the seventh is made without beads, the hook is placed under the thread of the first loop and the chain is closed into a ring with a half-column.
We tie a bead in the shape of a flower: video master class
Two-color harness
The knitting principle repeats the standard version in increases and decreases. An explanation for switching to a different color of yarn requires special attention. In the amigurumi technique, this problem can create a very unsightly step in the transition.
Having knitted the required number of rows with yarn of color No. 1, remove the hook from the working stitch. We thread it through the loop of the previous row. and then back to the working area. Through these two loops we pull a thread of color No. 2.
We continue to work StBN. If you intend to use yarn No. 1 again in the work, then it must be moved before knitting.
This is how we get neat transitions when changing the color of yarn for knitting StBN.
Striped harness
We cast on 4 VP yarn No. 1, close them in a ring StBN. Remove the hook from the loop.
Using yarn No. 2 we knit 2 stitches. from the resulting ring. We knit them like stbn. So we continue - we knit 2 Stbn in each stitch. We knit through the front walls of the loops.
Having reached the stitch from yarn No. 1, we change the color of the threads and continue the algorithm.
We tie it to the required diameter and do a fitting.
From the next row we begin to decrease. We knit 3 stitches, skip one, in the next row we knit two stitches, skip one, then knit 1 stitch, skip one. Finally, we stretch 1 p. in another, cut the thread, pull it through the remaining sts and tighten. We secure the end and hide the tail.
Crochet with beads a rope of the required length
Further work consists of sequentially performing single crochets with pulling up and fixing each bead. It is important to respect the specified number of stitches in a row (in this case six), as well as the distribution of colors. If an error is found, the crochet should be undone until everything matches the pattern and re-knitted.
Important advice: when forming single crochet stitches, the hook should be placed behind the inner “pigtail” of the previous stitch. In this case, the thread is in front of the bead, that is, knitting occurs in the inner surface of the strand, and the beads should remain outside.
If all actions are performed correctly, the beads should turn with their holes facing up. They turn when knitting the next row, so when examining the strand you can notice that the beads of the last row are turned with their holes to the side. This will change when their series becomes the basis for the next one.
The result is a tourniquet like this.
Options for using colored beads
To get a beautiful rope with a gradient color transition, craftswomen use a very simple method: they use transparent beads and melange thread.
Making ornaments of any degree of complexity becomes possible if you master basic crocheting with beads. Many interesting patterns include two or more contrasting bead colors.
You can experiment not only with color, but also with the texture of the material. The use of beads of different sizes allows you to obtain a voluminous, relief ornament.
The so-called “blind” set is known, in which beads of different colors are mixed on a thread. The finished strand comes out variegated or melange, depending on the contrast of the materials used.
The described master class on crocheting harnesses is universal. This is the basis for the formation of any colored or plain product.
Knitting technique with beads “Russian way”
I think bead knitting lessons will first introduce you to the crochet process. In order to more clearly explain to beginners how to knit correctly, I chose for a sample knitting a rope, which can be used as a cover for a pen, a hook, or as a woman’s jewelry in the form of a bracelet or necklace.
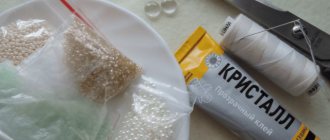
Material for work
In the process of exciting creative work, we will need the following material:
- Crochet hook, size 1.75 mm.
- Cotton yarn.
- Beads of the desired color.
- Colorless nail polish.
- Scissors.
Having prepared everything you need, let's start doing interesting work.