Hooray! Hooray! Hooray! Despite the snow outside the window, it already feels like spring outside. The sun is shining and the soul rejoices! I want to create!
We love spring: it gives so much inspiration! Flowers, butterflies, rainbows: so many colors!
We have combined all our ideas for spring crafts in this article so that it is convenient for you to choose an interesting master class for yourself and your children. Watch our master classes on plasticine printing, make spring applications from colored paper (or from homemade paper, as we like to do).
In the spring, wonderful holidays await us: March 8, Cosmonautics Day, Easter, May 1, Victory Day. Let's fill the holidays with creativity, give beautiful cards and make homemade gifts to family and friends. We will show you what children's crafts to make in March, April and May.
Check out our ideas for plasticine painting for creative clubs and for kindergarten. Plasticine is a material that helps children develop fine motor skills and will be of interest to younger schoolchildren. Do you know that even many adults are fond of creating pictures from plasticine?
Get inspired, create and may you have a great spring mood!
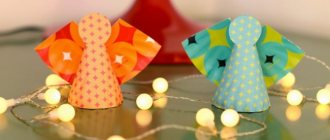
Origami
Working with paper and cardboard is simple and fast. Let's look at a few ideas for crafts made from paper and cardboard.
"Nest with Birds"
A simple applique that you can make for your baby. The result is real spring work. It is necessary to prepare colored and corrugated paper, thin cardboard, a small piece of fur, glue and plastic eyes.
Next, we mark the trunk and branches on brown paper, and cut out oval-shaped leaves from green paper. Draw a circle onto the cardboard and cut it in half. We make a nest from one half: we cover the side with narrow strips of corrugated paper.
We cut fur rectangles measuring 3*4 cm, sew them on three sides - these fluffy lumps will be birds. We attach eyes to the birds and cut out triangles - beaks - from yellow paper. We glue a tree with a nest to the cardboard and put the birds there. Ready!
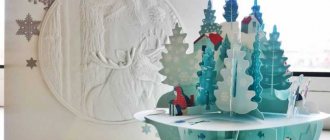
Butterflies 3D
These butterflies can be made using paper and a toilet paper roll. The body of the butterfly will be made from a sleeve, so the craft will be made in volumetric form.
For this idea, it is better to use self-adhesive paper, which you will use to cover the “body” and wings made of cardboard; we use buttons, beads, ribbons, etc. as decoration.
It’s better to use hot glue, but if you share the work with your child, then use regular PVA.
Bouquets made from paper cupcake tins
Don't want to fuss a lot? Use muffin tins, colored paper or even foil. They can be glued onto colored cardboard, and stems can be attached from colored paper - the bouquet is ready.
Cloud with rainbow
Completing this work will not require much effort at all. Cut out two identical clouds from white paper. We cut out seven strips from colored paper, preferably the same size.
Each stripe must match the color of the rainbow. We glue all the details of the “rainbow” to one cloud, then glue the second cloud to “hide” the base of the rainbow. Don't forget to draw a "face" for the cloud.
Crafts from paper rings
Does everyone remember about paper rings? Many adults personally “made” them in kindergarten and elementary school, since they used to decorate holidays with them.
Despite the fact that paper rings are no longer used, the technique is still “alive”. You can make voluminous flowers or a voluminous cloud from paper rings.
Bird mobiles
The base of the mobile will be an ordinary branch; it can be painted or left natural. We make birds from paper; they don’t have to be voluminous - it all depends on your own preferences and willingness to “join” the process.
We hang the birds from a branch on a fishing line, and it is better to attach the birds to the fishing line with double-sided tape or hot glue - it’s more reliable. You can add cotton wool clouds and also hang them like birds.
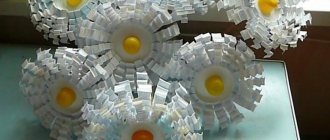
Volumetric flowers
For a child, a three-dimensional image made with his own hands is real creativity. It's not difficult to do this kind of work.
Happy Lawn
To make a lawn you will need:
- A4 sheet of cardboard for the composition base;
- colored paper;
- glue;
- scissors.
How to make a craft step by step:
- Fold a sheet of A4 green colored paper in half. At the bend points, cuts are made in increments of 2-2.5 cm. The cuts have different heights: near the edges - 5 cm, then the height decreases, closer to the center it will be 1 cm. The cuts are made mirror-like, conditionally dividing the sheet into 2 halves.
- Open the sheet, bend the slits inward - you get steps, they become flower stems.
- Cut the leaf with the lawn into the shape of a cloud and stick it on a sheet of cardboard to make the composition stable.
- Cut out flowers from red, yellow, blue paper and stick on the stems.
- Decorate the stems with leaves. To do this, cut out oblong parts 4-5 cm in length, bend them in half, and glue the bottom half onto the stem.
- Individual flowers are glued to the center of the lawn. For the stem, you need to cut a green strip, bend it like an accordion, and glue it to the base. Attach a flower to the top.
- You can add thin stripes of green to create grass and butterflies.
- The decoration of the composition will be a funny worm. It can be made by cutting out circles according to a template; you will need 15-20 pieces. They are bent in half and the bottom half is glued to the base, each next circle is glued close to the previous one. All that remains is to glue on the head with eyes and a cheerful mouth - the multi-colored lawn is ready.
Bouquet
Minimum materials required:
- a sheet of green double-sided paper;
- some colorful paper;
- toilet paper roll;
- glue.
The green leaf must be folded in half along its length, cuts made in 1 cm increments. The cuts do not reach the edge of the sheet by 5-7 cm. Then, without unfolding, the uncut edges of the sheet are glued together.
The toilet paper roll is shortened, its height should be 5-7 cm. A sheet of green paper is glued in a circle onto the roll - you get a grass tussock.
The final stage of work is to glue flowers onto the grass. These can be parts cut out of colored paper, pompons, beads. In the photo you can see the result.
Accordion bouquet
For a bright bouquet you need a sheet of green paper and some red or yellow colored paper. This is a very simple craft that every child can do, but it looks unusual and will decorate the table of a mother or grandmother.
Progress:
- Take a green leaf and fold it like an accordion along the short side of the leaf.
- Fold the resulting accordion in half and glue the side edges. This is not a fan, but a lawn.
- All that remains is to decorate it with flowers, these can be snowdrops or tulips made of paper, or fluffy roses made of pompoms.
Other volumetric color options
There are many ways to make voluminous flowers. Not much material is required:
- Cotton swabs (you need red ones). Sticks are stuck into the plasticine center in a circle, having previously cut off the cotton wool on one side. You will get bright flowers, they are attached to a tube-stem - and the bouquet can be placed in a vase.
- Quilling strips. It is necessary to wind several flowers according to templates, then they are attached to a dry branch.
- Yellow woolen threads are reformatted into dandelions - just make pompoms out of them.
- Wrap the candy in corrugated paper and secure it to a wire stem wrapped in green corrugated paper.
- If you take the top part (red, yellow, pink) of a plastic disposable spoon, you will get cute tulips. For 1 flower you will need 5 spoons; the handles glued together are wrapped in green corrugated paper. The leaves are fixed on top, the bouquet can be decorated with a ribbon or placed in a vase.
Homemade sun
Kids of any age will be able to make funny suns with their own hands. You will need cupcake or candy molds and long sushi sticks.
Progress:
- Cut out 3-5 suns of the same size from yellow paper, draw faces on them, decorate with beads, flowers, stickers.
- Cut out circles, 1-2 cm larger than the suns. Stick suns on them.
- Glue the circles onto flattened muffin tins or round candy wrappers.
- Secure the stick on the wrong side and cover it with another paper form.
Thematic composition
An excellent spring craft for kindergarten - a boat. You can also create a thematic composition: a boat sails along a spring stream.
How to make a boat? You can take a nut shell into which a toothpick-mast with a leaf-sail is attached with a piece of plasticine. You can also make a raft glued together from wine corks. Or make a ship out of paper.
A raft made from dry twigs (they are held together with glue or thread) looks good. You need to install a twig mast and a sail on the raft.
A scene is built on a sheet of cardboard (it can be framed):
- stream (made of plasticine, colored paper, small stones painted with blue paint);
- make flowers along the banks of the stream (colored paper and pasta will be useful);
- thin trees can be made from tubes;
- Another option is to place a jar with willow branches on the “shore”.
Such a craft will undoubtedly attract the attention of others, and the process of creating it will bring joy to children.
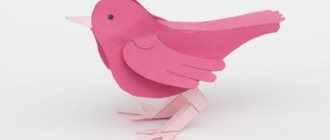
Symbol of spring
Birds are another indispensable symbol of spring. They can be made in various ways, using a variety of materials and techniques.
So, birds - DIY spring crafts for kindergarten. Each task takes 20-40 minutes, depending on the complexity and preparedness of the child.
Chicks
You will need pompoms and felt of the same color. You can take ready-made pompoms or make your own by twisting a thread onto a fork. Wings and a tail are cut out of felt and glued on. Eyes (ready-made or made from buttons, beads, paper) and a beak are added! You can also additionally glue the nest.
Birdhouse
This craft can be done in 2 ways:
- Cut out the parts of the bird's house according to the template, cut them out, then glue them together.
- Use a milk carton.
It is important to decorate the birdhouse. For this you will need buttons, stickers, colored paper. It is recommended to put a warm nest of branches or threads inside.
Another variant
Birds are cut out of paper or felt according to a template. A dry twig is painted or wrapped with thread. Birds are attached to the fishing line.
Chicks from scrap materials
The glove is tightly stuffed with padding polyester or synthetic padding. Each finger is tied in the middle with yellow thread. The upper part of each finger will become the head - eyes and beak are glued onto it.
The lower part is the body; wings can be glued to it from felt. The birds are placed in a small basket and secured with glue.
Important! All these crafts can be a wonderful gift for mothers and grandmothers on March 8th.
Easter crafts
Easter is a bright, joyful spring holiday, for which many kindergartens also create crafts.
The easiest option is a garland. Figures of hares and eggs are cut out of colored paper and attached to a thread.
Application "Egg"
On the base sheet, draw the outline of the egg and fill it; strips of colored paper or plasticine are suitable for this.
Panel "Easter Chick"
Cut the dense blue base leaf into the shape of an egg.
Draw the outline of the chicken and fill it in; different materials are suitable for this:
- rolled up small pieces of paper;
- plasticine balls;
- pom-poms;
- peas.
Felt crafts
Felt is quite often found in various ready-made craft kits intended for children. Quite a popular material has a wide variety of colors. You can cut out various animals from felt, and you can make them three-dimensional.
There are a huge number of variations; there are many video instructions on the Internet that explain in detail how to create a craft using felt.
Symbol of spring
Birds are another indispensable symbol of spring. They can be made in various ways, using a variety of materials and techniques.
So, birds - DIY spring crafts for kindergarten. Each task takes 20-40 minutes, depending on the complexity and preparedness of the child.
Chicks
You will need pompoms and felt of the same color. You can take ready-made pompoms or make your own by twisting a thread onto a fork. Wings and a tail are cut out of felt and glued on. Eyes (ready-made or made from buttons, beads, paper) and a beak are added! You can also additionally glue the nest.
Birdhouse
This craft can be done in 2 ways:
- Cut out the parts of the bird's house according to the template, cut them out, then glue them together.
- Use a milk carton.
It is important to decorate the birdhouse. For this you will need buttons, stickers, colored paper. It is recommended to put a warm nest of branches or threads inside.
Another variant
Birds are cut out of paper or felt according to a template. A dry twig is painted or wrapped with thread. Birds are attached to the fishing line.
Chicks from scrap materials
The glove is tightly stuffed with padding polyester or synthetic padding. Each finger is tied in the middle with yellow thread. The upper part of each finger will become the head - eyes and beak are glued onto it.
The lower part is the body; wings can be glued to it from felt. The birds are placed in a small basket and secured with glue.
Important! All these crafts can be a wonderful gift for mothers and grandmothers on March 8th.
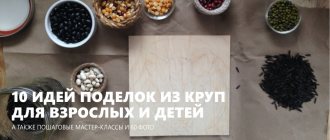
Crafts from cereals
We offer an original idea - a butterfly made from cereals. The work turns out bright and unusual. To make such a butterfly, you need to prepare thick cardboard, PVA glue, decor in the form of beads, rhinestones, beads, etc., cereals (millet, buckwheat and crushed corn).
You can draw a butterfly yourself, or you can use a template. If you are using a template, simply outline the butterfly design on the cardboard. Apply glue along the contour of the butterfly and fill them with buckwheat, also use decor in the form of rhinestones and beads.
We fill a distance of 3 centimeters from the contour along the inner part with millet. Then we draw the “buckwheat” strip again. We alternate twice more with millet. The “millet” part of the butterfly should be 9 cm, separated by “buckwheat” stripes. Then we cover everything with corn. The body of the butterfly can be decorated with decor.
Crafts from plasticine: panels
Often parents are asked to bring plasticine crafts on the theme “Spring”. So, is it possible to make a “spring” one? An excellent option would be to make a panel, it’s quick and easy. Making a panel with willow. You will need cardboard, colored plasticine, cotton wool.
Draw a willow branch on the cardboard with a pencil. Twist twigs from brown plasticine and stick to cardboard. Twist a willow bud from cotton wool, “wrap” it with brown plasticine at the bottom and attach it to the branches. Ready!
Crafts from buttons
Buttons can be used for a variety of purposes. Larger buttons can form part of a “picture” of flowers, and if you take a lot of colorful buttons, you can create a whole rainbow!
In general, in this case, imagination has no limits, the main thing is to simply choose buttons of the required size. And remember that this kind of work is suitable for children over three years old, since buttons are small parts that your child can easily swallow.
Easter motives
With Easter approaching, you can prepare many beautiful spring compositions with your own hands. Of course, it is important to help and advise your children during such periods. This fosters perseverance and the ability to finish what you start.
And children can make beautiful things associated with Easter Sunday as early as 4 years of age. For example, do
Crafts made from natural materials
Natural materials, such as stone or pine cones, can be an excellent basis for crafts. Let's consider several options.
Frog made of stone
It is better to choose a flat stone for the body, but you can get by with whatever you have. The pebbles must be of different sizes; you will need glue, acrylic paints and green cardboard.
We glue the frog’s body together: we glue one large stone together with the “legs” - smaller stones. You can glue eyes from small pebbles, or you can paint them with paints. You can use acrylic paints to paint the frog either completely or just the “face”.
Draw a water lily on green cardboard and don’t forget to glue the finished dried frog.
Hedgehog made of cones
You will need a cone and plasticine. From plasticine, mold a hedgehog's face along with its eyes, and attach it to the pine cone from the side of the stem. To make a hedgehog prickly, you can “insert” toothpicks into the cone, or glue them if the cone is not particularly open with scales. You can also use pine needles instead of toothpicks.
Crafts from various materials
Take a closer look at what you have on hand at home. If you paint an ordinary plastic bottle with paints, you will get an excellent “vase” for a paper bouquet.
You can use all kinds of pasta and make a whole picture. From a Kinder Surprise container and plasticine you can “create” a chicken, and even several.
There can be a great many variations, it all depends on your imagination. It’s best to do crafts with children - it’s fun, educational and exciting!
Spring craft for kindergarten
Spring crafts for kindergarten provide a wide scope for creativity, because nature itself offers many interesting topics.
Starting from the main thematic ideas and using imagination, you can come up with many original compositions on the theme “Spring” that are easy to do with children.
Here are the main ideas for an original spring craft for kindergarten. Based on them, you and your child can create your masterpiece with a spring mood.
In the kingdom of primroses
The first association with spring is the awakening of nature. A spring craft for kindergarten on the theme of the first harbingers of spring - snowdrops or crocuses - offers a wide range of interesting options for its creation.
With kids, you can create a beautiful applique in the form of small and fragile harbingers of spring - snowdrops - breaking out from under the snow in a forest clearing.
Colored paper, scissors, glue as the necessary tools, combined with imagination and a willingness to help the child create his spring craft for kindergarten - all that is required for this purpose.