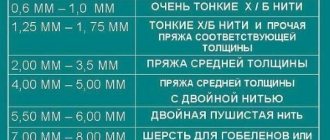
Selection of yarn and tool
The choice of yarn for making crochet scarves depends directly on the model. For a light summer option, it is recommended to use Iris yarn. It is a thin thread from which original, elegant products are obtained. Its composition is natural. This is a completely cotton thread. It is also acceptable to use thicker cotton.
A summer scarf made from thread containing additional components, such as sequins, will look original. And the yarn, consisting of threads of different thicknesses, will turn the product into a work of art.
Headscarves for adults and children, intended for cooler weather, are recommended to be knitted from wool yarn. It is advisable to avoid adding large amounts of acrylic, since the synthetic material magnetizes the hair. This will cause discomfort; such a scarf can ruin your hairstyle. The insignificant content of synthetics will not affect the quality of the product in any way.
When choosing a crochet hook, you should start from two criteria:
- Combination with thread. Very often the yarn contains information describing the parameters of the required tool, so it is selected according to the thickness of the thread.
- Convenience for the master. The hook should fit the master perfectly without causing discomfort.
To create a large product containing a complex pattern, it is advisable to opt for a tool with a thick handle. This guarantees less fatigue. For beginning craftswomen, it is preferable to have a flattened center on the handle. It will allow you to quickly understand knitting techniques. In this case, you should start with basic patterns, gradually moving on to more complex options.
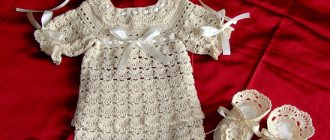
Children's options
Headscarves for girls can be of different models. All of them are knitted very simply and this process does not take much time.
For summer models, it is better to take thin cotton yarn. They turn out thin and don't get hot in them. For cool weather, bamboo and wool mixture are suitable. Before starting work, you need to make sure that the threads are not scratchy.
Traditional triangular scarves look great. You can knit them from the corner, from the middle, or sew them from two knitted triangles.
On such products you can make regular ties from laces or ribbons. You can also create a convenient model if you make an elastic band instead of ties.
To knit such patterns, classic patterns are used. For beauty, you can make an openwork binding. The ties can be made like laces. If the scarf is attached with an elastic band, then an elastic band is tied around the edge in a circle to the classic pattern.
Another interesting option for a scarf is bandages. These models are very beautiful and unusual. They fit snugly and hold up well. Knitting them is not difficult at all. Just choose a beautiful pattern and make a knitted strip of the desired width and length. Count the length minus 6-7 cm. Then tie an elastic band and decorate as desired.
Related article: Do-it-yourself soft pouf
To knit these headbands you can use the following patterns.
When knitting children's outfits, threads often remain. If you make a scarf out of them, the set will look very fashionable.
Measurements and calculations
A headscarf for a girl or woman is a triangular-shaped headdress. Its base is of particular importance for measurements. There are two ways to correctly calculate the length of the lower part:
- Pre-measure your head circumference. To do this, you should draw a measuring tape around the circumference, namely along the bottom of the hairline on the back of the head, the middle of the ears and the top of the forehead. To the result obtained, add the required length for tying a knot. The minimum value is 10 cm, the maximum depends on individual preferences.
- Try on periodically during the manufacturing process. Since the scarf starts from the top corner, by adding rows you can apply the product to the model. The ability to tie a knot will signal the completion of the process.
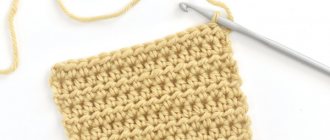
Before proceeding directly to creating a headdress, it is recommended to make a sample of the desired pattern. This is necessary to determine the density of crocheting a scarf. The size of the final product directly depends on it.
Knitting stages
Creating scarves for women or girls is quite a fascinating process. The order of work includes three stages:
- Start. Knitting begins from the upper corner of the scarf, which will subsequently fall freely onto the shoulders. This is convenient, since in the future you can easily adjust the height of the product.
- Main part. The knitting process is carried out by adding one repeat to the main pattern. It is important that all increases are made strictly symmetrically, then the scarf will look neat. This means that the number of stitches added on the right and left sides should be the same. It is by this principle that the required number of rows should be knitted.
- The finish should also be symmetrical. If the edges look sloppy, it is recommended to tie the product with stitches, connecting or single crochet.
To add volume, you can add a border to the scarf, which is knitted along the edge. It consists of five rows, the first four are made of air loops, replaced by single crochets. The final row is relatively labor-intensive because it is knitted in lush stitches.
How to crochet a napkin: diagram, description, photo, video
Crocheting a napkin is quite simple. You need to be patient and have the necessary materials. Threads #10 or iris are ideal for tying napkins and hooks. Thin threads and a thin hook are selected if openwork and dense lace is needed.
Instructions:
- Tying a napkin is quite simple. It is necessary that the fabric is dense and the head of the hook is sharp enough. This is necessary to simply pierce the canvas.
- Close the blind loop at the very beginning. Knitting begins from the corner of the napkin. Next, knit a row with BN stitches.
- After that, knit a sc in the new row, and then, stepping back a little, knit 5 dc at one point. Knit 1 sc and again knit 5 dc into one hole.
- Continue until you have knitted the entire perimeter. It turns out to be a very interesting binding, reminiscent of petals. It is also quite simple and even a beginner can handle it. It is enough to have basic skills.
How to crochet a napkin: diagram, description, photo
How to crochet a napkin: diagram, description, photo How to crochet a napkin: diagram, description, photo How to crochet a napkin: diagram, description, photo
Very interesting are the sharp ties that resemble corners. More options can be seen in the photo. More details about the execution of the elements can be seen in the video.
Manufacturing nuances taking into account the model
It is known that there are general recommendations for crocheting a scarf. However, each specific model has certain nuances. Therefore, it is advisable to follow a clearly structured algorithm containing a description and diagram of a crochet scarf.
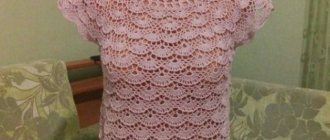
Women's openwork
A women's knitted openwork scarf will be a wonderful addition to your summer look. White Iris yarn is ideal for such a product. When creating an openwork scarf, you need to follow the step-by-step algorithm and look at the diagrams:
- The product starts from the upper corner of the triangle.
- 3 air loops are cast on.
- 3 lifting loops are performed on the next row.
- The first row is knitted.
- Each subsequent one is formed with corresponding symmetrical increases according to the scheme.
- Row 14 serves as the beginning of the pattern.
While working, be sure to check the symmetry of the product and analyze the number of rows required before completion. When finished, you need to knit the border. The women's openwork headscarf is ready.
Border scheme for scarf
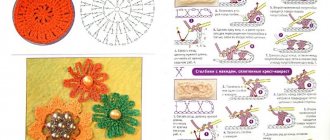
Summer for girls with an original pattern
A scarf crocheted in the shape of a field of chamomile will look very stylish and original on a girl in the summer. To create it, we use Anna 16 yarn in white, orange and green. You will also need hooks No. 1.6, and for the net – No. 1.4. All parts of a scarf for a girl are crocheted separately, then connected with monofilament into one product.
The step-by-step master class presents the following abbreviations: VP - air loop, VPP - air lifting loop, CH - double crochet, C2H - double crochet, SbN - single crochet. A flower is created according to the following algorithm:
- A ring is formed from eight orange VPs.
- Orange core – three runways, one CH, 3 VPs. Next, six times 2 CH and 3 VP between them.
- White petals - 3 runways, two dc, 8 ch, 3 dc, repeat the last step. The result should be 8 petals.
- To complete, 15 CH are tied into the air loops.
To create leaves, you need to knit the first row 5 VP, 1 dc in the first loop, 2 VP, C2H in the first loop, 2 VP, dc in the first loop, 5 VP, the row is closed. Second row – 5 VP, one sc, 5 half double crochets. One half-double crochet is knitted into a CH, and two half-double crochets into two VPs. Next, 2 CH, 1 VP, 2 CH are tied into C2H. Then everything is knitted in the opposite direction.
The number of daisies and leaves depends on the size of the finished product. When creating a headdress for a child 4-6 years old, it is recommended to use 21 daisies and 15 leaves. The scarf for the girl is assembled after all the elements have been steamed with an iron.
Women's jewelry
Women's knitted headscarves can be worn not only as a headdress, but also as a headscarf or scarf. This neck scarf is called a baktus. This wonderful wardrobe item for a woman will not only provide protection from bad weather, but also a stylish addition to her look.
A video tutorial will help you create such a beautiful scarf with your own hands, which describes in detail all the stages of knitting the fabric, color transition, as well as tying.
Thin openwork scarves are perfect for going to the beach and will protect you from the sun in the summer heat. They are knitted from cotton yarn.
For walks in autumn and spring weather, a scarf will also be appropriate. It is better to knit it from bamboo or wool mixture. It is advisable to choose a denser knitting and yarn.
A neck scarf can be worn in a variety of ways. Layered like a scarf around the neck, it will not only keep you warm, but also look very beautiful and stylish. You can also throw it over your shoulders like a shawl. This way of wearing a headscarf will add femininity and charm to your look.
The patterns below will help you knit gorgeous scarves with your own hands.
Decorative elements
A summer crocheted headscarf will always look stylish and original. Especially if openwork patterns were used when creating the product. However, there are many additional elements with which you can decorate the finished product.
Craftswomen often use beads, rhinestones, satin ribbons, and children's appliques, which can be purchased at a specialized store. Another way to decorate is to make knitted figures, flowers or bows from foamiran. It all depends on personal preferences and the flight of fancy of the needlewoman.
The location of decorative components is also a purely individual matter. You can decorate the entire area of the product by evenly arranging small beads or rhinestones, strew the bottom of the scarf with small handmade flowers, place a volumetric applique closer to the lower right or left edge, weave a contrasting color ribbon into the long side of the triangle. The main thing is that both children's and adult models are made of natural materials, fit perfectly in size, look impressive and unique.