- 37773
- 19-10-2020
- Author: Mysekret Team
- 0
Knitted ponchos do not go out of fashion in the autumn and winter seasons. New models and styles of these clothing items have simply flooded the Internet. Many girls order new items through fashion sites in order to stay in trend and follow fashion.
But we suggest you knit the poncho yourself. There are various knitting patterns that vary in difficulty. It is recommended to start with the simplest option for beginners.
Emergence and evolution
The off-season with its cool weather forces you to completely reconsider your wardrobe, putting aside winter or summer items until suitable weather arrives. To replace summer or winter looks that have lost their relevance, you have to select combinations of demi-season items that provide not only comfort, but also an unusual and stylish appearance.
A thing that is very popular today, which no woman who follows fashion trends will pass by, is a stylish South American poncho cape. This piece of clothing has a rich history and should not be considered an invention of modern fashion designers. Such clothing, which has become traditional in many countries of Latin America, was borrowed by local residents from the Indians.
Somewhat later, men and women all over the world fell in love with the poncho because of its comfort and unique ethnic flavor. The further development of the idea of a poncho and its transformation from an ordinary cape with a hole for the head into a modern, fashionable type of clothing was already the merit of the couturier. Now, thanks to the work of fashion houses, original styles are constantly appearing with details that the classic poncho did not have:
- hood;
- pockets;
- sleeves;
- neck;
- original prints.
You can always buy a cape you like in a store, but if you have the time and desire, you can always knit a poncho yourself. Among the many patterns presented on knitting websites, you can always choose an option to your liking.
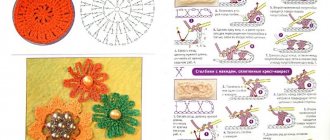
Poncho cape with fluffy wrap for an elegant look
A cape poncho with a fluffy trim will add elegance and tenderness to a woman's look. Agree that this beige-brown model fits harmoniously into and complements an outfit consisting of a turtleneck and light trousers.
Product size: 38/40. To work, you will need 100% wool yarn - 7 skeins (50 g each), 1 skein of grass yarn, knitting needles No. 4.5, No. 5, No. 6, hook clasp. Patterns: garter stitch, 2x2 rib. Elastic band 3x2. Row 1: *knit 3, purl 2*. 2 rows: *k2, purl 3* 3 rows: repeat the pattern from the 1st row. Decrease 1 stitch at a distance of 4 stitches from the right edge: knit 4 stitches, knit 2 stitches together. with a tilt to the left. Decrease 1 stitch at a distance of 4 stitches from the left edge: 2 stitches together, knit 4 stitches. Decrease 2 stitches at a distance of 4 stitches from the right edge: knit 4 stitches, knit 3 stitches together. Decrease 2 stitches at a distance of 4 stitches from the left edge: 3 stitches together, knit 4 stitches. Knitting density (knitting needles No. 5, elastic band 3x2): 20 loops and 23 rows = 10x10 cm.
Analysis of a detailed MK with the study of each stage
Back.
On knitting needles No. 5, cast on 110 stitches and knit with a 3x2 elastic band, starting and ending with row 1 chrome.
At a canvas height of 10 cm, decrease on each side at a distance of 4 sts from the edge 1 time 2 sts, then decrease 2 times 2 sts in every 6th row, 6 times 2 sts in every 4th row, 1 time 1 p. in every 4th r., 5 times 1 p. in every 2nd r. 62 sts will remain on the knitting needles. At a fabric height of 32 cm, form shoulder bevels, decreasing on each side of the product in every 2nd r. 1 time 5 p., 2 times 4 p. At the same time, to form the neckline, close the middle 26 p. Next, decrease from the inside of the neckline in every 2 r. 1 time 5 stitches on each side. Right shelf.
On knitting needles No. 5, cast on 53 sts and knit with a 3x2 elastic band, starting and ending with row 1 chrome.
At a canvas height of 10 cm, make decreases on the left, as on the back. At a part height of 28 cm, to form the neckline, decrease on the right in every 2nd r. 1 time 5 p., 1 time 4 p., 1 time 3 p., 1 time 2 p., 2 times 1 p. At a canvas height of 32 cm, form a shoulder bevel in the same way as on the back. Left shelf.
The left front is knitted in a mirror image to the right front.
Product assembly.
Finish the shoulder seams.
Along each shelf, pick up 64 sts on needles No. 4.5 and knit with an elastic band 2x2 10 r., starting and ending with row 1 chrome. Transfer knitting to needles No. 6 and knit 3 rows. garter stitch "grass" yarn, and then bind off all the loops. Along the neckline from each edge at a distance of 3 cm, cast on 100 stitches on needles No. 4.5 and knit 15 cm with a 2x2 elastic band. Next, close off all the loops. On each side of the collar, pick up 20 stitches using “grass” yarn on needles No. 6 and knit 3 rows. plat. viscous. Close all loops. On the top of the collar part, cast on needles No. 6 106 sts with grass yarn, knit 3 rows. plat. viscous. Close all loops. Sew a hook to the product. Pattern diagram:
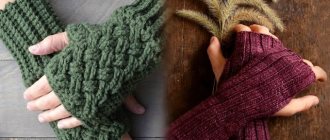
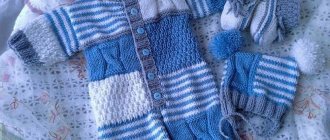
Multi-colored handmade leg warmers will help us complete this incredible look, which should be knitted either in tone or, conversely, in a beautiful contrasting color.
Advantages of ponchos and capes
Knitting is a good way to spend time, calm your nerves and relax, and at the same time please yourself by adding another fashionable new item to your personal wardrobe, while saving money. A poncho is an absolutely universal thing. It can be warm or, on the contrary, light, it will suit a person with any figure and at any age :
- to a little girl;
- girl;
- a confident woman.
This type of loose-fitting clothing can perfectly hide problem areas of the figure, while simultaneously emphasizing femininity. As a result of this feature, a simple, but at the same time very original cape has gained enormous popularity among women with curvaceous figures. It will be most convenient for beginners to master the basics of knitting a poncho using patterns and descriptions. For knitting, you can use not only knitting needles, but also a hook. It is with crochet that light openwork poncho-capes are crocheted, which are comfortable to wear in the summer.
Knitted capes and ponchos – Golden knitting needles
A delicate knitted cape trimmed with “pearl” beads and thin lace creates a feeling of airy lightness. The cape is knitted with openwork pattern from thin angora.
Read more
An excellent option for outerwear for the off-season is a poncho sweater with high double cuffs, decorated with cords and a wide stripe with Aran weaves along the back and front. You will need: 700 g of Apiretto yarn (55% polyamide, 35% wool, 10% angora, 50 g/105 m) No. 08126 ecru color. Knitting needles: No. 5 - 5.5 and No. 5.5 - 6. Circular knitting needles No. 5.5 - ...
Read more
Knitting a cape-loop with knitting needles. Description of work. Description of knitting a bag.
Knitting a poncho. description of work. Pattern diagram and poncho pattern. Description of knitting a bag.
Knitting a poncho jacket. Description of work. Pattern diagram and pattern.
Knitting a poncho with knitting needles. Description of work. Pattern diagrams and poncho pattern. Knitting a bag with knitting needles (partially crocheted). Description of work.
Knitting hats and mini-ponchos. Description and diagram of the pattern.
Knitting a poncho. Description of work. Pattern diagram and pattern. Source: Natalya magazine.
To knit a cape you will need: 8 skeins of black (art. 246.211) Bergere de France Eclair yarn; knitting needles No. 4, 5 and 5; hook No. 3.5; 3 decorative glass buttons. Elastic band 2/2, knitting needles No. 5: alternately knit 2, purl 2. Pearl elastic, knitting needles No. 4.5: odd number of loops. 1st r. (= purl): * knit 1, ...
Read more
- You will need: for the pullover 800 (900) g and for the cape 600 (700) g gray-brown ANAIS yarn (47% polyacrylic, 36% merino wool, 17% alpaca lamb wool, 40 m/50 g); straight and circular knitting needles No. 10; hook number 9. Pattern with “bumps”: straight and reverse rows: the number of loops at the beginning of the pattern is a multiple of 6 + 3 + 2 ...
- Read more
Universal size You will need: Anny Blatt yarn 5 skeins Sublime (70% wool, 30% silk. 115 m/50 g) red (1040). Knitting needles No. 4 and No. 4.5 Knitting density, knitting needles No. 4.5: 27 sts and 36 r. = 10 x10 cm. UPPER PART: cast on 25 sts, then knit according to pattern No. 1 and No. 2 LOWER PART: cast on 23 sts, then knit according to...
Read more
A braided cape with a golf collar is knitted crosswise from berry-colored yarn. Long sleeves complete the outfit. A job for experienced knitters who know how to make short rows. Cape with collar and sleeves Size: length 26 cm You will need: 400g. dark burgundy yarn Linie 120 (100% merino wool. 120 m/50 g); straight knitting needles No. 4; set of double needles No. 4; ...
Read more
Source: https://vyazhem-samy.ru/category/nakidki-i-poncho/
How to decide on a model
First you need to decide on the model and size of the product. There shouldn’t be any particular difficulties with the latter, because most poncho models have a very loose fit and easily fit any figure. And you can decide on the exact length later, during the knitting process. Usually capes are knitted from top to bottom, and if it suddenly turns out that the length of the product is insufficient, it can always be lengthened by knitting the required number of rows.
The range of cape models is very wide. It can be a cape in a traditional Mexican style, a poncho-jacket, a bolero poncho, an asymmetrical poncho, a cape with a hood, it can be without a fastener, fastened with buttons or a zipper. The appearance of the product is determined by personal taste preferences.
Poncho model with voluminous braids
The knitted poncho (diagrams and descriptions of the model with braids are given for several sizes) looks simply luxurious, and is also very warm. Knitted from 100% wool yarn with thick needles size 7 and 9, this voluminous piece can be worn as a summer coat.
Size range
Dimensions:
- 80-90 (90-102, 102-110) cm.
- Poncho circumference: 140 (148, 160) cm.
- Finished product length: 92 (96, 101) cm.
- The numbers in parentheses are for other sizes; if they are not available, the number applies to all sizes.
- Materials: 14 (15, 16) skeins of 100% wool thread.
- Gauge: a 10 cm square made in garter stitch using size 9 needles is 11 stitches for 18 rows.
Notations used
Crossing over 20 to the left: set aside, without knitting, the first 10 braid stitches on an additional needle, place them before work, knit the next 10 knit stitches, then return and knit the 10 set aside loops from an additional knitting needle in knit stitch.
Crossing over 6 to the left: remove 3 loops without knitting, using an auxiliary knitting needle, placing it in front of work, knit the next 3 loops, return to the 3 set aside loops from the additional knitting needle, knitting them with knitting.
Crossing over 6 to the right: on an additional knitting needle, place 3 removed loops behind the working fabric, knit 3 knit stitches, then return the set aside 3 loops and knit them in knit stitch.
Main part
It is knitted with size 9 needles in garter stitch in the form of a rectangular fabric, the row consists of 98 (102, 108) loops, after approximately 198 (206, 212) knitted rows the loops are closed in any way. Cuffs with large braids are knitted separately in the amount of 2 pieces: cast on 28 (32, 36) loops on needles No. 9.
- Row 1: Knit all stitches.
- 2nd row: 4 (6,
 knit stitches, 20 purl loops, 4 (6, knit stitches.
 - Repeat until 14 p. inclusive.
- 15th row: 4 (6, knit, crossing 20 loops to the left, 4 (6, facial knitting.
- 16th row: knit as in the 2nd row.
- From rows 17 to 42, alternate knitting as indicated in rows 1-2.
- Repeat the 43rd row as described in the 15th row.
- 44th row: knit as for the 2nd row.
- From 45 to 70 rows alternate as indicated in rows 1-2.
- 71st row: knit according to the description of the 15th row.
- Row 72: repeat as row 2.
- Alternate rows from 73 to 98 as indicated in rows 1-2.
- 99th row: knit according to the description of the 15th row.
- Row 100: repeat as row 2.
- From rows 101 to 115, alternate knitting as indicated in the description of rows 1-2.
- All loops are closed in any way.
Right side front
It is knitted from 23 stitches using knitting needles No. 9.
- Row 1: Knit the entire number of cast-on stitches in knit stitch.
- 2nd row: knit 2 stitches, purl 6, knit the remaining 15 stitches again.
- Alternate rows 3 to 8 as indicated in rows 1-2.
- 9th row: knit 15 stitches, cross 6 to the left, 2 stitches in knit stitch.
- Knit the 10th row as the 2nd row.
- Repeat rows 1 to 10 of the pattern until the height of the product is 53 (56, 64) cm, then from the wrong side to knit the neck, close the first 14 loops from the edge, knit with the pattern all the remaining 9 loops to the end of the row.
- In the next row, knit stitches of the pattern to the remaining 2, knit them together according to the pattern.
Knitting diagram and description for it - Knit like this, decreasing the neckline stitches to the end of the front. Bind off the last shoulder stitches.
Left side front
It is knitted symmetrically according to the description on the right side, only you need to finish knitting the neckline on the front side.
Collar
You need to cast on 83 stitches using size 7 knitting needles.
- 1st row, start knitting 1 knit stitch, purl 2 stitches, repeat in the indicated sequence until the end of the row, knit the last loop.
- 2nd row: 1 purl loop, 2 knit stitches, 1 purl stitch, alternate until the end of the row according to the pattern.
- Repeat rows 1-2 17 times in succession and bind off all stitches.
Assembly of the finished product
Step-by-step instruction:
- Fold the main piece in half along the long side.
- Sew cuffs on both sides along the bottom of the sleeves.
- Sew the sleeves at the seams.
- Turn the product right side out. Make a mark in the center of the back neck line with a contrasting thread or a special marker.
- Sew the left and right front pieces down from the marks.
- Mark the center on the collar, align with the back mark so that the markers match, sew the collar along the neckline on the back and front.
- Turn up the collar and hem the edge.
- Thread all cut tails of thread.
A poncho knitted according to any pattern or description will help you master the process of creating a new interesting piece of clothing and will be a good training in knitting skills.
Article design: Vladimir the Great
Yarn selection
The choice of yarn for a poncho depends on what time of year you plan to wear it. For an openwork summer cape, it is best to use a light cotton thread. For a summer evening poncho, thicker yarn and higher knitting density are suitable.
A poncho made of warm wool yarn will be an excellent choice for the off-season, and if you try, you can get not just a cape, but a full-fledged outerwear. To do this, it is enough to make a fur lining. Don’t forget about choosing a suitable knitting pattern. There are many combinations that you can create yourself to create your own knitted poncho.
We use knitting needles to make openwork clothes for girls aged 1-5 years
The little beauty will be very warm and cozy in this outfit. The openwork pattern used to make the product and the bright color of the yarn turn an ordinary classic item into an elegant and very, very beautiful one.
The size of this model is suitable for girls from 1 to 5 years old. To work, you will need half-wool yarn - 150 g, circular knitting needles No. 3, No. 3.5, a button.
Interesting patterns used in the work
Garter stitch: knit. and out. rows of faces are knitted. loops.
Facial surface: faces. rows of faces are knitted. loops, purl rows - purl. loops.
Purl stitch: knit. rows are knitted purl. loops, purl rows - persons. loops.
Rib 2x2: knit 2 alternately, purl 2. loops.
Openwork pattern: knitted according to a pattern that shows only faces. rows, purl rows, knit all the loops according to the pattern, yarn overs and knit stitches together. crossed sts. perform purl. Repeat the pattern from the 1st to the 8th row.
Picot cast-on: For regular stitch cast-on, first cast on a classic starting stitch (no need to leave the long end of the thread). This starting stitch lies on the left needle. Insert the right knitting needle into this loop and knit 1, leaving the starting loop on the left knitting needle and knitting. transfer the loop to the left needle. For the 3rd and all subsequent loops, insert the right knitting needle between the last two loops, pick up and pull the thread and, like a new loop, transfer it to the left knitting needle. To cast on with picot * cast on 5 sts, then cast off the last 2 sts, transfer the resulting st to the left needle, repeat from * until the desired number of stitches is reached.
Closing loops with picot: cast off 3 sts, * transfer the loop from the right needle to the left needle, cast on 2 sts again, bind off the last 5 sts, repeat from *.
Knitting density, knitting needles No. 3.5: 24 loops and 32 rows = 10 X 10 cm.
Your poncho will look even more impressive if you learn how to make a Wave pattern, read more at the link
Step-by-step job description for beginners
On needles No. 3 in a picot set, cast on 230 stitches and knit 4 rows. plat. viscous. Transfer knitting to knitting needles No. 3.5 and continue working as follows: knit 4, * 11 p. openwork pattern, knit 8, repeat from * 10 times, 11 p. openwork pattern, knit 4. After 40 r. knit for decrease in the 1st strip of faces. Iron on the left side of 2 knits together. crossed, with wide stripes of faces. stitch knit on the right side knit 2 together. and on the left side 2 persons together. crossed, in the last stripe of faces. stitch knit on the right side knit 2 together. Repeat such decreases every 8th row. twice more (= 158 p.). Next 8th p.m. perform as follows: k1, * p2, k2, p1, p2 together, k2, p2, k2, repeat from * 10 times, p2, k2 ., purl 1, purl 2 together, knit 2, purl 2, knit 1.
Transfer knitting to needles No. 3 and knit 1 purl. R., and the next 11 R. rubber band 2x2. Next purl. R. knit as follows: p1, * k2tog, p2tog, k2tog, p2tog, k2tog, p2, repeat from *, k2tog, p2tog ., knit 2 together, purl 2 together, knit 2 together, purl 1.
To form a collar, knit another 20 r.
garter stitch and bind off all stitches with picot stitch. Sew a knit seam at the front until the rib begins. Sew 1 buttonhole on the right under the collar. Sew a button to the product. Pattern diagram and pattern:
Today there are a huge number of variations on the theme of knitting a poncho. This is a classic cape model, a version with a hood, a sweater model, as well as a bolero poncho. Also, don't forget that combining knitted items to suit your style is a very, very useful skill. We offer you one of the variations for the poncho - the magically beautiful women's beret - at the link you will find an excellent fashionable selection for pleasant autumn walks.
In the following master classes you can see beautiful French poncho models for women.
Choosing knitting needles
The optimal knitting needle size is determined by the thickness of the threads of the yarn used. The most suitable knitting needles are one and a half to two times thicker. In order not to be mistaken with the size of the finished poncho, it is better to knit a small sample to calculate the number of rows and loops.
In some cases, it is necessary to use knitting needles of different sizes to make one product. The base fabric, for example, may require some knitting needles, while decorative elements may require completely different ones. When purchasing knitting needles, you should always check the quality of their polishing, otherwise they can spoil the yarn.
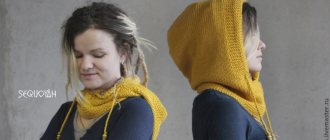
Master class on knitting a women's poncho with a hood
Product size: 34/36 (P 1).
For work you will need: 14 skeins of 50 g of yarn (100% wool, 90 m / 50 g), knitting needles No. 4, an additional knitting needle, buttons - 5 pcs. Patterns.
Rib 4x2: *K4, P2*, repeat from* to*. Braid: the number of loops must be a multiple of 24. Knit the pattern according to the pattern. 16 persons. crossed to the left: remove 8 sts on an additional knitting needle in front of the work, knit the next 8 sts, then knit 8 sts from an additional knitting needle. 16 persons. crossed to the right: slip 8 stitches onto an additional knitting needle at the back of the work, knit the next 8 stitches, then knit 8 stitches from the additional knitting needle. Knitting density: 36 loops and 28 rows = 10 X 10 cm.
To make the product unique, complement it with an elegant border. All the diagrams and recommendations in this article are especially for you!
Description of the work process with detailed instructions
Back.
Cast on 262 sts on the knitting needles and knit as follows: *2 sts purl.
satin stitch, 24 stitches braid*, repeat from* to*, finish row 2 purl stitches. iron. At a fabric height of 15 cm, decrease 1 stitch in each group from purl. loops, knitting 2 stitches together. Repeat decreases after 8 p. Then decrease on both sides in every 2nd r. 45 times 1 p., 14 times 2 p., 3 times 3 p., 1 time 4 p. and 1 time 5 p. At the same time, at a height of 62 cm to form the neckline, close the middle 18 p., and then tie each part separately, closing from the inside in every 2nd row 2 times 10 p. Right shelf.
Cast on 132 stitches on the needles and knit in the same way as the back.
At a fabric height of 15 cm, perform decreases as on the back, but do not decrease in the 1st group from purl. n. Next decrease on the left, as on the back. At the same time, at a height of 61 cm, to form a neckline, close in every 2nd row on the right 1 time 7 sts, 3 times 8 sts. Close the loops. Left shelf.
Knit the left shelf in a mirror image to the right shelf.
Assembling things.
Finish the side seams.
Along the edge of the neckline, raise 112 stitches for the hood. Work 32 cm with 4x2 rib, starting and ending row 4 purl. on the wrong side. Close the loops. Sew a seam on the hood. Along the edge of the right shelf and one half of the hood, cast on 234 stitches (of which 90 stitches should be on the hood), knit 1 r. facial, purl side continue to knit with 4x2 rib, starting and ending with 4 knits. on the front side. At a placket height of 1.5 cm, make 5 buttonholes (cast off 2 stitches and cast them on again in the next row). Place the 1st buttonhole at a distance of 42 stitches. from the bottom of the product, the remaining loops are 22 stitches apart. At a bar height of 3 cm, close all the loops by knitting them. on the front side. In the same way, perform the bar on the left shelf, but without buttonholes. Sew buttons to the poncho. Make tassels 7-8 cm long and secure them along the bottom edge of the poncho. We also offer a separate master class on making a hood to further familiarize yourself with the nuances of knitting. Pattern diagram and pattern:
A simple model for beginners
Any knitting pattern is a set of symbols, abbreviations and numbers, very complex and difficult to understand for a person knitting a poncho for the first time for a woman. Everything will be much simpler if you use not only the pattern, but also its description during the knitting process.
At the initial stages of learning to knit, it is better to choose the simplest and most understandable models . To knit a sleeveless poncho you will need approximately 300 g of yarn and circular knitting needles. The color of the yarn is chosen according to your taste.
To make it easier for novice knitters to understand how to knit a poncho, it is best to familiarize yourself with a detailed step-by-step description of the process:
- First of all, you need to cast on 184 loops on the knitting needles. Now you need to cast on four rows in garter stitch, the following rows are knitted according to the pattern: edge loop, two loops in garter stitch, 178 loops in the main pattern, two garter stitches, and the row ends with an edge loop.
- The neck of the cape is knitted as follows: after the 172nd loop, you need to close 44 loops in the center, and the loops on the right and left are knitted separately.
- The shoulders begin from the 188th loop. The fifty-sixth stitch will connect the gap between the two sides, then continue knitting 184 loops.
- Thus, you need to knit a fabric 157 centimeters long from the front edge, the back edge is knitted in four rows of garter stitch. Now the loops are closed with knit stitches.
- The final step is to pick up 150 neck stitches. The four edge rows are worked in garter stitch and worked off like knit stitches.
Easy to make, but very warm and cozy, the sleeveless poncho can become a stylish accent for an office or everyday look.
Knitted poncho: diagrams and description
a poncho is very easy and interesting. This process requires a lot of time and effort, but the result will not make you regret the work you do. There is knitting for every taste and using a variety of patterns. Choose the one that suits you and start creating.
And we will tell you how to knit this or that thing correctly.
See also...
✅ How to crochet a poncho: diagrams and description
✅ Knitting patterns and patterns: detailed description
✅ Crochet hat for a newborn: diagram and description
✅ Crochet tablecloth patterns for tables of different shapes
Scheme for beginners
Knitting a poncho for women is very simple, if you follow clear patterns and detailed descriptions. We will teach you how to knit this item with your own hands from soft pink yarn. We will need 300 grams of yarn , as well as long, circular knitting needles.
Patterns at work:
- Garter stitch: L. and I.R. – L.P., in K.R. – 1 K.R. – L.P., 1 K.R. – I.P.
- Main pattern: according to A/H with L.R., I.R. – all loops and yarn overs – I.P. Make 1* 1-8 R., repeat 5-8 R. Important point: loops are multiples of 16+2.
Description of the knitting process:
- Cast on 184 stitches on long (circular) needles, 4 stitches in garter stitch. We continue according to the pattern: K.P., 2 P. garter, 178 P. with the main pattern, 2 P. garter, K.P.
- For the neckline: after 172 R. we close the central 44 R., we knit the sides separately.
- In every 2 R. we close 1*3 P., 1*2 P., 1*1 P. This step is done for rounding.
- At 188 R. we reached the shoulder line.
- 56 P. With an intermediate set we connect the two sides, continue knitting for 184 P.
- When the fabric reaches 157 centimeters from the front bar, we knit 4P for the back. garter stitch, after which we close the P. with L.P.
- Raise 110 P. neck – 4 K.R. garter stitch. We close all P. like L.P.
Poncho with sleeves
A great option for the cold season is a poncho - a sweater with heavenly colored sleeves! For overweight ladies, this option is also very suitable, just add a few extra increments on the sides.
Materials:
- 1 kg of gray yarn.
- Knitting needles are simple and stocking.
- Hook No. 6.
Patterns used in the work:
- Elastic band: 2 L.P., 2 I.Z. = repeat.
- Main pattern: knit according to agriculture. In I.R. all P. and N. – I.P., 2 N.I.P. SK. Repeat from 1 to 4 R.
A simple poncho for the cold season is knitted from the back:
- 1 I.R. 110 P., main pattern . To make a bevel on both sides P.R. in each 2 R. 3 * 2 P. Here you should get 122 P.
- Knitting pattern straight 65 centimeters. We close P.
The front is a little more complicated, not as easy as the back.
- The work begins as a back , but here in order to make pockets - after 22 centimeters from the beginning of the canvas on both sides we set aside 18 - 39 P. To make burlap - 22 P. - 16 cm L.G.
- We add it to those P. that we set aside earlier: the main pattern on all P.
- Cutout: after 57 cm, close the central P. in each 2 R. 1*4 P., 3*2 P., 2*1 P. After 130 R. close the remaining ones.
- We use those 22 P. in 3 cm elastic bands. Let's close.
Next come the sleeves of this model , which need to be knitted like this: make shoulder seams, raise 62 stitches along the length of the side and knit using an elastic band pattern. For bevel: after 12 centimeters U.B. on both sides 1 * 1 P., each 6 R. 11 * 1 P. At 42 centimeters of the canvas, close all P. To assemble our item of clothing, we sew the placket , the pocket burlap is sewn with I.S. Cardigan collar: raise 40 P. back and front - elastic band in a circle 20 cm. Seams on the sleeves, tie the poncho 1 K.R. S.B.N. + 1 R.S.S.
Two-piece poncho
To make knitting convenient, the front and back parts are made on circular knitting needles, but straight R.
Basic patterns:
- Elastic band : with I.R.: K.P., (I.P., L.P.) = to the end R., I.P., K.P. In I.R. - P. according to the drawing.
- Rubber K.R. : L.P., I.P.
- Braid 5 P. in K.R.: the last 5 P. schemes are odd K.R. In even K.R. – according to the drawing, N. – L.P. Do from 1 to 12 K.R., repeat from 9 to 12 K.R.
- Relief pattern for one hundred and fifty-nine loops: according to A/H with L.R. In I.R. - according to the drawing.
Knit all P. once, the other half - without braid. We knit from 1 to 80 R., a braid from 1 to 12 R., from 9 to 12 R. knit to the end of R.
So, the work begins with two details. The front of the product is on long knitting needles 159 P., 5 R. with an elastic band. M/u K.P. – a relief pattern to form a corner. W.B. after the central braid.
For shoulder bevels 74 R. from the plank on both sides, K.P. close together with the first 4 P. At 80 R. from the beginning of the bar, set aside 61 P. in order to make a collar.
the back for the jacket as before. To assemble the pullover, sew the shoulder and side seams. Those P. that we set aside - on circular knitting needles, 122 P., 14 cm - with an elastic band.
Video tutorials: how to knit a poncho
A stylish poncho can be made from multi-colored threads. The striped product goes harmoniously with denim items, gives additional volume to the chest and narrows the shoulders due to the correct cut.
A delicate summer poncho is made of thin threads with a V-neck. It can be worn over a top or swimsuit. Also, many wear the product with jeans and skirts, creating a stylish look.
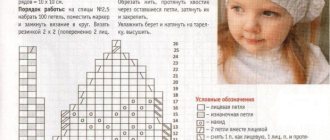
Knitted poncho for girls: diagram and description
A beautiful poncho can be knitted for a little girl. Such clothes will protect you from the cold and go harmoniously with dresses and skirts. And you don’t have to wear a scarf, because your throat is always warm.
Poncho coventry
Unusual Coventry poncho for sizes 110 - 116 made of wool yarn using circular knitting needles (line from 40 to 120 centimeters).
Patterns used in the work:
- Fishing gum: 1R.: I.P., L.P. – until the end of R. 2 R.: remove P. as I.P. to the next P. in R. below. – until the end R. 3 R.: I.P. next P. in R. below, remove P. as L.P. – until the end of R. Repeat rows two and three.
- Blocks: 1, 2 R: 2 L.P., 2 I.P. – to the end R. 3, 4 R.: 2 I.P., 2 L.P. – repeat.
- Braid Lattice: see diagram.
Description of work:
- 52 P. in ring, pattern 1 12 cm one R. L. P., P. R. 2 P.
- 14 P. according to the grid pattern, 3 L.P., 7 P. according to the block scheme, 3 L.P., 14 P. according to the braid lattice, 3 L.P., 7 P. according to the agricultural blocks, 3 L.P.
- Each 2 R.P.R. on each side about the sleeves. At a length of 22 centimeters from the pattern, the P. of the sleeves are placed together. The back of the product, as well as the front, is knitted in the same way: at a height of 11 centimeters from the armhole, close 1 P. on both sides. After 4 R., close 2 R. in each. 1 P., 2 P., 3 - 5 P. consecutively.
- We tie around the perimeter. From the front P., which we set aside, we pick up the P. on the side up to the armhole, knit with an elastic band 1*1, do the same on the postponed P. for the sleeves. Then along the agricultural fishing gum 4 cm, close. You can decorate with buttons, this is optional.
Knitted openwork poncho
In order to learn how to knit a poncho as quickly and efficiently as possible, we suggest you watch video lessons on knitting an openwork product.
White poncho with pineapple pattern
A stylish pattern reminiscent of pineapples is suitable for knitting items with a high neck. This poncho is suitable for middle-aged women who prefer to wear turtlenecks.
Summer poncho
Poncho is not exclusively winter clothing. If you knit it from thin threads and do not add a neckline, you will get a stylish summer option.
Poncho with garter stitch pattern
Now we knit a poncho from two rectangles using knitting needles with diagrams and descriptions. This cape will be short and decorated with braids. You can make it with buttons or a hood, if desired. The size of the future product is universal.
Materials:
- 500 grams of yarn of any shade.
- Knitting needles 4.5 millimeters.
- Two fasteners.
Patterns: garter stitch: L. and I.R. – L.P., relief pattern on A/H 2 a.
Description of work: two rectangles with dimensions of 40*80 centimeters. You need 57 stitches and make 5 centimeters in garter stitch. Next, take the last 5 R. in garter stitch. Knit the second rectangle in the same way . Look at the photo to see how to sew the parts correctly. For a neckline of 72 P. - 13 centimeters according to S/X 2a. finish knitting with garter stitch in 5 R. sew the fasteners that we mentioned above to the product.
Coventry for girls
Every person has a natural desire for beauty. From a very early age, fashionistas love a variety of outfits, especially those knitted for their child by a caring mother. There are a huge number of patterns and descriptions of knitted ponchos for girls, but the best choice would be the “Coventry” poncho - beautiful and very delicate. In this case, it is imperative to give preference to yarn, mainly consisting of natural fibers; in addition, for knitting you will need circular knitting needles. For the pattern, you can choose any elastic band, as well as a lattice of strands, ropes or braids.
The final appearance of the Coventry poncho depends on the preferences of the needlewoman. You can use any additional decorations, such as embroidery, beads or appliqués . The style can be a poncho-jacket for a young lady, which can always keep her warm at school, kindergarten or on the street, or a comfortable warm vest for long walks in early autumn or spring. The main advantage of such a knitted poncho for girls is the presence of a high collar, which eliminates the need to additionally wear a scarf and make sure it doesn’t get tangled.
A poncho is a stylish accent in the wardrobe of any modern fashionista. It can be either an openwork weightless cape, a warm jacket or poncho-vest, or even an openwork shawl. In order to master the technique of knitting a poncho as quickly and efficiently as possible, it is better for beginners to look for patterns with descriptions and instructions.
What is a poncho? What to wear with this wardrobe item
This traditional Indian clothing has been known since the 15th century, came to the world of modern fashion from South and Central America, and very quickly began to gain popularity among the fair sex. The secret of this trendy cape is that it not only allows you to warm yourself comfortably and in an original way in our cold climate, but also hides some figure flaws.
Recently, modern designers have developed many original, varied styles, from which every fashionista can choose the one that suits her style and body features.
A knitted poncho (even a beginner can easily understand the diagrams and descriptions) is the easiest option for making your own fashion product. It is enough to knit a rectangular or square fabric with a cutout for the head.
This cape will highlight your slender legs and will look good in the following clothing combinations:
- tight pants;
- long skirt;
- jeans;
- pencil skirt;
- tapered mini dress;
- tights, leggings.
It should be noted that a poncho adds volume and some massiveness to the image, so it is better to combine it with tight-fitting clothes, preferably of a different texture.
The most common length is mid-thigh length. It looks great in any version and is considered universal.
Models with a short cut visually lengthen the legs, which is especially important if you are short.
The most popular now are bright colored models of ethnic style or with catchy geometric patterns. A large cell or stripe also remains relevant. All of these colors go better with plain clothes in neutral colors.
A poncho is a completely self-sufficient item that does not require additional decor or accessories. Fringe or large knitted braids along its edge will be quite enough.
Currently, boho styles are gaining great popularity. Designers decorate models with bright patterns with unusual fittings, various tassels or fringes. Boho is characterized by natural fabric, freedom of movement and asymmetrical length.
Traditional Indian ponchos were made of wool: for the poor, llama wool was used, and the rich could afford alpaca. The colors of the products were distinguished by the variegation and pattern of a certain area, so a stranger was immediately recognized by the colors of his clothes.
From the Indian tribes, this clothing migrated to the army and began to be used to warm soldiers. It was popularized by hippies in the late 60s. Then the baton was picked up by housewives who began to create an original knitted wardrobe item.