Crochet has been one of the most popular types of needlework for many years. This technique allows you to create a wide variety of clothing, accessories, useful and beautiful things for the home, toys, etc. Many people, looking at crocheted things, are amazed and cannot imagine how this can be created with their hands. In fact, mastering this technique is not as difficult as it might seem at first glance. With the help of our article, we suggest you learn the basics of knitting using a regular crochet hook and try yourself in this technique.
A little about hooks
There are a variety of hooks: metal, wood, plastic and even ivory (I have one, a gift from my aunty knitter. Honestly, the tool is not suitable for knitting, but as a beautiful souvenir it’s very good, and also as a reason to show off to girlfriends with their “treasures”).
But for those who want to learn and are just starting to knit, such delights are useless, although you can immediately choose a hook from the material you like.
The most important feature by which hooks differ is the size of their head, or rather, the slot into which the thread falls when knitting. The thicker the thread, the larger this slot and the head, respectively. And this difference is indicated by numbers. Napkins and collars from thin threads are knitted with hooks numbers from 0.5 to 2.
And hats and scarves are numbered from 2.5 to 6-7.
To start knitting and learning, a hook size 3-3.5 is suitable. And any yarn of medium thickness.
A few words about choosing yarn for training.
The yarn also varies. And this is a topic for a separate article. At this stage, I would advise you to take a thread with a good twist, so that the hook does not separate the thread during knitting and does not create unnecessary inconvenience.
How to hold a hook.
Something else needs to be said about the position of the hook in your hands. Here everyone chooses the option that is most convenient for him/her)).
The figure below shows a method called "pencil". Simply grip the hook the way you would grip a pencil for writing.
The following picture shows the "spoon" method, in which the hook is held like a spoon while eating.
As you can see, everything is very simple.
Thread position when knitting.
Where the thread should be placed while knitting is shown in the figure below. A working area for the hook is formed between the index finger and thumb. The thread going to the ball is located under the middle, ring and little fingers. And the little finger lightly presses the thread against the palm so that it does not dangle. The free end of the thread is 4-5 cm. More is possible. When finished, I thread this end through a large eyed needle and carefully thread it into the work.
The basic elements of crochet are chain stitch, single crochet and double crochet. Let's look at how they are done one by one.
How to learn to crochet from scratch photo
To start crocheting, you need:
- yarn - wool, cotton or any other;
- hook - its size is selected in accordance with the thickness of the yarn used for knitting;
- the ability to knit basic elements - first of all, an air loop, and then several types of stitches - single crochet, double crochet, 2 or more crochets.
Having the necessary tools, materials and having mastered the knitting of basic elements - air loops and stitches, even a novice craftswoman can safely begin knitting real products.
Any crochet starts with a ring or chain consisting of so-called air loops (v.p.). To knit it, you must first make a slip stitch. The photo below shows the sequence of performing a sliding loop.
A chain consisting of c. p. - the beginning of almost any crochet. The first row is subsequently knitted on its basis. The same element is also used in basic patterns - when knitting arches or picots, lifting loops, and when connecting separately knitted parts.
The next element that is often found in crochet is a single crochet, designated as a single crochet. This is the fundamental element that produces a dense fabric. It is used for knitting toys, blankets, carpets, bags, and also as an element of other patterns.
The double crochet, referred to as dc, is another fundamental element that is often used in crochet. It differs from the previous option - st b/n, by the presence of one more yarn over, which is done before inserting the hook into the loop of the chain. As a result, st/s is twice as high as st/n, and the fabric knitted with this pattern is soft and embossed.
A higher version of the stitches can be obtained by knitting stitches with 2 crochets, designated as st 2 n. This type of stitch is most often used when knitting openwork motifs and crossed patterns.
Using v. etc. and different types of columns, you can knit other popular patterns - “bump”, lush column, crossed column, fan, fillet mesh, etc.
Start of knitting. Air loop.
So, you have a hook and a ball of thread in your hands. Where to start?) Any product begins with a chain of air loops. And it starts with the first air loop. We cross the thread with our fingers to form an ordinary loop and insert a hook into it, as shown in the figure.
Next, place the hook under the thread.
We grab the thread with a hook and pull it into our ordinary loop.
Congratulations! You've learned how to make the first loop, and that's half the battle!)
Next, all the loops of the chain are knitted according to the same principle. Insert the hook into the loop, grab the thread from below and pull it through the loop. This is what a chain of air loops looks like:
At first, my hands will not obey you, my fingers will be tense, but this is a normal phenomenon for all novice needlewomen. With each new approach it will turn out better and better.
How to learn to crochet a circle
The circle is a motif often used in knitting tablecloths, napkins, rugs, dresses and other items. Its knitting begins with a chain of 3 or more chain stitches, which closes in a circle. In addition, circular knitting can begin with a thread twisted into a ring and a sliding loop. In the first case, a through hole is formed in the center, in the second, there will be no hole in the center if the free end of the sliding loop is tightened. The first row is usually knitted in st. b/n or st/n. Starting from the second row, increments are made evenly in knitting - 2 stitches are knitted from one loop:
- if the circle is knitted from st b/n, then it is necessary to increase 6 times;
- if the circle is knitted from half-stitches, increases are made 8 times;
- if the circle is knitted in st/n, increases are made 12 times;
- if the circle is knitted from st. with 2 double crochets, increases are performed 16 times.
In the 3rd and subsequent rows, increases are made at increasing intervals - after 1, then after 2, then after 3 and so on loops.
The process of knitting a circle of st/bn is shown in detail in the master class
Circle knitted with double crochets (dc)
In each subsequent row, the increment interval increases by 1 stitch until the circle reaches the desired diameter.
The process of knitting a circle of st/n is shown in detail in the master class
Using the same principle, increases are knitted and the circle is worked in a spiral. The only thing is that with this technique, circle knitting in a new row is not performed in. lifting point, and the place of transition from one row to another turns out smooth and is marked with a marker so as not to get confused when counting the rows.
The second element is a single crochet.
As with any knitting technique, stitches are added at the beginning of each row. When knitting a single crochet, one chain increase is made. Therefore, the hook is inserted into the second air loop from the hook.
Insert the hook, grab the thread and pull it through the loop.
Thus, there are now two loops on the hook. And now we grab the thread again and pull it through two loops on the hook.
Congratulations! You have mastered single crochet! Now the same needs to be done in the next loop and all other loops of the air chain.
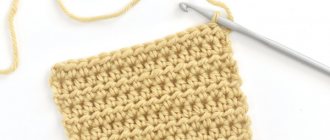
This is what a row of single crochets looks like:
And this is what the pattern looks like, knitted with single crochets:
How to crochet air loops
With the help of air loops in the process of crocheting, an initial chain, a zero row of knitting, is formed. In addition, air loops are used in the future when knitting almost any patterns. How to cast on loops? It’s simple: holding the starting loop between the middle and thumb fingers on your left hand, hook the working thread and pull it into this loop, then grab the working thread again and pull it into the newly created loop. By knitting such loops one after another, we get this chain:
And the third important element is the double crochet.
If the row begins with a double crochet, then you need to make four lifting loops. Because the double crochet is higher than the single crochet. To make a yarn over, simply yarn over the hook. And after that, insert the hook into the 4th free loop from the hook.
Next, grab the loose thread with your hook and pull it through the loop.
Next, grab the loose thread again and pull it through the first two loops on the hook.
After this, two more loops will remain on the hook. And they also need to be knitted by grabbing the thread with a crochet hook and pulling it through these two loops!
Congratulations! You have mastered knitting an important element - double crochet!
This is what the pattern looks like, knitted with double crochets:
Well, you have mastered the basic elements of crochet for beginners! In this article I talked about which hook and yarn to take when starting to learn knitting. And she provided diagrams showing how to knit a chain of chain stitches, a single crochet and a double crochet step by step.
I hope you found this article helpful! And now you can easily learn to knit! Good luck with your creativity!
Author of the publication
offline 4 years
Crochet patterns for beginners with detailed explanations
Each element in the diagram has its own execution technique and its own designation. You can create simple things using simple elements. This way you will not only master the knitting technique, but also see the real result of your efforts.
Basics of crochet for beginners
The chain is the most important basic element in all knitting patterns. But it is not as simple as it seems. Uneven loops immediately catch the eye and spoil the impression of the work done. So a tip for those new to crochet: crochet the braid until you see that it is the same along the entire length . And no matter how many meters of finished braid you get, practice, undo and practice again. What the chain knitting technique looks like and its designation in the diagrams can be seen in the photo.
For variety, you can master the double crochet chain. How to do this, look at the photo.
The chain is used as a basic element (like a set of loops in knitting) and for air connection of different elements of the product.
The post is another important element of the technique , with which you can knit a fabric from a braid. Columns are used to form transitions between knitting parts, secure individual parts, and in some other cases. A simple single crochet stitch is performed as shown in the diagram.
Double crochet is already a decorative element . There can be 1 or more yarn overs, and they are designated as follows. The number of serifs in the diagram indicates how many yarn overs need to be made on the column.
Slingshot - several double crochets , which are made from one loop. They will help you knit a round center or a beautiful petal for a flower.
Knitting can be done in the round, or can be done using a transition stitch. You can see in the photo how to correctly carry out the transition in order to get a perfectly smooth edge of the product.
Filet crochet for beginners
Filet knitting is a sequential alternation of chains and single crochet stitches. As a result of your work, you will get a grid with different types of cells, as shown in the diagram.
A simple pattern at first glance is the basis for crocheting clothing items and beautiful decorative elements. Upon closer inspection, it seems that the details are not crocheted, but embroidered with plain threads. See what basic elements can be made using the fillet knitting technique.
And here is an example of a finished product based on the same small fragments.
An interesting combination of colors and a detailed pattern will help you create a blanket using the patchwork technique, but based on knitted fragments.
Crochet flowers and petals for beginners (step by step with photos)
Flowers and floral designs are the first thing that all beginners probably master. Using simple products you can learn to knit and read -crochet patterns-.
Here are examples of the simplest colors with knitting patterns. But don't be discouraged that your efforts will only be spent on training. See what compositions can be made from the simplest elements.
Crochet toys for beginners
You already know how to knit a simple circle based on stitches and a simple chain. Now you can move from flat diagrams to three-dimensional toys. Even if you don’t have small children, you can knit a small keychain for yourself and your loved ones.
Crochet is so practical that you can create even the smallest details.
For the parts of the body and legs you need to knit a kind of cylinder. The base is the same circle as in the middle of the flower. When the diameter of the base is sufficient, simply stop adding loops. Knit the walls of the cylinder with a simple stitch using the loop-in-loop method. To narrow or widen the loops, perform uniform addition and reduction of loops.
Not only voluminous toys can be knitted. There are several ways to decorate a children's room with beautiful panels with all children's favorite characters. Funny owls can be simple.
Or they can be voluminous with ruffled feathers.
Here are some examples of completed works.
Having mastered crocheting toys, you can create many holiday characters for children and their friends.
Crochet doilies for beginners
Crochet was probably invented by lovers of openwork napkins. Our grandmothers had no other way to decorate their home and give it coziness than with the help of crocheted napkins. Openwork details require careful adherence to the pattern. Otherwise, you will end up with a convex hemisphere, pulled together at the edges, or a wavy edge.
Before you start knitting napkins, you can start with simple coasters for plates or glasses. Please note that the basic element according to a simple scheme can be used separately. Or you can put together a chic tablecloth from a sufficient number of fragments.
Napkins as a decorative element have already slightly lost their relevance. But lace weaving, with which you can decorate dinner napkins, tablecloths or even items of clothing, is valued today more than ever.
Check out some simple chain and column designs that will help you create not just utilitarian, but also fashionable design elements.
On the eve of the New Year and Christmas holidays, everyone is preoccupied with decorating their home. From the fragments you can create wonderful balls, as shown in the diagram. In order for the parts to keep the shape of a ball, you need to use a little trick: starch the finished fragments and dry them under a press.
How to Learn to Crochet Practical Things (Beginner's Guide)
For many modern needlewomen, the mention of decorative napkins does not arouse any enthusiasm. Art for art's sake is no longer so popular; many people prefer utilitarian products. And with the help of crochet you can make not only beautiful, but also useful things that will also serve a decorative function.
- To work, you will need a special type of yarn - ribbon yarn. The thread is very thick, 7-9 mm, holds its shape well in the product and allows you to quickly create the intended model. And ribbon yarn also has a lot of beautiful pastel shades, so fashionable in interior design today. It requires a special hook No. 12 or No. 15.
- For example, several multi-colored skeins of thick yarn and a hook will help you knit baskets that you can use as an organizer.
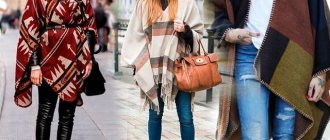
- A fashionable handbag matching the color of the coat can be knitted in one evening.
- A convenient shopping bag will help out. Who doesn't like visiting supermarkets with plastic bags.
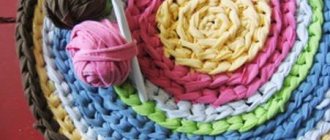
- You can create several interior items - a rug, covers for stools and storage boxes with lids.
- In the diagram you can see a diagram for the base of a bag or box. The diagram can be adjusted according to the size of the product.
- The diagram shows a step-by-step knitting technique that can be used to knit a basket of any diameter.
Crochet booties or socks for beginners
It is impossible to crochet socks in the classical sense. The technique does not involve knitting elastic. But knitting high closed slippers with soft soles is quite possible. And you can start training on your toes for the little ones. With a minimum set of basic techniques and some imagination, you can knit cute slippers, sneakers or even boots for your baby based on one pattern.
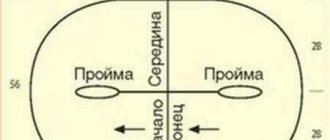
- Start by knitting the sole . Tie a chain of the required length - this will be the central part of the sole. Start knitting in the round according to the pattern, adding loops where necessary. As a result, you should get a sole that fits your baby's feet. You can just touch the leg to make sure everything is done correctly.
- For the edges, continue to knit according to the pattern or simply work stitches without adding stitches. The height should be sufficient so that the toe does not fit too tightly around the foot. After that, move on to designing the upper part of the sock.
- For a baby who is already actively moving indoors, you need to make a more secure tie.
- Or knit a high freebie in the form of a boot. But you need to provide the possibility of putting on a sock.
- Socks for adults are knitted using the same principle. They are not suitable for walking on the street, but they can easily replace homemade crocheted slippers or warm your feet in the cold season.
- Booties can be worn outdoors, but require a factory sole. Buy flip flops and remove the straps. You will need an awl to pierce the sole. Make punctures evenly along the entire perimeter of the sole, immediately pulling the thread through them. Next, knit the booties according to the chosen pattern.
- But the soles of flip-flops are very thin and quickly deform. Do you have old booties or espadrilles that have worn through your fingers? So what to do? Take the sole to a shoemaker and ask them to stitch it around the perimeter. Or make a blank from felt and sew it around the edge with thread. Now you have a blank with which you can start working.
- Look at several knitting patterns and finished results from the work of thrifty craftswomen.
Tunisian crochet for beginners
The Tunisian knitting technique is a mix of crocheting and knitting. You will need a hook, but its length allows you to knit fabric with more than one working loop. Using Tunisian knitting, craftswomen create large fabrics that can be arranged and stitched to create different patterns.
If we describe Tunisian knitting in words , we can say the following:
- you cast on a chain of the required number of loops;
- perform a transition column and move in the opposite direction;
- in the reverse step you do not pull the thread through the stitch loop and leave it on the knitting needle;
- as a result, after going through the entire chain, you have the same number of loops on your hook as there were in the chain;
- moving as you knit, you knit all the loops again and when you complete the row, you again get one loop.
In the diagram it looks like this.
Here are a few examples of finished products made using the Tunisian knitting technique.
Half-column: video master class
Single crochet
We insert the hook into the 2nd point of the chain and grab the thread.
We pull out the loop and pick up the thread again.
We knit a stitch, passing the elongated stitch immediately through both stitches on the hook.
We repeat, repeating the algorithm.
How to learn to crochet a scarf
Having mastered crocheting basic elements, you can safely start crocheting a simple scarf.
To work, you will need wool, half-woolen or cotton yarn - approximately 100 - 200 g (at least 180 m of yarn per scarf), a hook of the appropriate size. Knit a chain of 16 vp, including the last 3 vp. - this is for lifting.
1 r.: work st/n at 5 from hook b. p. chain and then knit until the end of the row of st/n.
2 rows: turn knitting, knit 3 stitches. p. rise, skipping the first column in the previous row, knit dc to the end of the second row.
Repeat row 2 until the scarf reaches the desired length. When knitting the last stitch, cut the thread, tighten its end into the working loop on the hook and hide it, stretching it along the knitting edge. The finished product can be decorated with a fringe of threads, a strip of lace, and tassels.
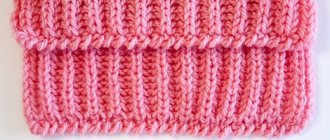
The photo below shows a scarf knitted according to the pattern described above, but not from bottom to top, but across, that is, a set row consisting of a chain is immediately equal to the desired length of the scarf. The number of knitted rows will depend on the desired width of the product.
An example of knitting a scarf with a double stitch pattern is shown in the following video.
https://youtu.be/DKJVi_JHbs4https://youtu.be/-BSqpmxH5ZQ
_
Relief columns
Stitches that are knitted not in a loop, but around the body of the stitch of the previous row, are called embossed. We wrote about how to perform them and what textures are obtained in the lesson about double crochets.
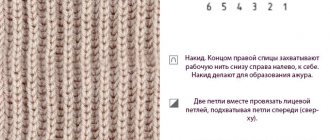
Knit Purl
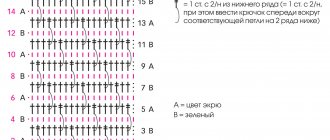
And a few more simple drawings from the same lesson. In a pattern of crossed columns, circles indicate the number of air loops between them - usually there are one or two, but there may not be any at all.
Crossed Crossed to the right Crossed to the left 3 with a common top 5 with a common base
Choosing a hook and basic knitting techniques – 1 lesson
Choice
For beginners, the topic of crochet lesson No. 1 is especially important. You need to select a hook for the job responsibly; the quality of the knitting largely depends on this. There are three main criteria for choosing a tool: its diameter, length and material from which the hook is made.
Diameters range from 0.5mm to 8mm, lengths from 120mm to 160mm. The principle of choosing a hook is very simple - its thickness should be 2.0 - 2.5 times the thickness of the thread. It is clear that if you take a thin thread and a thick hook, you will get a sloppy and loose fabric, and if you knit a thick yarn with a thin hook, the knitting will be too dense and stiff.
Hooks are made from plastic,
wood,
aluminum,
become,
bones,
combined from different materials.
The most practical are steel hooks; they are the most durable and comfortable. Although, for a person who has picked up this instrument for the first time, it makes sense to try different options in order to make a choice. Plastic and wooden ones electrify the yarn, aluminum ones can stain it, bone ones are very fragile and expensive, combined ones can break at the junction of two parts. In general, the choice is yours.
How to hold
Let's continue lesson 1 with a description of how to hold the hook and thread correctly.
Description - for right-handers, if you are left-handed, then repeat all the actions in a mirror manner. So, we hold the hook in our right hand - see photo. We hold it with our index finger and thumb, like a pen or pencil. The elbows and hands should move freely. Pass the end of the thread between the little and ring fingers and make a turn. Then we stretch it over the fingers and place it between the ring and middle fingers.
Having circled it from below, we draw it over the index finger. When knitting, hold the thread tightly between your thumb and index fingers.
Let's continue our 1st lesson and look at the basic knitting techniques as clearly as possible.
Irish lace crochet caterpillar cord: video MK
Motives
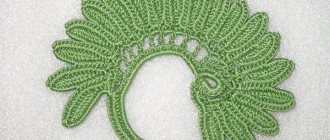
Irish lace patterns are represented mainly by natural motifs. These are leaves, flowers, branches, shells, curls. Using this technique you can knit very stylish, unique products. And not only for women, but also for children. You can use Irish lace, for example, to decorate a baptismal set. In this case, you need to use natural threads and choose motifs that suit the baby.
We offer a small selection of samples with diagrams. The symbols on the diagrams are standard; we present them for beginners learning knitting.
Air loop and chain of air loops: video master class
Half column
Knitting a half-column requires performing the simplest technique: insert the hook into the 3rd stitch of the chain, grab the thread,
first pull it through the loop of the chain,
then - through a stitch on the hook.
We repeat this until the end of the row.
Most often, a half-column is used to obtain a smooth and dense edge of the fabric or to neatly connect individual parts of a product.