Advantages of choosing a method
Knitting with a fork is a method that many craftsmen have simply forgotten today. However, the weaving technique is of particular interest to needlewomen. Advantages of choosing a working tool:
- Ease of operation.
- A small number of components, which are not difficult for even inexperienced craftsmen to familiarize themselves with.
- A large selection of forks that differ in size, material and distance between adjacent skewers.
- The ability to make your own fork from a bent knitting needle.
- The ability to model a knitted product yourself, first drawing up a knitting pattern on a fork.
- To connect adjacent braid loops you will need an ordinary knitting needle or the same fork.
- A large selection of models and schemes that are freely available.
A classic crochet hook of any size is used as a working tool (the choice of size depends on the type of yarn and the diameter of the loops for the fabric).
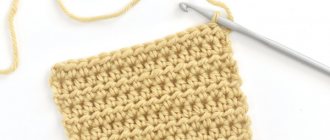
We knit a pattern for models from fork tape
Tie a ribbon with a length of 15 long turns on a fork as described earlier in the lesson. Now the element needs to be removed and combined into a pattern that can be used to create a very beautiful and delicate cardigan.
Video MK crochet on a fork
Knitting patterns
Diagram No. 2 shows a connection of five turns in a single crochet, with five arches knitted between them.
1. So, we pick up the already knitted element and a crochet hook. We knit an air loop into the initial turn to secure the beginning of the future pattern.
2. We insert the hook into the first five long loops, as indicated in the diagram and tie them with a single crochet. Next, you need to do five air moves and repeat the previous step.
3. Thus, until the end of the row we will get three repeating sections (rapport). We tie both sides this way. As a result of our efforts we get such a wonderful pattern.
In the previous two lessons we learned how to knit a simple ribbon using a crochet hook and fork and join it into a beautiful pattern. Undoubtedly, having learned to knit using the fork method, you will want to knit a similar cardigan. The following model instructions will help you on how to do this, but for plump people.
You will need the following materials:
- four skeins of yarn, 100 g each. (165 m);
- fork 9.5 cm wide;
- hook No. 4;
Since the principle of knitting is clear, it remains to learn in detail the subtleties of the design of knitted stripes and how many turns are collected for a cardigan.
Instructions for connecting parts from strips and tying them
Knitted stripes are connected using patterns and arches, guided by knitting pattern No. 2 above.
| Must be imposed |
|
The next thing is that you now need to connect and tie them correctly.
- We take three strips with 130 loops and connect them for the back and front. 2. Next, on a separate shelf for the neck and sleeves, there is a combination of one strip, which consists of 80 and one strip with 75 turns - the reduction should occur on the side of the neckline. 3. Completing the cardigan involves connecting the remaining two strips with 160 loops on the back with the sleeves, namely, connecting the turns of the bottom sleeve tape with the sleeve loops on the front. 4. We tie the sleeves with single crochets, and then according to schematic image No. 1. 5. Tying the neck, front and bottom is done like this: one row with single crochets and two rows with double crochets.
This way the work will be completed and the wonderful cardigan will become a favorite item in your wardrobe.
Next, let's move on to creating a scarf that will not only complement your look, but can also serve as an excellent gift for someone close to you.
Types of knitting forks
For a working tool, not only the dimensional line differs, but also the material of manufacture. The structure of the fork is of utmost importance: excessive thread slipping between adjacent fork skewers can make work difficult. Today in handicraft stores you can find the following types of knitting forks:
- Wooden models.
- Plastic forks.
- Metal forks.
If desired, you can make an excellent knitting fork with your own hands by bending an ordinary knitting needle.
Wooden forks
Such models are very convenient in practical needlework. They have a comfortable handle and two skewers. Their shape resembles a slingshot. Weaving the loops is done on adjacent skewers, and the finished braid is removed through the handle.
In addition, a number of advantages of choosing should be noted:
- Practicality.
- No excessive thread slipping.
- Durability of use of the tool.
- The absence of static electricity during the knitting process, which allows you to knit interesting accessories without damaging the external decor.
Wooden forks vary in size and are available at the best prices.
Plastic tools
Plastic is a universal material. It is durable, practical, and resistant to moisture and damage. Available at the lowest prices, but have a significant drawback.
Note!
- Knitted raglan - step-by-step instructions, patterns, recommendations. Photo review of the best works and new products from craftswomen
Knitting a shawl - step-by-step instructions for making a shawl with your own hands. Tips for beginners on knitting + photo reviews
Amigurumi ring ⭕: features of the amigurumi technique. Step-by-step DIY master class with simple knitting patterns + 180 photos
Excessive sliding of the thread along the surface of the skewers makes work difficult. For this reason, it is better for novice masters to train on wooden or metal forks.
Metal forks
They are ordinary knitting needles, curved in an arc. They can have different diameters of skewers and the distance between them. The choice of knitting technique, accessory model, and working yarn depends on these parameters.
Metal models are quite heavy, but are distinguished by the absence of thread slipping on the skewers.
Basic techniques for casting on loops
Fork knitting is nothing more than pattern knitting. The main element in this type of needlework is a braid crocheted onto working skewers.
Today there are only three types of columns:
- Half column.
- Classic column.
- Double crochet.
The presented techniques differ in the weaving of the central strip of the braid, which is quite simple for any master to learn.
Note!
- Knitted braids: simple patterns and the best master class for creating patterns with knitting needles. How to knit braids with your own hands + photo reviews
Knitting booties for newborns: detailed patterns for knitting booties for beginners + 150 photo reviews of the best products
Mittens - TOP 100 photos of the best creation ideas. Description of the technique + instructions for knitting mitts with your own hands for beginners
metelica-online.ru
Here are various types of knitted items that are crocheted on a fork. Knitted items are given with knitting descriptions, knitting patterns and patterns. Knitting on a fork is a fun knitting activity! Next there is a master class on fork knitting.
This pink knitted pullover looks luxurious. The pullover is knitted on a fork from a yarn that is 60 percent cotton and 40 percent polyacrylic. Here is a description of knitting, a knitting pattern and a pullover pattern. Knitted products of this type are very popular.
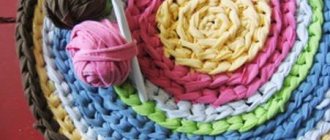
The photo shows a very cute knitted napkin. The napkin is tied on a fork. Knitting is such a joy!
Elegant knitted skirt with a description of knitting, a knitting pattern and a skirt pattern. The skirt is knitted on a fork. Knits like this skirt are like pictures! Don't take your eyes off!)
Watch a master class on fork knitting.
The photo shows a very beautiful knitted blouse in a delicate lilac color. The airy blouse is knitted on a fork and richly decorated with flowers. Miracle!) Knitting a wonderful blouse will delight you!
A girl in a summer knitted cotton dress is like a picture!) The dress knitted on a fork is given with a description of knitting. Knitted items look so luxurious. Knitting on a fork makes me happy.
In the photo there is a girl in a wonderful white pullover. Just like the picture!) The pullover is knitted on a fork. Elegant and beautiful!
A beautiful knitted skirt looks wonderful on a girl. Skirt with knitting description, knitting pattern and pattern. The skirt is knitted on a fork.
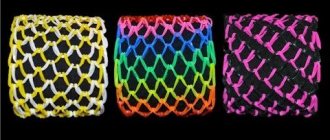
The picture shows a girl wearing a multi-colored scarf. The scarf is knitted on a fork, it is here with a description of knitting. Such original knitted products are very popular. Knitting on a fork creates masterpieces!)
In the photo there is a charming girl in a knitted bolero and an evening dress! Luxuriously! Bolero is tied on a fork.
The white vest is knitted on a fork. Here is a description, knitting pattern and vest pattern.
The photo shows a luxurious white jacket. She is tied on a fork.
The elegant top is knitted on a fork. Here is a description and knitting patterns for the top.
A wonderful knitted set for an evening out: a knitted stole and a handbag. The set is tied on a fork. Here is a description and patterns of the knitted kit. Knitting on a fork produces masterpieces!)
A girl in a knitted top is like a picture!) The girl is holding a fork, on which she knitted a beautiful top!) This is such wonderful knitting!)
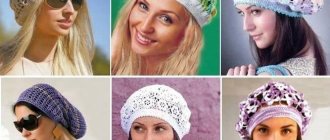
The girl in the picture is wearing beautiful knitted items: a hat and a scarf. The hat is crocheted and the scarf is on a fork. Here is a description and diagram.
The white scarf with fringe is very delicate and beautiful.
A green summer coat is knitted on a fork. Here is a description and pattern of the coat.
Luxurious white shawl with description and diagram.
In the photo there is a girl in a beautiful knitted cape. These are the masterpieces you can knit on a fork! Here is a description of the cape and a pattern for the cape.
The girl in the photo is wearing a very beautiful knitted sweater with a wrap. Like the pictures: a girl and a jacket!) Knitting like this produces wonderful things!
White knitted cape with description, diagrams and pattern. The cape is knitted from yarn containing 60 percent cotton and 40 percent viscose.
The stole knitted on a fork is good: so delicate and beautiful! An outfit with a stole suits the girl very well!
The beautiful blue jacket the girl is wearing is knitted in a very original way! Rarely beautiful products are revealed by knitting on a fork)
White knitted vest with collar with description, knitting patterns and pattern.
A knitted summer jacket on a girl is just a miracle!) The jacket suits the girl very well!
A knitted coat looks luxurious for the summer. Here is a coat with a description and pattern.
Knitted blouse made of white wool with description, diagrams and pattern.
The blue scarf is very cute. It turned out to be a very nice scarf!)
Elegant knitted cotton bolero with description and diagram.
The picture shows a knitted swimsuit with description and diagrams.
The knitted dress looks luxurious! The evening dress is knitted.
The photo shows a stunningly beautiful knitted product: a knitted sweater with a collar and a zipper. Here is a jacket with a description and pattern.
This may interest you:
- Women's backpacks
- Knitted suits
- Women sweaters
- Leopold the cat
- Doll toys
By Blogsdna
Half column
For knitting you need to prepare yarn, a crochet hook, and any model of fork. Fork knitting master class for beginners:
- Use a crochet hook to tighten a regular loop (the same as in classic knitting).
- Wrap the working thread around both skewers.
- For convenience, you will have to hold the first loop with your finger.
- The cast-on loop should be located strictly in the middle between adjacent skewers (this approach will ensure a beautiful, even weaving of the ornament).
- Through the loop, grab the working thread with a hook and form the next element.
- Twist the fork and hook so that the thread wraps around both skewers.
Braids are made by alternating loops and wrapping the working thread around skewers.
Features of knitting technology
In fact, knitting on a fork (English name hairpin lace - lace on a stiletto heel) has existed for a long time , they just forgot about it at some point.
In the modern world, it is gradually returning and beginning to win its place in the world of knitting. The main advantage is that the knitting process is easier and faster than standard knitting or crocheting. The result is light, flexible and airy products for all occasions.
Even a beginner will be able to distinguish things woven using this method. They are distinguished by rectangular elements and wide loops. The main idea is to weave the thread around the tines of a fork and knit using a regular crochet hook.
List of all necessary materials and tools:
- Special “U”-shaped fork - the standard version is a base, and pins and a spacer are already located on it. There are two types available: universal and stationary. Their difference is that on the second the width does not change, but usually beginners do not focus on this. You can make a homemade fork from a hairpin or an ordinary knitting needle.
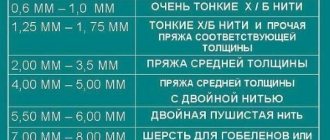
- A crochet hook is a standard crochet tool. However, there is a main rule for selecting a hook for a fork - the thickness of the pins must correspond to the thickness of the hook, and the diameter of the fork is equal to the volume of the thread.
- Tapes are parts of the future product.
- Yarn of any thickness. It is better to choose beautiful, delicate colors.
The process of fork knitting is similar to patchwork. The ribbons are tied with different loops into one solid product. The joints between elements can be practically absent or increased, it all depends on the scope of imagination.
It is possible to make the product round. To do this, you need to slightly gather and tighten the loops on one side, and expand them on the other.
Classic column
The first stages of work are no different from the previous method. After installing the loops in the middle of the skewers, proceed according to the instructions. Fork knitting master class for beginners:
- The hook is placed under one of the loops formed on the fork.
- Grab the working thread and bring it to the hook.
Next, knit a classic single crochet. The next step is turning the fork and hook to form a new loop on the skewers.
Instructions for Beginners
For an ignorant person, it will be difficult to figure out the knitting technique on your own. Master classes for beginners can help.
Step-by-step master class on fork knitting:
- Make a loose loop on one of the pins of the plug.
- Turn the fork clockwise so that the thread wraps around it.
- Separate and pull back the thread that comes from the ball of thread.
- Thread the hook through the first loop.
- Place the working thread behind the loop and pull it out.
- Make a regular knot. It must be formed exactly in the center so that later you can get even side loops. Don't be upset if you don't succeed the first time. Usually after the 15th, your hands begin to get used to it and the knots turn out smoother.
- Turn the fork clockwise again.
- Hook the loop behind the front thread and pull through.
- To tie a knot.
- Turn the fork over.
- Repeat the process until you have 30 stitches.
- Remove the workpiece (tape).
- Secure the tapes to the foam using pins. The distance between the workpieces should be a maximum of five millimeters.
- Carefully straighten all the loops with your crochet hook.
- Insert the hook into the bottom rightmost loop.
- Pry up and pull out the bottom leftmost loop.
- Pass the hook through the resulting loop into the next right one.
- Hook and pull out the right one.
- Repeat the procedure with all remaining loops.
You can complicate the design and make not one knot in the center, but two or more. Then the product will come out more prominent and will look more elegant.
All other steps are exactly the same as in the first option. The number of knots may not be limited, but it is important to leave a small distance on the sides so that there is something between which to fasten the flaps.
Double crochet on a fork
Another technique that is the basis for weaving patterns on a fork. Knitting on a fork for beginner needlewomen:
- The first steps are no different from the previous methods.
- The loop is installed in the middle of the fork. An air loop is formed.
- Make a standard yarn over.
- The working thread is grabbed through a loop on a skewer.
- As a result, three consecutive loops are formed on the hook.
- First of all, the thread is pulled through two elements, and then through two more.
Turn the fork again to get the next loop. All work with forks is based on weaving three traditional braids.
Principle of technology
The process of creating unusual-looking products is very simple. In fact, only three types of columns are used . Ribbons are knitted on a fork, which are then connected using different loops. The lace is formed into a single fabric and a pattern is given to it.
Knitting methods
- Half column.
- We fix the thread on the hook or the right tendril of the fork.
- We wrap the thread around the fork and then form a loop in the center.
- We twist the hook and fork in such a way as to secure the loop and wrap the thread around the knitting needles.
Related article: Do-it-yourself boots for a doll with suede patterns
- Make the next loop in the center of the loose thread.
- We continue knitting until the desired size of the ribbon.
- We finish by simply tightening the last loop.
- Single crochet.
- We repeat the whole process as in the first case, until the moment when you need to make a new loop.
- We form a second loop on the hook, grabbing the thread from under the loop on the fork.
- We knit a single crochet.
- Repeat with each new loop on the fork.
- Double crochet.
- We form an air loop on the fork, the hook is in the center of the thread.
- We make a yarn over.
- We grab the working thread through a loop on the knitting needle, the result should be three loops on the hook.
- First we knit two loops of them.
- Then the remaining two.
- We continue to work.
This is how the most basic patterns are knitted. They are decorated with additional air loops, yarn overs and even entire motifs.
Connection with a pigtail pattern
The prepared tapes must be laid on foam rubber or a dense textile layer. Then proceed according to the instructions:
- The tapes must be fixed (ordinary push pins can be used).
- The hook is inserted into the first loop of one ribbon, then into the opposite loop of the adjacent weave.
- Pull one loop through the other so that one working loop is formed on the hook.
Next, pass the hook into the next opposite loop of the ribbon, and repeat all the steps. Weaving is carried out to the end, alternating the indicated actions.
Tight weave
Instructions for the master:
- Fix adjacent tapes to the underlying foam rubber.
- Tie a thread of yarn to the central braid, and from there cast on five air loops.
- Insert the hook into the starting loop of the braid.
- Knit another air element.
Using this principle, work through all the loops of the braid. Connect adjacent ribbons with a tied edge with a regular loop using a hook.
Crochet an air scarf on a fork
We will create a wonderful scarf 120 cm long with our own hands.
For needlework you will need the following materials:
- universal fork – the width of the tool can be adjusted on it;
- hook No. 4;
- yarn with a composition of 40% mohair, 60% acrylic;
- thick thread 40 cm long;
- one long knitting needle.
Video for beginners knitting a scarf
The width of the device should be seven centimeters.
For the finished product, you will need to knit two identical strips of yarn, which then need to be joined together.
We knit a ribbon about two hundred turns long on each side. Which method you have already learned, do not forget to turn the instrument over after each loop.
This is what the strip will look like when you knit the required number of identical loops. Then the finished item will be symmetrical and fit well.
In order to start combining the finished ribbon into a pattern and join it into a scarf, you need to remove it from the fork. We take a thread approximately 40 cm long and thread it with a hook through all the loops on one side.
Then remove the ribbon from the fork and tie the ends of the threads into a knot, preventing it from falling apart. On the other hand, we need to stretch a long knitting needle that we prepared in advance.
You don’t have to worry that the ribbon you tied will begin to unravel, because its creation is completed. After completing all the preparatory work, we begin knitting the pattern. Place a crochet hook inside the last loop and make seven chain stitches.
We count the first four turns, hook the third and fourth under the knitting needle and knit a single crochet. Next, we remove them from the knitting needle, stretching them past the first two, which should remain.
We continue to make five chain loops, then grab the first two under the knitting needle - single crochet. After these manipulations we get a cross-on-cross pattern.
When performing this simple pattern, you should knit two sides of the track. When you knit one, make seven chain stitches and attach them to the middle of the ribbon where you knitted the single crochet stitches. To do this, insert the hook into the first stitch and knit a new stitch without a crochet.
Having finished knitting one side, turn over half of the scarf, string the loose loops onto a long knitting needle and repeat the previous steps. Having knitted three of the four sides, we move on to connecting them and forming our scarf.
Choosing yarn for weaving
Choosing working tools is only half the battle. The quality of the yarn is of paramount importance. A good thread has tensile strength, consists of combined fibers, is resistant to moisture, and does not slip on the fork.
It is better for novice craftsmen to use strong threads of sufficient diameter for training work. Finer fibers with the addition of acrylic are best used after achieving certain knitting skills and experience.
Today, experienced needlewomen recommend choosing the following types of yarn:
- Linen with the addition of acrylic threads. Great for weaving openwork fabrics on a fork.
- Cotton with a mixture of synthetic components. It is characterized by the absence of allergens, porous structure, soft texture. Great for creating summer dresses, children's blankets, beautiful shawls for evening walks.
- Mahra. It is distinguished by long pile, which allows you to weave unique blankets and rugs for the bed. The products have incredibly beautiful decor.
The master has the right to independently choose the type of yarn and working method. And ready-made instructions from experienced needlewomen will help you quickly and efficiently learn.
First lesson
The following master class will help a beginner in creating base stripes. It is worth noting right away that the loops on the fork will have to be counted several times. And for more comfortable knitting, finished loops should not be immediately assembled into a pattern. At the same time, the existing patterns for beginning needlewomen are quite simple. This will allow you to master the basics of all technology in a short time.
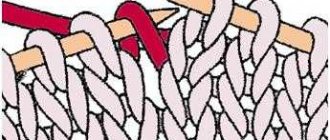
The first openwork strip can be made by taking the main tool in your left hand and using a crochet hook in your right hand to knit the first loop on it from the yarn. To do this, the thread should be laid around the right needle from front to back, holding the base loop with your left hand. Subsequently, the braid will also have to adhere in this way. Using a hook, the working thread should be picked up and threaded through the resulting air loop. After this, it needs to be placed in the middle of the knitting needles and pushed back. Meanwhile, with your right hand you need to turn the fork from right to left to form a loop of working thread around the right knitting needle. At the same time, the hook is inserted behind the front wall of the resulting loop from bottom to top. We need to grab the working thread to form a loop. This procedure must be performed twice in order to knit the two resulting loops.
The next step, which this master class dictates for beginners, involves the formation of a second loop. To do this, holding the additional tool between the knitting needles, turn them to the left and knit 1 single stitch from the left front loop. In this sequence, you will need to knit the loops on the fork to the edges. After which you can remove the finished part of the braid. For beginners, it will be easier to carry out this procedure using schemes with simple forks. Holding the strip of braid with your left hand, without unnecessary manipulation, you can effortlessly remove the crocheted part through the top.
Using this master class and the diagrams shown in the photo, you will get a braid that will become one of the elements of the finished product.