Needlework
06/14/2018 Anastasia Prozheva
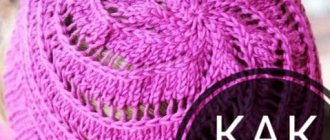
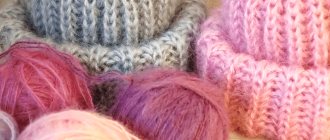
The “Gerda” beret is very loved by many fashionistas, because it is very comfortable, beautiful, and suitable for absolutely any type of face, for any age. Of course, you can buy such a beret, but finding a suitable one in a store will not be easy; it is much better to knit it yourself. Many girls who have been knitting for a long time are very familiar with this pattern; there are many techniques for making the pattern. This pattern is very voluminous and is one of the variants of the Aran patterns. This article will tell you how to knit a “Gerda” beret with knitting needles with a description.
As already o belongs to the Aranian motifs. Aranas are ancient knitting patterns that came to our country from Ireland. Things created using such beautiful patterns look very sophisticated and attractive; in appearance, such a pattern resembles a braid, but it is not so.
Let's go to the lesson
The “Gerda” beret is one of the most common and simplest variants of arans. In such a headdress you will undoubtedly stand out from the crowd of people and will happily wear it for more than one season.
You will need:
- Fairly dense yarn;
- Stocking needles No. 5;
- Knitting needles No. 5 for the main pattern;
- Knitting needles No. 3.5 for elastic.
Work process.
- We cast on 132 stitches and distribute them onto four double needles. We start working on the elastic with three purl loops, to the height you need.
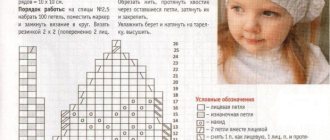
- Then we add pattern repeat - it consists of 16 loops, of which three are purl and 13 are pattern. We make increases according to the knitting pattern below.
Yarn from a broach:
And we knit the back wall:
- To create a pattern, you need to change the knitting needles to a larger size and knit the first row - three purl, six knit stitches, one purl, six knit. Then we work according to the scheme:
Related article: How to weave a wallet from rubber bands on a machine and on a slingshot with photos and videos
- Sixth row: purl three, knit seven, purl one - and so on until the end of the circle.
- Repeat the pattern according to the pattern until the fiftieth row.
- In order to complete the beret, after the fiftieth row - knit all the purl loops in threes together with the wrong side - the number of loops will noticeably decrease. When there are not enough loops for circular knitting needles, take stocking needles for work. On the next row, cut two stitches together until approximately sixteen stitches remain. You need to pull the thread through the loops twice and pull them together.
- The beret is ready.
When working on creating the “Gerda” beret, it is worth considering some points: to make the product last longer, use natural threads; in addition, synthetic materials can very often cause allergies.
Tips for knitting a beret:
- To make the elastic fit more tightly to the head, you can knit it in two rows of levels, and when finished, fold it in half and stitch it.
- To make the shape of the headdress look more interesting, the level from 20 to 27 rows can be repeated twice.
- When the beret is completed, it needs to be washed and dried by stretching it on a plate or balloon.
Innovation of knitting art
Voluminous knitted ladies' berets, which are made of wool yarn using large knitting, are an excellent option for daily wear.
They can be worn with modern outerwear: a down jacket, a duffle coat, a short coat. Do not deny yourself the pleasure of trying on different styles and colors - this feminine and elegant headdress has the right to take its special place in the wardrobes of modern fashionistas. This is exactly the kind of beret provided by the designers of the Norwegian creative studio Drops Design - Gerda's beret. It should be knitted from Alpaca Drops yarn, which consists one hundred percent of the wool of goats living in the Andes. This kind of yarn is famous in knitting circles and is valued as high quality. It will undoubtedly elevate any item, including a light headdress. Of course, you can buy a beret, but how nice it is to knit it yourself, putting your skill and soul into your work. It is better to create your own unique look with the help of a Basque beret with braids from Drobs.
Sweet "aspen"
There is also a type of pattern that is popularly called “aspen”. This pattern is different in that it really looks like an aspen leaf; such a beret is perfect for the autumn season.
We will need:
- 2 skeins of yarn, 50 g each;
- Circular knitting needles No. 2;
- Stocking needles No. 2;
- Stitch markers.
Description of the stages of work.
- Using smaller needles, cast on 140 stitches, place a marker, complete the circle.
- Make the following round row: k1, p1. loops 2 times; K1, p2 – repeat this step in a circle.
- Repeat the next round row until the knitting height is 2.5 centimeters.
- Next round row (increases): K1. with double crochet, 1 p. double crochet; 1 person 2 p. – repeat in a circle up to 220 stitches.
- Next round row: K1. 1 person crossed, purl 1 1 purl. crossed 2 times; 1 person 2 p. - repeat in a circle.
Article on the topic: Grapes made of beads with diagrams and photos: master class with video lessons
Let's make a pattern.
- We switch to larger knitting needles and knit a repeat of 11 stitches (see knitting pattern) 20 times in a circle. We knit according to the pattern up to the sixtieth row. Switch to stocking needles when all sixty rows are knitted and there are no 40 stitches on the knitting needles.
- Next row: knit one loop and draw a sliding loop over the knitted one, do this in a circle for 30 loops. Having broken the thread, thread it through the remaining loops and tighten.
Wash the product in warm water, put it on a plate, and let it dry.
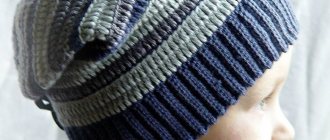
Another master class in this style is shown in the photo below.
We recommend that you visit the Osinka website, where you will find a lot of pattern options, with various techniques, lessons, and there are also a lot of tips for understanding and deciphering complex patterns for knitting aran.
Takes “Gerda” with knitting needles - diagram, description and video master class
1:504 1:509
Some call this cap the Gerda beret, others call it the Basque beret. Both are right. Both names mean the same thing - a model from the Norwegian design studio Drops Design. The design of this headdress will not leave anyone indifferent. It is decorated with original relief patterns with braids - this is one of the simplest types of braids, so even a novice craftswoman can knit such a beret.
1:1220 1:1225
2:1729 2:4
The beret is knitted from warm yarn, preference is given to natural wool. Suitable for the cold autumn of central Russia or the warm European winter.. In the article we offer you a detailed description of knitting, a pattern diagram, and a video master class.
2:443 2:448
3:952 3:957
You will need:
3:994 3:999
— DROPS NEPAL yarn from Drops (65% wool, 35% alpaca 75met/50g), soft Norwegian thread, non-prickly, great for hats — 150 grams; - circular and stocking needles 40 cm No. 5 and No. 3.5. Density: 17 p. = 10 cm in stockinette stitch Dimensions: 56-57 cm and 57-58 cm.
3:1422
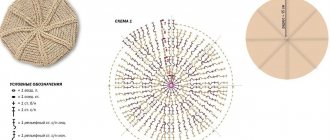
Knit the embossed pattern for the Gerda beret on knitting needles according to the pattern and carefully read our description.
3:1610 3:4
We will knit using the classic method from the elastic to the crown.
3:109 3:114
Description of knitting a Basque beret
3:184
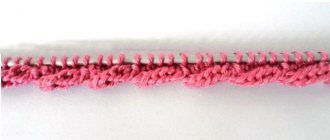
- On the sp. No. 3.5, dial 84/96 p. (for sizes 56-57 and 57-58). Tie 10 rubles. with an elastic band 3 by 3 (k3, p3) in the circle, starting with purl 3.
- Go to sp. No. 5 and distribute the Basque pattern as follows: * P3, k1, yo, k1, yo, k2, p1, k2, yo, k1, yo, k1. * - repeat until the end of the row (= 112/128 sts).
- Next - * purl 3, pattern according to pattern * - repeat from * (7/8 repeats). To avoid holes, yarn overs need to be knitted by the faces. p. behind the back wall.
- Then continue strictly according to the scheme. When you finish the hat, it becomes uncomfortable to work with circular knitting needles, move on to stockinette knitting needles.
- When you knit all the rows of the Gerda beret in height, there will be 42/48 loops on the knitting needles. Next day knit 3 purl stitches. elastic bands together (= 28/32p.). In the next one - all 2 persons. at the same time (= 14/16 p.).
- We break the thread and pull it through the remaining loops in two turns. We pull them together.
3:1690
In the original, the beret should be 24 cm high.
3:80 3:85
4:589 4:594
Attention!
4:618
Why is a piece of the diagram outlined in a red rectangle? This is made for those who knit according to their own calculations and the density does not match. You can work the circled rows once, like Drops. But if your beret height is not enough, then knit this sector twice.
4:1103 4:1108
On the Internet you can find a version of the Gerd beret (Basque) made from another yarn - LANAGOLD. Of course, if you are an experienced knitter, then make your calculations and use your imagination!
4:1403 4:1408
For example, for warmth and a change in appearance, tie a longer elastic band, tuck it in and get a double band. Or knit a beret yourself that is longer, drooping, in boho style.
4:1737
We hope that our instructions on how to knit Gerda’s beret with knitting needles were clear.
4:143 4:148
5:652 5:657
When the product is ready,
do a wet heat treatment (WHT): wash in lukewarm water, no more than 30 degrees.
Squeeze, being careful not to twist, and dry on a horizontal surface. The higher the percentage of wool in the yarn, the more carefully you need to monitor the water temperature when washing. 5:1201 5:1206
For beginner craftswomen - video master class from Yulia Dolgova:
5:1327 5:1332
5:1339 5:1344 5:1349
Source
5:1370 5:1375 5:1380
Product care rules
Once finished, the product must be washed by hand. Under no circumstances should you use a washing machine either for the first time or in the future. Otherwise, you can seriously damage not only the beauty of the product, but also ruin the wool. You should do this:
- It is necessary to ensure that the water is not hot. Don't rub the product too hard. You just need to gently squeeze it, allowing any remaining dirt or dust to float freely along with the water.
- After this, the new hat must be lightly wrung out and placed to dry on a horizontal surface, carefully straightened out.
Knitting is a kind of art that never excludes flights of fancy. Therefore, if a needlewoman has a desire to bring something of her own or somehow change the original model of this headdress, then there should be no obstacles to this. For example, an elastic band can be knitted twice as long and folded so that the hat fits the head more tightly and is warmer.
To give the hat more volume, you can repeat 20-27 rows. If the yarn is thinner than in the description, you can fold it into several threads. Many people take thinner knitting needles, this will allow them to make an even more beautiful and intricate pattern. But then it will be necessary to take into account that the master will need to increase the number of repeats and loops.
If experience allows, you can fantasize as you like, the main thing is that the person who will ultimately wear this beautiful and warm product likes it. In addition, Gerda’s beret, a diagram and description of which is available on the Internet, not only helps to emphasize individuality, but also improve one’s skills.
Execution Features
An interesting knitted model of a women's beret, Gerda, has a number of its own design features. The Internet provides master classes for needlewomen on knitting a beret, with detailed descriptions and diagrams.
But it’s worth considering the nuances that affect the final appearance of the beret. By adhering to them, you can avoid serious mistakes when creating this pattern yourself:
- You need to knit a Gerda hat with medium-thick yarn, then the pattern will be embossed, but not too voluminous, which will allow the product to fit your head perfectly.
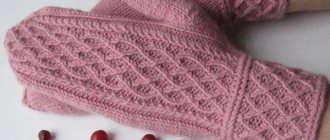
- You can make a set by knitting mittens and a scarf-front to the beret, using the same knitting pattern.
- The master selects knitting needles in accordance with the density of the yarn. To knit the lower part of the beret with elastic bands, you need thinner knitting needles than for the main fabric.
- The thickness of the knitting needles and the knitting density affect the size of the product. It can also be adjusted in width by the number of sectors with a pattern. Traditionally there are seven, but can be increased to nine, this also depends on the density of the yarn and the number of knitting needles.
- When knitting a braid pattern, you can repeat the selected fragment of the pattern on the Gerd beret pattern with knitting needles several times in height, this will make the braid longer. Therefore, before you start working on the hat, it would be a good idea to knit a sample pattern and elastic band.
- Based on the sample diagram and substituting your parameters, you can find out the width of the pattern on your future hat.
- The beret will consist of a cuff - elastic and fabric with patterned wedges. First, an elastic band is knitted; its finished size will be 5 cm. Then they move on to the main fabric, making patterns of 7 repeats in width.
The finished size of the fabric should be on average 20 cm. At the end of knitting, a connecting seam is made, which will not be noticeable on the finished product.