What is snood and its benefits
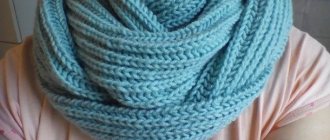
Snood is a type of classic scarf. It differs from the usual type of scarf in its shape, which has the appearance of “infinity”. The accessory takes on this form in two ways:
The ends of the knitted straight fabric are sewn together;
The product is knitted in the round (seamless option).
Previously, when the snood scarf began to come into fashion, it was called: “pipe”, “collar”. Over time, the product was modernized, and it began to be called snood, its second name is “a scarf without beginning and end.”
Taking into account fashion trends, the snood scarf is actively used by the entire population of the planet, from the smallest to the adult. By gender, an accessory can differ only in: design; color; additional decor.
Comfortable snood scarf
Advantages of a snood scarf:
- When putting on an accessory, you have to rack your brain about how best to tie it to your child, so that the throat is always warm during outdoor games and is not exposed to wind and cold air.
- It is put on over the head and placed in the desired position; even the smallest child can cope with this task.
- A universal product, it replaces two items from your wardrobe at once - a scarf and a hat.
- A snood scarf is an accessory that is used in all seasons.
- The accessory fits any wardrobe and harmonizes perfectly with different items of clothing.
The snood, knitted with your own hands, will be the only copy, so it will make the baby stand out from the general crowd of children. A correctly selected bright color and beautiful design of the product will make the child’s image trendy and unique.
How to choose the right yarn
When choosing yarn for snood, you need to be careful and take into account several nuances:
- The color of the finished product should be in harmony with the color of the baby's outerwear or the color of his eyes.
- For the winter period, a scarf-collar that fits tightly to the throat is perfect. Its color should be bright, but not red tones and shades. In the cold and without highlighting with color, a child’s cheeks are rosy from the frost. It is also better to avoid green color, it can play a cruel joke and make your child look sick.
- The size of the accessory is another main point when choosing a knitting pattern. An incorrectly selected size will look awkward on the baby and will not protect against frost.
- For the demi-season season, snood is knitted from thin wool yarn, with any type of “elastic”, which will give the product pomp and originality.
- In the winter cold, an accessory made of thick yarn, angora goat fluff, and a voluminous shape looks relevant.
- On warm spring days, a snood made of natural threads (cotton, linen, bamboo), knitted with an openwork pattern, will come in handy for walks.
- To decorate the accessory use: beads, various thematic appliqué designs, rhinestones.
Snood scarf size chart
| Child's age (years) | Product width (height, cm) | Product length (diameter, cm) |
| 4-6 | 15 | 100 |
| 7-9 | 18 | 115 |
| 10-12 | 20 | 130 |
| From 12 | 22 | 145 |
The simplest children's snood with knitting needles for beginners: diagram, description, video
A snood collar for a child, knitted with a simple pattern on knitting needles, is an excellent universal option, worn by:
- Under outerwear;
- For outerwear;
- Under the hoods;
- Over the hood;
- Instead of a hat.
In cold weather, you can use a snood to cover the freezing lower part of your child’s face.
Children's scarf-collar knitted with the "Rice" pattern
What you need for work:
- Children's yarn (100% wool, 50g/200m) – 100g;
- Circular knitting needles No. 4mm, length = 80 cm.
We will knit for babies from 1 to 3 years old. Product height = 24.5, volume length = 52cm.
The height and length vary at the discretion of the needlewoman, it all depends on how the product will be worn.
The “double rice” pattern is used in knitting; it is good because the product has the same pattern on both the front and back sides. If your child has to put on an accessory on his own, no matter how he puts it on, it will always be correct.
The scarf-collar is knitted in two ways: in the round and straight. In the first option, you need to mark the junction of the loops with a marker. The second option is knitted in turning rows, each row ending with a purl loop. This is done to form a smooth edge of the product, so that after stitching the accessory will have an invisible seam.
Description of work:
Cast on 80 stitches on the knitting needles, then knit according to the pattern:
Knitting pattern in the round
The pattern is knitted by alternating knit and purl stitches.
1 r: slip the first stitch onto a working needle, *knit, purl* -knit from* to* to the last stitch of the row, purl.
2 r: *knit, purl* -knit from* to* to the end of the row.
3 r: *purl, knit* - knit from* to* to the end of the row.
4 r : *purl, knit* - knit from* to* to the end of the row.
Thus, knitting 21 cm is 58 rows.
Finish knitting with a 2x2 rib (knit 2, purl 2). Knit 7 rows and bind off the loops.
Snood knitted with a “rice” pattern
Video: MK of a simple snood for 3.5-4 years
Snood for a boy with knitting needles: diagram, description, video
The snood scarf knitted with an English elastic band has a voluminous shape, is soft and very cozy. Using any type of elastic in a knitting pattern is a guarantee that the item will not stretch and will always have its original shape.
To work we will need:
- Wool blend yarn (50% wool, 50% acrylic) – 100 g;
- Circular knitting needles according to yarn size.
We will knit according to the pattern:
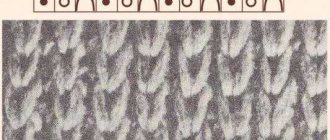
English gum pattern
Description of work:
On the knitting needles we cast on a number of loops that are a multiple of 4, plus two edge stitches.
1 r: remove 1 loop, *make a yarn over on the working needle before work and remove the second loop without knitting. There were three loops on the knitting needle. Then knit the next two loops together, catching the loops on top*, repeat from* to* until the end of the row, purl the last loop. Turn the knitting.
2 r: remove the edge, *yarn over, remove the loop, knit the next two loops together, catching the loops on top* - repeat from* to* until the end of the row, purl the last loop. Turn the knitting.
We continue to knit the pattern alternating rows 1 and 2 until the desired size is achieved.
Close the loops.
Connect the edges with a hook or a large needle. Place the finished product on a damp towel to moisten it. Give the clamp the correct shape and dry it in a lying position.
Video: Children's snood with "English elastic" pattern, two turns for 1-3 years
Trumpet scarf with “Spikelets” pattern
We need:
- h/w yarn (100g per 100m) – 200g;
- knitting needles No. 10.
Density: 10p. equal to 10cm.
Description
We cast on with knitting needles 50 stitches, including 2 cr. 1 p.: 1 cr., next 2 p. we knit for the bottom slice in 1L., then from the left sp. we remove only one knitted stitch (right), the 2nd stitch remains on the left sp. Then we knit 2 stitches again. in 1l. for the lower segments (the first loop of two is the unslipped stitch from the first pair) and again we remove only one right stitch, leaving the second on the left sp. We work like this until the end of the river. After we knitted the last 2 stitches, on the left sp. 1p remains. We knit her faces.;
2 p.: 1 cr., next 2 p. knit in 1i., then remove from the left sp. only one (right) stitch, the 2nd remains on the left sp. Then we knit 2 stitches again. in 1i. (the first loop of two is an unslipped loop from the previous pair) and again we remove only 1 stitch, leaving the 2nd on the left sp. We work like this until the end of the river. We knit the last stitch purlwise. Repeat both rows until the snood height is 40cm. Closed p. and sew the snood.
Snood for a boy with knitting needles: diagram, description, video
This snood-collar model for a 3-4 year old boy is knitted in the round. The thread for the volume of the product is taken in two folds. The height of the collar is 20 cm. The pattern and description are quite simple, so for those who have never knitted such things, this is a chance to make a fashionable accessory for a baby with their own hands.
To obtain a voluminous scarf, you need to select yarn of appropriate thickness and composition. If the knitter knits tightly, then it is recommended to take the knitting needles a size larger, otherwise, the tool is selected a size smaller than the recommended one. For example, on the wrapper of a skein of yarn, needles No. 3 are indicated; for loose (weak) knitting, you need to take No. 2.5 mm.
The following materials were used for the sample:
- Children's yarn Nako bambino 50g/130m – 100g;
- Circular knitting needles No. 3.5 and length 80 cm.
Knitting begins with a set of loops, continues with knitting an elastic band and the main pattern, and ends again with an elastic band.
Description of the work progress:
Cast on 105 stitches on the knitting needles, the last stitch is additional to join the row. There are 104 main loops in total.
We close the ring: we pull the first loop of the cast-on row through the last one.
You should get an even circle on the knitting needle; when knitting the first row, you need to make sure that the loops do not twist, but lie flat, this will determine the beauty and neatness of the finished product.
Rib: 1x1, knitted by alternating knit and purl stitches. In each subsequent row, knit over knit, purl over purl. Knit 3 cm high.
Let's move on to knitting the main pattern according to the pattern below:
Description of the main pattern:
Rows 1 to 5: *knit (k), purl 2 (p), k 3, p 2*, repeat from* to* until the end of the row.
From rows 6 to 10: *k2, p2, knit, p2, k*, repeat from* to* until the end of the row.
The pattern is knitted alternating with rows 1-5 and rows 6-10. One repeat is: 8 loops long, 10 rows high.
Knit a height of 14 cm, but if the repeat in height is not finished, then it is better to tie it so that the product has a finished pattern.
For the final stage in knitting a snood, we switch to a 1x1 elastic band and knit another 3 cm.
Close the loops using any known method.
Moisten the finished product, spread it out and dry it on a flat surface. This is done so that all the loops of the accessory are aligned and take on the same shape, and the product itself looks neat, just like it came from a store.
Snood for a boy
Video lesson: Knitting Snood for a boy
Knitting in the round
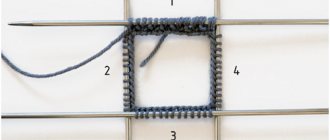
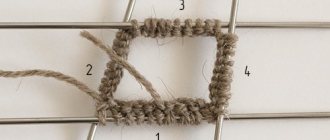
How to knit a pipe without a single seam? This is done with circular knitting needles or on five knitting needles, like mittens.
Start working on five knitting needles, according to the diagram and description:
- Buy Troitskaya yarn, which is half wool and acrylic. It requires a set of tools with a diameter of No. 5. The main pattern is faceted elastic. Pattern diagram: even rows – 2 knits/2 purls, similar odd rows – 2 knits/2 purls. Knit the edges of the fabric in garter stitch.
- Having calculated the number of loops for your hood size, dial the number that is divisible by 4 and divide equally into 4 knitting needles.
- Use the suggested pattern to knit the pipe to the desired length, and then switch to garter stitch.
- In order for the pipe to be neat and keep its shape, its top needs to be tucked and stitched with a hidden seam.
The pipe can be tied without a seam using circular tools. To do this, you need to connect the cast-on loops into a ring and knit in the round. You can knit with any other pattern.
Children's snood with "Butterfly" pattern on buttons: diagram, description, video tutorial
A snood collar with buttons is a warm and cozy product suitable for all babies and even their mothers. Buttons on the accessory make it effective and unique, and also extend its service life. Knitting such a snood is not difficult, so even an inexperienced knitter can handle making this trendy accessory.
What we need:
- Wool blend yarn (50% wool, 50% acrylic) 100g/115m – 200g;
- Knitting needles according to yarn size - circular or straight;
- Decorative buttons – 4 pcs.
In the photo, the dimensions of the scarf are: 30 cm wide, 70 cm long. The parameters of the product can be changed at your discretion and in accordance with the age of the child. The product is knitted in rotating rows.
In the diagram of the main pattern, the edge loops are not indicated, so when counting the initial set of loops, add 2, one ends the row and is knitted on the inside, the second is removed without knitting at the beginning of the row.
Description of the work progress:
On the selected knitting needles, we cast on such a number of loops that their sum is divided by 10 (without remainder) + one edge loop on each side. In MK, 50 + 2 = 52 stitches are cast on.
Knit the first three centimeters in garter stitch (all stitches, except the edge stitches, are knit). Then continue knitting with the main pattern according to the attached pattern:
We knit 3 cm in garter stitch (knit and purl rows are knitted with knit stitches).
We move on to knitting the main pattern according to the pattern:
1 r: chrome, 2 knit (s), remove without knitting 5 loops, how to stretch the knit threads before work (broaching), * 5 knits, 5 with broaching knits *, repeat from * to * to the end of the row.
2 and all subsequent even rows (except 10 and 20): knit with purl (purl) loops.
3, 5, 7, 9 r: knitted as the first row.
10 r: we form “butterflies”, chrome, purl 4, insert the working knitting needle through the drawn loops (5 pcs.) behind the work and move them to the knitting needle, knit them together with the next loop in the row (6 pcs. on working knitting needles) purl loop (butterfly), purl 9, butterfly, purl 4.
From 11 to 20 rubles: repeat the knitting pattern from 2 to 10 rubles.
20 r: chrome, purl 9, butterfly, purl 9.
The product is knitted according to this pattern to the desired length. Ours is 64 cm.
Finish with garter stitch with button holes.
Buttonholes: edge, knit 2, bind off 2 loops, *knit 13, bind off 2* - 2 times, knit, purl.
After forming the loops along the buttons, we knit another 1.5-2 cm in length using garter stitch. It should be noted that two loops are knitted above the “holes”.
Finish knitting the snood by closing the loops.
Finally, sew on the buttons, moisten the product and dry it flat on a flat surface.
Snood collar for girls, boys and mothers
Video: MK knitting snood with a butterfly pattern
Snood for girls with a braid pattern: diagram, description, video
A warm, beautiful and cozy scarf-collar for a girl is made with a braid pattern. An excellent option for winter walks, the snood is put on in one turn, over clothes. For experienced craftswomen, it will not be difficult to knit a hat and mittens for a complete set. Beginning needlewomen can first knit a snood according to the provided diagram with a description, then take on more complex products.
Materials that need to be prepared for work:
- Yarn (50% acrylic, 20% wool, 20% alpaca, 10% mohair) – 100 g;
- Circular knitting needles according to yarn size.
Knitting is circular, seamless.
To calculate the required number of loops to start working, you need to knit a 10x10 cm sample, and count how many loops there are per 1 cm. For example, 1 cm = 3 p, we need 28 cm x 3 p = 84 p. + 1 loop to close the row in a circle
To start working, cast on 85 sts and knit a row with a 2x2 elastic band, connect the last one to the first loop and close the row, you should get a ring. We switch to knitting according to the pattern:
Description:
From the first to the third rows, knit: * 3 purl, 12 knits, 3 purl *, repeat from * to * until the end of the row, 7 times in total.
Row 4: *P3, K4, slip 4 loops onto a pin, leave behind the work, K4, remove the loops from the pin onto a knitting needle with the work and knit them, P3*, repeat from* to* to the end of the row, only 7 times.
From the fifth to the seventh rows: *P3, k12, P3*, repeat from* to* to the end of the row, 7 times in total.
Row 8: *P3, remove 4 loops on a pin and leave before work, k4, from the pin, transfer the loops to the knitting needle with work and knit them, k3, p3*, repeat from* to* to the end of the row, only 7 times.
Repeat knitting from rows 1 to 8 until you reach the desired height.
Finish the work by knitting the last row: p2, k2.
Close the loops using any known method.
Video: Volumetric children's snood with braids
Snood for girls with lapel
An excellent option for a warm scarf-collar for a girl during the cold season. The accessory is knitted simply by alternating knit and purl stitches.
What you will need:
- Thick yarn (80% acrylic, 20% wool, 100 m/160 g) – 1.5 skeins;
- Knitting needles according to yarn size;
- Fastener buttons – 4 pcs.;
- Decorative buttons – 4 pcs.
Progress:
Cast on 24 stitches on needles. We knit the product in rotating rows. We always purl the last loop, since we need a beautiful and even edge.
The first 8 rows are knitted with knit stitches only, with the exception of the edge stitch.
Row 9: edge, knit 22, edge, turn.
10 r: chrome, 22 purl, chrome.
11 r: chrome, 22 purl, yarn over, chrome.
12 r: chrome, knit 23, purl, chrome.
13 r: chrome, 23 purl, yarn over, chrome.
14 rubles: chrome, 24 faces, chrome.
We knit in this order, up to 33 loops on a knitting needle, by adding loops through a row.
In this way we continue to knit, adding one loop in each odd row until there are 33 loops on the knitting needle.
Collar lapel: knitted in garter stitch. Without stopping adding loops in the rows, we knit until the total number of loops is 48, half of the snood is ready. The second half of the product is knitted in reverse order.
Decrease the loops like this: knit the penultimate two loops of the odd row together, do not touch the edge stitch. For symmetrical knitting, apply one half to the other while working so that there is no distortion.
Finish knitting with garter stitch. Close the loops.
Try on the scarf and mark where to sew on the buttons. Sew on the buttons and then decorate the knitting with decorative buttons.
A fashionable, warm and such a beautiful accessory for a girl is ready.
Warm snood for girls
Two-tone and lush
For knitting you will need:
- 8 skeins of yarn (woolen, fluffy): 4 of one color and 4 of another;
- knitting needles 9 mm round;
- needle;
- scissors.
Let's analyze the algorithm of work.
Cast on thirty-one stitches.
This master class uses colored yarn, it looks more interesting, but you can use one color of thread.
1st row: front, straight cast, remove the loop without knitting (thread behind), thus knit until the end of the row. 2nd row: straight cast, without knitting, remove one loop (thread behind), knit a loop and cast the previous row with the front element together. 3rd row: knit a loop and cast the previous row with the front element together, then make a straight cast without knitting, remove the loop (thread behind).
Take turns knitting the 2nd and 3rd rows until the end. The length of this snood is about 65 cm.
Do not touch the knitting needle with the final row, take a free knitting needle in your hands, cast on thirty-one stitches from the other edge of the snood, the knitting needle faces in the opposite direction from the other.
Next, turn the knitting needle so that the sharp ends point in the same direction, close the knitting with the 3rd knitting needle, remove and close the loops simultaneously in order from two knitting needles. Cut the yarn and wrap the scarf as desired.
Related article: Filimonovskaya painting with patterns step by step for children with templates
Snood is ready.
Snood for a child: diagram, description, video
To knit a scarf-collar for a child, the yarn must be chosen so that when you touch the baby’s delicate skin, it does not cause allergic reactions and does not prick. The winter version of the accessory can be knitted from yarn with the addition of goat fluff, and for a warmer period, yarn with the addition of natural thread (cotton, silk) is suitable.
In “Yarn” stores, there are entire shelves with yarn, which is intended for children's products. Therefore, it is quite easy to choose the appropriate material for children's accessories.
Knitting a snood for a baby is simple and will only take a few hours; even a novice needlewoman can easily cope with this simple knitting pattern.
To work you will need:
- Children's yarn – 1 skein;
- Knitting needles according to yarn size.
If preference is given to circular knitting needles, then the product will be knitted in the round to the desired height. Using straight turning rows, the accessory will be knitted to the desired length, then the ends will be sewn to each other.
In any case, the finished snood will be very warm, beautiful and cozy. The most important thing is that the child’s throat will always be closed and protected from wind and frost.
Video: knitted snood scarf for children
Varieties of scarf-collar
There are several types of snoods:
- ribbon or continuous ring: the pattern can be drawn on one side;
- a ring that can be fastened with hooks or buttons;
- a closed and several times twisted ring.
This versatile piece of clothing is also affordable. So if you decide to make a gift and please your loved ones or yourself, you can familiarize yourself with the knitting patterns of snood scarves with descriptions and feel free to get to work.
In fact, the main feature of the snood is its little secret - it has neither a beginning nor an end. Therefore, lazy housewives can sew any scarf, and a fashionable snood collar is ready! The seam can be hidden in folds or decorated in an original way with pieces of fur, rhinestones or beads, depending on the season.
If you still decide to try the difficult profession of knitting on your own, you need to arm yourself with a suitable tool . You need to choose suitable knitting needles (presumably number 3, 4 or 5) and 200-300 grams of yarn. There is a little recommendation from experienced knitters. To determine the density and number of loops, first knit a sample - it will show how the threads behave and what needs to be done in order to get a beautiful and complete pattern.
The simplest patterns for beginners are considered to be “ribbed” and “garter stitch”, so you can use them in your first knitted product. Combine these two patterns and your DIY scarf is ready!
