It's never too late to learn to knit - this especially applies to young mothers. After all, this process allows you to create unique and at the same time practical things for all family members. The best knitting option is a knitted vest for a girl - this wardrobe item goes perfectly with any clothes and is suitable for children of different ages. After all, even the smallest representatives of the fair sex always dream of being not only beautiful, but also fashionable.
How to calculate the number of loops
Despite the fact that knitting a vest for a girl is not as complicated a process as knitting a sweater or overalls, it is also important to take into account certain nuances. Before starting the process, it is very important to calculate the required number of loops to cast on. The fact is that if there are more loops than necessary, the sleeveless vest will turn out shapeless and will simply hang on the girl. And vice versa, if the loops are missing, then the item will turn out to be too tight and will not look good on the child.
Therefore, before starting work it is very important to make the correct calculations. Here you will need two main indicators:
- The child's chest circumference, where X cm is an unknown number that equals the chest circumference.
- The length of the product sample, knitted in advance, where N is a known number that is equal to the number of loops of the sleeveless shirt sample.
Since X is the desired number, it must be determined. To do this, the identity of the child’s chest circumference and the size of the previously knitted sample should be divided by the number of loops that were required to create the product sample. The result obtained will be the number of stitches that will need to be cast on in the process of knitting the vest.
It is very important to take into account one important point here: since vests are not knitted entirely, but in two separate parts, which then need to be combined into a single composition, the first number in the formula, denoted by the letter X, must first be divided in half.
Knitting the pattern is very important, as is adding 2-3 extra stitches from the front of the vest, since in little girls the chest size is always slightly wider than the back size. If you follow the rules for calculating the number of loops, you will be able to knit exactly the size of a sleeveless vest that will fit perfectly on your child.
A simple pattern for knitting a school vest with a description
Knitting a school vest is a timeless classic that can be made quite simply. To do this, it is worth considering the work scheme. But, in addition to this, it is necessary to take into account some basic rules and subtleties. You need to start with the basics, or rather, with the correct set of loops, so that the product is made exactly to size.
Calculation of the number of loops
In any pattern that has approximate indicated dimensions, there is also a prescribed number of loops. However, there is always an option when your own measurements differ from standard standards. Then the product can be large or, conversely, small. It becomes very sad to undo and redo the work done. However, there is a way to avoid this process.
There is always the opportunity to calculate the number of loops yourself. There are several simple ways to do this, which have been tested by many craftswomen. One of the best options is as follows:
- knit a small sample with the corresponding pattern. It should be approximately ten by ten centimeters. You can choose a smaller size, but the above option is optimal to make the calculation much easier;
- count how many loops there are in one centimeter and in five;
- use the proportion to calculate the number of loops for a product with a width of, for example, 70 centimeters. You should end up with two values to start from:
1 cm = 2 loops 70 cm = 140 loops 5 cm = 9 loops 70 cm = 126 loops
After receiving the first results, you need to stretch the sample a little, imagining how it will sit on a person, and repeat the measurements . The result should be several values. Between them you need to choose the middle one and build on it when casting loops for the product. It is worth noting that this method has never failed anyone. And it takes a fairly short time to calculate.
Knitting the back
After you have chosen the appropriate pattern and calculated the number of loops, you need to start knitting the back. According to the standard, it is always knitted first .
You can use a ready-made diagram, which can be found in any fashion magazine or on the Internet. Initially, you need to cast on the required number of loops and knit about 5 centimeters with an elastic band. Then knit with the selected pattern up to a height of 50 centimeters. Next, to cut the neck, close off the middle 17 loops. And knit both sides separately. In order to have a beautiful, neat rounding, you need to close three loops once, two times two loops, once one loop. Having reached a height of 53 centimeters, close all loops.
Front with V-neck
Cast on the required number of stitches and knit as a back stitch until the neck level is reached.
At a height of 43 centimeters, in order to form a V-shaped cutout, you need to close the middle loop. Continue knitting separately. In order for neat bevels to be present, from the neck side it is necessary to close one loop nineteen times, in every second row. Having reached a height of 53 centimeters, you need to close all the loops. After doing everything, you need to carefully inspect all the corners and edges for smooth closed loops and maximum accuracy of the process performed . When all the irregularities have been clarified, you can begin to assemble the product. It is worth considering this process in more detail.
Assembling the vest
Once both parts are ready, you need to begin the stitching process. This is exactly what the threads and needle were originally prepared for. It is worth considering that the color of the threads must match the shade of the yarn. This work must be done from the wrong side . Before this, it is advisable to steam the product well, especially its edges .
This must be done so that when stitching there is a thin, neat line. After the product is ready, it needs to be turned right side out. And steam thoroughly again. Then all the shortcomings will be immediately visible. It is worth noting that the stitching process can always be improved, provided that basting was done initially.
If everything is done correctly according to the scheme, then the finished product will be ready for use.
Knitting methods
Nowadays it’s easy to find various patterns and descriptions of sleeveless vests for girls with knitting needles - to do this, just go to the Internet and look at any thematic site. Nevertheless, there are several basic options for creating children's vests, which differ in the way they are knitted:
- Knitting a sleeveless vest with an openwork or relief pattern (most suitable for experienced needlewomen).
- Creating a product with dense satin stitch (suitable for beginner craftswomen).
- Creating a vest with added ornament.
- Using several types of knitting and different materials at the same time.
However, no matter what kind of sleeveless vest model you make, it is worth remembering that they all consist of at least two main parts - the front and back parts, which are connected at the end of the work. For beginner needlewomen, a simple knitting option that uses the purl and stockinette technique is best suited.
Description of knitting a vest with a hood for a girl
Vests for girls with a hood are also considered quite popular. This product is much more complex in its technique than a simple vest for a schoolgirl.
Back
The backrest will be similar to the standard version. Using the main thread you need to cast on the required number of loops. For example, let's take 46 loops. Next you need to knit 4-5 centimeters with an elastic band. By adding one loop. After 40–42 centimeters from the bar, you need to close the middle 11 loops and continue knitting separately. It is also necessary to close along the edges of the cutout in the second row, the first loops. After 45 cm knitted from the bar, you can close all the loops.
Before
Start working as with the back. Only the neckline should be deeper. In this case, you need to close the middle loop 30 centimeters from the bar. Start casting off the first 5 stitches along the edges of the cut. Close all loops at back height.
Knitting a hood
You need to cast on 83 stitches and knit approximately 4 centimeters in stockinette stitch. After this, bind off 1x1 loops on both sides, in every second row there are 5x1 loops, in the fourth row there are 1x1 loops. After 14 centimeters, simultaneously mark the middle two loops and knit 2 more together in front of them. After that, one stretch. Similar decreases must be repeated in the fourth row once. Every other row four times. After 24 centimeters, close off the remaining loops.
Assembling the sleeveless vest
In order to assemble the finished product, it is necessary to carry out some actions that are similar to the original version. The shoulder seams are made first. Next, you need to sew a seam at the back and sew the hood into the neckline. Then sew in the sleeves in the same way. Then the side seams are made. If desired, you can tie all the edges with a thread of a different color for decoration. You can decorate with beads or sequins.
Required measurements
Knitting a vest for a girl with the description yourself is quite simple if you follow all the stages of the process. Therefore, before you begin, be sure to do the following:
- Take the girl's measurements. First, the chest circumference is measured.
- Then the length of the front to the armhole is determined. To do this, measure the required length of the future product from the side, immediately from the armpit. It all depends on personal preferences, the main thing is that the vest is not too short or too long.
- The length of the armhole is determined. To do this, you need to change the length from the armpits to the beginning of the shoulder. It is very important to take measurements without bending - in a straight line. Otherwise, the item will turn out to be the wrong size.
- At the end, a measurement is made of the total length of the sleeveless vest, which should be obtained after the product is knitted. This measurement line should extend from the very base of the neck to the required length.
Having made all the necessary measurements, you can begin to work. Here you need to be patient, because not everything always works out the first time - even knitting a sleeveless vest requires some training and skills.
How to knit a children's vest for a girl's school?
Before you start knitting a vest for a schoolgirl, you need to consider several basic factors.
- The first thing worth noting is the general style of the establishment. Namely, does the school have a generally accepted uniform? Then you need to stick to this option;
- The second thing worth noting is the combination of the vest and the rest of the casual school clothes. It is necessary that the knitted product does not look ridiculous, but, on the contrary, gives the form elegance and attractiveness;
- The third thing to consider is the rapid growth of children. When knitting, it is worth noting the fact that the vest can become small very quickly. Therefore, additional supply is urgently needed.
In any case, before you begin developing and planning the future layout, you need to clarify all additional preferences and factors . And also, consider all the options for fashionable and modern vests that can not only diversify the schoolgirl’s basic wardrobe, but also give her image elegance and originality. It is worth considering in more detail exactly what items are needed in order to create a beautiful product.
What is needed for the job?
There are several basic items that need to be prepared before you begin.
- The first thing worth noting is the knitting needles. Each set comes with a number. It must be taken into account that the coarser the threads are, the thicker the tool should be. Accordingly, with fine yarn it’s the opposite;
- the second point is yarn. Its quantity, number and color must be indicated in the product diagram. If the vest is made for a child, then you can use several shades;
- a knitting pattern is also required to follow the pattern clearly. If it is a small format, then it is recommended to enlarge it and print it on a printer. Then there will be less chance of missing any detail;
- you need to prepare threads and a needle. They will be necessary to sew together the parts of the finished product;
- decor is an optional element. You can use a wide variety of beads and sequins. If the product has buttons, then they can also serve as a kind of decoration.
After all the details are prepared, you can proceed directly to the process of knitting a vest.
Required materials and tools
To make a good and beautiful knitted children's vest for a girl, you should prepare in advance all the materials necessary for the work. Therefore, you need to make sure that you have the following tools at hand:
- Knitting needles. The size of the knitting needles depends on the exact thickness and density of the product you plan to create. It is best to purchase at least two sets of knitting needles of different diameters.
- To sew the resulting parts together, you will need a hook - they are the easiest to pull through loops. However, an ordinary thick needle may be suitable for these purposes.
- Yarn for knitting - this material is selected individually based on the preferences of the needlewoman. Yarn type and color can be completely different. However, if you plan to make a winter sleeveless vest, then it is best to purchase natural woolen threads, while for the summer version, lycra or acrylic are most suitable.
- You will definitely need sharp scissors to cut off the remaining threads.
- Measuring tape for measuring the dimensions of a product and taking measurements of a child.
Having prepared everything you need, you can begin to study the diagrams with a detailed description of the process of creating sleeveless vests for girls. In fact, there are a lot of options for creating a product. However, below will be presented the fastest and easiest ways to knit sleeveless vests.
Children's knitted vests for boys, with description
Option 1
Vest for boys aged 4-5 years. It is better to do it in light, warm colors, then the small pattern will be clearly visible. For knitting, you need to select a medium-weight thread and needles No. 5. This model is decorated with a zipper, the work is of medium complexity, a stand-up collar and an armhole with an elastic band no more than 2 cm wide.
Also, you will need to make two decorative elements, they are necessary to imitate pockets, and sew two buttons. Detachable zipper for the provided model, 35 cm long.
Before you start working, calculate the density of the knitting by first knitting a small piece of 10 by 10 cm. Then you will be able to make the correct calculation of the loops and not re-tie the elastic several times. The provided model has a knitting density of 10 by 10 cm = 16 loops per 20 rows.
The pattern shifts with each row, so look at the diagram carefully.
For the back part you need to cast on 53 stitches. When the piece reaches 22 cm, start working on the armhole. Decrease 1 stitch in every 2 rows, repeat 5 times. After reduction, the number of sts on the back will be 43 sts.
When the height of the knitted fabric is 33 cm, begin cutting the loops to form the depth of the cutout. To do this, on the front part of the product, count 14 loops on the sides, 15 loops should remain in the middle, cut them in one row. You will have 2 parts of the back shelf; we knit the face further according to the pattern. The wrong side is the way the loops look. Inside the cutout on the front side, cut another p., after 1 p. 2 more. Shoulder bevels should have 12 loops each, and the height of the shelf should be 36 cm, close all remaining stitches in one row.
For the front shelves, cast on 27 stitches. Further following the diagram, you need to knit 22 cm, start forming the armhole, it closes identically to the back shelf. When the canvas reaches a length of 30 cm, begin forming the neck. To do this, cut 5 loops on the front side, after another row 5 more loops, after another row the number of shortened loops is reduced to two, repeat again, then 1 loop twice. Cast off 12 shoulder stitches in one row when the length of the finished shelf reaches 36 cm.
For pockets , cast on 15 stitches and knit 6 rows. Attach the finished strips to the product and sew on the buttons.
Collect items . Carefully sew all seams together.
Neck. Gather all the stitches from each row on circular needles. at the armhole. Tie 8 cm, close the st. To prevent it from stretching in the sock, when knitting the last 4 cm, you can add a thin thread of elastic of the same color to the thread. You need to tie it tighter than the entire vest; the last row also closes tightly, but does not tighten.
Armhole. Gather the stitches from each row of the armhole onto a knitting needle. Tie 2-3 cm and close the loops. The armhole is tied tightly.
Lightning. Sew the zipper to the side seams of the front panels. Ideally, the fabric should extend slightly over the zipper.
It is recommended to slightly moisten the finished product and dry it on a spread towel. The procedure necessary to straighten a knitted fabric.
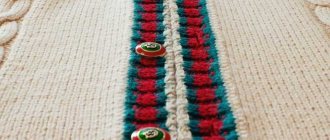
Option 2
Warm vest for a 7-8 year old boy, decorated with a braid and garter stitch stripes. The pattern is clearly visible in light-colored yarn. The pattern is simple, even mothers who have never knitted before can handle it.
Before you start working, do not forget about the knitting density.
Sew the sides of the vest. Along the neckline of the front and back panels, gather the stitches from each row onto knitting needles. You can adjust the height of the elastic band at your discretion. Before closing, close the loops tightly so that the product does not stretch too much. To knit an armhole, also collect loops from each row, the total number for one armhole is 87. Tie a 3-5 cm elastic band. The last row is closed tightly.
Don't forget to moisten the finished product. Dry only in a horizontal position.
Classic way
To make an ordinary vest with your own hands that a girl can wear at any time of the year, just follow simple recommendations. The process of creating a simple vest consists of several stages:
- First, you need to take all measurements from the child for whom you plan to sew a sleeveless vest.
- Then you need to knit a sample set of loops that will be needed to create a vest of the desired size. It is worth remembering that since the sleeveless vest is made from the back and front, the set of loops must be divided into two.
- In order for the product to look good and fit on the child, it is necessary to make an elastic band about 3 centimeters wide. However, the elastic can be made in a smaller size, for example, 1x1 or 2x2. It is very important here to alternate the purl stitch with the front stitch. The thicker the thread, the thinner the size of the elastic should be, and, conversely, from a thin thread you need to make a wider elastic.
- Once the elastic is completely made, you can begin to create the main parts of the product. It should be remembered that the front and back of the sleeveless vest should be knitted in a continuous pattern up to the armhole.
- Having tied the sleeveless vest to the armhole, you will need to decrease the stitches in each row on the front side - this approach will allow you to make a comfortable and high-quality item. The number of loops that should be removed must be determined by the needlewoman herself, based on how dense the yarn is and what size the girl is. In any case, the thicker the yarn, the fewer loops you have to remove.
- After this, the remaining loops are divided into three parts, one of which will be the neck (located in the center of the product), and the remaining two on the sides will be the shoulders. It is very important to knit the shoulders so that they are slightly higher than the neckline. To do this, it is best to use another additional knitting needle - you will need to remove all the loops that are up to the neckline, after which this part just needs to be closed with threads.
- As for knitting the shoulders, they should be done 2 centimeters above the level of the neckline. After they are knitted, they also need to be tied with yarn and closed.
- The front part of the product is made exactly according to the same principle as the first. The main thing is that they turn out identical.
Sleeveless vest for girls 5-6 years old
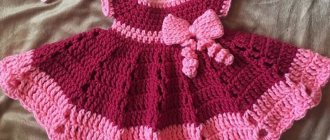
A 5-6 year old girl already wants to be the most beautiful and neat. This wonderful sleeveless vest is knitted from soft, cozy yarn for comfort to wear and allows you to create a lot of interesting looks for a young lady.
An unusual decor made of satin ribbons will make your little one the most fashionable on the playground.
What you need for knitting
To knit the proposed sleeveless vest model for a 5-6 year old girl, you need to prepare the following tools and materials:
- Wool blend yarn (wool with acrylic) 100 g 200 m – 200 g.
- Satin ribbon of a suitable shade to match the yarn - two pieces of 2 m each.
- Straight knitting needles 5 mm thick.
- Knitting needles 4.5 mm thick.
- If necessary, an additional short knitting needle for tying a braid.
Knitting patterns, patterns
In a square of knitted fabric with a side of 10 cm there are 21 rows of 16 loops.
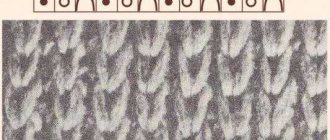
The main knitting patterns used in the work are presented in the table and diagrams:
| Pattern | Knitting technology |
| Cross elastic | Alternate p. follows this way: *1st person. R. persons p., 2nd purl. R. purl, then knit 3rd person. purl the row, knit the 4th row with facial loops, then you need to repeat from * the required number of times to the intended height of the product. |
| Braid of 16 p. | Odd rows should be knitted only with knit stitches, all even rows with purl stitches. Knit 1 - 4 p. facial stitch. In the 5th row you need to remove 4 stitches unknitted while working, using an additional knitting needle, knit 4, then knit 4 stitches left on a short knitting needle, remove 4 stitches again, now before work, knit 4 knits, then include in work 4 p. with extra. knitting needles and knit them. 7 - 15 rub. it is necessary to knit the faces. satin stitch, 17 rub. perform similarly to 5th. |
| Classic elastic band 2 by 2 | It is required to repeat the alternation of k2, p2. required number of times. |
The diagram is above.
Knitting instructions step by step
Knitting the model should be done in the described sequence:
- To make the back, you need to cast on 74 loops using 4.5 mm knitting needles and knit them with a 2*2 rib pattern. It is required to complete 20 rubles in this way. You should start knitting with facial loops.
- You need to change the needles to number 5 and, starting from the next row, work in stockinette stitch. It is necessary to knit a row, evenly decreasing 16 loops. After knitting 21 rows, 58 stitches will remain in the work.
- Knitting in stockinette stitch must be continued until the formation of the armholes begins.
- Having reached a height of 22 cm from the beginning of knitting the sleeveless vest, it is necessary to close off the loops for the armholes in every 2nd r. It should be knitted 2 times for 2 p., and then 2 times for 1 p.
- Having knitted 16 cm from the beginning of the armhole, you should start decreasing on both sides for the shoulder bevels: you need to close 4 sts 1 time and 5 sts 2 times. Decreases need to be done in every even row. At the same time as the initial decrease, it is necessary to close 14 central loops to form the neck, completing each shoulder separately.
- Work on knitting the right front should begin by casting 42 sts. You need to knit 6 sts with a transverse elastic band, 36 sts with an elastic band 2*2 20 rows.
- From the 21st row, you need to switch to knitting needles No. 5 and distribute the loops: 6 stitches of cross elastic, knit 4, purl 2, 16 stitches with the “Broid” pattern according to the pattern, purl 2, knit 10. Evenly while knitting a row you need to decrease 2 sts.
- The formation of the armhole should begin in the same way as the back.
- To form the correct neckline, you need to make decreases at a distance of 14 cm from the beginning of the armhole. For this purpose it is necessary to put it aside for later. knitting needle 5 sts, the next 6 sts need to be closed, and then 16 loops are also closed in the 21st row. Next, you need to bind off in each even row, first 2 times for 2 stitches, and then 1 time for 1 stitch.
- The right shoulder bevel must be knitted 15 cm from the beginning of the armhole: in every 2nd row you need to close 5 stitches once, 2 more times 6 stitches each.
- The left shelf should be made symmetrically to the right side.
- Next, you need to sew the shoulders of the sleeveless vest and decorate the edge of the neckline. To do this, you need to knit the left loops of the right front, then cast on 58 sts along the edge of the cutout, use 6 sts of the left front on an auxiliary needle. You need to knit 8 rows as follows: 6 stitches of cross elastic, 58 stitches of 2*2 elastic, 6 stitches of cross elastic. All loops that remain after this must be closed.
- The side seams of the sleeveless vest must be sewn and the braids decorated with ribbons, as shown in the figure.
Sleeveless vest for a baby up to one year old
Little children under one year old very often get colds and get sick. Therefore, for the youngest children, a vest made from natural yarn is the best way to protect themselves from various ailments. Knitting stages:
- After the baby’s measurements are taken, you should decide on the length of the sleeveless vest. For a small child, it is better to make a long version of the product so that the back and butt are covered.
- Of course, before you start knitting the product, you need to make a sample with a set of the appropriate number of loops.
- After the loops have already been cast on one knitting needle, you have to make an elastic band of small width - up to a maximum of two centimeters, no more. This is due to the fact that a vest for a girl under one year of age will be very small, so making wide elastic bands does not make any sense.
- After this, you should do garter knitting: the outer row is knitted on the front side of the product, and the back row on the reverse side. This knitting option is considered the simplest, which is important for beginner knitters. If you have experience in knitting, then you can use any other technique for making a sleeveless vest, taking into account the individual parameters of the child.
- After the back of the product is knitted (remember about the armholes), you need to remove several loops from the left and right edges of the product. In this case, the front and back of the workpieces must acquire a rounded shape.
- The front part of the product is made using the same principle.
- After both parts are knitted, they need to be turned inside out and sewn together using a thick thread.
After the product is ready, all that remains is to trim off the excess knots and threads. The finished knitted vest can be decorated with an ornament or any other decoration.
Gray sleeveless vest for a little lady
An interesting sleeveless vest model with a large collar with snaps or buttons. The children's sleeveless vest is knitted from wool and acrylic on knitting needles 7 mm thick. The description is given for a) 2 years, b) 4 years, c) 6 years, d) 8 years, e) 10 years. You can knit a sleeveless vest from any wool or wool blend yarn.
To work you will need:
- Yarn 50 g/40 m, (25% wool, 75% acrylic), 4-5-6-6-7 skeins.
- Knitting needles 6 and 7 mm thick.
- Add. spoke.
- Buttons or buttons – 6 pieces.
Pattern: stockinette stitch, 1/1 rib, fantasy pattern.
Sample: 10 cm faces. smooth = 11 p./16 r.
Back
For 6mm knitting needles. cast on 29-33-37-39-41 sts, knit with 1/1 rib. 5 cm high. Continue with 7 mm knitting needles. persons satin stitch At a distance of 8-10-10-11-13 cm (12-16-16-18-20 r.) from the elastic band a, b – close on both sides 1 time, 1 p. Next, we make a raglan, closing on both sides sides in every 2nd row:
- 8 times 1 p.
- 9 times 1 p.
- 11 times 1 p.
- 12 rub. 1 p. each
- 13 rub. 1 p. each
At a distance of 19-23-25-27-30 cm (30-36-40-44-48 r.) from the elastic we leave the remaining a – 11, b – 13, c,d,e – 15 sts on an additional needle .
Right half front
We cast on 7 mm knitting needles. 23-25-27-28-29 sts, knit with a fantasy pattern according to the diagram. At a height of 18-20-20-21-23 cm (28-32-32-34-36 r.) from the beginning, mark the left edge. loop (defines the side seam), then we form an armhole, as in the diagram. At a height of 29-33-35-37-40 cm (46-52-56-60-64 r.) from the beginning, leave additional loops. knitting needle Knit the left half of the front in a mirror image.
Collar
We knit with a 1/1 elastic band on the ones left for extra. sp. loops on the right half, continue to add 5 loops 1 time, then on the left half of the front. We get 55-59-63-63-63 sts. Continue knitting for another 9 cm, close off the loops.