Which paper to choose
To make the composition work, give preference to dense options. For example,
- White printer paper. It holds its shape well, has a slightly rough texture and is quite dense.
- Color options for printing are also suitable. They will not fray at the folds.
- Another option is stickers. Small, dense, multi-colored notes for notes without an adhesive layer are ideal for modular crafts.
- Double-sided glossy chalk, from which magazines are printed, is also suitable for creating designs.
- Paper money. With their help you can realize original ideas of three-dimensional origami.
- Special material for origami.
- Tracing paper.
White Swan
The described creation requires 375 white modules and 1 red module, which will serve as a beak. For your attention, instructions on how to make three-dimensional origami:
- We collect the first three stripes. Each will require 30 modules. We assemble the first one from modules - the long side is on display, and the second and third, on the contrary, are the short side on display. We roll each strip into a circle.
- We place the fourth and fifth ranks similarly to the second and third.
- Take the workpiece by the edges and press in the middle, turning it inside out.
- For the sixth stripe you also need 30 modules and put them on with the short edge outward.
- The seventh stripe is wings. 12 modules, skip 2 corners, 12 modules.
- The eighth rank and subsequent ones will be reduced by one module until only one remains. So, the eighth will have 11 modules, the seventh will have 10, etc. It turned out to be two wings.
- Tail. We install 5 modules, and with each subsequent row we remove one.
- Neck. Here you will need 24 white and 1 red module. We assemble the strip, and then bend it as necessary.
- The neck is installed on 2 free corners, which were freed during the design of the wings.
- Now we enjoy the resulting masterpiece.
Types of origami
Modular origami is made by connecting many elements. They are fastened mechanically without glue. There are several options for creating modular origami:
Kusudama is a technique originally from Japan. Each module is connected with glue or ordinary threads.
The "wet" method is a modern method of creating origami. The paper is wetted with water. Allows you to create a variety of figures.
Kirigami is another Japanese technique. Assembly is carried out using scissors.
We recommend reading:
- Modular origami vases - a simple DIY assembly diagram. Step-by-step instructions for beginners + 125 photos of the best ideas
- Origami fish: step-by-step instructions for creating a fish using the origami technique. Many photos of finished works, diagrams, master class, video
- Origami rose - instructions on how to make a beautiful rose with your own hands. The best schemes for beginners to create and assemble (photo + video)
How to make an origami module
Prepare A4 paper (standard paper from a sketchbook, or paper for printing or copying).
1.
Fold the paper in half, then again and again - if you unfold the paper, you will have 16 divisions.
* You can fold the paper one more time, then there will be 32 divisions, and they will be smaller.
2.
Cut the paper into 16 or 32 rectangles.
* You can use either scissors or a stationery knife for this; the latter will be faster.
3.
Fold one of the resulting rectangles in half in width.
4.
Now fold it in half lengthwise and return to its original position (go back to step 3). In the middle you now have a line with which you can fold the module evenly.
5.
First fold one side of the rectangle towards the middle, then the other (similar to folding an airplane).
6.
Now bend the edges of the pieces that protrude.
7.
You need to bend the protruding sections upward.
8.
Bend your structure in half (connect the 2 sides of the module).
You need to make as many such modules as needed to assemble the desired structure.
Where to begin
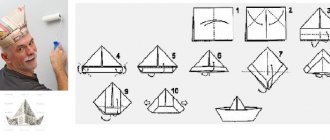
Any instructions on how to make three-dimensional origami begin with a description of the creation of the main module. The classic version should be rectangular. To do this, the sheet is folded in half along the long side, and the upper corners are folded towards the center.
The protrusions bend back and towards the top. And the corners are inward.
The part is bent vertically so that the pocket remains outside. The result will be a triangular piece.
What does the concept of “module” mean?
Volumetric origami has a second name - modular. This name arose as a consequence of the fact that three-dimensional paper figures are made up of many small modules.
Read here - How to fold an origami “jumping frog” with your own hands? See the instructions and master class with detailed descriptions and photos!
So, modules exist in only two sizes - 1/16 and 1/32. That is, a sheet of A4 size is taken and cut into either 16 squares or 32.
I must say that it is easiest for beginners to work with 1/16 modules. Paper, either white or colored, must meet only one requirement - strength. It should bend well, but not tear due to trifles.
So, let's assemble the module. Cut A4 into a certain number of squares. Fold the square exactly in half. We bend the left corner towards the center. We do the same with the right one.
We turn the craft to the other side and lift the free rectangles to the top. And we bend the corners that peek down from the outside.
Check it out here too!
- How to make an origami paper butterfly with your own hands: a step-by-step master class on making original crafts with photos and videos
Origami paper machine - instructions on how to make it yourself. The best master class with photos and videos
Tank made of paper using the origami technique (100 photos): a simple master class on creating an unusual craft with your own hands. Instructions + description
Classic assembly method
Basic, classic models are fastened by placing two previous blanks on the pocket on the sharp corners
This method is not suitable for the manufacture of moving elements. The parts hold tightly together.
Module assembly rules
There are many variations in the manufacture of typesetting elements. Let's look at the most common three-dimensional origami made from triangle parts.
The module is obtained from a rectangular sheet measuring 1/4, 1/8, 1/16 or 1/32. The paper needs to be folded in half along the longer side and again along the short one. Next, the workpiece must be unfolded and, aligning the two corners, folded along the central axis.
Those parts that protrude should be folded back and up, and the corners should be tucked inward. Then the product needs to be bent vertically (the pockets must remain outside). The module is ready!
Assembling the body
We collect the bird in circles. To do this, you need to close a circle of 16 yellow blanks. And after that, build 4 rows on top of it from the same number of blanks.
After this you will need to make 6 reverse rows. We turn the blanks over with the hypotenuse facing up and connect them together. This will create the body of a chicken.
We recommend reading:
- Origami butterfly: step-by-step master class with real examples in the photo. Subtleties and secrets from craftswomen + instructions and video lesson for children
- Origami paper flower, made by yourself. 140 photos of original ideas + step-by-step instructions
Origami dog - step-by-step instructions for children. 123 photos of original ideas for creating a dog out of paper using the origami technique (master class + video)
Each wing requires 6 parts. They are connected to each other in 3 pieces, below we fix 2 parts in a row, and close them in the third row with one piece.
The finished wings will need to be inserted on both sides at the same height. And don't forget about the beak. It must be installed in the center of the figure.
Modular origami. How to make a module.
The main thing you need for modular origami is paper and great patience.
.
Due to the fact that the figures in modular origami are not very small, you need to prepare many modules for them, from several hundred to several thousand
.
Each module has 2 pockets. With their help you can connect modules.
Typically, when folding modules, no glue is used, since the friction force prevents them from falling apart. But it happens that in some places the paper structure is not stable, then it is strengthened by gluing several modules with PVA glue
.
You can use both pure white and colored paper
. Office paper will do, but you can also use pages from magazines and even candy wrappers. Regular colored paper is quite thin and tears at the folds. It can be used to create small modules (if you divide A4 paper into 32 parts).
To connect modules, simply insert them into each other. This can be done in several ways.
For example, like this:
Collecting shells
We take 14 blanks and close them into a ring. After this, we will build up four rows of 14 pieces, and make the fifth and sixth from 21 pieces.
The top piece of the shell should include three rows of 8 elements. In the fourth row, add 16 more blanks and repeat 4 times.
Eyes can be made from colored paper, self-adhesive paper, or ready-made souvenir eyes can be attached.
Stages of work
Stage 1
After all the materials are prepared, you can begin creating the box. The most basic step is creating the foundation. Using the origami technique, we create modules.
You should get birds. To do this, you need to take a sheet of colored paper and divide it into parts, into even medium-sized squares. If you have colored square stickers on hand, they may come in handy.
We fold the square into a triangle, then again and make a small groove. We put together three blanks.
Stage 2
There should be 26 such blanks. Now that they are ready, you can begin to form the shape. We fold the blanks into a circle or oval, and you need to try and fold the birds in such a way that the colors are repeated through the same number of blanks.
Stage 3
These parts should be attached to each other with hooks. But to be sure, you can apply glue.
Note!
Origami boat from childhood. We collect materials, make a classic boat, a motor ship, a sailboat. Step-by-step photo instructions for folding a boat with your own hands
How to make simple modular origami? Module assembly diagram, fastening modules to each other. Step-by-step instructions for modular origami for beginners
Origami crane - how to make it yourself? Materials for creating a crane, step-by-step instructions with photos. Application of Cranes made of paper
Stage 4
The remaining rows should be assembled in the same way. There may be 10 of them, or maybe more.
Stage 5
Cut a circle out of cardboard and lower it to the bottom.
Stage 6
The base is ready, now you can start forming the lid. This item will be a little more difficult to assemble. You need to prepare the modules in advance and assemble them according to the snowflake principle. While collecting, form a pattern and try to maintain every line.
Stage 7
We take wire and beads and form a handle. If you are into beading, you can weave a beautiful pattern.
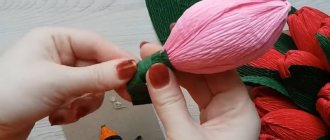
Other ideas for creating modular origami
It's amazing how many interesting things you can do with modular origami.
For example, a paper apple made using this technique can decorate a teacher’s bouquet for the autumn holiday. It is inflated with air just like the heart. To create it you need two pieces of paper. One for the fruit, the second for the stick.
Made using the same technique, a three-dimensional ball made of wrapping paper or textured sheets will be a wonderful decoration for the New Year tree. And snowmen, assembled from individual elements, will help decorate your apartment for the holiday.
The modular origami system allows you to make three-dimensional figures of animals, vehicles, aircraft and even entire castles. The larger the composition, the more blanks will be needed to create it, and the more time it will take to create the model.
What is modular origami
Modular origami is a special type of art that involves the creation of three-dimensional figures from triangular elements that are folded using the traditional origami technique.
In the classic version, no stitching or glue is used - the modules are held in place by friction and the elasticity they create. The first mention of this technique appeared in Japan in the book "Ranma Zushiki" by Hayato Ohoko in 1734 . The art was passed on from teacher to student until 1797, when the first written instructions appeared. In the 1960s, modular origami began to spread throughout the world. It gained particular popularity in 1993, when Chinese immigrants were brought to America and, while in prison, whiled away the time by creating figures from modules.
To create a modular craft, you need to put together identical triangular elements . They may be needed from several tens to several thousand, depending on the size and complexity of the product.
Photo of volumetric origami
Did you like the article?
0