The orchid can rightfully be considered one of the most exquisite and sophisticated ornamental plants. The flower has earned the love of many fans thanks to its unusual structure and variety of shades. If there are no living beautiful orchids in the house, you can easily make one from artificial materials. Foamiran orchids do not require daily care, but they bring a lot of pleasure to their owner.
Working with material
In fact, working with such material is quite simple. Very often daffodils and Thomas orchids are made from this material. Even a beginner can master the technology. First, certain objects are cut out with scissors, for example, geometric shapes, hearts, flowers or petals.
A specific hole punch is used to create an openwork edge or create holes. Volumetric particles are created by fingers by stretching the material and then maintaining this configuration. Sheets are of the same tone .
If you need to get color transitions, you will have to create them yourself. Dry pastels are perfect for this. If you complete all the manipulations sequentially, you will get a gorgeous foamiran orchid that can be placed in a pot. Using the ready-made instructions, creating a flower is not difficult.
Beautiful orchid flowers from foamiran: design of a branch
An orchid is a light-loving plant, and if it is not possible to provide the flower with a lot of light, but you really want to fill the interior with delicate beauty, foamiran compositions will be an excellent alternative.
If we want to make an orchid branch, then, in addition to several flowers, we need to make buds. They will add naturalness and completeness to the image.
A live orchid in a pot has bloomed; add a branch of artificial flowers to the real plant. Flowers look very laconic when decorating an interior in Japanese style.
Many needlewomen prefer to use foamiran because it allows you to create realistic flowers
Master class on making buds:
- To do this, we make a hook at one end of the wire;
- Wrap the hook with cotton to the desired size of the oval bud;
- Using a light green tape at the base of the structure, we wrap the wire in a spiral, going down 3-4 cm;
- We cut out 3 small petals from foamiran, giving them a slightly curved shape with an iron;
- Carefully glue it to the cotton bud - the petals should be adjacent to each other, forming an unopened small flower;
- Paint it in the color desired for the composition.
Our flowers and buds are ready, let's start forming a branch. Its basis will be the wire to which flowers and buds are screwed. The arrangement of flowers on the branch should be asymmetrical, one above the other. Treat the stem of the product in a spiral with green tape. That's all, the unique orchid branch is ready. A twig planted in a pot will look very gentle and natural. The soil for such a beauty does not require watering, but for the varied decor of the pot, your imagination may not be limited to the soil.
Tips and tricks
The structure of an orchid is slightly different from the structure of a simple flower. It has three sepals, two side petals and a central petal that looks a lot like a baby's lips. The color range is quite varied. Foamiran stretches well when heated, acquiring the required shape, which helps create beautiful petals. In addition, this material:
- Environmentally friendly.
- It can be easily cut with tools, which is quite convenient for children's creativity.
- The material can be washed with water without fear of changing shape.
A huge range of colors and shades helps you make a flower as close to the real thing as possible. Now this material is popular among craftswomen. The material can be found in any specialty store.
Little tricks for creating an orchid
An orchid is an unusual plant that has a structure that differs from other, common flowers. It has two side petals, three sepals and a petal in the center of the flower, reminiscent of baby lips. Color ranges from white to deep purple and dark red. The most attractive in its beauty is the cymbidium - this subspecies of flower can be made of artificial material, for example, plastic suede. Such a flower is no different from a living plant; it will decorate the interior of any room.
The main advantages of foamiran are the following qualities:
- plasticity - the material easily stretches and changes when heated;
- it can be easily cut with scissors;
- finished products can be washed well with plain water;
- foamiran is environmentally friendly;
- the variety of shades makes it possible to create flowers that are as similar as possible to living orchids.
- Foamiran can be purchased at any store that sells craft supplies.
Patterns and templates
There are probably no people who don’t like orchids. These bright flowers of a unique shape are usually called a symbol of the tropics. Petals are distinguished depending on the type of plant. To create an orchid pattern from foamiran you will need the following:
- The core of the flower, the “lips”.
- Petals (5 pieces).
- Stamens and columns (for certain subspecies).
The most popular variety is considered to be phalaenopsis; the flower size of this plant ranges from five to fifteen centimeters. You can make a stencil of just 1 petal and the middle (sponges) to make a phalaenopsis from good suede. Even an inexperienced person can make a template for a flower; you just need to listen to the recommendations of professional craftsmen. To create a pattern for a cattleya orchid, you will have to make 2 different types of petals, and in the version with cymbidium, you will need a template to create the middle of the flower.
The foamiran orchid template is made from thick cardboard or high-quality paper. First, choose the type of flower, and then make templates and transfer them to sheets of high-quality suede.
DIY foamiran orchid. Templates. Master class with step-by-step photos
How to make an orchid from foamiran with your own hands step by step with photos
DIY phalaenopsis orchid from foamiran.
Author: Yuliya Dmitrievna Archvadze, primary school teacher Place of work: MBOU “Budanovskaya Secondary School named after Hero of the Soviet Union M.V. Greshilov”, Budanovka village, Zolotukhinsky district, Kursk region. Description of the material: the master class will be of interest to primary school teachers, additional education teachers, schoolchildren aged 10 years and older, educators, and parents. Goal: Making a phalaenopsis orchid from foamiran. Objectives: - educational: expand children's knowledge about orchids; — developmental: to develop visual and figurative thinking, children’s creative abilities, fantasy and imagination, fine motor skills; instill interest in arts and crafts; - educational: to cultivate artistic taste, accuracy, perseverance, hard work.
An orchid is a butterfly... An orchid is a bird... How mysterious she is, how tender she is!.. Names and faces are lost in memory, Only she will remain in memory alone. With delicate petals... Trembling and imperious... It seems to enchant, captivate your eyes. It will cast a gentle spell, will entice you dangerously, and will intoxicate your head with a sweet aroma. It seems like an instant... A breath of wind... A light moth will carry away the vision... An orchid is a butterfly... An orchid is a fairy... Unreal - a fabulous, unearthly flower. Irina Mayskaya
The orchid has captivated many with its beauty, exoticism and delicate aroma. There are various legends and beliefs about her, and there are many signs. This amazing flower appeared on the globe back in the 4th century BC. This is evidenced by the statements of Confucius, where in his writings he called the orchid the queen of fragrant plants, and also compared being in a room with orchids as communicating with a very good person. Astrologers symbolize the orchid with the constellation Scorpio - a bright sign full of mysticism and love. No wonder, even in an ancient legend, it is said that when the goddess Venus dropped her shoe, an orchid grew in that place! The orchid is the oldest and largest family of flowering plants, with about 40,000 species, and new species continue to be discovered. Orchids are classified as herbaceous perennial plants; various species grow in almost all climatic zones, but, nevertheless, most species grow in countries with tropical and temperate climates. Some orchids grow on trees, but use them only as a support and are not parasitic plants, others live on steep cliffs, putting down roots in cracks between the stones, and there are orchids that even live underground and are pollinated by underground animals. The most common type of orchid is phalaenopsis. This species has gained popularity because it is the easiest to grow.
For work you will need : - foamiran (lilac, dark lilac, green) - black beads (according to the number of colors); - a piece of foil; - crepe paper (green); - wire; — universal adhesive gel; - flower pot; - plaster; - Styrofoam; - scissors; - pieces of bark.
Progress of work First, let's prepare cardboard templates of all the parts that we will cut from foamiran. Templates
On a lilac colored foamiran we draw out patterns of the petals of future flowers with a sharp object (an awl, a toothpick), on a dark lilac colored foamiran we draw out patterns for the middle of a flower, on green - leaves. Cut out the necessary parts.
We tint the flower petals and the center with crayons or colored pencils.
We give shape to all parts of the flower. We warm the material a little with our fingers and gently stretch it so as not to damage the integrity of the material.
We string a bead onto a piece of wire 8 cm long and twist the ends. Then we make a hole in the upper part of the part with a needle and string it on a wire.
Then we attach double petals, followed by triple petals.
The flower is ready. We will make the remaining flowers in the same way.
Making a bud. We wrap a small piece of foil around the wire, forming a bud. Then we glue the foamiran petals. We make a green bud in the same way. Making spines. We cut the wire into pieces of arbitrary length and cover it with strips of green crepe paper.
We attach flowers, buds, roots and leaves to the peduncle. We cover the peduncle with green crepe paper.
We fill the flower pot halfway with pieces of polystyrene foam (to make the product lighter). Fill the top with plaster of Paris (not very liquid) diluted in water and insert a flower into the middle. We hold it until the plaster hardens. Carefully place pieces of pine bark on top. The orchid is ready!
We recommend watching:
Anemone flowers from foamiran. Master class with step-by-step photos DIY hair clip “Red poppy from foamiran”. Master class with step-by-step photos Do-it-yourself twig with flowers from foamiran. Master class with step-by-step photos DIY foamiran composition. Master class with step-by-step photos
Similar articles:
DIY paper orchids
Making an orchid with your own hands
To make a beautiful flower, prepare everything you need in advance and do the work consistently. You will need the following:
- Foamiran sheets of a certain color.
- Floral wire for stem.
- Molds for creating petals.
- Thick paper for creating blanks.
- High-quality pastel and a fixative for it.
- Acrylic paints and a simple brush.
- Cotton swab.
- Scissors.
- Iron.
- Glue gun.
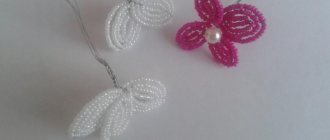
We create earrings and a ring with the Cymbidium orchid from foamiran
Today I want to talk about how you can create a set of accessories from foamiran.
About a month ago I received an order to make these earrings and I tried very hard to make the earrings as similar as possible to the photo assignment.
I immediately decided that I would make a ring to go with the earrings for a harmonious set.
To create the earrings and ring you will need the following:
- Iranian foamiran;
- lotus petal mold;
- iron;
- melamine sponge;
- small scissors;
- second glue;
- orange stick;
- toothpick;
- acrylic paints;
- semi-matte acrylic varnish;
- brush;
- thin brush;
- thin wire;
- pins;
- Bulka;
- base for earrings;
- ring base;
- chain;
- ear wires;
- pins;
- rings;
- set of tools.
I needed to make a flower no more than 3 centimeters in diameter. Having developed a suitable pattern, I began work.
I cut out the required number of parts from Iranian foamiran and processed each one on the mold using an iron and melamine sponge:
I also cut out 20 small flowers:
I painted every detail with acrylic paint:
For convenience, I held the parts with pincers:
To give the flowers a rounded shape, I placed each of them for a moment on a heated iron:
I made some of the flowers more open, some less open, and made small buds from the rest:
The lip of the Cymbidium orchid has a curved shape. I tried to achieve this using an iron and subsequent processing of the details on the bun:
I also treated each petal with a bulk, making a depression in the wide part:
After coloring, I put each flower on a pin:
The most important part of the work was painting the side petals of the orchid and the lips. I applied white acrylic paint with a thin brush, trying to achieve a complete resemblance to the photo assignment:
I assembled the flowers onto the chain using a set of tools: round nose pliers, pliers and tongs.
I inserted a pin into the middle of each flower and glued a metal ball on the inside:
To create a beautiful, neat loop, I cut the tail of the pin to 1 cm:
I bent the tail of the pin at an angle of 90 and used round pliers to make a neat loop on each flower:
Using an earring hook, I put a chain on the base for the earrings and strung flowers on it.
Having collected the prepared orchid petals into a flower, I glued them onto the bases for earrings and rings:
I glued a thin wire to the back of each petal and painted it with paint. This will allow you to lay the petals in different directions if desired:
Also, every detail of the kit was coated with acrylic semi-matte varnish for a slight shine and hopefully fixing the paint:
Thank you very much for your attention and support!
I hope that you enjoyed this master class and find it useful! I wish you all creative days and joy in every moment! 
Paper orchids
If you want to make orchids from paper, prepare colored paper (it’s better to take thick paper), green floral tape, glue, a pot, foam rubber, wire, an awl, wire cutters, pebbles, and a decorative branch.
Consider a step-by-step master class:
- we find a ready-made or draw an orchid flower template ourselves, cut out the white petals, pink centers and green leaves;
- We twist all the elements with scissors to the center;
- we fold the petals into a flower, make a hole in the middle with an awl;
- Use wire cutters to cut off the wire sticks - these will be the legs;
- string the flower onto a wire and fix it;
- wrap the leg tightly with green floral tape;
- We make one branch from ready-made orchids: we screw the rest to the main one in turn (the principle of weaving a wreath);
- wrap the leg with green ribbon;
- glue the leaves;
- fill a small flower pot with crumpled paper;
- We cut out a circle from foam rubber (the diameter is the same as a pot), make a hole in the center, place it in the pot;
- “plant” a ready-made orchid and a decorative branch there, tie them together with thread;
- sprinkle the surface of the foam rubber with small stones.
Step-by-step instructions on how to make an orchid
Let's start making orchids from corrugated paper. Take a skewer and tape the tail of the candy onto the blunt end. We take corrugated paper and make a sketch of the petal, which will be located in the center.
If you don’t know how to draw it correctly, look on the Internet to see what it looks like in a flower. We cut out the petal and make several stripes on the folds at the edge so that we get veins.
Read here - Diaphragm vacuum pump
Next, draw the outer petals on corrugated paper. Two petals should be slightly rounded, three more elongated. Cut out the petals and slightly stretch the paper on each petal in the center.
We wrap the central petal around the candy and seal it with tape. Next, take the rounded petal and coat the edge with glue, which we will use to attach it to the skewer. We fasten it again by wrapping the candy, the second rounded one with glue on the other side.
It is important that the rounded petals are on both sides of the central petal. Glue 2 elongated petals in front, glue another one at the back
This way you can create a huge number of flowers. They can be wrapped in paper or the packaging can be more interesting. For example, you can shorten the skewers and insert them into a piece of oasis.
Then we beautifully decorate a small box or basket and put the oasis there. Here you have a wonderful and original gift for any occasion. If desired, you can add other flowers and leaves.