Pros and cons of knitting raglan on top
Let's look at the benefits first.
- No seams in the sweater;
- Items are easy to try on and, if necessary, adjust;
- There are fewer parts, therefore there is no need to break the thread and hide the ends;
- It is easier to distribute the yarn if there is enough of it end to end. First, you can knit the yoke and sleeves, and then knit the rest of the yarn onto the body of the pullover.
The disadvantage is the limited number of patterns that can be made using this technique, since it is very difficult to fit into such a pullover patterns with a large number of loops in one report. Therefore, such products are most often sewn and knitted from the bottom up.
Before you start working, you need to calculate the loops
The knitted finished product will be successful and beautiful if the blouse is the right size and fits well on the child. That's why it's so important to take your measurements correctly.
In the calculations, you also need to take into account the freedom of fit. To do this, add 5-8 cm to the resulting figures so that the pullover does not restrict the baby’s movements.
For ease of use, draw a diagram of the future product on paper. Transfer all measurements to the drawing, first in centimeters, and then transfer them to loops and rows. To do this, you need to knit a sample to determine the knitting density.
Note!
How to crochet a mouse and a rat: video master class on crocheting the 2020 symbol
How to knit a warm hat with ears for a newborn boy and girl - video tutorials with patterns, instructions for beginners
How to crochet a beautiful scarf: video master class on creating unusual, beautiful, simple scarves for boys, girls, men and women
If you want to knit a beautiful jumper or cardigan as a gift, then you can take the necessary measurements from the tables on the Internet.
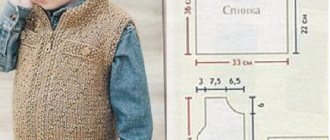
Raglan for boys, knitted
I'm knitting raglan now. For the first time, but I like it, I’ve already knitted 1/3 of it, and only now the thought struck me that I probably should have knitted it together, online.
Girls, while it’s still fresh in my memory, I can give you some hints, I’ll try to write down my thoughts and post a short description with the finished work. If anyone wants to join, knock on the door, we’ll continue knitting together)))
To work you need:
* yarn;
* stocking needles;
* circular knitting needles.
There is no need to sew the sweater, it is knitted in the round, there are no seams.
*******************************ADDED:****************** ******************
For those who joined to knit, I write what and how I did. I will try to make it as clear as possible, but if something is not clear, please ask. Please make a allowance for the fact that I am also knitting raglan for the first time.
I am knitting for a 2-3 year old boy, now he is 88 cm, not large.
Yarn: Rainbow RAM (30% wool, 70% acrylic), 100g, they write that it is 500 meters, but there is a typo, and I see that it is less, and the store said that it was written incorrectly.
Spokes: 2.0
In my sample I got 3 loops of 1 cm. I knit tightly.
I calculated the loops based on the neck girth (NC) and the knitting density, which is known to us from the sample. EXAMPLE: OSH = 23 cm, increase in looseness of fit + 4 cm, and knitting density is 3 loops per 1 cm:
3x(23+4)= 81 82 loops. The number of loops must be even.
But I know from experience that knitted items made from yarn that contains wool can shrink a little after washing, and I added a couple of sentiments to the calculation, especially since winter is not a month here and it grows quickly, I knit with a reserve. But you shouldn’t knit a very wide neck either; the further width of the product itself also depends on this.
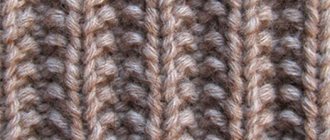
I cast on 92 loops. I knitted the first row with an elastic band 2*2, closed the knitting into a ring, distributed the loops evenly into 4 stitches
and continued knitting in the round with an elastic band 2*2 to the desired height (mine is 4 cm)
After several knitted rows, you can check whether the head fits easily and whether the neck is not too loose, because a lot also depends on how tightly the thread stretches; you may have to reduce or increase the number of loops you cast on.
Let's move on to knitting the raglan line.
There are several types of knitting here, I chose a strip of 2 knit stitches, before and after which I make increases through the row.
So, each line of raglan will consist of 2 loops, which means that on the 4th line you will need 8 of them, then 92-8 = 84 loops. Divide the remaining stitches into 3 parts (front, back and two sleeves) 84/3=28.
After the elastic band, we knit 1 row with facial loops, conditionally distributing the loops in this way (you can mark it with a colored, contrasting thread):
2 l.p. on the raglan line, 14 l.p. on the sleeve, 2 l.p. on the raglan line, 28 l.p. on the front, 2 l.p. raglan lines, 14 l.p. on the second sleeve, 2 l.p. raglan lines, 28 l.p. backs - These are all my 92 loops that were involved in knitting the neck.
* You can mark the beginning of the row anywhere, as long as you don’t get lost later 
Starting from the next row (let’s call it 1), we will have yarn overs on both sides of the raglan line, i.e. we knit:
1) yarn over, 2 l.p. on the raglan line, yarn over, 14 l.p. on the sleeve, yarn over, 2 l.p. on the raglan line, yarn over, 28 l.p. on the front, yarn over, 2 l.p. raglan lines, yarn over, 14 l.p. on the second sleeve, yarn over, 2 l.p. raglan lines, yarn over, 28 l.p. backrests
2) all the knit stitches, and if you want the yarn over loops to not have holes, knit the yarn over stitch over the other wall.
We knit the 3rd row and all odd rows with yarn overs on the sides of the raglan lines, the area of the sleeves, front and back, and in each row we will increase by 2 loops each, and by 8 loops each odd row.
Row 4 and all even rows are knitted with knit stitches.
To find out to what length you need to knit this part of the raglan, you can periodically try it on a person, or you can take measurements: attach a measuring tape to the collarbone and insert it deep into the armpit - for me it turned out to be 15 cm.
When I knitted 15 cm along the raglan line, I had 276 loops on my needles.
Next, we separate the loops for the sleeves - remove them on circular knitting needles or thread.
I divided it like this: the original quantity was 276 loops, I gave 72 loops each for the back and front, and 66 loops for the sleeves, i.e. I included a raglan line from the sleeve.
Now we knit only the back and front in a circle, do not touch the sleeves yet. We knit the required length, up to the elastic band, then a few more centimeters with an elastic band.
Happy knitting.
Sample: should it be knitted?
Knitting density is an important indicator when calculating loops in knitting. It helps us determine the number of loops and rows in 10 centimeters. Each needlewoman has her own value. It depends on the thickness of the yarn and the size of the knitting needles, as well as on how loose or tight you knit.
And before you start knitting a jumper, you need to knit a control sample to understand what density you have. And it is knitted exactly from the yarn and the size of the knitting needles that you prepared for your project. A knitted fragment of the pattern will help you not only determine your density, but also see what the pattern you have chosen for the jacket looks like.
I understand that you, like me, do not like knitting these patterns. But this is very important, since it is he who will help you not spoil the future masterpiece. So be patient.
So, the sample is ready and we proceed to the next stage - calculating the knitting density.
Note!
How to knit a hat with a lapel using knitting needles or an elastic band: step-by-step instructions for beginners
How to crochet a winter hat: 95 photos of new models of warm, fashionable, original knitted hats with a lapel and a beautiful pattern
- How to knit a beanie hat correctly with knitting needles: video master classes, patterns, knitting patterns for fashionable models
Cute little thing
A standard children's sweater is knitted the same way for both a boy and a girl. Children's knitted sweaters can differ only in color and selection of patterns (jacquard or openwork). Let's consider what sweaters can be knitted for girls from little ones to teenagers.
A beautiful sweater with a yoke for a girl aged 1-2 years is knitted quite easily.
Required tools and materials:
- 100% acrylic yarn, for example, Simply Soft (170 g/288 m) green, pink, white;
- circular knitting needles No. 5;
- stocking needles No. 5;
- needle for assembly.
Progress:
- For the main part, cast on 108 stitches on circular knitting needles, connect and mark the beginning of knitting with a marker;
- Knit 5 cm elastic band 1×1;
- At a height of 20 cm, transfer 10 loops on each side to additional knitting needles for undercuts;
- For the sleeves, cast on 28 stitches on stocking needles and knit with a 4 cm elastic band;
- Continue knitting in satin stitch, making two additions per row every 7 rows;
- After 25 cm, transfer the first and last 5 stitches to an additional needle for undercuts;
- Make a yoke: transfer the loops of the main part and sleeves to one knitting needle;
- Knit the pattern according to the pattern for 8 loops:
- Decrease in row 18: knit 2 stitches in the round and knit 2 stitches together;
- Continue knitting according to the pattern for 6 loops (5 rows);
- Make decreases: knit 1 stitch and 2 stitches together in the round;
- Continue knitting until the height of the yoke is 14 cm;
- Decrease: knit 2 stitches in the round and knit 2 stitches together, in the next row decrease by 1 stitch;
- Knit with an elastic band of 2.5-3 cm and close;
- Sew on the sleeves.
Related article: How to make a home air humidifier with your own hands
For a girl from 2 years old (for younger preschool age), you can knit a casual sweater with dogs.
Required tools and materials:
- yarn gray-blue, white, pink, light gray, light pink, black 180 m/50 g (60% acrylic, 40% wool);
- knitting needles No. 2.5 and 3;
- hook No. 3;
- buttons and ribbons;
- needle for assembly.
The sweater is knitted using stockinette stitch. Increases and decreases are indicated as “2x1x10”, which means “2 times 1 stitch in every 10th row”.
How to link:
- First, we knit the back: cast on 91 loops on circular knitting needles No. 2.5 with gray-blue thread and knit two rows in garter stitch;
- We switch to needles No. 3 and knit in satin stitch, gradually decreasing on both sides: 2x1x10, 6x1x8, 8x1x10, 4x1x12, 4x1x10 (75 loops);
- After 21 cm of knitting for the armholes, we close on both sides 1x3x2, then 1x2x2, 3x1x2;
- 13 cm from the armholes for the shoulder bevels we close on both sides 3x5x2, 2x5x2, 1x6x2, 3x6x2;
- Simultaneously with the first decrease for the shoulders (point 4), we close off the middle 19 loops for the neckline and knit separately, closing 1x3x2, then 2 loops along the edges of the neckline;
- We knit the front in the same way as the back, but we make a deeper neckline: after 10 cm from the beginning of the armhole, we close 13 loops and knit separately, closing 1x3x2, then 1x2x2 and 3x1x2 along the edges of the neckline;
- We knit the sleeves: we cast on 51 loops on knitting needles No. 2.5 with gray-blue thread and knit two rows in garter stitch;
- We switch to needles No. 3 and knit in satin stitch, adding 3x1x14 on both sides, then 2x1x12, 3x1x12, 4x1x10, 9x1x10;
- After 22 cm we form a sleeve cap, closing on both sides 1x3x2, 1x2x2, 10x1x2, 2x2x2, 1x3x2;
- Cast off the remaining 17 loops;
- We knit a pocket: on knitting needles No. 3 we cast on 23 loops with pink thread and knit with a jacquard polka dot pattern, making an increase of 2x1x2 from the edge, closing after 7 cm;
Related article: How to make a zombie costume with your own hands
- We embroider the “loop” stitch of the dogs according to the pattern, starting 10 cm from the bottom of the sweater;
- Assembly: sew on the pockets, make shoulder seams (cast on 91 stitches along the edge of the neckline on knitting needles No. 2.5, knit 3 rows in garter stitch, close, for the second sleeve as well), sew in the sleeves, sew on the side seams, sew buttons, bows to the dogs.
Instead of dogs, you can make other embroidery.
A cute warm sweater with a fox is also suitable for a preschool girl for everyday wear (for example, to kindergarten). It is warm, and most importantly, bright and beautiful.
What is necessary:
- 100% wool yarn (200 m/100 g) in blue, cream, yellow, orange and black;
- knitting needles No. 5;
- circular knitting needles No. 5;
- scissors;
- needle.
The size in the description is for a girl aged 4 years (5-6 years). All parts (back, front, sleeves) are knitted separately and sewn.
Make decorative reductions as follows:
- on the right side - the edge is removed, the front stitch and 2 loops are knitted together;
- on the left side - 2 loops are knitted together with a tilt to the left.
Knitting stages:
- For the back: cast on 54 (58-60) loops with an additional thread (diagram shown below) with yarn of the main color;
- Knit 5 cm with 1×1 rib;
- Continue with stockinette stitch for the next 22 (23-24) cm;
- Start doing raglan: first bind off 3 loops from both edges, and then make decreases in each 2nd row, knit 13 (14-15) cm, leaving 20 (22) loops from the raglan bevels;
- Knit the front as well, but perform a jacquard pattern (chanterelle), starting with row 16 (18-20);
- For a neckline of 31 (33-35) cm, leave 10 (12) loops in the middle and finish each side separately: cast off 3x1x2, leave 2 loops each;
- Start knitting sleeves: cast on 24 (26-28) stitches with crossed stitches with additional thread and knit 5 cm with 1x1 rib;
- Knit in satin stitch, from the 7th row start increasing on both sides by 1 loop, then 6x1x6;
- After 21 (22-23) cm, close off 3 loops on both sides, then make decorative decreases 1x1x2, leaving 4 loops from the raglan bevels;
- Assembly: make raglan seams, sew up the main parts on the sides, sew on the sleeves;
Related article: 25 crochet handbags. Magazine with diagrams
- Transfer the remaining stitches from the front (2), from the right sleeve (4), from the back (20 or 22), from the left sleeve (4) and from the other side of the front (2), then cast on 7 loops in front, transfer the remaining neck loops ( 10 or 12) and cast on 7 more loops (you should get 55 or 60 loops);
- Knit the neckline for about 8 rows and bind off the stitches.
The sweater is ready.
Sweaters using the same principles can be knitted for teenage girls, but choose a different, more “adult” pattern.
How to determine knitting density
The knitted fragment of the pattern must be washed, dried and steamed a little. Many things, depending on the composition and manufacturer of the yarn, after wet-heat treatment can both stretch in width and/or length, and shrink.
Using a ruler, we determine the number of stitches in 10 centimeters along the fragment, taking into account even half a loop, and the number of rows in 10 centimeters in height. Now you can easily determine the number of stitches and rows in one centimeter and convert your measurements from centimeters to loops and rows. Another important stage is the calculation of raglan and sprout.
Beginning of work
Before starting work, you should take accurate measurements from the model.
Everything is important here:
- Neck circumference.
- Chest circumference.
- Shoulder width.
- The length of the sleeve.
- Armhole depth.
- Length of the finished product.
When starting to knit a sweater using the raglan technique, it is important to determine the number of loops that guarantees the desired density of the fabric. For this purpose, I put at least 20 stitches on the knitting needles and knit them using the chosen technique, wash them in warm water and steam them.
Only a sample that has cooled after steaming will help you figure out how many loops are 1 cm, which means how many will be needed to form the neck. The number of rows per 1 cm2 will help determine the length of the finished product.
Making such a calculation is quite simple:
- We multiply the length of the neck circumference by the number of loops in 1 cm2.
- OS is 36 cm.
- There are 3 loops in 1 cm2 cm.
- The number of loops in the first row is 36X3=108.
Having found out how many loops should be cast on the knitting needles, they begin to create a drawing of the pattern (scheme) according to which the work will be carried out.
Having drawn a circle, divide it into 4 zones:
- Front - 36 p (loops).
- Sleeves - 18 loops each
- Backs – 36 p.
The rays that define the boundaries between zones are raglan lines. Further computation requires extracting the loops to create these boundaries. For each of them, 2 loops are enough, the number of “P” in each zone decreases accordingly. There will be 35 stitches left on the back and front, and 16 each on the sleeves.
Before knitting raglan with circular knitting needles, you need to remember the need to form the so-called sprout. The fact is that the height of the neckline on the back is slightly higher than this value on the front of the product. You can form a neck using elongated loops.
Cast on the required number of stitches (108) on the knitting needles. Knit a base row, with the help of which a circle (neck) is formed.
First of all, a sprout is formed:
- Mark the beginning of the first row with a marker (pin).
- Knit 4 liters. p. (facial loops) of the left sleeve (L.R.).
- Create a raglan group (R.G.) - 1 yarn over, 1 l.p. raglan (l. p. R.).
- Knit 34 l. n. backrest.
- R.G. And 4 l. p. of the right sleeve, turn the fabric and knit the same thing, but with purl loops.
- Then in the 3rd row the number of loops on the left sleeve is increased by 1 and on the back by 2 (5 and 36), the loops on the right sleeve are increased by 4. Knit 9 liters. p and perform a turn.
- 4th row according to the diagram. 9 purl loops (purl stitches) P.R., R.G. purl, 37 purl. p., R.G., 9 out. p., L.R., turn.
- 5th row – 10 l. p., L.R., R.G., 38 p. p., R.G., 14 p. p. P.R., turn.
- 6th row – 14 purl. p. P.R., R.G., 38 p. p., R. G., 14 p. p.L.R., turn.
The addition is made in 10 rows strictly according to the scheme, constantly checking the correctness of the calculations. Having formed a sprout, knit in the round, adding a yarn over in each second row in the raglan line. Thus, the increase to the fabric is 8 loops every 2 rows. If the depth of the armhole is 20 cm, then the length of the raglan line should be at least 32 cm.
Main canvas
As soon as the required number of rows is knitted and the raglan has reached the height indicated in the diagram, additional fishing line is introduced into the work, onto which the loops that form the sleeves are transferred. Now only the main fabric is knitted. The number of its rows is determined depending on the selected length of the product.
To calculate, the result of the preliminary measurement is multiplied by 3 (the number of rows in 1 cm2). Reducing the loops is only necessary if fitting is planned. The rest of the products are knitted in an even fabric, checking the size that determines the circumference of the hips. The final stage is knitting a strip or elastic band. Its height depends on the characteristics of the sweater model. On sweaters, the bar is made at least 5-7 cm high, on sweaters - 8-10 cm high.
Sleeve Formation
Having completed the creation of the main fabric, they begin to work on the sleeves.
Many experienced craftswomen prefer to do this with stocking needles. This allows you to avoid the formation of joints and the sleeves are seamless. An important detail is the bevels, which are made in accordance with the diagram, changing the number of loops in every 5 or 6 rows:
- Five rows are knitted without change.
- Row 6 – the two outer loops are knitted together.
- Again 5 rows without changes.
- Row 6 – two outer loops together.
When calculating the sleeve length, the shoulder length is added to the given value. The result is the number of centimeters from the beginning of knitting. The number of rows can be calculated by multiplying the resulting length by the number of rows per 1 cm2 (by 4).
The work is completed by forming a placket, which is higher on the sleeves. It reaches from 10 to 12 cm. This length is additional and has nothing to do with the length of the sleeve itself. The height of the cuff is not included in the size corresponding to the sleeve length.
Collar and completion of work
The collar of a sweater is one of the most noticeable details, so special attention should be paid to working on its formation:
- The loops of the first row must be carefully unraveled.
- Place on double needles, adding a yarn over every 4 stitches.
- Knit several rows (their number depends on the planned height of the collar).
- Replace the working needles of the tools with 1-2 numbers less and knit 2 rows with a low collar and 8-10 rows with a high one.
- Return the previous knitting needles and continue knitting until the desired height is reached.
A low collar framing the neckline is formed by transferring all the loops from the knitting needles to the nylon thread. Steam and carefully sew with a hidden seam.
Replacing the working knitting needles with a smaller tool (diameter, number) ensures a tight fit of the collar to the throat.
What yarn to use for knitting for children
Not all yarn is suitable for knitting children's blouses. After all, the thread can cause allergies and irritate the baby’s delicate skin. When buying threads, you need to take into account the age of the boy or girl, what season the future new thing will be intended for, and what technique the item will be made in.
First of all, the yarn must be wear-resistant, since all children are very restless and active. Under no circumstances should the yarn become deformed or shed when washed.
Hypoallergenicity is the second important factor. Children's skin is very sensitive to chemical dyes and synthetic fiber threads. They are often diluted with yarn made from natural raw materials. Carefully read the ingredients on the label.
But children are allergic to animal fur, then it is better to use acrylic threads. And things made from pure cotton are quite rough. This yarn is not suitable for clothes for children under one year old.
The third factor is softness. The work performed should not prick or cause discomfort to little fashionistas when worn.
For winter blouses and cardigans, an important factor is not only heat retention, but also the ability to remove moisture, as a result of the mobility of children.
I recommend choosing mixed yarn or acrylic for knitting children's masterpieces for 1 year. It does not cause allergic reactions in babies, practically does not wear out, is soft, does not fade or shrink when washed. All thread manufacturers have a children's line of yarn in their assortment.
Caring for children's knitted items
Children's knitted blouses can easily highlight the individuality of each child, giving him comfort and warmth. It is suitable for wearing every day, as well as for a holiday or celebration. But they require careful care.
It is best to wash baby's warm clothes by hand at a temperature of no more than 40 C. Otherwise, the clothes may shrink significantly. For washing, you must use conditioner or a special powder for children's clothes that does not contain bleach.
In this case, you need to follow the main rule - wash light and dark things separately. Pay special attention to items knitted with threads of different colors. There is a risk that darker yarns may stain lighter ones.
The soap solution must be completely removed from things. To do this, you need to rinse them several times until the water becomes clear.
Knitted sweaters can be machine washed only if there is a corresponding marking on the label of the skein of wool.
To avoid damage to the fibers, you need to select the “wool” or “delicate” mode, and also do not forget about the additional rinse.
Under no circumstances should clothes be dried near heating devices or on a radiator, or hanging. Only on a horizontal surface until completely dry.
Iron knitted items only from the wrong side with minimal heating of the iron and store folded.
Following these simple rules will help you keep your knitted creations in good condition for a long time.
children's raglan knitting
Knitting tutorial
1. Threads 2. Tools 3. Conventions Lesson 1. Loops and methods of forming the leading edge Lesson 2. Knitting samples with knit and purl loops Lesson 3. Adding and decreasing loops in knitting Lesson 4. Methods of knitting yarn overs Lesson 5. Knitting samples with a crochet from knit and purl loops Lesson 6. Ornaments Lesson 7. Techniques for knitting colored ornaments Lesson 8. Knitting small items on two knitting needles Lesson 9. Knitting small items on two knitting needles (continued) Lesson 10. Knitting small items on two knitting needles (continued) Lesson 11. Knitting small items on two knitting needles (end) Lesson 12. Knitting scarves and shawls Lesson 13. Techniques for knitting removed loops and rearranging them Lesson 14. Knitting samples with removed and extended loops. Elastic bands Lesson 15. Knitting samples with removed and extended loops. Patterns. Lesson 16. Techniques for knitting lumpy patterns (“bumps”) Lesson 17. Techniques for knitting strands. Patterns with interceptions. Lesson 18. Variants of plaits for the curious Lesson 19. Types of entwined loops and patterns from them Lesson 20. Openwork knitting Lesson 21. Openwork patterns Lesson 22. Openwork patterns (continued) Lesson 23. Openwork patterns (end) Lesson 24. Knitting techniques on five knitting Lesson 25. Knitting gloves Lesson 26. Knitting openwork gloves Lesson 27. Knitting knee socks and socks Lesson 28. Knitting children's clothing Lesson 29. Building a pattern for the base of a blouse with a sewn-in sleeve Lesson 30. Knitting products with a sew-in sleeve Lesson 31. Knitting products with "Raglan" sleeve Lesson 32. Models of sleeves Lesson 33. Varieties of sleeves Lesson 34. Varieties of pockets Lesson 35. Basic techniques of crochet Lesson 36. Hook to help knitting needles Lesson 37. Needle embroidery on knitted items Lesson 38. Practical exercises. Products with sewn-in sleeves Lesson 39. Practical exercises. Products with raglan sleeves Lesson 40. Repair of knitted products Appendix. Examples of knitted products Appendix. Examples of knitted products (continued) Appendix. Examples of knitted products (continued) Appendix. Examples of knitted products (continued) Appendix. Examples of knitted products (end) Hats Cap Beretik JLo Takes with knitting needles from the top of the head Volume hat Cap Cap JLo Simple crochet beret Knitted toy What materials will be needed What tools to take What is needed for stuffing toys Which glue is better Crochet and knitting Basic crocheting techniques Loops for lifting or Crumous columns without a crochet -crochet, crochet -crochet columns with crocheted crochet columns with two crochet, convex and concave columns of shirt loops elongated loops (fringe) Knitting round details Reducing and adding columns Knitting loops of the set loops closing loops closing loops of the last row the latest row the latter adding loops Circular knitting Stitch “forward needle” Stitch “back needle” Stitch “over the edge” Chain stitch Bouquet of colored laces Clover Daisies Mimosa Anchor Making a tassel Earrings Forget-me-nots Chamomile Berries Thread men Rosette Daffodil Carnation Fish No. 1 Fish No. 2 Bells Decorative panel “Basket with flowers” Pompoms Making a pompom Beads from pompoms Bracelets from pompons Christmas garland Sun bunny Mouse Snowman Applique Applique Wall panel Giraffe with a centimeter Appliques for a girl’s jumper Appliques for a boy’s jumper Gnome Bear Frog with a flower Cat with a mouse Toy pillow Funny in aliki Cushion cover « Ladybug" Pillow toy "Tiger Cub" Pillows Pillow "Lyovushka" Pillow "Turtle" Small dolls Keychain "Amanita" Keychain "Cheburashka" Clown Favorite girlfriend Bunny
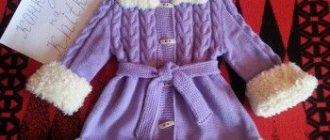
Photo of children's sweaters knitted from above
Please repost
0