Easter egg made of beads, master class with step-by-step photos for beginners
I offer you an original way to braid a wooden egg with beads. This is not difficult to do. It turns out original and very beautiful!
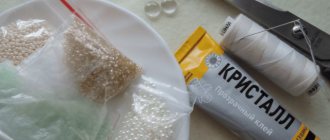
For production we will need:
- Wooden egg
- White and beige beads 10/0
- A thread
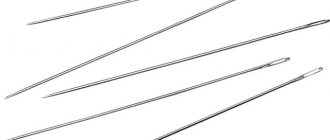
- 2 needles
- Gold beads, 3 mm in diameter
- Tape, 1 cm thick
- Double sided tape
- Glue gun
Manufacturing:
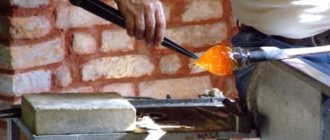
1. First, take our egg and cover it with double-sided tape. Then we remove all excess so that only the sticky layer remains.
2. Starting from the “sharp” end of the egg to the “blunt” end, we cover it in a circle with decorative tape, along the entire perimeter, leaving no gaps. You need to do this from one half of the egg, moving from the center to the other, as shown in the photo. Then this can be done continuously without cutting the tape.
3. When the entire product is covered with tape, cut it off and glue the end with a glue gun.
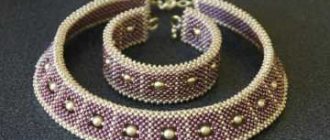
4. It turns out something like this, a very beautiful and neatly pasted egg, without gaps.
5. Using a centimeter tape, measure the circumference of the egg and its length (without the sharp part). In this case, it is 14*4 cm. We thread 2 needles into one long thread, from two opposite ends. We string a golden bead onto one of them and pull it to the middle of the thread. You can see the diagram, which we will also discuss in detail below, in the photo above.
6. Now on each side, that is, on each needle, we string 5 white beads. Then we thread the gold one through one needle, lower it onto the thread and pass the second needle through it. Tighten it and you get a loop like this.
7. Thread 5 more white beads onto each needle. We fasten again with one golden one, pushing it through both needles.
8. In our case, according to size, we make 5 such loops and move on to the second row. You measure with a tape. Make sure the size matches your bead width. After we have put on the sixth golden bead, we string 2 white beads onto one needle and pass through the third white one in the fourth loop, as shown in the photo above.
9. Next we thread 2 more white ones. And on the second needle we draw 5 white ones. We fasten it with gold again. Thus, we weave a product of a suitable size for the egg.
10. Through the third white bead of the first row, the opposite step from the last one, where we end, we pull a needle and thread. Thus, we fasten the 2 sides. We also fasten through every third white bead of each step. Place the prepared egg here.
11. According to the diagram above, we decorate the edges of our beaded “napkin” with beige beads.
12. Thus, we display 5 rows, according to the diagram.
13. Tighten the thread, fasten it, make a knot and hide the thread.
14. Move to the opposite side. The diagram for it is provided in the photo above.
15. That's all. Our souvenir egg for Easter is ready! It turned out very beautiful!
Making coasters for Easter eggs
This master class will tell you how to make egg coasters with your own hands. We need the following accessories:
- thick cardboard;
- corrugated paper;
- office glue;
- delicate lace;
- needle and thread;
- scissors;
- material for decoration.
Using scissors, cut a strip of cardboard and glue the ends together to form a ring. From corrugated paper, cut out a large strip of width and glue it onto cardboard, we will get a skirt, as in the photo. You can decorate the top with your own hands and decorative elements.
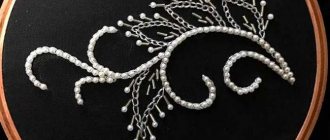
If you don’t have such paper, then you can make lace trim. Decorating it with various pearls. This design is very easy to do with your own hands.
Making a stand from beads
To make such a stand, we need the following accessories:
- beads and beads;
- thin wire;
- fishing line
Let's see how you can make such a craft.
We create a ring from the wire, string beads on it, between which two beads are inserted. The circumference of the ring should correspond to the circumference of the eggs. Tighten the edges of the fishing line and remove the ends, hiding them in the beads.
Read
We weave an autumn maple from beads using a photo tutorial
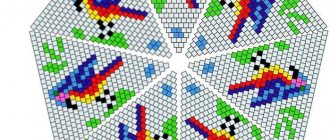
Take glass pieces and weave them into a chain consisting of twelve links. Each piece consists of six beads. Then, twist it into a ring. In the core of each space, place a bead of a different shade. Place a needle through the central beads. Then, on one side, we sew beads in a circle. We attach the rings to each other by sewing the beads to the beads. Go with a needle along the last row of the ring, sewing the main material, we return to the material of the other ring, connecting them. The photo shows what should come out.
At the bottom of the stand, you can make an additional row of glass, then its appearance will be even better.
Weaving master class - Easter egg with beaded lilies of the valley
I offer you a very interesting way to decorate an egg with beads. We will not only decorate it, but also put it on a stand with lilies of the valley. After all, Easter is a bright spring holiday and lilies of the valley come in handy here.
For production we will need:
- Egg (blank)
- Beads of any color
- A thread
- Needle
- Glue
- Plastic pearls of different sizes
- Vise
- Band-Aid
- Metallized gold thread
- Wire – 0.3-0.4 cm.
- Supermoment glue
- Toothpick
- Rough nail file
- Rubber
Manufacturing:
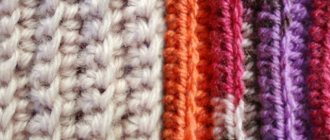
1. We will not consider the method of braiding eggs with beads. You can do this as usual or use the method above. As for the color of the beads, decide for yourself.
2. You can use different shades of the same color and braid it, stretching them as much as possible from bright to light or vice versa. You can make just a plain or multi-colored egg.
3. Cover the vice with adhesive tape so as not to damage the beads. Using a toothpick, place the bead here and fix it (without being too zealous). Using a saw, we cut off the top of the head.
4. We weave a flower from beads, as in the photo. We tuck the tails of wire and thread into the hole of the sawn bead. We drip glue onto the cut and fix the flower here.
5. Now wrap it with wire so that the hole in the bead is closed.
6. Thus, we use all our beads and make a lot of lily of the valley flowers. The topmost bead is secured with a long wire and thread in two turns.
7. Using the same wire we collect flowers of different sizes. We fix the beads tightly, at a distance of approximately 5 mm. We cut the wire diagonally and install a new flower in the same place. There is no need to cut the wire from the last bead; we wrap it around all 4 flowers.
8. Using hand weaving, on a wire with a diameter of 0.4 millimeters, we make leaves of different sizes and cut off the twisted ends short.
9. Now we fasten the flowers with the petals. Tightly twist all the wires together and decorate with threads that match the color. Flatten the bottom with pliers.
10. Sew the stand. We sew eight rows one by one. On the third row of Ndebele we make a flare, placing beads. The flare can be made the same, or the top part can be embroidered more than the bottom.
11. On the egg shirt we sew 4 Ndebele stripes onto 2 size 15 beads to divide it into 4 equal parts. Now we try on the egg and determine the row to which the stand reaches. The bouquet will be sewn to this line. Apply the flower and secure with an elastic band. Sew 2 branches of flowers onto the flowering branches.
12. We strengthen the stand. In this case, a roll of small tape worked perfectly. Cover the hole at the top with a piece of plastic.
Double-sided weaving method
This technique is perfect for beginners. You should start learning this technique using beads of two different colors. One will be used for weaving even rows, and the second for odd ones. The first and second stripes are woven as follows:
- The first two beads are threaded through.
- Return and insert the needle into the first bead.
- It is necessary to string two beads on a fishing line (as in step 1).
- Thread the needle through the third bead.
- Weave two rows in this way. The first row of beads is combined with each other, and in the second the beads are held on the first row.
- Pairwise connection of the first and penultimate beads, the second with the last. Pass the fishing line through the beads of the unpaired row (3-4 pcs.) Bring the thread through the beads of the paired row. Do the same, passing the thread in the 3rd or 4th bead of the odd row on the right side.
Start working on the third row of the product. To do this, you need to string a bead and thread the fishing line into it. Then pass the thread through the last bead and knit. Repeat these steps and carefully work on the canvas according to the existing pattern.
This method is used to create a belt around the thickest part of the egg. The size of one strip is selected based on the size of the product (height and width). Typically, the size of the belt is in the range of 10 rows. Its length depends on the circumference of the widest part of the egg.
Important nuances
For convenience and a better fit of the fabric, it is worth making the first two rows of the belt, and then putting them on the egg. This will prevent mistakes with choosing the size of the canvas, and the tightness of the beads will give an excellent appearance to the product. The remaining ends of the belt must be fastened by tying the remaining threads together.
Braiding in the narrowing part of the egg must begin after making the belt. For proper operation, you need to carefully reduce the number of beads with each new row. For a better fit of the fabric, this should be done evenly, pulling the thread through the same number of beads of the previous row.
If a skew or too large gaps between the rows appears during work, you must immediately unravel the braiding and do it again. The very last bead, located in the upper center of the egg, is carefully secured. This is done by threading a thread through it and neighboring beads, which is then tied into a knot. The remnants of the thread are cut off, and the ends are hidden under the nearest rows of braid.
Easter egg made of beads with flowers, a simple way of weaving
I offer another original, beautiful option for covering eggs for Easter. A shirt made of beads and beautiful flowers are made from it. Making it is not at all difficult.
For production we will need:
- Blank – egg
- Multi-colored beads
- Glue moment
- Thread and needle
- Thin wire
- Round beads
- Duct tape
Manufacturing:
1. Take the egg in your hands, pointy end up. Visually make a mark on one side of this end. From here we will wrap the beads so that the pattern is diagonal.
2. So, let's drip some glue here. We thread a long thread into the needle. We fix the second end of this thread with glue. We string here one-color beads (yellow in this case), 20 cm long. We stretch this snake to the very end of the thread.
3. Now, twist the beaded strip in a spiral, leaving no gaps. First we make a layer of glue and wind the beads. Do not apply a lot of glue at once, because it will be inconvenient to work.
4. Now you can use beads of a different color or, as in this case, alternate 2 green and yellow beads. The length of the “snake” is also 20 cm. We glue it in the same way.
5. We continue in the same spirit, alternating 20-centimeter snakes of another green, combined, yellow, and so on in a circle. When the circle is closed, cut the thread and hide it. This way you can make different colors and combinations.
6. We string beads (in this case, purple) onto the wire. Mark a small part and twist it in a loop. It turns out to be a petal. Next we outline a larger part, twist it so that the smaller petal remains in the larger one. This can be seen in the photo.
7. Thus, we twist several petals, forming a flower. When the last petal is completed, string the bead and make sure it is in the center. Leave the wire at the ends.
8. String green beads onto another piece of wire. We collect almost the same flower, only from single-sector petals. We twist it in a circle and thread it under the purple (in this case) flower.
9. If you want to make such flowers not only to decorate eggs, but, for example, to collect a bouquet, then you can make leaves. We string green beads onto the wire. We make a loop, but much larger than for the petals. Now we twist this loop with a loose flagellum. Next, from the same wire, we make the same figure. We wrap these petals with adhesive tape of a suitable color to the main stem.
10. Thus, we make the required number of flowers. I repeat that leaves are not needed for eggs. “Bite off” the wire with pliers.
11. Glue the flowers with glue diagonally or in random order.
Preparation and selection of material
Before starting work, you should find all the necessary material to create beaded Easter eggs. These materials are the same, and their choice does not depend on the preferred technique of working with beads. For this lesson you will need:
- Blanks (egg-shaped or similar).
- Beads of various colors and preferred sizes.
- Glue.
- Needles for working with beads.
- Bead thread or fishing line.
The blank can be easily found in specialty stores for handicrafts and beadwork. Regular blanks made of wood or plastic will do.
You can also use the shell of an ordinary egg to make the product. This requires:
- Make small holes (at the ends) and remove all contents.
- Strengthen the remaining shell by covering it with pieces of newspaper or other soft paper.
Knowing this technique well, you can do without the shell. You just need to make a blank from pieces of soft paper in the required shape. For its stability, the base is made flat. To give a beautiful look , the top layers of paper are smoothed with sandpaper and coated with paint.
Any beads are suitable for this work. Czech glass beads are of particular quality . If they are not available, Chinese will do.
The choice of colors and size of beads depends on the chosen pattern and pattern.
Background colors are usually pastel tones. White, blue, light pink and other neutral colors are suitable. For the significance of the look, the pattern is made from a bright and catchy color palette in all variations.
Beads are sold by weight, not quantity. It is necessary to know exactly the required mass for the product. Its determination is possible thanks to the presence of a diagram and a special table .
Threads (fishing lines) and needles for work are found in the same stores where blanks are sold. When choosing a thread, you should give preference to the thinnest and strongest ones so that they fit the existing hole in the bead. The needle should also be thin, with a small eye.
Video master class on weaving a large Easter egg from beads
The author of this video proposes to make a large egg in a symbolic Easter binding with the image of the icon of the Blessed Virgin Mary. This is not the only video from the master class. It consists of 2 parts and is quite long in time. But there is no need to rush into giving a gift for this Holy holiday.
Enjoy watching!
On the eve of Holy Easter, I want to do good and give it to people. On this day, it is customary to treat each other with colored eggs. Also, give gifts from the bottom of your heart. Eggs decorated with beads are one of the most successful options for this holiday.
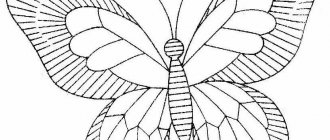
Simple bead weaving patterns for beginners
Several simple patterns for creativity. You can decorate Easter eggs with these decorations.
Take our selection to social networks. After all, Easter is just around the corner! Let original master classes and weaving patterns always be at hand! I wish you success! See you soon!