Needlewomen come up with something new every time and modernize embroidery techniques. Even if the method dates back to ancient times, it bears little resemblance to the process that was originally used to make paintings and products. One such method of creating paintings is diamond embroidery, which is popular due to its low entry threshold. This article will tell and show everything about diamond embroidery, how embroidery is done, diamond technique and the history of its origin.
What's happened
The diamond embroidery technique is based on laying out pictures, scenes and landscapes using rhinestones according to certain patterns, which are taken from the Internet or invented independently. Patterns for embroidery with beads or cross stitch are often used for this, but unlike these types of needlework, embroidery tools like needles and thread are not needed here. Only with tweezers and colored rhinestones can you create very beautiful paintings in a relatively short time. The use of simple patterns eliminates mistakes even for the smallest and most inexperienced craftswomen. To complete the process you need patience and accuracy, which will allow you to create beautiful pictures.
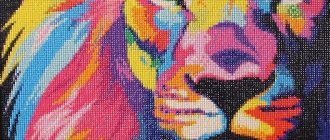
Tiger cub embroidery
Video with diamond embroidery master class lessons for beginners
This video shows how to do diamond embroidery correctly. An interesting way to organize pebbles is demonstrated - using a drawing palette. All the nuances and details in diamond painting are described.
The video clearly shows the process of creating diamond painting. The nuances of the technique are discussed, and how to properly organize the work process is explained.
This video clearly shows how to install a diamond mosaic using tweezers and a stylus. The advantages and disadvantages of the tools are demonstrated in detail.
Story
The technique was first used in Ancient Greece before our era. In those days, it started with decorating the clothes of rich people. For this, they did not use rhinestones, since they did not exist yet, but jewelry or pearls. They were used to lay out patterns and abstractions on sleeves and collars, and were fixed with glue or wax. Naturally, only some people could afford such a pleasure.
Important! The technique became further widespread when used in decorative and applied arts and the design of paintings containing landscapes, scenes and still lifes. Here, simple beads made of lapis lazuli or clay of different colors were used more and more often.
Mosaic art - the progenitor of crystal embroidery
When glass was first obtained in Rome, it immediately became popular to use it in mosaic art. Decoration became more accessible: beads were used to decorate clothes, and flat pieces were used to decorate house facades. After lead, antimony or bone meal began to be added to the glass, it turned into cloudy smalt. This opaque enamel was used to make paintings and stained glass windows in the castles of rich people.
You might be interested in this Review of beautiful patterns and ornaments for cross stitch
Still life of crystals
General information
The idea of laying out pictures with small pebbles arose in ancient times. Even in the 5th century, trends from the countries of the East were reflected in the art of Greece. In those days, precious stones were used. Now the technology for creating such paintings with your own hands has been adapted to modern possibilities. This hobby has gained wide popularity among modern lovers of needlework. There are also other names: diamond mosaic or painting, embroidery with stones and rhinestones.
The word "mosaic" is of foreign origin. It is found in French (mosaïque), Italian (mosaico) and Latin (musivum). It is translated into Russian as “dedicated to the muses.” this term is used to refer to the concept of composing a whole image from small fragments. Since ancient times, all kinds of materials have been used for this technique: glass, smalt, stones, ceramic tiles.
Once upon a time, mosaic images exclusively decorated the walls of temples and palace vaults. Now there is a wonderful alternative. Chinese manufacturers have breathed new life into an ancient idea and adapted this art to modern times. Diamond painting crystals are made from acrylic and plastic. Sometimes there is a coating on the stones, which gives additional shimmer.
Work kit
The standard set includes all the necessary tools and materials for the creative implementation of an original idea . As a rule, a ready-made kit includes:
rubberized dense canvas base with an adhesive layer and a protective coating, a pattern of crystal placement is applied to the fabric;- diamond rhinestones and crystals, packaged separately in small bags;
- tools (most often, tweezers for laying out pebbles);
- plastic plates;
- separate bags with a zipper for storing stones;
- detailed instructions with designations of circuit symbols, as well as an image of the finished work.
In addition, you will need a ruler to align the rows. It is also recommended to purchase special containers that combine many cells. They are easy to store rhinestones in.
Types of schemes
As in traditional cross stitch, there are two types of schematic drawing of the future picture. Printed in black and white on the included paper insert, the colors are conveyed through the use of various symbols. If the canvas size is not large and the painting does not have a particular variety of shades, this method is quite acceptable. However, in this case there is a higher probability of making a mistake and subsequently redoing it.
Development of Diamond Mosaic
Like any method of decorative art, diamond embroidery has developed and modernized. In the Middle Ages, the so-called bugles first appeared, which became the progenitor of diamond embroidery. Already in these times, canvas was used as a canvas, on which there were symbols for cross-stitching. Colored pieces were laid out on it along the contours, having previously soaked the canvas with wax.
Bugle beads began the spread of this technique in Russia
In Russia in the 19th century, noble women and court servants sewed beads. Using glass beads we made:
- Wallets;
- Paintings and icons;
- Robes;
- Bracelets and jewelry.
At some time, the method faded away and lost popularity, but was revived with the development of arts and crafts techniques in the mid-twentieth century. It was at this time that the concepts of “diamond embroidery” and “diamond laser mosaic” began to be used.
Round rhinestones with edges
In the 21st century, technology has been improved even further. Today it is used to decorate panels or decorate interior items. All you need to get started is to purchase a special kit at a sewing store or online. You can master the principles using the instructions that are often included in the kit.
Diamond set
What to do to make rhinestones stick
The finished picture must be leveled . To do this, take a rolling pin or a special roller for diamond embroidery. According to the experience of needlewomen, it is not necessary to spend money on additional devices - improvised ones will do. It is important that the rolling pin is clean, not beveled, preferably with handles.
You need to lay a cloth on a flat surface and place the picture on it with the pattern facing up. Cover the top with a cloth as well. Next, roll the rolling pin in different directions over the rhinestones, pressing slightly. At the same time, a crunching sound will be heard - these are the rhinestones falling into place. When the sounds stop, you can move on to the next stage - ironing , so that the mosaic sticks to the canvas even better.
Editorial Voice
Matryona
Fan of embroidery and sewing
Ask a Question
To iron the canvas, you need to turn on the iron and set the “ silk ” mode. The temperature should not be higher than 120 degrees, otherwise the plastic will melt. The drawing is turned over with the front side down and, pressing a little, they begin to move the iron over the entire surface, without missing any sections. You need to do this for about 5 minutes .
After ironing, the picture is turned over again, covered with a cloth and rolled again with a rolling pin, finally pressing the rhinestones onto the heated glue . Now they will have much less chance of coming off.
After all procedures, you need to let the rhinestones dry . At this moment, you cannot roll the canvas, much less fold it, otherwise the adhesion of the diamonds to the fabric may be disrupted again.
Contents of the sets
The kits include all the necessary materials to create beautiful mosaic pictures. They contain a base, which is usually made of paper or fabric with an adhesive applied. The base may differ in the composition of the glue and the surface itself, but the rhinestones are all the same and are made of acrylic. It is acrylic that allows you to achieve the effect of sparkling rhinestones, both in artificial and natural light.
Standard embroidery kit
The set should also include small tweezers, which are used to place the stones on the base, and a stylus with gel, which allows you to conveniently stick the stones. Most often, the second one must be purchased separately, but it is worth it, because the end of the stylus is filled with gel, with which it is easy to take stones and attach them to the desired place.
Important! You can buy everything separately and, probably, save money, but thereby spend a lot of effort and time searching for each specific item. The most convenient option is to order a complete set on the Internet or in a specialized store for needlewomen.
The process of uploading a picture close up
Types of schemes
According to the classical method, patterns for embroidery with crystal diamond rhinestones are black and white and color. Their main difference from each other is that the patterns are located directly on the base, and there is no need to cross out embroidered crosses or beads. For such work, it is better, of course, to prefer to use a color scheme, but if the picture includes a small number of colors or it is small, then it will be convenient to use a black and white scheme.
You might be interested in this: How to properly embroider pictures and clothes with rhinestones
Gluing the finished work with double-sided tape
Form
“Diamonds” for embroidery are divided into two types: square and round. The former can differ in the type of cut, having nine or thirteen diagonal or transverse edges. This is not taken into account when laying out paintings. The completed work, due to the different angles of reflections and colors, gives the work a beautiful and unique shine.
Round rhinestones are also cut, and this also adds shine to the finished product, but they are not as versatile as square ones. Most often they are used when displaying animals, butterflies, birds, and winter scenes.
Distributing diamonds into cells is convenient and easy
Choice of rhinestones
- The shape of
the pebbles is round or square. The former are more suitable for depicting nature, bouquets, simulating soft curves, rain, dew. The second ones are for city landscapes (walls of houses, pavements, bricks and paving stones). Round ones are distinguished by their special shine and iridescence due to the large number of edges. - According to the material,
the elements can be made of glass or acrylic. Glass ones give the picture a diamond sparkle and perfectly convey the sparkle of water or the gloss of icons. Acrylics look richer and brighter, suitable for street sketches and still lifes.
How to understand colors
It's not very difficult. Just look at the base and determine which symbol is needed. Next, this symbol is looked for in a special color table called the key to the scheme. There are three types of numbers in the set and on the base: the first indicate the serial number, the second indicate the color of the rhinestone, and the third indicate their quantity. The quantity in a set may be larger, since manufacturers put them in reserve.
Important! To avoid confusion in colors, you should always separate the rhinestones in special trays, which are also often included. It is also important that the pebble clearly falls on the symbol, or the row will be uneven and the pattern will shift.
Close-up of the embroidery process
How to fix rhinestones
Strengthening the rhinestones after laying out is necessary so that they do not fall off or fall out in the future, violating the integrity of the picture. This happens if:
- there are defects on the rhinestones themselves;
- Gaps have formed between the rhinestones (this problem is typical for square rhinestones);
- the adhesive layer is weak and comes off the base canvas;
- The canvas is uneven: there are folds, creases, and “bubbles.”
Any diamond mosaic kit on the Rukodelov.ru website https://www.rukodelov.ru already includes high-quality glue and a pencil applicator for installing stones. Further consolidation can be done at home using improvised means.
Do the work sequentially:
- Step 1. Place the finished mosaic on a flat horizontal surface (table, ironing board, window sill). Heat the canvas with a hairdryer to make the glue softer and better adhere to the rhinestones. Cover the picture with a cloth and, with a little force, roll it with a hard, heavy object: a rolling pin, a bottle of water, or any cylindrical object. You can also leave the embroidery under the weight of books or bars for 1-2 hours.
- Step 2. To enhance adhesion, the painting can be ironed through a cloth, gauze or towel. Maximum temperature – 110-120 degrees, without steam. It is better to iron from the wrong side. Before you begin, try running the iron over a small area, such as a corner of the embroidery. Then leave the picture unfolded for several days so that the glue dries and the rhinestones are firmly fixed in their positions.
- Step 3. Cover the mosaic with transparent acrylic varnish: this will give it shine, an effective gloss and additional strength. Choose a glossy water-based varnish, preferably in liquid form, because... the aerosol lies unevenly on the surface. Apply liquid varnish with a brush, using gentle strokes, so that it not only lies on top, but also gets into the micro-cracks between the rhinestones. It is enough to go over the brush 2-3 times.
Now it is important for you to emphasize the beauty of diamond technology with a reliable frame: frame, baguette, passe-partout. We'll tell you how to do this below.
Technique
The work process begins with preparing the workplace and all the tools. A bright room with an empty table is best for this. Light plays a key role, since the eyes will get tired very quickly from such a display. No step-by-step instructions are needed here, since making a picture from rhinestones is very simple.
The technique of diamond embroidery is simple, but contains nuances. Firstly, there is no need to remove the layer protecting the adhesive surface from the entire canvas, since it will dry quickly and the stones will not stick. As work progresses, it is bent or cut into pieces.
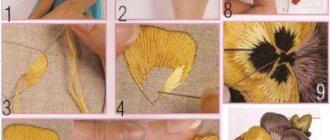
Embroidered flowers
Also, do not glue or press the rhinestone too hard, as it will be impossible to correct the uneven row later. The rows of diamonds should be even, and the stones themselves should fit tightly to the base and to each other. To check the row for evenness, use rulers. So all the cells are laid out, and all that remains is to decorate the picture with a baguette.
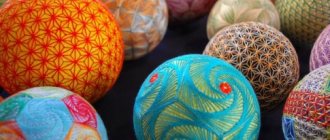
Rhinestone ball
Tips and tricks
The technique of performing diamond embroidery is quite simple and affordable. However, there are some nuances, knowledge of which will greatly facilitate the process:
- Before you start working, it is advisable to unroll the canvas, lay it out on the table, cover it with a napkin and place it under a press. Large books are best. This will allow you to level the canvas, after which it will be much more convenient to work on it.
- If the stone does not fit, you need to press lightly until it clicks.
- You need to peel off the protective surface of the canvas as the surface is filled with crystals. But if you had to take a forced pause, the film can be glued back. The glue won't dry until next time.
- Bags of rhinestones can not only be numbered, but also have the pattern marked on them.
- In the process of gluing diamonds, it is important to try to work as accurately as possible, placing the rhinestones closely, in even rows.
Storage and processing
The design of the finished picture must be approached no less responsibly than its production. They often design products themselves or in a framing workshop. The methods are different and it all depends on the taste of the author and his preferences.
You might be interested in this: MK on embroidery on mesh fabric for wedding dresses
When decorating the base yourself, you should carefully glue it to thick cardboard or paper, thin plywood using glue or double-sided tape. It is best to press the base with a rubber roller. This will eliminate deformation with the correct technique.
Step-by-step manufacturing process
Important! If the author does not intend to start decorating in the near future, then the product is carefully rolled up with the crystals facing out and hidden in a case or table from dust.
Diamond embroidery: Useful life hacks TOP 10
- It’s better to start with small formats like postcards (sizes from 15 by 15 cm), gradually moving to larger ones (up to sizes 125 by 80 cm). The advantage of the first option is fast execution, the second is the realistic image and presentable appearance.
- Finished or unfinished mosaics are stored rolled up. It is important to roll only with the pattern facing outwards. Otherwise, there is a risk of making creases and squeezing out individual crystals. You can fix creases by ironing them through gauze.
- The finished canvas is left flattened until completely dry. To secure it tightly, it is recommended to roll the canvas with a rolling pin and then cover it with something heavy.
Recommendations for Beginners
Experienced needlewomen have collected tips to help novice craftswomen in their craft and give them some lessons. Among the main recommendations are the following:
- The corner that will be comfortable should be embroidered first;
- It is best to lay out strips, since laying out rhinestones along the entire length can cause you to get tired and the method will seem tedious;
- You cannot remove the protective layer from the entire base at once. Otherwise, it may be damaged or dirty;
- Choose for work only full embroidery kits, in which the picture is laid out in full, and not in parts.
House on the poppies
Which diamond embroidery is better: Chinese or Russian?
This topic of discussion gave rise to many disputes between craftswomen. Some say that China has the cheapest and most beautiful stones with a huge variety of them. Others object, saying that in Russia they can also make them for every taste and color, at an affordable price. In fact, everyone is right, since both in Russia and in Asia, including China, there are manufacturers producing high-quality and inexpensive sets of crystals. The choice is huge, please.
Image of grapes
Sets from different countries differ in some properties: the composition of the base, glue and the layout according to which the layout is made.
The most popular names of embroidery kits are:
- Granni - Russia;
- Diamond painting - Russia;
- Snow White - China;
- Anya - Korea;
- Gossamer - Russia;
- Color-Kit - China.
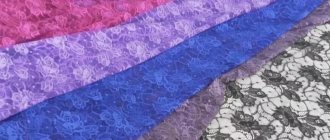
Lilac embroidered using special recruitment
Tweezers and stylus in diamond embroidery
Sparkling panels are conventionally called embroidery. In fact, the pebbles are not sewn to the base, but glued. For convenience, special tools are used. Ready-made kits always include a plastic stylus (a stick for installing rhinestones) and tweezers. Using a stylus, it is convenient to remove an individual rhinestone from the total mass in the tray and install it in the desired place in the design. Recently, there are styluses that allow you to grab and glue 3 parts at the same time, to save time. Using tweezers, crooked elements of the composition are corrected.