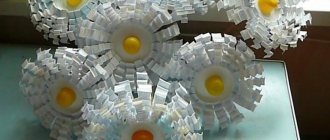
Piglet.
We will get an original pig, although it is very simple to make.
For the pig we will need:
- Plastic cups.
- Glue or stapler.
How to do:
- We fasten the cups with a stapler.
- Thus we make a circle.
- We lay out the top ball of the cups in a checkerboard pattern. There will be fewer glasses, which means that with each layer the figure will resemble a ball more and more.
- We cut out the eyes, smile and paws. Glue it.
You can use any color of plastic!
New Year's game "Mouse and her cheese"
The game “The Mouse and Her Cheese” will help reinforce children’s knowledge of colors. The child is asked to place the mice in holes of the corresponding color.
You will need:
- colored paper;
- cardboard;
- glue;
- markers;
- regular pencil;
- scissors;
- ruler.
Step-by-step instructions for creating a game:
- Cut a strip of white paper 3 cm wide and 21 cm long.
- We bend the strip into a “loop” and glue the edges.
- Using a simple pencil, draw a semicircle on the glued edge, rounding the corners.
- Trim the corners with scissors.
- Cut out 2 ovals from white paper.
- Glue the ovals, stepping back a little from the edge. These are mouse ears.
- We draw a mustache, nose, and eyes for the mouse with felt-tip pens.
- Cut out the mouse's tail from paper.
- We attach the tail from the back side.
- Making a piece of cheese.
- Cut out two semicircles from colored paper. Yellow should be smaller than red.
- First glue a red semicircle onto a sheet of cardboard, then a yellow one.
- We cut out ovals of different colors from colored paper and glue them onto the cheese in any order.
- To play the game you need to make as many mice as there are colored holes in the cheese. The color of the mice's tails should match the color of the holes in the cheese.
Watch
You will definitely like this gift.
What you will need:
- Styrofoam;
- Cardboard;
- Corrugated paper;
- Ribbon;
- Lots of delicious sweets;
- Decor.
We make it step by step:
- Cut out 2 circles from cardboard. and just such a circle made of polystyrene foam.
- We make a “sandwich”: cardboard, polystyrene foam, cardboard.
- We glue beautiful paper onto the cardboard.
- We place candies along the edges of the sandwich and tie them with ribbon.
- Let's decorate. Using beads, Christmas tree decorations and other decor, we make arrows and ornaments.
Your family and friends will love this homemade gift. And there are many options!
New Year's crafts - Summary of a lesson on plasticineography "Bullfinches" in the second junior group
Publication “Summary of a lesson on plasticineography “Bullfinches” in the second junior…”
Summary of a lesson on plasticineography “Bullfinches” in the second junior group. Goal: to continue to introduce children to non-traditional drawing techniques, to draw with plasticine (plasticineography. Objectives: • To expand and clarify children’s understanding of wintering birds, the features...
Image library "MAAM-pictures"
New Year's photo report of crafts in kindergarten
New Year's photo report of crafts in kindergarten. Winter is a wonderful time of year. It is remarkable because it awakens fantasy, creativity and imagination. With the onset of December, everyone begins to look forward to the new year. And according to tradition, for the New Year in our kindergarten there was...
Lesson summary “Craft “Snowman”” Objectives: Exercise children in gluing ready-made shapes according to plan. Learn to convey in a drawing the structure of an object consisting of several parts. Preliminary work. 1. Observing freshly fallen snow while walking. Objectives: to form an idea of winter; evoke aesthetic...
Winter buildings made of snow. Making it with children Winter is a magical, amazing time of year. The children are looking forward to the snow and are happy about it. As soon as snow falls, everything around becomes fabulous, incredibly beautiful. Winter is the time of year when children can play snowballs, make snow sculptures, and go down the slide. Motor…
New Year's crafts – Cardboard craft “Our friend Snowman”
Article “Cardboard craft “Our friend...”
A simple and cute cardboard snowman is a great idea for winter crafts with kids. This traditional character is loved by everyone, young and old, and will definitely delight all the children in the group. Surprise moment. Children enter the group, several white circles are scattered on the floor...
Master class on making New Year's cards for teachers of junior groups of preschool institutions
This school year we are working with children 3-4 years old. How to make a beautiful New Year's card with children of this age? The idea came when I had some beautiful wrapping paper on hand. And the cards turned out like this! What will you need to make a postcard? Paper with...
Master class on the application “Mittens for Santa Claus” with drawing elements
author: Chutova Maria Pavlovna teacher of additional education MAOU DO SUT No. 1 Krasnoyarsk Goal: to create a magic mitten lost by Santa Claus using cardboard, paper and decorations. Objectives: Educational: - master practical skills in making applique;...
Master class on making the didactic game “Buttons for a Snowman”
Making a didactic game “Buttons for a Snowman” Purpose: To consolidate colors; Strengthen the ability to count a certain number of objects; fix the composition of numbers within 10; consolidate the performance of addition and subtraction operations within ten; consolidate knowledge...
Pages: … 1198
Orange tree
A beautiful and fragrant tree made from dried citrus fruits will definitely take 1st place in the competition!
The tree looks magical! And even a child can make such beauty.
I will only give advice on drying citrus fruits:
- Try to cut the oranges into even slices, otherwise the thinner edges will burn.
- Before drying in the oven, it is better to blot the slices with napkins to remove excess moisture.
- Start drying at 100°, turning the slices periodically. Some slices will dry faster - take them out immediately.
House
These are very simple models. The baby can actively participate in their production.
We will need:
- Cardboard tubes,
- Glue,
- Dye,
- Paper cake pans,
- Cotton wool.
We work:
- We paint the tube white. We draw doors and windows. We glue glitter on the windows as if it were snow.
- We fix the paper forms on top.
- It will be beautiful if you glue cotton wool onto the forms.
You can make it not only from a cardboard paper towel holder, but also from a simple box, but also from all sorts of things. You can make a whole city, add miniature cone trees or trees made of painted cones. And the doors can be decorated with miniature wreaths.
And the city itself can be diversified. For example, make a big castle with small houses around it. You can put a couple of Lego men on the model to make the city come to life. The city itself is conveniently placed in a box.
Cardboard house
The house is made of cardboard: we draw it out, glue it with a hot gun or instant, glue it on top with toilet paper or napkins with PVA glue for relief and to hide the joints of the cardboard.
We make the roof from cotton pads - we glue snowflakes on top, you can put artificial snow from the store in the pipe - this is smoke, which indicates that it is frosty outside.
And silver shiny glue helps our house sparkle from the frost. All other elements are: a mailbox - a matchbox covered with paper, artificial snow from Fix Price, snowflakes, gifts and an artificial Christmas tree, and, of course, character figurines too.
Source
Houses according to the template
If there are no paper sleeves, then you can use a template from cardboard or thick paper, you can take a beautiful designer one, cut out the blank and glue it. The template can be printed or drawn on the monitor on plain paper, cut out and drawn on cardboard.
It is convenient to make bends using a ruler
Of course, the baby will need more of your help here than if the houses were made of bushings.
Craft "snowman"
For this you will need:
- cotton pads;
- felt
- cardboard
- PVA glue
Preparation method:
- Place discs in the shape of snowmen on cardboard and glue each circle onto the paper.
- Additional parts of the snowman, such as a bucket, scarf, nose, are cut out of felt or colored cardboard. Let your child glue the pieces onto the snowman.
Christmas tree
Christmas tree made from paper using a template
Do you know what to do to make a voluminous, chic craft from two parts? I will show!
We work:
- Cut out 2 blanks from colored paper (it is advisable to use thick paper).
- Fold them in half.
- Draw half a Christmas tree on the fold.
- Cut out.
- Make cuts in the middle in both pieces. In one - from top to middle. In the other - from bottom to middle.
- Place one on top of the other and secure them.
- Decorate!
If your baby can easily cope with such work, you can give him a more difficult task. For example, creating large compositions.
For example, if you know how to make Christmas trees and houses, you can come up with a serious craft for a competition. One like this:
True, I would replace Klaus and the second character with our heroes. Why, I already told you here
New Year's bunnies applique
We suggest starting our creative process by making an applique with beautiful bunnies on it. You can make similar winter crafts with your own hands for kindergarten together with your child. The baby will be interested, and it will be much easier for you.
For work we will need:
Template for applique
- pattern of hares, if you know how to draw well, then you can draw it yourself;
- glue stick;
- blue cardboard, can be replaced with regular cardboard and then painted with paints;
- PVA glue;
- white and blue ball of knitting thread;
- scissors;
- container for chopped threads;
- brush;
- decorative snowflakes and stars.
Having all the listed components for making our application, we move on to creating a beautiful picture. Making crafts for kindergarten on the theme of winter is as follows:
- We print out a template of two bunnies near the Christmas tree. If you are good at drawing, the template can be drawn on a regular white sheet. Next, cut out the workpiece with scissors.
- We place blue cardboard in front of us; it can also be replaced with regular cardboard, but you will have to paint it blue and wait until the paint dries. Apply glue to the cut piece around the entire perimeter. We apply it to the bottom of the cardboard, smooth it out well and wait until everything dries.
- While we wait for the glue to dry, take a ball of white knitting thread. Cut it very finely into several containers. In one of the containers, cut the blue threads and mix everything well with your hands.
- During this time, the glue presumably dried. We now need to apply a thin layer of PVA to the surface. It is advisable to do this with a paint brush.
- Now let's start decorating the Christmas tree. A thin layer of glue has been applied, take a container with mixed threads, and slowly begin to pour green threads onto the Christmas tree. We continue these actions until we fill all of our forest beauty.
- Next, apply a thin layer of glue to the bunnies. Using chopped white threads we cover the hares and the lower part. Applications.
- Let's move on to decoration. We take our beautiful stars and apply glue to each one, you can simply drip one drop onto the cardboard in different places, whatever is more convenient for you, do so, the quality does not depend on it. Glue the stars in random order. If you wish, you can add snowflakes to the application.
At this stage, the production of crafts on the theme of winter for kindergarten is completed. It is recommended to involve children in the work; of course, they will not be able to draw or print the template yet, this work is assigned to the parents, but they will be able to glue all the other elements. With this type of work, fine motor skills will develop.
Garland
We already had an article about garlands. This same work is new! It’s so simple that even toddlers can do it easily. But it looks original!
- Cut strips of paper.
- We secure their edges.
- We thread the thread through the stripes of the circle.
- Glue a feather or a snowflake or an angel into the middle of the ball.
stencil for garland
It turns out to be a very unusual composition.
DIY composition of pine cones:
DIY Christmas tree made from pine cones
Progress
- Draw a circle on a piece of whatman paper; its dimensions should correspond to the height of the tree.
- Cut the circle to the middle and roll into a cone.
- Secure the edges with glue.
- Take pieces of plaster bandage, wet them with water and glue them to the base.
North Pole
Kids won't have to work long on this craft. Take a closer look, all you need here is this:
- Cut circles or other shapes from thin, snow-white foam.
- Glue them together to create picturesque landscapes of the north.
- And arrange various ready-made toys for the inhabitants of the north.
It turned out to be a beautiful picture. And the kids did it within 10 minutes.
Crafts for kindergarten
Preschool children 3-5 years old, together with their parents, make crafts on the theme “winter” with their own hands for kindergarten.
Children with great pleasure are ready to make houses, snowmen, snowflakes and Christmas trees, and color the finished drawings.
Hare
There are different ideas to create our children's favorite hero. But I wanted to introduce you to one that your little ones will definitely like. After all, we will create from plasticine (salt dough, clay)! And this is the toddlers’ favorite material.
So, let's start by making balls. I will name them in decreasing order.
- Gray: 1 large, 2 slightly smaller, 2 medium and 2 smaller than medium.
- Yellow – 2;
- White – 2;
- Reds – 2;
- Black – 2.
We crush the largest one to make a circle (like a button). We place a smaller “button” on it. Divide the next button into 3 parts. The two outermost ones are the ears. The yellow “buttons” are the cheeks. We draw mustaches on them. Above the cheeks is a ball nose. At the bottom of the cheeks there is a “button” mouth. The eyes consist of two “buttons” at once, white and black. There are puck feet on both sides of the craft. From the remaining plasticine we make a tail and a stand for the hare so that the craft can stand.
If you want, you can make a red Santa hat to give the bunny a New Year's look. To prevent the bunny from getting bored, you can add a Christmas tree or a sleigh.
Craft “bear in a den”
For this you will need:
- polystyrene foam - crumbs;
- balloon
- cotton wool;
- plasticine;
- glue.
Preparation method:
- Inflate a balloon the size of an apple, coat half of the balloon with glue and sprinkle with foam crumbs.
- After the glue has dried, we pierce the ball in several places and pull it out.
- Glue the resulting hemisphere onto cardboard.
- We sculpt a figure of a sleeping bear from plasticine.
- We decorate the surface of the cardboard and den with cotton wool.
- We place the bear figure inside our den.
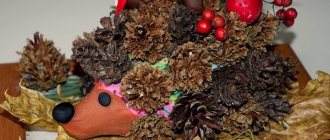
Piggy from a sock
The second cute sock pig - step by step photo
Piggy from a sock
The simplest version of a sock pig in the video: And patterns from the channel “How to make gifts with your own hands”
Plasticine painting
A plasticine painting is one of my favorite crafts. Even a simple plot made with plasticine looks three-dimensional, deep, as if it was painted by a master with oil paints.
Look, even an ordinary Christmas tree looks decent. And to make the picture unusual, I want to remind you of the double exposure technique. This is when the entire picture is made in the form of an object, person or animal. For example, a snow-covered forest in the shape of a Christmas tree. You can’t even find such works on the Internet. The most I found was a picture in a circle, photo below.
Well, regular rectangular designs are also incredibly good. And it’s a useful activity for little hands. Mom only needs to draw the main objects that will be in the picture, and the baby can already paint. I wrote all the techniques for working with plasticine paintings here.
Snowman applique
If a child touches on the New Year's theme, you can tell him about Santa Claus's faithful helpers. Tell an interesting story, and in order to fully immerse yourself in the fabulous atmosphere of winter, we suggest making winter crafts with your own hands for the kindergarten in the form of a snowman.
This character is interesting to many children. It is especially interesting to sculpt it from snow. But since parents do not want their child to get sick after making a snowman, we make a snowman on paper. To make the application we will need:
- a simple pencil and an eraser;
- paper;
- cotton wool;
- glue;
- scissors;
- a piece of foil, all you have to do is eat the chocolate and take it from there;
- brush and paints.
If you have all the necessary components, then the craft will also be free. Making an applique in the form of a snowman:
- On paper we draw two circles of different sizes. On top of the first circle we draw a circle of smaller diameter, then we draw a third circle, smaller than the second. Add snowman handles to the second circle on the sides.
- Now we take cotton wool and tear it into small pieces. We arm ourselves with a glue stick and begin gluing pieces of cotton wool. This must be done over the entire surface of the snowman, and so that the cotton wool does not protrude beyond the drawn lines. (you can use regular PVA glue)
- We arm ourselves with scissors, take foil and cut out a triangle from it, the appropriate size for the hat of the drawn snowman. Coat the foil with glue and stick it on the head. The body of this DIY winter craft for the kindergarten is ready. You can start decorating.
- Then we take paints. First you need to make a background. Using blue paint, we create a background, but it is advisable not to catch the outline of the snowman.
- We wait until the paint dries. After drying, paint snowflakes with white paint. We also paint black eyes and a smile.
- For the snowman's nose we will need red paint. We draw a nose for her on the cotton wool. If you wish, you can put white dots between the snowflakes, which also look like snowflakes. For more similarity, draw lines on the snowman’s body with blue paints.
At this stage, the snowman applique is ready. If you involve your child in the work, he will be interested in participating, and may also arouse interest in this type of creativity.
Christmas decorations made from sour cream caps
All you need are lids, beautiful pictures, glue guns and string.
View this post on Instagram
CHRISTMAS TOYS FROM SOUR CREAM LIDS???? Ideal for Kindergarten. Rate from 1 to 10???? Download the link to the pictures in stories. _______ “BLACK WEEK” has begun on Mamsi! Discounts up to 9️⃣0️⃣% all week???????? A lot of outerwear (link in profile header). I will choose in due course. And a question about children's overalls. It's convenient❓ ⠀ !!️Use any promotional code and prices for mamsi will become even lower???????? ⠀ ???? innatol 1️⃣5️⃣% (reusable discount when ordering over 5000 rubles) ⠀ ???? innatolstova 1️⃣0️⃣% (one-time discount when ordering over 2500 rubles) ⠀ ⠀ It’s more convenient to follow promotions on @mamsyru. Soon they will have a holiday quiz with goods for 1 rub???? #mamsi
Publication from CHILD DEVELOPMENT?????????????????? FUNNY???? (@innatolstova) Nov 19, 2021 at 9:34 PST
Snowball
To create this craft you will need: a glass jar of baby food, distilled water, liquid glycerin, various glitter or small foam balls (optional), small toys from Kinder Surprises, glue.
- Using a glue gun, firmly glue the toys to the inside of the lid. Wait until completely dry.
- Pour a little more than half of the distilled water into the jar and fill the remaining empty space with glycerin.
- Pour glitter into a jar (the amount is at your discretion).
- Apply glue along the edges of the lid and screw the jar on.
- Turn it over and enjoy the beauty!
- A detailed master class in the previous article here - how to make a snow globe
How do you like this idea?
How do you like the crafts? Did you like it? Then tell your friends about the collection and invite them to visit our website!
Winter in a ball - DIY snowman Olaf
A small world in a glass ball is so magical! Just what you need for the New Year. Thanks to our master class, you can create your own little fairy tale with your child and surprise the children in kindergarten.
Before you begin manufacturing, you need to prepare the following material:
- A small glass jar with a lid (the more unusual its shape, the better);
- Small figures (ceramic or plastic) that can easily fit into a jar. Small artificial Christmas tree;
- Glue;
- Glitter, coconut shavings or foam balls for artificial snow;
- Glycerin (sold at the pharmacy);
- Distilled water;
- Foam plastic or polymer clay.
First of all, we prepare the basis for our fairy tale plot. To do this, glue a foam snowdrift onto the lid of the jar (with older children it can be sculpted from polymer clay - but it will have to dry well). Coat the snowdrift with glue and sprinkle with glitter. We carefully shake off everything that does not stick.
Using glue, we fix a pre-selected figurine and an artificial Christmas tree made of serpentine on the snowdrift.
When the glue has hardened well, it's time to fill the jar. Fill the jar approximately 2/3 with distilled water and glycerin. Here, at the same time, you can explain to the child Archimedes’ law, since the jar, after closing, must be filled with liquid to the brim.
Before closing the jar, pour artificial snow into it. If you fill with sparkles, they should be large. Otherwise, the “snowfall” effect cannot be achieved; the “snow” will simply float at the top.
Coat the outside of the neck of the jar with glue and screw the lid tightly on.
There can be a huge variety of plots for a “winter tale”. It all depends on your imagination and the selected materials for the craft.
In the video you can watch a step-by-step master class on creating a New Year's glass ball: