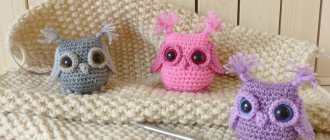
Owl pattern
The “owl” pattern is made quite simply with knitting needles if you have the skill of knitting knit stitches and purl stitches, as well as experience in making braids.
This pattern looks great on hats, mittens or gloves, as well as on sweaters. By using simple loops, the bird figurine is voluminous. Using additional finishing, accessories are decorated with additional beads or tassels for the owl's ears.
Trendy pattern
The trend this season is mittens that have patterns in the form of animals and birds. The owl has become especially popular. If you don’t have mittens yet, you can knit ones yourself that no one else has. Knitted items have always been in fashion, so making such mittens yourself will attract great attention from others. The knitting pattern is simple, even a beginner can knit a similar pattern.
What you need to prepare:
- yarn of the selected color, which contains wool, can be half with acrylic, and this is 150 grams;
- knitting needles;
- scissors.
We start knitting from the left mitten. Cast on 32 buttonholes on the knitting needles, distribute the loops onto four knitting needles. When we do this, we then knit the first and last loops to close the ring, but with one crochet. Now we knit an elastic band two by two.
Note! For elastic, it is best to take knitting needles one size smaller than for basic knitting.
This is how we knit 24 rows. Next, we begin to knit with other knitting needles - *we make 6 knit buttonholes, and from two we make one knit button* and so we knit three more rows from one star to the other - we get 28 rows in total. We continue to knit two rows, only knit rows. The next row is knit 20, purl 2 and knit 6. We have come to the place of the finger.
Related article: Straight weave bauble patterns for beginners using 2 colors with a pattern
A detailed description will allow you to knit the product perfectly. We remove the finger loops with a pin. We knit 16 knits, then remove 10 on an auxiliary needle, 4 purl, 8 knit and again 4 purl. In the next row there are again 16 knits and 4 purls, 8 knits, 4 purls. We continue to knit rows without shortening or adding, and so on 7 times. In the next row we knit 16 knits, purl 4 and slip 2 onto another knitting needle for work, knit 2 and knit from an additional knitting needle. Now we remove two before work, 2 knit, 2 from a pin and 4 purl.
Again knit 16, purl 4, knit 8 and purl 4. This is how we knit three rows. In the 27th row we knit 16 knits, 4 purls and remove two on another knitting needle for work, 2 knits, buttonholes with additional purls. Two again, but before work, purl 2 with an additional one, purl 4. Now knit 16, purl 4, knit 2, purl 4, knit 2, purl 4. In the 29th row we knit 16 knit stitches, 4 purl stitches, knit 2 together, add a purl buttonhole, knit 2 purl stitches, add one, remove one, knit one and pull the one that was removed through it. Next, purl 4.
We knit 16 knit stitches and the same number of purl stitches. 31 rows – knit 17 and purl 14, knit. In the next row we knit 18 knits, 12 purls and 2 knits. The last rad of the pattern is 19 knit, 10 purl and knit. We try on the mitten, it should reach the tip of the little finger. Now we make a decrease - we knit two buttonholes at the beginning of the first and third knitting needles, and two at the end of the second and fourth. When there is a bottom buttonhole left on each knitting needle, pull out the knitting needles and pull the thread through the buttonholes - tighten.
Now we need to knit a finger, to do this we remove the postponed buttonholes onto the knitting needle, then add 4 more buttonholes, and in another row we decrease two buttonholes. So we should have 12 loops and distribute everything onto four knitting needles. We begin to knit in the circle with stockinette stitch until the middle of the nail, then we make decreases, as in the base of the mitten. We tighten the remaining four buttonholes with thread.
Related article: Paracord bracelet with clasp
The mitten is ready, all that remains is to sew the beads in place of the eyes and embroider the beak, if desired.
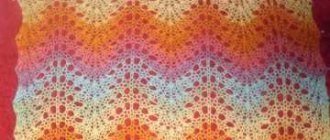
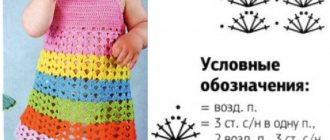
Pattern diagram
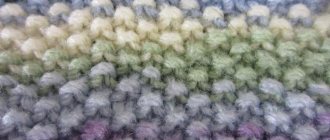
The “owl” pattern is knitted with knitting needles. The pattern looks a little scary, but if you understand the symbols, even a novice knitter will find it easy to repeat the pattern.
The pattern is knitted in stockinette stitch on stockinette stitch. The owl's body is obtained by knitting crossed loops. There is a peculiarity in knitting - the formation of the purl stitch is performed a little differently: purl loops are knitted in the front rows, and then knit loops are made in the purl rows.
To create a beautiful “owl” pattern with knitting needles, the description diagrams contain symbols and tips on choosing yarn and devices.
To make an owl measuring 10 cm by 7 cm, you need knitting needles No. 3.5, yarn 200 m/100 g. It is not recommended to use too fluffy yarn or melange with short sections - the owl may turn out sloppy. If a specific thread is selected, it is necessary to knit a control sample to distribute the threads and check the behavior of the yarn in the pattern. Some twisted threads are not suitable for crossed loops - the pattern can get twisted due to the twisted structure of the yarn threads.
Rapport (repetition of pattern): this is 14 stitches wide, 32 rows high.
What you need for work
First of all, to work you will need to remove the owl knitting needles with a description (or a macrame weaving pattern), as well as yarn or thick rope. Depending on the chosen work technique, the craftswoman may need:
- Material for the “filling” of a soft stuffed toy (sintepon, foam rubber, old rags and rags).
- Large buttons or ready-made eyes for toys.
- Colored floss threads and an embroidery needle to make individual decorative details for the amigurumi toy.
- Artificial or real feathers that can be used to decorate the top of the head, wings, and tail of a knitted bird.
- The smallest needlewomen, girls of preschool and primary school age, can also make an owl with their own hands from multi-colored rubber bands, using a special weaving machine, or make a night bird from beads according to a ready-made pattern. Elastic bands and beads can be of any color, it all depends on the child’s imagination and artistic taste. If you don’t have a weaving machine, you can use a regular wooden or plastic stick, shaped like a fork with two prongs. The elastic bands are fixed between the teeth, and the work is woven according to the pattern.
Decor options
You can decorate knitted owls in different ways, it all depends on your imagination and available materials. Decor using real or artificial feathers looks most impressive. However, it should be borne in mind that such feathers can cause allergies. If this material is borrowed from real birds (for example, street pigeons), it can bring a dangerous infection into the house. Therefore, it is best to decorate a children's toy with feathers made from cardboard and painted in natural “bird” colors. Just a few of these decorations on the top of the head are enough, and the owl will look like it’s alive.
To create the illusion of rich, motley plumage, you can use multi-colored shreds for decoration.
An owl crocheted or woven from scrap materials using the macrame technique is an excellent option for joint creativity between children and their parents.
Originally posted 2018-03-19 10:17:03.
Description of knitting
1st row: *knit 6 stitches, then purl 2, then knit 6*;
2nd row: knit * purl 6, knit 2, purl 6 *;
3rd row: knit *6 knits, then purl 2, knit 6 again*;
4th row: knit *6 purl, k2 again, purl 6. *;
5th row: * remove three (3) loops on an additional needle. The spoke is at work. The next 3 loops are knitted with knits, after that three loops are knitted from an additional knitting needle, 2 are knitted with purls, three loops are thrown onto an additional knitting needle, the knitting needle is in front of the work, the next three loops are knitted with knits, then loops with an additional knit are knitted *;
6th row: all even rows from the 6th row to the 20th row are knitted with purl stitches;
7th row: all odd rows from the 7th row to the 19th row are knitted only with facial loops;
21st row: * on an additional loop behind the work, three loops are removed, the next 4 knit stitches are knitted, and 3 knit loops are knitted from the additional knitting needle, then 4 are removed on the auxiliary knitting needle in front of the work, three are knitted with knit stitches, from the additional loop only one is knitted facial *;
22-28th rows: all even rows are knitted exclusively with purl loops;
Rows 23-27: knit all odd stitches;
29th row: knitted as the 21st row is knitted;
30th row: knit *3 purls, then knit 8, then knit 3 purls*;
31st row: *first knit 2, purl 10, knit 2*;
Row 32: knit *1 purl, knit 12, purl 1 *.
We continue to insulate ourselves
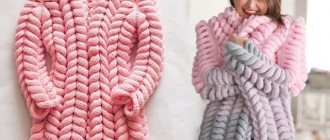
A wonderful warm and cozy sweater with an owl pattern will be relevant not only for a walk in the cold season, but will also perfectly complement a romantic look for a date and will be appropriate in the office, in combination with a blouse and trousers.
Related article: Decrease loops by crochet in a circle in an openwork pattern with video
We offer you several ideas for creating a warm sweater for lovely ladies and babies.
Sweaters with owl motifs look very impressive. Let's knit such a wonderful sweater with our own hands for a child.
Size: for height 104.
We will need:
- natural yarn (100% wool) of different colors (250 g beige, 100 g grey, orange, brown, black and white 50 g each);
- knitting needles No. 5.5.
Pattern:
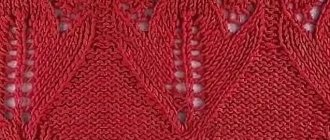
Patterns and diagrams. Front side: the front row is knitted with knit stitches, the back row with purl stitches. Wrong side: the front row is knitted with purl stitches, the purl row with knit stitches. We knit the elastic according to the pattern: knit 2, purl 2. We carry out the striped pattern according to the 4 x 4 principle, as follows: we knit 4 rows with beige thread, 4 rows with gray thread.
The owl motif is shown in the diagram.
Stages of work
Back. We cast on 66 loops and knit an elastic band. Approximately 4 cm, in the last row we add one loop on both sides. We knit in stockinette stitch to a height of 36 cm. Cast off 17 loops in the middle for the neckline. The shoulders end separately, from the neck 1 x 4 loops in the second row. After 42 cm from the start of work, we close all the shoulder loops straight.
Before. We knit similarly to the back, we knit a motif. We make the neck deeper. To do this, after 34 cm from the start of work, close the middle 9 loops. We start knitting the motif approximately 1 cm from the elastic on the middle 33 loops. We knit the remaining loops in stockinette stitch. We finish the shoulders separately, along the edge of the neck we close in every 2nd row 1 x 3 stitches, 1 x 2 stitches and 3 x 1 stitches. We close the remaining loops at the height of the back.
Sleeves. Cast on 30 loops for each sleeve with beige thread and knit an elastic band, approximately 4 cm. Add 2 loops in the last row. Knit a strip pattern, adding 2 loops on both sides to bevel the sleeves in every sixth row, and 13 loops in every fourth row. After 28 cm from the elastic, we close all the loops directly.
Article on the topic: Women's pullovers with knitting needles with a description of the knitting process and patterns
Assembly. Assemble the parts, lightly moisten them and stretch them according to the pattern. Let dry, then sew.
Another incredibly delicate women's pullover with an owl motif.
The motif diagram and product pattern are in front of you.
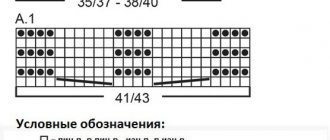
Legend
In order to knit the “owl” pattern with knitting needles, diagrams with descriptions contain selected information, but most knitters find it more convenient to work by reading the accepted symbols.
The following symbols are used in the diagram:
- An empty square - a knit stitch is knitted in the front row, a purl stitch is knitted in the purl row.
- A square with an empty circle inside - a purl loop is knitted in the front row, and a knit stitch in the purl row.
- 6 cells with an arrow crossing them pointing to the right - an interception of six loops is knitted with a slope to the right. For knitting, remove the 1st, 2nd, 3rd loops for working on an additional knitting needle. 4, 5, 6 are knitted, then loops are knitted from an additional needle.
- 6 cells with an arrow crossing them pointing to the left - an interception of 6 loops is knitted with a slope to the left. To do this, remove the 1st, then the 2nd, then the 3rd loops on an additional needle in front of the work. After this, the 4th, as well as the 5th, 6th are knitted, then the loops are knitted from an additional knitting needle.
- 7 cells with an arrow pointing to the left - interception of 7 loops. It is knitted in the same way as interception from 6, but first 3 loops are removed, 4, 5, 6, 7 are knitted, and then loops are knitted from an additional needle.
- 7 cells with an arrow pointing to the right - an interception of 7 loops is knitted with a bias to the left. Before work, remove stitches 1, 2, then 3 and 4 onto the auxiliary needle, then knit 5, then 6 and 7, and then knit stitches from the spare needle.
To decorate the resulting owl, beads are used - large black beads are sewn in place of the mouth, and small ones are sewn in place of the nose. If desired, you can leave the pattern without decoration.
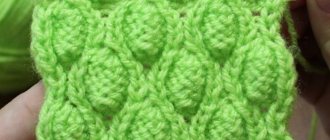
The “owl” pattern is easy to knit with knitting needles, the description of which is presented above. It allows you to decorate not only clothes, but also home accessories. For example, you will get gorgeous pillows with an owl design.
The owl knitted pattern, made with knitting needles, looks interesting and unusual. It can be used to decorate both adult and children's clothing.
Master class with a description of knitting the “Owl” pattern according to the pattern
The main background for this pattern is the purl. smooth surface The owl is knitted by crossing stitches. They can be obtained by transferring several links to an auxiliary knitting needle or pin after the previous ones have been knitted. Next, the turn moves to the removed links located on the additional tool. To make the loops tilt to the left, leave the knitting needle at work. And in order for them to be directed to the right, the knitting needle must be located in front of the work.
Here is an example of an owl pattern that would look great on a child's hat, gloves, mittens or scarf.
Only a true fashionista will appreciate a knitted bracelet with an owl pattern.
Take, for example, any yarn and knitting needles numbered 3.5, so that the owl turns out to be ten by seven centimeters in size.
The pattern of the “owl” pattern has a repeat consisting of fourteen loops. For one bird pattern, thirty-two rows are knitted, but without taking into account the purl stitches.
We are starting a master class on knitting a pattern with an image of an owl. The first row is made as follows: first six faces. p., then two and. p., and again six persons. n. The next strip is performed with a slight change: after six and. p., knit two faces. p., and then again six and. p. The third row is similar to the first.
Read
Several options for knitting patterns for the “Snake” pattern
In the fourth row, do everything as described in the second. Now we move on to knitting the fifth row. Take an extra knitting needle, leaving it at work, remove three links. Then we knit the next three faces. etc., then move on to the elements filmed on an additional instrument that perform persons. way. Tie two and. p., again remove three things for an additional tool, leaving it before work. The next 3 stitches need to be knitted. method, and after them the removed points are repeated in the same way.
We continue our master class, it is not finished yet. We knit all even rows, starting from the sixth to the twentieth, inside out. We knit the odd stripes from the seventh to the nineteenth. buttonholes. In the twenty-first r. again use the additional tool and transfer three points of work onto it. Next, knit four faces. etc. and those links that are on the auxiliary knitting needle. Once again, remove and transfer 4 stitches before work, and perform the next three with your face.
Then the “owl” pattern is knitted very simply. Even stripes from twenty-second to twenty-eighth are knitted. loops. Odd numbers from twenty-third to twenty-seven are performed with facials. At 29 p.m. tie the loops exactly as you did in 21 r. In the thirtieth row, follow the following knitting sequence: after three and. items are knitted by eight persons. p. and again three and. P.
In the thirty-first r. after two persons. p. knit ten and. n. and two persons. n. In the thirty-second it is necessary to connect 1 and. n., then twelve persons. p. and again one and. p. Upon completion of knitting, you should get such a wonderful owl, as shown in the photo.
To diversify this pattern, the owl's eyes can be decorated with beads, beads or rhinestones. This concludes our master class. We invite you to watch a video tutorial on knitting and patterns of other patterns with the image of an owl.
Read
Knitting booties without a seam for babies