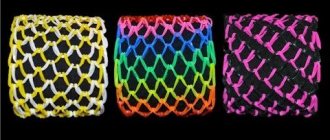
Nuances of work
Quite a lot of techniques for making dragon scales have already been invented; various improvised devices, cutlery, special machines and just fingers are used for construction. True masters of their craft cannot be stopped; by any means they try to bring the matter to its logical conclusion, and it always turns out great.
Numerous toys and shapes cannot compare with the dragon scales bracelet. If you choose the colors correctly and with imagination, the item will be extraordinarily beautiful. It’s easy to create a gift for a friend; you just need to find out your favorite colors and combine them into a stylish piece of clothing.
What do they symbolize?
Identical products will be a symbol of friendship and good relationships between those wearing them. Or mean something more and be a confirmation that teenagers are in a couple, and separation will never separate lovers in different directions.
Regardless of the underlying meaning, the dragon scale bracelet made from rubber bands is very beautiful and looks youthful. If someone hears for the first time that it can be made with their own hands, rather than bought in a store, the information will definitely be of interest.
Dragon scale weaving techniques
There are two main weaving techniques:
- manual, that is, on the fingers;
- machine - using a special “many-fingered” or slingshot machine, as well as any available means.
Dragon scales are woven quickly from rubber bands on a loom. In general, using the machine is more convenient than weaving on your fingers. The large machine is suitable for weaving wide bracelets and linen products from elastic bands.
Weaving dragon scales from rubber bands, made on a machine, will be denser and more accurate. Next, we offer a step-by-step explanation of the machine technique for weaving “dragon scales”.
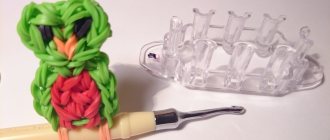
How to weave a dragon from rubber bands step by step with a description of the work
Getting started: braiding the tail.
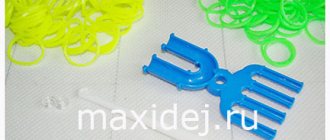
To weave a dragon we will need:
- Machine
- Two hooks
- Rubber bands red, black, pink
Take a black elastic band and put it on the hook in two turns. Then we take two red elastic bands and remove the black elastic band from the hook on them.
Now let's position the machine so that the notches on the posts point to the right. We put the resulting workpiece on the first two pegs of the top row. Let's make another blank and put it on the second and third column of the same row. Thus, we need to put the blanks on all the pegs of the top row.
Next, take a red elastic band and make three turns on the last column. And we braid a regular braid. We'll insert the hook into the last elastic band from above, hook a couple of lower loops and pull them up, transfer them to the previous column. We again insert the hook into the upper elastic bands of the penultimate column, hook the bottom pair of loops and, pulling them upward, transfer them to the column preceding it. We weave the entire row using this principle. The same tail can be woven without a machine, for example, on a slingshot using the fish tail technique with the addition of black elastic bands.
Take another hook and remove the tail from the first loops. It can be put off for now.
Head braiding:
- Take a black elastic band, put it on the hook in two turns and remove it with two red turns. Let's put the workpiece on the middle row, starting from the column where the head ended. This is the dragon's neck. We repeat this action six times, moving along the columns to the right.
- Take a black elastic band, twist it twice onto the hook, and stretch it over the second posts of the bottom and top rows. Once again we wrap the elastic band around the hook two turns and pull it onto the same posts.
- Now we will weave dragon ears. Take one pink elastic band and make four turns around the hook. Hook two pink elastic bands on the hook and remove the first pink one. Let's take two more rubber bands and remove the previous ones on them. We put the resulting eyelet on the fourth column of the top row. We will weave the second eye and put it on the fourth column of the bottom row.
- Again, take two red elastic bands and put them diagonally on the second column of the middle row and the second column of the top row. Throw the next two elastic bands in this way on the second column of the central and the second column of the bottom row. Then we put on two pairs of elastic bands on the top row, starting from the second column. And exactly the same two pairs on the bottom row.
- Let's start weaving the dragon's head on the machine. Take two red rubber bands. We throw it on the first two pegs of the middle row. We will put another pair on the second and third pegs. The third pair - on the third and fourth. Now take a pink rubber band and twist it three turns onto the hook. Let's put two red elastic bands on it and take off the pink ones. We will put the resulting blank on the fourth and fifth columns of the central row.
- Next, we will put two red elastic bands diagonally from the fourth peg of the bottom row to the fifth peg of the middle one. And according to the same principle, add two elastic bands from the fourth peg of the top row to the fifth peg of the central one.
- Next we weave the tongue. Take one red rubber band and make four turns on the hook. Let's take this rubber band off for a couple of red ones. And once again remove the blank for the next pair of red rubber bands. Now take one red elastic band, remove the blank from it and put it on the fourth column of the top row and the fourth column of the bottom.
- Now take one red elastic band and make a triangle on the third columns of all rows.
- Next, put one elastic band on the last column in two turns. In total, you need to put three such elastic bands on this column. We start weaving from the post on which the last elastic band was put on. After the head is knitted, take a red elastic band, thread the hook through the first column of the central row, pull the elastic through and make a loop. We remove the head from the machine. Let's straighten our heads.
Dragon legs.
Now let's intertwine the legs. Take two red rubber bands. And we’ll put three pairs on the bottom row. Take a black elastic band and make three turns on the last column. We knit it and remove it from the loom onto the hook. Let's make four such legs.
We weave the body.
Let's take three red elastic bands and stretch them onto the first pegs of the top and middle row, as well as three elastic bands onto the first posts of the bottom and middle row. Next, on the top row we will put on three elastic bands four times. We'll do the same on the bottom row. And three elastic bands diagonally from the top row to the center, and from the bottom. We fill the middle with rubber bands in the same way as on the tail.
Now we put the dragon’s paws on the first and fifth side columns. We will put the head on the last working column of the central row, and the tail on the first column.
On the first columns of the side rows we will put a red elastic band, folded in half. On the second, third, fourth and fifth columns of all rows we will put on an elastic band folded in half so that we get triangles. And we knit, starting from the head. Insert a hook into the middle of the first column of the middle row, and stretch two red elastic bands through it. We make a loop and remove the dragon from the machine. We received a dragon figurine.
Dragon scale bracelet made from rubber bands - how to weave, video
Multi-colored Rainbow Loom rubber bands are perfect for creating stylish DIY jewelry.
There are many patterns for weaving figurines and accessories using them, thanks to which every child or adult can create an individual attribute that meets his ideas about beauty and originality.
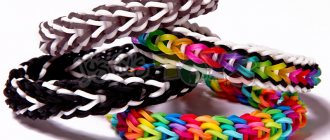
A dragon scale bracelet made from rubber bands is popular. Since the decoration woven using this technique looks bright, it suits any style, and using the play of colors, it is possible to create an extraordinary design.
In order to learn how to weave an original “dragon scales” decoration from Rainbow Loom, you will need a little effort, desire and a set of colored rubber bands with the necessary attributes (loom, hook, fasteners).
There are several options for creating an accessory using this technique, it all depends on the weaving technique, the tools used (slingshot or forks), and the width of the finished work.
Each technique is different in process and results, to choose the appropriate option, you need to experiment with different methods.
The mesh bracelet, which is woven using the “dragon scales” technique, looks original and interesting. To create such an accessory you will need:
Step-by-step instructions for creating the Dragon Scales accessory:
- We prepare all the necessary tools and attributes: select rubber bands of the desired colors, set up the machine, installing the pegs so that they are hollow on the right side.
- We take the first rubber band, twist it in a figure eight and connect the 3rd and 4th pegs of the left side to it.
- We continue to put on the elastic bands, twisting them and connecting the columns in pairs in this order - 5-6, 7-8, 9-10. If you want to weave the decoration wider, the number of first elastic bands can be greater.
- We connect the pegs involved in the weaving together in a checkerboard pattern: we put on rubber bands, having first twisted them in this order - 4-5, 6-7, 8-9, 10-11.
- For ease of weaving, you should use a crochet hook or do all the manipulations with your fingers. Let's get to work: some posts will have two layers of Rainbow Loom, take the bottom ones and throw them over the peg. We repeat this manipulation until the end of the row, as a result there should be 1 loop left on each element.
- We put on the third row by analogy with 1, connecting the columns in the same order, the only difference is that these and subsequent Rainbow Looms do not need to be twisted.
- Scheme of work: on those pegs where there are 2 rows of elements, we throw the lower ones over the column. We do this until there is only 1 rubber band left.
- We continue to weave the work, repeating the manipulations in order: we put on rubber bands, alternating in each row in a checkerboard pattern; from the columns, where there are 2 layers, remove the bottom one. We weave an accessory of the required length.
- If you want to weave a product with a sequential alternation of certain colors, then for each row you need to use a Rainbow Loom of a specific shade.
- In order for the accessory not to unravel, but to please its owner for a long time, it is necessary to complete it correctly: remove all the lower elements, leaving 1 Rainbow Loom on the pegs. Next, we shift the elastic from the last clove to the penultimate one, and from the first to the second. We remove the element from peg 3 and transfer it to 4, from 5-6, from 7-6. We attach fasteners to all loops - there will be 4 hooks in total.
- From the other end of the product we take 2 corner loops and attach them to the side hooks. Opposite the two middle fasteners there are crossed elastic bands, and we attach them to the clasps.
- The chic accessory is ready.
To understand in detail the technique of weaving a bracelet with a mesh, and to become familiar with all the nuances of the work, watch the video:
How to make “Dragon Scales” on a mini machine
It is possible to create a beautiful dragon scale bracelet using only two machine posts. The accessory woven using this technique is narrow, but fits perfectly with any outfit and will help complement a stylish look. For work you will need: Rainbow Loom, machine, hook, fasteners for the finished product.
Step-by-step creation of an accessory:
- We are preparing the attributes: rubber bands of two colors, a machine on which to work you will need two pegs located in parallel.
- We put the first rubber band on the posts, twisting it in a figure eight.
- We don’t twist the second Rainbow Loom, we put it on the same posts. To create a pattern or stylish design, you need to alternate elements by color.
- To weave, remove the bottom row from one peg and throw it to the center of the work.
- We put on Rainbow Loom of a different shade. On one peg there were 3 layers, on the other - 2, we will work with the one with more elements: remove the bottom two layers and throw them to the center.
- We knit a decoration of the required size in the same way according to the pattern: we put on an elastic band, from a column where there are 3 elements, we throw the two lower ones into the center of the work.
- To complete the product from the post, where there are 2 loops left, we throw the bottom one to the center, and connect the remaining two. We hook the clasp onto the remaining loops, and then connect the second side of the hook to the beginning of the product.
- Look at the photo below for the result of the work:
A video tutorial will help you understand step-by-step work:
We weave a bracelet from rubber bands on four posts
An unusual decoration can be obtained by weaving on 4 posts of a classic loom. To work, you will need 1 row from the machine, which will use 4 pegs, two shades of Rainbow Loom, a hook and S-shaped fasteners. Sequence of creating decoration:
- We put an elastic band on the middle posts, and on top we connect pegs 1-2 and 3-4 in pairs of elements (to create a pattern, it is better to choose a different shade of the side Rainbow Loom).
- We throw the central lower element over the posts. We put two elastic bands on the middle pegs of the color that was originally used in the middle, and remove the previous layers, moving them upward.
- Paired elements are put on the side pegs, as in the second part of the first point, after which the lower layers are removed from each column.
- We weave until the end of the work according to the scheme: on even rows we connect the middle pegs and remove the lower layers from them, on odd rows, Rainbow Loom connects the side posts, and the lower loops are removed from all elements. Rubber bands are always used in pairs (except for the first), in the center of one color, on the sides of another to create an original design.
- We finish the bracelet when we put Rainbow Loom on the side pegs and removed all the lower loops. We transfer the elements from the side columns to the central ones, and put one elastic band on top. We throw the lower loops up, and attach a lock to the remaining Rainbow Loom and connect both ends of the product.
- The beautiful decoration is ready.
To find out the details of weaving, watch the video:
The “dragon scales” bracelet looks amazing, with rainbow shades of elastic bands alternating in it. For weaving you will need: a machine with four teeth, a Rainbow Loom in rainbow and neutral colors, a hook and fasteners. Step-by-step execution of the bracelet:
- The basic principle is to weave according to the “dragon scales” pattern: we use double elastic bands, on 1-2, 3-4 columns elements of the main color are always put on, on 2-3 columns the shades of the rainbow alternate, thanks to which the pattern is formed.
- 2 red elastic bands are put on the central posts, the side ones are connected in pairs with black ones. The lower layers from the central elements are thrown over the teeth.
- The next stage is an orange elastic band in the center, and the lower loops are thrown over it. Next, two black ones are put on on the sides, the first layers are removed.
- Next, we knit according to the pattern: we put elastic bands on the central pegs (the colors of the rainbow alternate) and remove the lower loops only from these teeth; black elastic bands on the sides, the bottom layer is removed from all posts. We weave a bracelet of the required length.
- We close the work by transferring the loops to the central pegs to secure the hooks.
- We connect both ends of the product and the masterpiece is ready.
To see the technique for making decorations in rainbow colors, watch the video:
You can create a chic bracelet using the “dragon scales” technique from Rainbow Loom without using a special machine. Even improvised means are used to create, for example, forks, pencils, fingers, slingshots.
Beautiful multi-colored rubber bands, different shades, beads, figurines will help make the accessory more original and sophisticated.
Video tutorials and master classes with a detailed description of the process will help you master the technique of weaving even complex accessories, and understand the step-by-step instructions for making products using various tools.
Fork weaving method
Slingshot weaving lesson
Dragon scale bracelet on a three-row machine
You will need: a classic loom with 4 posts, elastic bands of two colors, a hook, an S-shaped clasp.
Master Class
- Move the middle row of the three-row machine one post.
- Put two rubber bands on the posts.
- Start with the bottom row of the first column, and the second row of the middle column which is offset one to the left.
- Place the elastic on the second row of the first stitch, on the bottom row of the third stitch, on the bottom row of the second stitch, and on the middle row of the third stitch.
- Complete two rows.
- Turn the machine over.
- Place an elastic band, twisted in half, onto the middle outer post.
- Remove the bottom elastic band from the middle outer post.
- Place the elastic on the post on which it is attached on the reverse side.
- Remove all the rubber bands and put them on the posts where they are attached.
- Secure the weave.
- Put on the hook clasp.
I recommend watching this video!
DRAGON SCALE BRACELET made of rubber bands on pencils | Dragon Scale Bracelet Rainbow Loom Watch this video on YouTube
Bracelet “Dragon Scales” (made of rubber bands)
The “Dragon Scale” rubber band bracelet is one of the most popular. Very elastic (thanks to the specifics of weaving, a bracelet of the same length will fit those with hands of different sizes) and airy, delicate weaving resembles lace (or maybe chain mail?). This wide bracelet is woven quite quickly and simply, and you don’t need a lot of elastic bands to make it.
The Internet suggests weaving “scales” on a fork, a slingshot, and a loom. Still, the most convenient is the last option. It is important to carefully follow the sequence of actions so as not to be disappointed with the result. It is the unfolded weaving on the machine that gives clarity; In this case, only one row of columns will be needed.
To weave the “Dragon Scales” bracelet you will need:
How to weave a “Dragon Scale” bracelet: job description
To weave “scales” you will need a regular weaving machine, but only one row of posts. The remaining rows can be removed, or not removed, so the structure is more stable, as it seems to me. In any case, the extra rows will not interfere with weaving, but they will not be used.
We work on the columns that are closest to you.
For the master class, the “Dragon Scales” bracelet is woven from elastic bands of two colors. This is very convenient if you are dealing with this type of weaving for the first time, as it allows you to avoid getting confused in the rows. In the future, if you like the weaving, you can weave plain, rainbow, and any other bracelets that your imagination can tell you.
An undoubted advantage of such weaving is that the length of the finished bracelet is not limited by the length of the machine, as was the case, for example, in the “Stars” bracelet.
So let's get started. We stretch 4 red elastic bands in eights: on the first and second column, third and fourth, fifth and sixth, seventh and eighth.
We put white elastic bands on top, also in eights: on the second and third; on the fourth and fifth, on the sixth and seventh, on the eighth and ninth.
The next stage is to throw the lower elastic bands up. We are only interested in those columns that have 2 rubber bands. In this case, we hook the bottom one and throw it over the post.
We do the same for all the other columns, where there are 2 elastic bands.
Next - red rubber bands again. We put them on evenly, without a figure-of-eight cross (like all the other subsequent elastic bands in this bracelet). The red rubber bands should be in exactly the same positions as the first red row.
Again, we look where we have 2 elastic bands (everywhere except the last column), and throw the lower elastic bands over the columns.
We last put on red elastic bands, so now we will put on white ones. As already said, without crossover, starting from the second column, i.e. the white ones will be in the same positions as the previous “white” row.
Throw the bottom elastic bands over the posts.
We continue to alternate red and white elastic bands and throw the lower elastic bands over the posts.
Have you woven the bracelet to the desired length? The last row should be the same color as the first. In our case - red.
We weave it in the traditional way, and then connect the elastic bands:
- from the first column we throw the red elastic band onto the second;
- from the third to the fourth;
- from the fifth to the sixth;
- from the seventh to the eighth;
- from the ninth - also to the eighth.
We got 4 columns with elastic bands. And we take figure-eight fasteners to fasten to each of them all those rubber bands that are on each post.
We examine the first row and highlight the loops on it, which will also go into the fastener. Attach red loops to the free parts of each fastener.
Our rubber band bracelet “Dragon Scales” is ready.
We hope that all the nuances of creating such a bracelet were clear, and if you still have questions about how to weave it, please ask them in the comments.
Eva Casio specially for the site Handicraft Master Classes
Bracelet "Dragon scales" on two forks
You will need: rubber bands, 2 table forks, tape, fastener.
Master Class
- Secure the fork handles with tape.
- Place an elastic band twisted in a figure eight on each pair of teeth.
- Place the rubber band over the center prongs in the middle of the forks.
- Place the bottom row of the post on the top, fastening 2 and 3, 4 and 5, 6 and 7 teeth.
- Repeat this process for 2 rows, stringing 1 and 2, 3 and 4, 5 and 6, 7 and 8 prongs.
- Repeat steps 3 and 4 of this master class until you reach the desired bracelet size.
- Finish weaving the bracelet in this way: put an elastic band on all the tines of a fork, twisting between each tine, transfer the bottom rows to the top ones, and the outer ones to the middle ones.
- Thread double posts from each fork onto the clasp, you should get 4 half clasps, then attach the other side of the bracelet.
The rubber band bracelet “Dragon Scales” is ready! I recommend watching the video master class!
How to make a bracelet from rubber bands No. 27. Dragon Scales. Rainbow loom bracelet. Dragon scale. Watch this video on YouTube
How to weave a Dragon Scales bracelet from rubber bands on a loom, photo master class
Leisure
Dragon Scales differs from other rubber band bracelets in that it is quite wide. Therefore, it looks very beautiful on the hand, replacing several jewelry at once. It is more convenient to weave Dragon Scales on a loom, although some craftswomen also do it on a fork. But if you are a beginner in weaving, then it is better for you to use the machine that is usually included with sets of rubber bands. So let's start our master class.
To weave a bracelet, we will need: A weaving machine A hook Elastic bands of any colors; for clarity, I will use 2 colors, pink and yellow (they are in the photo).
We will weave this bracelet on 8 columns of one row. It is advisable to remove the 2 rows on the machine that we don’t need so that they don’t bother us. We first throw 4 elastic bands of the first (yellow) color onto our columns in a figure eight. One for columns 1 and 2, the second for columns 3 and 4, the third for columns 5-6 and the fourth for columns 7-8.
Then we put on 3 more elastic bands of the same color, also in a figure eight, but as if on top of the elastic bands already thrown on, the first at 2-3, the second at 4-5 and the third at 6-7.
Now from each column where there are 2 elastic bands, we throw off one lower elastic band. In this way, we seem to knit the bottom row of elastic bands.
We put 4 elastic bands of the second (pink) color on the posts.
We have 2 elastic bands on each post; we hook the bottom elastic bands (yellow) and take them off. We put 3 more yellow elastic bands on the machine and again “knit” the lower elastic bands on all the columns, where we now have 2 elastic bands.
We put on the elastic bands again, 4 pink elastic bands. There are 2 elastic bands on each column, and we throw off the bottom ones. After that, we put on 3 more pink elastic bands and take off the bottom ones again. We weave the bracelet further in the sequence: we throw on 4 elastic bands of the same color, knit the bottom ones, throw on 3 more elastic bands of the same color and throw off the bottom ones again. After that, we do the same with rubber bands of a different color. In order not to get confused in the weaving, I advise you to place 7 elastic bands of each color on the table at once. After a while you will end up with a sort of mesh:
So we weave the bracelet to the length we need. And we complete the bracelet in this way: We put a pink elastic band on four columns. We take off the bottom elastic bands. Now, when there is one elastic band left on these columns from the outermost column, we transfer it to the adjacent column (which already has an elastic band), so that we get 2 elastic bands on one column. And from the other extreme column we do the same. Now we hook the bottom elastic band on each of these posts and throw it off. Each of these 2 columns has one elastic band, and from one column we transfer this elastic band to another column. We put a fastener on this one elastic band.
We do the same with the other four columns: first we throw one elastic band over 4 columns, then we knit the bottom elastic bands, when there is only one elastic band left, we throw the outer elastic bands onto the adjacent middle columns. There are 2 elastic bands on these 2 columns and we throw off the bottom ones. We throw the elastic band from one column to another and put on the fastener. We need to put the elastic bands with which we started weaving the bracelet onto the posts (in order to put the fasteners on them correctly). We got 4 columns, each with 2 yellow elastic bands.
We put one yellow elastic band on columns 1 and 2, and we also put a yellow elastic band on columns 3-4. Now we crochet 2 lower elastic bands. There is one elastic band on each of the columns, and now we throw the elastic band from the first column onto the second column, and the elastic band from the fourth to the third. We take a part of the bracelet that already has clasps and put them on this part of the bracelet. Final photos: Author – Elena Send your master classes made from rubber bands for publication
Simple tricks at home for your guests
Easy and simple tricks at home can bring you fame...
DIY pendant street lamps from cans
The success of a holiday depends on lighting, and candles turn the ordinary into...
DIY gift for Father’s Day – mini-album with photos (master class)
Father's Day is a holiday that is celebrated in many countries around the world...
How to make a paper wallet with your own hands using the origami technique
The proposed paper wallet, which you can easily make from zhur…
Knee socks with felt soles - made from an old sweater with your own hands
In frosty winter weather, even in the house you want to wear cozy knitted hats...
Knitting with fur ribbons, step-by-step master class
Knitting with fur ribbon is a great way to recycle old items. ...
How to make a men's leather watch bracelet at home
This year, a variety of leather bracelets have become very popular,...
Monkey from rubber bands, how to weave on a machine (photo master class)
A rubber band monkey can be your fun studying companion if you...
Your opinion about the article
Click to cancel reply.
Double "dragon scales" on a slingshot
You will need: a slingshot with 4 posts, a hook, a clasp, 86 black and 42 colored elastic bands.
Master Class
- Position the slingshot with the indentation facing you.
- Place a figure eight of red elastic on the 2 middle posts.
- Place a figure eight of black elastic on the right and left posts.
- Throw the red rubber band behind the post.
- Place a pair of pink elastic bands on the middle posts, wrapping them twice.
- Remove the lower middle black elastic bands by the columns.
- Fold the black elastic band in half, then place it in a figure eight on the right posts. Do the same with the left columns.
- Throw the bottom row of rubber bands behind the columns.
- Continue weaving in the same pattern and do not forget to alternate the colors of the rubber bands.
- Finish weaving when there are black elastic bands left on 4 columns, then remove the elastic bands from the outer columns to the middle ones.
- Weave by throwing the bottom elastic bands over the posts.
- Transfer the elastic bands from one column to another, then put on the S-shaped clasp and connect the ends of the bracelets.
The double rainbow “Dragon Scale” on the slingshot is ready! I recommend watching the video master class!
Bracelet made of rubber bands Double Dragon Scales on a slingshot of 4 columns (mini-machine) Watch this video on YouTube
Rubber Bracelets: “Dragon Scales”
Bracelets made from rubber bands look very bright and creative. They will perfectly highlight your style and make a wonderful gift. Dragon scales or mesh can be woven in different ways. In this article we will look at how to weave a bracelet from rubber bands “Dragon Scales”.
Dragon scale bracelet on a three-row machine
You will need: a classic loom with 4 posts, elastic bands of two colors, a hook, an S-shaped clasp.
Master Class
- Move the middle row of the three-row machine one post.
- Put two rubber bands on the posts.
- Start with the bottom row of the first column, and the second row of the middle column which is offset one to the left.
- Place the elastic on the second row of the first stitch, on the bottom row of the third stitch, on the bottom row of the second stitch, and on the middle row of the third stitch.
- Complete two rows.
- Turn the machine over.
- Place an elastic band, twisted in half, onto the middle outer post.
- Remove the bottom elastic band from the middle outer post.
- Place the elastic on the post on which it is attached on the reverse side.
- Remove all the rubber bands and put them on the posts where they are attached.
- Secure the weave.
- Put on the hook clasp.
- Secure the fork handles with tape.
- Place an elastic band twisted in a figure eight on each pair of teeth.
- Place the rubber band over the center prongs in the middle of the forks.
- Place the bottom row of the post on the top, fastening 2 and 3, 4 and 5, 6 and 7 teeth.
- Repeat this process for 2 rows, stringing 1 and 2, 3 and 4, 5 and 6, 7 and 8 prongs.
- Repeat steps 3 and 4 of this master class until you reach the desired bracelet size.
- Finish weaving the bracelet in this way: put an elastic band on all the tines of a fork, twisting between each tine, transfer the bottom rows to the top ones, and the outer ones to the middle ones.
- Thread double posts from each fork onto the clasp, you should get 4 half clasps, then attach the other side of the bracelet.
- Position the slingshot with the indentation facing you.
- Place a figure eight of red elastic on the 2 middle posts.
- Place a figure eight of black elastic on the right and left posts.
- Throw the red rubber band behind the post.
- Place a pair of pink elastic bands on the middle posts, wrapping them twice.
- Remove the lower middle black elastic bands by the columns.
- Fold the black elastic band in half, then place it in a figure eight on the right posts. Do the same with the left columns.
- Throw the bottom row of rubber bands behind the columns.
- Continue weaving in the same pattern and do not forget to alternate the colors of the rubber bands.
- Finish weaving when there are black elastic bands left on 4 columns, then remove the elastic bands from the outer columns to the middle ones.
- Weave by throwing the bottom elastic bands over the posts.
- Transfer the elastic bands from one column to another, then put on the S-shaped clasp and connect the ends of the bracelets.
- Place an elastic band (of the first color) on the middle posts and connect them in pairs (with elastic bands of the second color) on top of pegs 1-2 and 3-4.
- Throw the central bottom elastic band over the posts.
- Place 2 elastic bands of the first color on the middle pegs, remember to alternate colors while weaving. There is one color in the center, another on the sides.
- Peel off the previous layers and place them on top.
- Place paired elastic bands onto the side pegs, then remove the bottom layers from each post.
- Continue weaving in this way: connect the middle pegs on the even rows and remove the lower layers from them on the odd ones. Elastic bands connect the side posts, and the lower loops are removed from all elements. Always use rubber bands in pairs, except for the first one.
- Weave the bracelet to the desired length - the elastic bands should remain on the side pegs, and the bottom loops should all be removed.
- Move the rubber bands from the side posts to the central ones and put one rubber band on top.
- Bring the bottom loops up, then attach the clasp to the remaining elastic and connect the ends of the bracelet.
I recommend watching this video!
Bracelet "Dragon scales" on two forks
You will need: rubber bands, 2 table forks, tape, fastener.
Master Class
The rubber band bracelet “Dragon Scales” is ready! I recommend watching the video master class!
Double "dragon scales" on a slingshot
You will need: a slingshot with 4 posts, a hook, a clasp, 86 black and 42 colored elastic bands.
Master Class
The double rainbow “Dragon Scale” on the slingshot is ready! I recommend watching the video master class!
"Dragon Scales" double compact
You will need: a classic loom with 4 posts, elastic bands of two colors, a hook, an S-shaped clasp.
Master Class
The double rubber bracelet “Dragon Scales” is ready! I recommend watching the video master class!
Choose your favorite colors of rubber bands, get creative and combine them to create masterpieces. If you don’t have a slingshot or a loom, don’t despair, because the “Dragon Scales” bracelet can be woven using improvised materials such as pencils, forks or a comb. How to do this - watch in this video!
Loading…
Let's look at weaving Dragon Scales on a loom
To weave dragon scales from rubber bands on a machine we will need:
- 1 row of columns;
- hook;
- rubber bands (40-45 pieces in 5 different colors).
- Let's place the posts so that the open parts face to the right;
- Take the first elastic band and put it on the 3rd column (we will count from the left) and twist it with a figure eight;
- Now we make a figure eight on the next two columns, we continue to make them until we get 4 pieces on the machine.
- We do the same thing, but in a checkerboard pattern: we put the first rubber band on the 3rd and 4th columns;
- We continue to do this until there are 4 more eights on the machine;
- Now we take the hook in our hands. On some columns we got 2 rows of rubber bands, so we throw the bottom one over the top one, as shown in the figure.
- We repeat this operation until the end and in the end we get one row, lower it down to make it easier to weave.
- We take a new elastic band and put it on the 1st and 2nd columns, but not with a figure eight, we repeat the same with the 3rd and 4th columns, 5 and 6, 7 and 8.
- On some columns we again have 2 rows and we transfer the bottom one to the top one.
- We put on the elastic bands again in the usual way, but starting from the 2nd column to the end, and then repeat the previous operation.
Since last time there were 2 elastic bands on the last column, now there should be the same number on the first one, so we begin to put them on, starting from the very beginning.
- Repeat the last 2 operations until you reach the desired length;
To get several rows of the same color in a bracelet, you need to wear rubber bands of the same color for 10-15 rows. Now we complete the dragon scales.
Please note that you should end up with one row.
- We take the last elastic band and transfer it to the previous one.
- We perform the same operation with the first column, but we already put it on the one located on the right. Now we have 2 rows of elastic bands on the first and last.
- Then remove the next one elastic band and put it on the next one. Now we get that columns 2 and 4 remain empty. But the penultimate one still has one elastic band. We must transfer it to the previous column, thereby there are already 3 elastic bands there.
- We put on hooks. They should pass through those places where there are 2 or 3 elastic bands, we get 4 hooks;
- We turn our attention to the other end of the bracelet. We take the two outer rubber bands in our hands, lift the “scales” and put them on the corresponding hooks.
- Opposite the central hooks there are elastic bands crossed with a figure eight. We are just fixing them. Our dragon scales are ready and can be removed from the machine.
This video shows how to weave a bracelet on a machine.
In 15 minutes, repeating after the author of the video, you can weave the same bracelet.
How to weave Dragon Scales on a loom:
For the option on 6 columns, pull 3 blue elastic bands in figure eights onto columns 1-2, 3-4 and 5-6. Pull the next two white elastic bands between the first ones, by 2-3 and 4-5 columns, also in figure eights.
Now take your hook and throw the first row of elastic bands (blue elastic bands) over the second row so that they are intertwined. To do this, pull the blue elastic band first on the second, then on the third, fourth and fifth columns and throw it over the column.
To make it more convenient to weave the bracelet, lower the elastic bands to the bottom of the columns. Take 3 blue elastic bands and pull them onto the same posts as the first ones, but now not in figure eights, but in the usual way (in the future we will pull all the elastic bands this way). Now, using a hook, throw all the elastic bands under the new row through each column. Pull two white elastic bands as you did the first time, over columns 2-3 and 4-5 (in the usual way) and again throw the lower elastic bands over the column (second, third, fourth and fifth) over the new row.
You will need to repeat this pattern, alternating blue and white elastic bands, until the bracelet is long enough to wrap around your hand. It's time to complete our Dragon Scale bracelet. To do this, pull two blue rubber bands along the edges, remove the one stretched by 1-2 columns with a hook from the first column and pull it onto the second, and remove the one stretched by 5-6 columns from the sixth and pull it onto the fifth column. There will be four columns with rubber bands left. Now remove the elastic from the third post and pull it onto the fourth. There are three columns left with rubber bands.
Insert the elastic bands from each post into the clip (you will need three clips) and remove the bracelet from the machine. Connect both ends of the bracelet with clips. You are done, the Dragon Scale bracelet is ready.
A simple way to weave with forks
For this we need:
- 2 forks;
- rubber bands (40-45 pieces in five different colors).
- First, connect the forks with an elastic band;
- We put the rubber bands on in a figure eight on teeth 1 and 2, 3 and 4, 5 and 6, 7 and 8;
- Now we need to connect the teeth. To do this, we put elastic bands on 2 and 3 (without twisting), and then we throw the lower ones up;
- Repeat these 2 steps with 4 and 5, 6 and 7;
- We alternate rows: put the elastic on 1 and 2 teeth and so on. We repeat our 2 main steps until we reach the desired length. The colors of the rubber bands can be changed as you wish;
As a result, this is how the rubber bands should be positioned.
- We put fasteners on all the posts and calmly remove the rubber bands from the fork;
- Finally we complete the bracelet;
Video tutorial on how to make a bracelet in 15 minutes using two forks.
Here you will not hear the author’s voice, but everything will be written on the screen, which does not prevent you from repeating it step by step. The lesson lasts only 12 minutes.
Useful gift
There are times in life when you spend hours racking your brain over what souvenir to prepare for the upcoming birthday of a friend or girlfriend. Knowing how to weave dragon scales, it’s worth choosing this option. A banal photo frame or any other purchased trinket will not express as much attention and care as something made with your own hands. Such crafts are somewhat more valuable, because a person’s soul and effort are invested in every process; such signs of attention are guaranteed to lead to success.
Adults will be happy to accept a dragon made of rubber bands, a video master class can be easily found on Internet resources, brutal men in the family, a brother or father will definitely be interested in the idea. Such a valuable souvenir will find its place on the rearview mirror in the car or on the desktop in the office.
Available means
Sometimes the thought of creativity comes late in the evening or on the weekend, when the handicraft stores are already closed, there is no need to despair, having the basic material in stock, you can start assembling using a pencil or a comb. Weaving dragon scales is a fairly unpretentious task, it does not matter what tools are used on the way to successful completion, the main thing is the end result.
As mentioned above, you can take cutlery, namely two forks, fasten them together with tape and you will get an excellent impromptu threading machine. Work on such homemade devices proceeds no worse than with conventional stationary products. You can diversify your leisure time and turn your attention to a fish scale bracelet made from rubber bands; the option is slightly different, but also looks quite nice on the body.
For your own use
Having figured out how to make a bracelet from dragon scale rubber bands, you can start collecting your own collection; every self-respecting lady should have jewelry for all occasions. Having gone through your wardrobe, you will need to write down all the frequently worn items; compatibility and combination can be clarified with adults; such moments are very valuable. The list has been compiled, there should be no interference, a separate image now has its own unique and striking accessory.
Any classmate will notice that every day of the week his friend has a new color of dragon scales. What will this mean and how important it is to talk about it during a walk, especially if after school the road home will be on both sides. During such close communication, trusting relationships can be established, and friendships will last for many years after graduation.
Touches of humor
Fans of fun elements should not be limited to standard models of strict leashes. Young mothers can try adding elements of cartoon characters to create decorations for their child’s hands; animal faces or funny ears will be an excellent addition to designs made of different shades. Teenagers will love using hearts or strawberries with eyes and a smile. There are so many offers that for every person there is a rather interesting way to complement the image.
Weaving technique "Dragon scales"
The most convenient way to learn to weave is to start with bracelets. This way you can practice and master several techniques. We'll talk about one of them below. It's called "Dragon Scale".
So, how to weave a “Dragon Scales” bracelet from rubber bands? There is nothing difficult about this, especially if you have experience in crocheting. In any case, after some practice you will be able to do this automatically.
First, let's look at how to weave a bracelet from rubber bands "Dragon Scales" on a slingshot, since it will be a little easier than weaving on a machine.
You will need:
- 14 blue rubber bands;
- 14 green;
- 14 orange;
- 14 purple;
- 14 yellow;
- 25 red;
- 4 clips.
But you can take any other colors at your discretion.
Rubber band bracelet: Dragon Scales - photos, diagrams
Oh, this mesh. A very beautiful stylish bracelet made of rubber bands called Dragon Scales. Wide, bright, original bracelet. Today you will learn how to weave such a charm - the Dragon Scale bracelet.
Bracelets made of rubber bands have long ceased to be something for children. The bracelets turn out so beautiful that many fashionistas can’t refuse them. Even men wear bracelets made of rubber bands.
This bracelet can be woven both on a loom and on a slingshot. You can even make a dragon scale bracelet with a slingshot. Have you tried weaving with a comb? No? It's time to try it. The Dragon Scale bracelet can even be woven using a comb.
How to weave a Dragon Scale bracelet from rubber bands on a machine
The most popular way to weave a Dragon Scale bracelet is on a machine. For weaving you will need a classic Rainbow Loom machine. For weaving you only need 1 row of the machine. If you have a removable machine, then you can remove the remaining 2 rows so that they do not interfere with you.
Weaving is very simple, if you watch the video of weaving dragon scales, everything will become clear to you. Having learned how to weave several rows of a bracelet, everything will go as planned.
Dragon Scale Bracelet Colors
What colors should we use to make a Dragon Scale bracelet? – we are often asked this question. We have collected for you photos of the most beautiful bracelets made from Dragon Scale rubber bands. You still don’t know how and from what rubber bands to weave a bracelet?
This bracelet looks beautiful with bright elastic bands, such as pink, red, yellow. You can make a kind of gradient transition in the Dragon Scales bracelet - elastic bands from dark to light, and vice versa.
Or you can weave a Dragon Scale bracelet on a loom from two different colors of elastic bands, for example, blue and yellow, green and light green, blue and red and other similar combinations.
Or weave a dragon scale bracelet from all different elastic bands. It will turn out very bright and rainbow.
Elastic band bracelet: Dragon Scales Elastic band bracelet: Dragon Scales Elastic bands bracelet: Dragon Scales Elastic bands bracelet: Dragon Scales Elastic bands bracelet: Dragon Scales Elastic bands bracelet: Dragon Scales
How to weave a Dragon Scale bracelet - other weaving techniques
The Dragon Scale bracelet can be woven not only on a loom, but also on a fork, and even on a small slingshot. True, on a slingshot this bracelet will not be as wide as on a machine.
But to weave a wide Dragon Scale bracelet on a fork, you can use 2 forks at once. Experts in the video of weaving dragon scales on a fork show how to weave.
On a slingshot you can weave a very narrow Dragon Scale bracelet, but this does not negate its originality. It turns out to be a very cute narrow bracelet made from rubber bands on a slingshot.
Now you know how to make a bracelet from Dragon Scale rubber bands on a machine, on forks and on a slingshot. Create and weave with pleasure, may your work please you
With love, Yavmode.ru Editorial Board
Weaving a bracelet using the “Dragon Scales” technique on a slingshot
Let's get started. To understand how to weave a Dragon Scale bracelet from rubber bands, you should carefully monitor the progress of the work.
- Throw a red elastic band over the right column of the slingshot and twist it 2 times.
- Place the red elastic over the two columns and slip the first stitches onto it.
- Cross the loop from the left column to the right one.
- Scroll another red rubber band twice on the right column.
- Place the red elastic band over the two columns and repeat the procedure.
- Do this all twice. But leave the last elastic band on two posts. So we have determined the width of the bracelet. You can make fewer loops, then it will be narrower, or, conversely, more loops to increase the width.
- Throw one red elastic band over both sides. Remove the top two elastic bands from the right column.
- Drop the top elastic from the right column to the left.
- Throw one red elastic band over two posts. And repeat the previous procedure.
- So, there are two rubber bands left on the right column. And now you can add the next color.
- Place the orange elastic band on two columns and slip the last two elastic bands from the right column onto it. Cross the orange rubber band from the left side to the right.
- On the next orange elastic, drop the top two loops from the left stitch.
- Repeat these manipulations several more times until all the red loops are completed. There is one orange rubber band left on two columns. Add one more to it.
- On the right side, drop the top two loops and move the elastic to the left side.
- So, throw off all the loops one by one until one orange loop and the top elastic band remain on the right. Move on to the next color.
- On the yellow one, drop all the rubber bands from the right column. Then slide all the yellow elastic onto the right side.
- Add another yellow elastic band. Weave the yellow row to the end. And make another one, throwing loops from right to left (in the same way as before).
- Weave a few more rows using the remaining elastic bands of other colors.
- At the end of weaving you should have four pairs of elastic bands. Put a clip on each of them and throw it off the slingshot.
- At the very beginning you have woven 4 loops, find them and connect them with the clips.
Here's how to weave a bracelet - "Dragon Scales" - from rubber bands quickly and easily. As you can see, there is nothing difficult, but at first the activity requires a certain concentration of attention. But over time, your skill will increase, and your movements will become clear and mechanical.
We weave a bracelet on a machine
To make a “Dragon Scales” rubber band bracelet on a machine, prepare the machine for two rows.
- Place three elastic bands, twisting them in a figure eight, onto three pairs of posts.
- Pull 4 elastic bands diagonally, using the outer posts on both sides.
- Slip the stitches from the row closest to you into the middle. Repeat all this on the other side.
- Add three more elastic bands to three pairs of posts.
- Throw elastic bands on them on both sides.
- And again stretch 4 elastic bands diagonally.
- Remove one elastic band from each column.
- Continue in this manner until you get the bracelet length you want.
- Slip all the stitches onto the row closest to you and put clips on all the stitches. Remove the weave from the posts and connect the ends of the bracelet using clips.
Here's how to weave a bracelet - "Dragon Scales" - from rubber bands using a loom. Try making a bracelet on a slingshot and on a machine to determine which method suits you best. Many people prefer a slingshot, but after trying the machine, they change their minds. Everything is individual.
But there are some figures that can only be made on a machine. However, this does not apply to bracelets.
This weaving will allow you to create beautiful bracelets from rubber bands that will completely suit your taste.
Schemes and instructions for creation
On the machine
Dragon scales only need two columns
If you want to weave a wide bracelet, then you should use a professional machine. Creating a stylish accessory will take about half an hour, about 200 rubber bands, several silicone hooks in the shape of the letter s and a little patience.
- We position the machine with the wide side facing us.
- We put irises in pairs on all the columns of the first row, twisting them in the form of the number eight.
- On the same posts, but starting from the second one, we again put on rubber bands in pairs, without twisting them.
- Now we hook the bottom loop and pull it over the back wall of the post.
- We put the elastic bands on the same row again, starting from the first column.
- We hook the bottom loop and pull it over the back wall of the cylinder.
- Repeat steps 3-6 until you get a bracelet of the desired length.
- We put the last loops in pairs on a silicone hook.
Video: Weaving a dragon ornament using a loom
On the forks
Using a fork, you can achieve a tight weave of elastic bands
In order to weave dragon scales on forks, you can use either one cutlery (in which case the bracelet will turn out to be narrow), or two, connecting the handles with tape (in this case the accessory will turn out to be quite wide). Consider the option of dense weaving on one fork.
- We fold the elastic band in half (we will do this with all the irises) and put it in the form of a figure eight on the outer two teeth on each side.
- We put the next iris on the two central teeth without twisting.
- We pull the bottom tier into the middle.
- We put the elastic band on the outer teeth again (don’t forget to fold them in half).
- We pull the bottom row into the middle.
- Repeat steps 2–6.
- To put on the clasp, we pull the last loops to the center, and we hook the remaining two tails to the hook of the clasp.
- We also put the initial constrictions of the eights on the fastener.
Video: Using a fork to create a bracelet with a dragon pattern
On a slingshot
The slingshot is convenient for weaving thin bracelets
A cute thin mesh bracelet in the shape of dragon scales can also be used on a slingshot.
- We twist the iris in a figure eight and put a slingshot on two columns.
- Do not twist the next elastic band and put it on top of the previous one.
- We grab the bottom left one and pull it into the middle.
- We put on the rubber band again.
- We hook the two lower loops on the right and bring them to the center.
- Repeat steps 2–5 until the bracelet is the desired length.
- To put on the fastener, pull the loops together so that there is one elastic band left on each post.
- We bring both sides to one side (no matter which) and thread the hook of the clip fastener.
- We do the same with the initial loop.
Video: How to make a decoration from silicone rubber bands on a slingshot
On the comb
For braiding, it is convenient to use a regular comb with wide teeth.
The pattern of weaving on a comb is practically no different from weaving on a professional machine. There is only an option to make a tight bracelet by folding each rubber band in half.
- Take a comb with wide teeth.
- Fold the rubber band in half and twist it into a figure eight.
- We put tight eights on pairs of teeth.
- Now, without twisting in the middle, we put the irises on the teeth of the previous level, starting from the second.
- We tighten the lower tier by the even teeth.
- We put on the irises again starting from the first tooth.
- We transfer the bottom row over the top.
- Repeat steps 4–7 until the required length.
- We combine pairs of loops and thread the clip-fastener.
Video: Dragon scales made on a comb
On hook
For weaving, you can use medium-sized crochet hooks
For weaving, you can get by with one crochet hook.
- We put the first row of rubber bands on the hook, folding them into figure eights.
- Now we take the pencil in our left hand and throw the first loop from the hook onto it.
- Take the next iris and sketch it on a pencil.
- We pull the elastic from the pencil through two loops from the hook and return the loop to it.
- We transfer the last loop of the row to a pencil, twisting it with a figure eight.
- Turn the bracelet over (as in knitting).
- Repeat steps 2–6.
- We tighten the opposite loops with a clasp to secure the bracelet.