Weaving various jewelry and crafts from beads and seed beads has long won due attention from needlewomen. And this is not surprising, because there is no special work in this, you just need patience. Stringing beads on a thread or fishing line in a certain order allows you to create beautiful patterns.
Handmade beaded beads look good with any clothing. All you need to do is select beads of one or several colors, take a thin fishing line, an elastic band or thread and a needle.
After some time, with the help of all this, your image will be complemented by a wonderful accessory.
The simplest version of beaded beads
Long beads that do not have a special pattern are considered simple. They are made from multi-colored beads, beads, sequins and other decorative details. They won't take much time.
You need to string the beads and seed beads in the sequence you choose and at the end of the work, tie the thread or fishing line in a tight knot. They are put on over the head, which means no fasteners are required.
From several of these threads you can make a denser decoration. Add some imagination and get a unique handmade necklace made of beads and seed beads.
For example, you can braid them. For several parts at once, the fastener is still useful. For such jewelry, you can make a pendant from beads with your own hands.
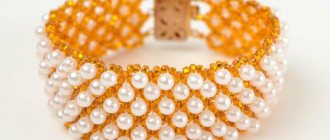
Learn to weave a bracelet with a square beaded rope
As always, the master class begins with preparing all the necessary materials. So, you will need this list:
- beads for weaving and joining the product;
- monofilament;
- metal fittings for a bracelet in the form of a lock, connecting rings and holders;
- scissors with a beaded needle with pliers and round nose pliers.
Take a piece of monofilament thread and put four beads on it, which you then need to close into a ring. Tie a thread and make several knots for greater reliability, as shown in diagram number 1. String the beads again, but only in the amount of three, then pass one through the ring and pass through the next one, as in photo number 2. Once again, you should dial three pieces of glass and go through 1 bead in the ring and the one that was collected in this strip.
Now take one element and weave it in the opposite direction, passing through the middle bead of 3. Add another glass and while weaving, go into the central bead of the next 3 pieces of glass. As a result, you should get the first square. The next steps that you must do is to repeat the production of other cubes in the quantity required for this bracelet.
Read
Ways to weave stylish collars from beads and pearls
Weave a square strand of twenty cubes. You need to string golden-colored beads and pass through the beads, which are located under three squares from the very beginning of the product. You will need to take another piece of gold glass and close the inner ring, passing through the beads located at the other end of the strand. Proceed with the production of another cube, doing this after the connection has occurred. Now you should repeat the second and third stages, stringing 2 golden-colored beads, and then attaching the inner ring. Go around the circle again on one side and then on the opposite side so that you can pull them all together.
The master class continues, and you need to weave another small part of the flagellum with your own hands, making eleven squares. We retreat four cubes from the last connecting place and repeat the fastening with golden glass. After going around the circle of added beads, pull them along the sides, that is, on both sides of the product.
Perform beading of the required size on this cord bracelet, maintaining the above-mentioned indentations in the squares and connecting them with a snake. Now you need to attach the metal clasp with your own hands. We attach a special holder to the harness. Move the 4th cube away from the edge and pinch it, placing it on the square. Hang the holder on the ring, and then hang the carabiner on it.
The photo presented shows this process in more detail, and you can repeat it step by step. In a similar way, you can make a necklace and earrings, changing only their bend and amplitude. Now the master class is completely completed and you were able to fully learn how to weave a square rope. If you want to consolidate the material you have covered, then we recommend that you use weaving patterns and video lessons.
Beads made from beads
Many people ask the question: “How to make seed beads yourself?” This is not as difficult as it might seem at first glance.
It is necessary to weave a semicircular base from size 10 beads. It is then placed on a felt ball and secured with a sewing needle. Next, this ball is sheathed using the same beads.
It is most convenient to use a diagram that will help you understand in detail the braiding of the ball. Here is an approximate diagram by which you can create a ball:
- The first two rows contain 5 beads. At the end of the row, you need to pass the thread into the first bead of the row.
- In the third row you need to add 5 beads. We make every 2 of this row under 1 of the previous one.
- The fourth and fifth rows are sewn without changes.
- The next increase is made in the 6th row. Here you need to weave one new bead under the two previous ones. Thus, under two there will be three.
- We leave the seventh and eighth unchanged.
- In row 9 we increase again.
- We sew up to the 20th row as before.
- We add 20 again.
- Next, up to the 23rd row, we make identical rows and begin to reduce.
- The penultimate and last row should contain 5 beads. Thus, we make 7 beads that will be used to create a beautiful necklace.
In order to make the middle ball larger than the rest, you need to trim it with needles. They are made from 10 beads. To create them you need 4 beads per needle.
Decorating a vase: ideas and master classes on how to make a vase with your own hands (80+ photos)DIY hats for newborns. Several types of knitted winter hats for every occasion in a baby’s life
How to crochet beautiful napkins: tips with video lessons and patterns
They need to be attached to separate beads of the ball. Cover the entire ball with needles to make it larger. This will help you make your own beaded bead necklace.
Video master class
Author's lessons on the topic
1. Bracelet “Dewdrop”.
Read the full master class on this decoration here
2. Bracelet “Snake”
3. Necklace “Ethno”.
What you need to know about wearing beads
Beads are a capricious but versatile decoration. Their capriciousness lies in the way they are worn. To properly use this accessory in your wardrobe, you need to remember the following:
- It is customary to knit very long beads in a knot; this will emphasize their discreetness.
- For a two-tone style of clothing, the beads should contain less of the dominant shade.
- The beads should be lower or higher than the neckline of the garment.
- For bare shoulders, shorter beads are suitable.