One of the most popular cartoon characters is Baba Yaga. Cunning, but cheerful, insidious, but crazy funny. She attracts both adults and children with her mysterious and unusual character. But there is no trace of such a hero as Baba Yaga in other countries.
She is a forest dweller, who from time to time either causes trouble in the forest or acts as an assistant. Not a single New Year's performance can do without this image. Where Baba Yaga is involved, there will definitely be a mystery, intrigue and an interesting turn of events.
But creating the image of Baba Yaga is not so easy. It’s one thing to come up with a costume from rags and old scarves, and another thing to create a mask. And make a Baba Yaga mask, even despite the many existing methods.
But such a mask is worth the effort and time, as it is perfect for a child’s school party, as well as for adults, in particular, for Halloween.
Gummous nose
What kind of material is this?
Gummoz is theatrical plastic. How to make Baba Yaga's nose from this material? Everything is very simple. Gummosis has a consistency similar to plasticine. You need to knead it in your hands and start sculpting the shape right on the model’s nose. Apply gummose layer by layer until you reach the desired length. Then you can adjust the shape. When the nose is ready, you need to lubricate it with baby cream and carefully smooth out all the edges.
Particular attention should be paid to places that come into contact with the skin. Now you can cover your nose with liquid latex. It dries quickly, so apply 6 to 8 coats. When the nose is ready, sprinkle it with baby powder and carefully remove it from the model. Now, using acrylic or special theater paints, you need to add color to the product. You can glue Baba Yaga's nose to her face using special skin glue. If you don’t have it on hand, liquid latex will do.
Papier-mâché nose
How to make Baba Yaga's nose with your own hands?
The easiest way is to make it from papier-mâché. It was this method that all decorators used until theatrical plastic, silicone and polymer clay appeared. How to make Baba Yaga's nose out of paper? Old newspaper needs to be torn into small pieces and soaked in water. To make the substance more viscous, you can add office glue and flour to it. While the newspaper is soaking, you should make a blank from plasticine. It may not necessarily have a clear shape, but the size should match the desired final result. When the paper is well soaked, you should lay it out in a thin layer on a plasticine blank. Now you need to wait until the base dries. After an hour or two, you should smear the first layer of newspaper with PVA and glue the second layer to it. Repeat the procedure again. You should not do more than 3-4 layers, otherwise the nose will become too heavy. When the mold is ready, you can proceed to making parts.
If desired, you can make moles or growths out of paper. When the mold is dry, you need to remove the plasticine from it and then cover the paper with primer. Now you can paint the product in any color. To preserve the nose for a long time, it needs to be varnished. And so that the product does not shine, you should make sure that the varnish is matte.
Characteristic hookedness
The most acceptable technique for making crafts is papier-mâché. This method allows you to make a part of the desired shape and give it credibility. At the last stage of decorating, you can also involve the child in the work.
Before starting the creative process, it is advisable to view several illustrations of Baba Yaga in order to get a complete idea of the upcoming work on the craft.
You need to prepare:
- Old newspapers;
- Plasticine;
- Acrylic paints (or gouache) flesh color, brushes;
- PVA glue;
- Vaseline (can be replaced with liquid soap or oil);
- Thin elastic band.
You should first decide on the size of the base of the nose. To do this, you need to take a measuring tape and, placing it on your own face, circle your nose with it. This will give you the desired diameter of the circle. A part of the required shape is molded from plasticine. The wide part of the workpiece should correspond to the previous measurements.
The central part of the nose curves slightly downward, forming a hook.
The resulting form is treated with Vaseline over the entire surface. This is necessary to prevent the paper layers from sticking to the plasticine. The newspaper is torn or cut into narrow strips of short length.
Related article: DIY flowers on a fabric dress: master class with photos and videos
The glue can be diluted with water in equal proportions. Newspaper pieces are dipped in an adhesive composition and applied one by one to a plasticine blank.
In this case, the paper must completely cover the plasticine, and therefore the strips overlap.
After applying the first layer, repeated layers of newspaper follow in the manner described above. When the workpiece is pasted over with 4-5 layers, the work stops. The part should be thoroughly dried.
The plasticine is carefully removed from the hardened workpiece.
All that remains is to paint the nose. The paint must completely cover the surface of the product. To prevent newspaper cuts from showing through, paint should be applied in two layers.
When the nose is dry, you can use a thin brush to create wrinkles on it or draw warts.
Holes are pierced on both sides of the workpiece. In such work it is more convenient to use an awl. A thin elastic band is attached to the holes.
The length of the elastic is measured based on the circumference of the head. The styled attribute is ready to use.
The created nose will help complement the image of not only Baba Yaga, but will also go perfectly with the costume of Kikimora or Leshy.
If there is no time before the performance, a characteristic accessory can be quickly made from paper. To do this, just roll the paper sheet into a cone and glue it along the outer edge.
Bend the central part of the cone so that the pointed part “looks” down. Color the nose with any pencils or felt-tip pens. Thread the ends of the elastic through the sides and secure them.
The image of Baba Yaga is used not only at performances. Needlewomen manage to create dolls that replicate the famous fairy-tale character.
The most painstaking work on a doll is creating its face. Correct display of characteristic features is the key to recognition of a fairy-tale hero. Dolls are made using different techniques. On the wave of popularity are soft products made using nylon tights.
A significant part of the work in sewing Baba Yaga from tights is the precise execution of the lines of the character’s nose, cheeks and eyebrows.
Related article: Fairytale house made from a plastic bottle
Since it is difficult to create a hooked nose from soft material, for dolls of this type it usually consists of a wire base covered with padding polyester. First, the wire is bent so that it resembles a bent nose.
The wire is wrapped with padding polyester and sewn to the head.
The synthetic winterizer blank is covered with nylon (tights, stockings, and knee socks are used in the work). In order for the nose to take the required shape, it should be tightened with threads.
The needle is guided from the beginning of the bridge of the nose from right to left. During operation, the thread is subject to tension, forming a convex bridge of the nose, as in the photo.
At the bottom, the needle pitch should be widened. All that remains is to create the nostrils. At the end of the work on the bridge of the nose, the needle is inserted obliquely and tightens the tissue, forming the lower part of the nose. The process is duplicated on the other side (for the second nostril).
Using a similar technique, you can create the necessary accents on the face of the intended character and give him characteristic facial expressions.
Epoxy nose
To make one of the most complex elements of makeup for Baba Yaga, you don’t need to put in a lot of effort.
The nose is easy to make from epoxy resin. You can buy it at any hardware store. How to make Baba Yaga's nose? The creativity kit consists of the resin itself and a hardener. We dilute the brown substance in any plastic container and add cut paper or sawdust for volume. Mix everything thoroughly and add hardener. Now you need to create the shape of the nose. You should wear gloves when modeling the product. When everything is ready, leave the workpiece to harden. It is advisable to let the form dry for at least 24 hours. After the nose has hardened, it needs to be sanded to smooth out any surface irregularities. Now the product can be painted. For this you should use acrylic. If this option for making a nose seems too complicated, you can buy epoxy plasticine. The process of creating the form will be the same, only you will not have to add sawdust and paper to the substance.
How to make a Baba Yaga mask with your own hands?
The Baba Yaga mask is an excellent option for some children's matinees, or for costume parties.
Now, I will show you how to make a cool Baba Yaga mask, without spending a lot of money, time, and very easy to make:
We will make a mask like this:
Materials:
After the model is “molded”, we cover it all, as well as the platform on which it is fixed, with tape.
Also, instead of a mask, you can make a cool Baba Yaga makeup, which can replace the creation of a mask:
The full version can be read here.
In my opinion, it is best to make a Baba Yaga mask using papier mache. So, you will need a ball, newspapers, toilet paper, water and PVA glue.
First of all, inflate the balloon, then draw an oval on it (approximately the same as your face), then tear the newspaper into pieces, dip each piece in water and place it on this oval (you need to make two layers in this way), then you need to continue applying the leaves of the newspaper, but no longer dip them in water, but cover them with PVA glue (you need to make 2-3 more layers).
Let this structure dry, then separate it from the ball itself and straighten the ends.
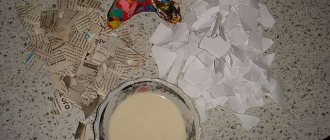
Next, tear toilet paper into a bowl (about half a skein), then add a little gadfly (20-30 grams) and three tbsp. spoons of glue. Stir. Next, form a nose from this mass on a round mask. It should look something like this:
You can use the same mass to shape your face. All you have to do then is let the mask dry, paint it white, then use any other paint to decorate your face, cut out the eyes, and cover it with clear varnish. The result should be a mask like this:
Plasticine nose
You can create such a product from available materials. How to make Baba Yaga's nose from plasticine? To do this, you need to make a mold from foil. This will be the basis. It should be shaped like a triangle. Now you can stick plasticine on the workpiece. Please remember that this material cannot be painted. Therefore, you should either immediately purchase flesh-colored plasticine, or buy sculptural plasticine and mix it with grated beige pastel. You can model the shape with your hands or use stacks. You can glue the finished product to the nose using special skin glue.
Polymer clay nose
The material for making the mold can be purchased at any art store.
How to make Baba Yaga’s nose out of it at home? Knead the polymer clay in your hands until it reaches the consistency of plasticine. Now you can start molding. The easiest way to do this is on a model. First you need to form the main mass, and then move on to the details. We give the nose a bend and make wings. If desired, you can glue various growths or voluminous moles to your nose. Using a toothpick, you can give the product a leather texture. When the nose is ready, you can immediately paint it. This should be done with regular eye shadow. First, rub beige color into the shape, and then darken the wings of the nose with brown. We bake the finished product in the oven. To ensure that the nose can be reused many times, it should be painted with varnish. And to ensure that the product does not shine, you should choose a matte finish.
Paper Witch
To make such a bright, interesting Witch craft, you will need the following materials: a toothpick, colored paper, colored cardboard and a glue stick.
Cut out all the necessary parts (see photo).
Using pencil glue, glue them together.
Make a witch's broom from a toothpick and a piece of orange colored paper.
Nose made of plaster
You can make one of the important parts of a fairy-tale heroine from scrap materials.
How to make Baba Yaga's nose at home? For this we need plasticine and plaster. As well as acrylic paint and a plastic container. How to make Baba Yaga's nose step by step? You need to start by making a mold from plasticine. We fashion the shape of the future product. Now you need to prepare the container. Grease a plastic container with any fat. It can be cream or sunflower oil. We immerse the plasticine blank into the mold. We place it so that the hole that fits on the nose is on top. Now you need to dilute the plaster with water and pour the white substance into the mold. Shake the plastic mold a couple of times so that air bubbles come to the surface. Let the workpiece harden.
When the plaster has set, remove it from the plastic container and divide it into two parts with a sharp knife. We remove the plasticine and grease the workpiece with fat. Place the mold back into the container and fill it with plaster again. When the white substance sets, pour out the excess. As a result, we get a hollow nose shape. When the plaster has completely hardened, remove it from the mold and paint it flesh color.