Absolutely every person wants to plunge into a fairy tale for the New Year. To create this fairy tale, people buy New Year's decorations, garlands, tinsel and all kinds of figurines. Usually a lot of money is spent on this, and given that before the holiday itself, prices soar several times, the amounts can be colossal.
Why spend a lot of money if you can make a wonderful New Year’s decoration with your own hands, which is absolutely no different from the store-bought one?
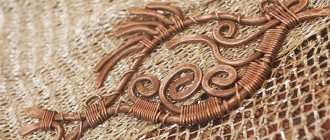
Make a deer out of wire, and the New Year's mood will not take long to arrive. To create it you don't need a lot of money or special skills.
How to make a deer from wire with your own hands?
The method that will be described below is suitable for absolutely any size of the future figure.
The only thing is that you need to use a larger diameter wire if you decide to make a larger figure (minimum 4 mm).
If you want to make a deer that will stand outside, you need to use moisture-resistant material.
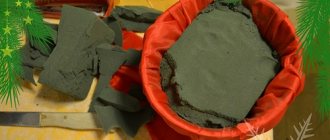
From ceiling slabs
In fact, this is a variation of the previous master class, since some ceiling tiles are also made from polystyrene foam. To make deer, choose the most simple, undecorated ceiling tiles in a neutral shade, about 5 mm thick. For cutting you will need a sharp stationery knife or scissors.
Idea: To decorate a mantelpiece or window, you can make a composition of deer and sleigh.
You can take the deer templates from the previous master class, and download the sleigh template below:
New Year's sleigh template.
You may be interested in: garden figures for the garden.
Additional materials and tools:
- acrylic paint;
- PVA glue;
- glitter of any shade;
- a small piece of fluffy/fur fabric;
- sequins or rhinestones;
- hot glue.
Step-by-step production:
- Print out and transfer the product blanks to the plates. For a three-dimensional composition you will need 2 sleigh elements and 4 deer.
- Cut out all the parts and cover with a layer of acrylic paint.
- The deer antlers need to be decorated with sparkles. To do this, apply a layer of PVA on them and sprinkle. It is advisable to do this over a protected surface, for example, oilcloth or plastic disposable tableware.
- Complete the decoration of the deer by tying a thin piece of fur fabric around the neck like a scarf (for example, you can use an old vest/hat).
- Glue the halves of the sleigh together and decorate the sides with rhinestones.
- Then glue the two halves of the sleigh together. You can glue a piece of fur fabric to the bottom.
- Assemble the composition from all the parts, securing it to the stand. Apply a layer of glue on top and sprinkle with artificial snow.
Tip: to ensure that rhinestones and glitter hold securely, you can apply a layer of transparent varnish on top.
Video: deer with a sleigh.
What is needed to create a deer
Wire. The stiffer the better, so that the deer keeps its shape. Do not use fragile or low-quality materials for work. Also, the wire should not be flexible, otherwise after a certain time, the figure will begin to lose shape and become distorted.
Light emitter. For a deer that will glow and connect to an energy source. Typically LED strips of various colors are used. For better fastening of the diodes, it is necessary to use a plastic clamp.
Balloon of paint. In our case - white, to completely give the winter atmosphere.
Tips from needlewomen
It is not necessary to make a deer right away from solid wire. For convenience, you can separately create the torso, head, paws, tail, horns. And then carefully fasten all the parts together. This method is great for creating a large figure. If the wire is too thick and difficult to bend, you can stuff it onto the plywood and use pliers. Special attention should be paid to the symmetry of the parts so as not to end up with “lame legs”.
To make a deer figure from wire in one piece, you should strictly follow the prepared drawing. To get as close as possible to the sketch, you can apply the finished parts directly to the diagram, repeating every centimeter.
For greater beauty, the finished deer can be painted. The wire does not always have a beautiful shade. The most suitable colors are gold, silver and white. In any case, these colors are only recommended; in fact, you can choose any color of the rainbow. Especially if the craft is made by children together with their parents.
The main advice is that when painting deer, it is better to go out into the fresh air. It is not recommended to do this indoors so as not to stain the furniture and not to inhale chemical fumes when sprayed.
Step-by-Step Guide to Making a Wire Deer
Below you will be given instructions on how to make a deer from wire with your own hands.
First, you need to find on the Internet a photo of a wire deer made by yourself. Thanks to this image, you can choose the best version of your future figure.
The first step is to create a form. To make a wire deer frame with your own hands, start with lines that are located horizontally.If you are new to handmade, then it is advisable not to choose figures with complex execution, otherwise you may not have enough experience.
These lines are: the ridge and the stomach. After that, start doing the neck, legs and head. For large parts of the body, take a long and whole piece of wire.
If bending the wire causes you difficulty, then there is a simple way: you need to take a sheet of plywood and drive nails in the bend areas. Curl the wire on these nails and you won't have any problems.
When shaping the legs, it is necessary to carefully work out their shape. They must be thicker at the base of the body, and the knees must bend slightly back.
Also try to make the horns as similar as possible so that they look harmonious and symmetrical.
After the wire work is completed, paint the deer with spray paint. You can choose absolutely any color, it all depends on the flight of your imagination.
As mentioned above, in our case, white color was chosen to associate with winter, to create a DIY wire New Year's deer.Also, painting is not only aesthetic. After all, thanks to painting, all errors and unevenness of the figure will be hidden.
If you wish, you can decorate the deer with New Year's decorations, such as tinsel or Christmas tree decorations, the main thing is not to overdo it, because there should be a golden mean everywhere.
This stage is suitable for those who want to create a glowing deer from wire with their own hands. First, wait until the paint on the deer figure is completely dry. Then take the diode tape and wrap it around the deer so that there are no empty spaces.
If the figure is large, then use plastic clamps as fasteners. For brighter light, it is advisable to use ribbons of white or other light shades.
But this is not necessary, because you can use any color you like. In order for the structure to be strong and durable, it is necessary to secure the places where the wire is connected.
To do this, you can use a thread, preferably silk, or also a wire that needs to be tightened tightly with pliers.This completes the creation of a wire deer. As you understand from the method described above, making a deer from wire with your own hands does not require any special skills.
Difficulties arise extremely rarely and are very easy to correct. This deer is suitable as decoration for a home, office or any room.
Can be used as an outdoor decoration provided that durable and moisture-resistant materials are used. Try to make such a deer yourself, and you will understand that no difficulties can arise, and even a person who is completely unfamiliar with handmade crafts will be able to cope.
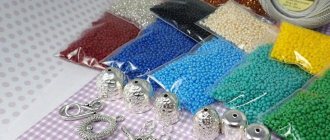
Selection of materials and color scheme
To create a New Year's deer at home you will need the following tools:
- sharp nippers;
- scissors;
- meter or ruler;
- pliers;
- masking tape;
- small hammer.
They are necessary for manipulating the main material - wire. It should be selected with a large diameter from 0.8 to 2 mm and a length from 30 m to 50 m, only in this case the figurine will be stable and withstand the weight of additional decor. You can use thick wire for the legs and main parts of the frame, and make difficult parts from thinner and more flexible wire.
New Year's balls (they are hung on horns) and garlands are usually used as decorations. Lights and lanterns greatly influence the perception of crafts; the mood depends on their colors:
- white reminds of snow and its shimmer;
- green looks mysterious and looks good next to the spruce;
- yellow creates a very warm and pleasant atmosphere;
- red and blue light reminds of parties and dancing.
The creation of a Christmas deer begins with a frame, and the shape is supplemented with either wire or thick colored woolen threads, which will give it a more cozy look:
- white is a win-win and standard option that goes well with any interior;
- gray is an unusual solution, suitable for lovers of stylish things;
- black looks defiant and bold, immediately attracts attention when shooting Christmas photos or videos, looks impressive with a white frame, red and blue garlands;
- golden and beige will fit perfectly into family evenings, will delight children, and combines perfectly with the warm shades of lanterns;
- brown has become one of the fashionable shades of the season; it looks great with a frame made of copper or bronze wire and red garlands.
Additionally, paper, a glue gun, pencil or pen will be useful.
DIY photo of deer made from wire
Simple models for different occasions
If not every child can assemble naturalistic figures, like those offered by Brazilian origami artist Joe Nakashima, a stylized deer head using the origami technique will not cause any difficulties. You can decorate a card, garland or gift box with a cute image. It is recommended to use craft paper, which will give the craft a “professional” look.
Step-by-step instruction:
- Fold a 15x15 cm square diagonally from top to bottom.
- Then from right to left.
- Open the top layer from the inside
- Flatten it into a diamond shape.
- Turn it over to the reverse side.
- Repeat steps 3 and 4. We get the basic “Double Square” shape.
- We position the workpiece with the free end facing us. Fold the right and left corners towards the center. Then we lower the upper triangle down. Opening the folds.
- We raise the lowest point “all the way”.
- Smooth out the side flaps. This is the basic form of “Bird”.
- Turn the product over.
- Fold the reverse side in the same way.
- We take the forked ends upward and to the sides, bending them at a slight angle.
- Lower the front triangular valve.
- Fold the sharp bottom corner twice.
- We bend the top one towards ourselves a little.
- We twist the animal's ears as shown in the diagram.
- We turn them over again.
- Cut the top triangle in half.
- Open both ends to the sides.
- Raise the extreme points up.
- We smooth out the corners by bending them back.
- Draw the deer's face.
Bookmark
A deer head made according to the following pattern easily turns into a convenient corner bookmark. In the “company” of the fabulous Rudolph from Santa Claus’s team, reading New Year’s comics will be much more interesting.
You will need:
- brown paper or craft;
- yellow designer cardboard;
- a red button or small pompom;
- doll eyes;
- scissors, glue stick, black marker.
Step-by-step instruction:
- Cut a craft square, 15x15 cm in size, in half.
- Fold the strip in half lengthwise.
- Then across and open again.
- Fold the right side down along the center line.
- Repeat step 4 for the left side.
- Turn the workpiece over.
- We bend the corners to create a “heart” shape.
- Return the model to the front side. Draw a mouth with a marker, glue on the eyes and nose. Cut out and add horns and ears from yellow cardstock.
Of course, the bookmark can be used not only for the winter holidays. If desired, Rudolph's red nose is replaced with a regular black one.
If the head models seem too easy, nothing prevents you from making an origami deer using Joe Nakashima’s video tutorial. For a three-dimensional figure you will need a square of paper 21x21 cm and a little patience.