Preliminary preparation
To make a butterfly in an original style from quilling paper with your own hands, the master will need to stock up on:
- •a tool for twisting spirals;
- •a ruler with templates of different diameters;
- •scissors;
- •tweezers;
- •decorative pins;
- •cork board or foam backing;
- •glue.
Also, novice craftsmen will need a diagram or outline drawing that will help maintain the correct proportions or create the clearest possible edge.
As for the elements, to make such a craft it will be enough to master the process of forming rolls, “eyes” or “leaves” and “drops”.
Option number 1 is the simplest
This method of creating a butterfly using the quilling technique is suitable for young craftsmen and beginning needlewomen. In addition to the tools, you will need quilling strips and a sheet of regular thick printer paper.
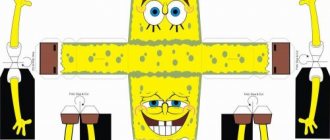
We start working with the body of the butterfly. To do this, cut out an isosceles triangle from printer paper and twist it, starting from the base. You can roll the body with your hands, or use a wooden stick, a pen rod, or any other convenient object.
Having rolled up the “cocoon”, the tip (the top of the triangle) is fixed with glue.
We cut out two small strips from the same paper. We roll one into a tight roll - this is the head of an insect, from the second we form antennae, twisting the ends with a quilling tool.
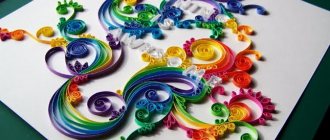
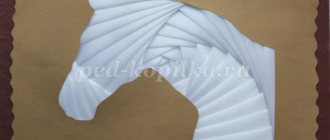
Let's start making the wings. To do this, we form free spirals from different colors of paper, of different diameters (so that small rolls can be placed inside larger ones).
Alternatively, you can immediately glue several multi-colored strips together and only then twist the resulting tape.
We open the finished rainbow roll to the desired diameter.
Carefully remove the quilling butterfly wing from the template and glue the tip of the paper.
Using a similar algorithm, we prepare three more such elements. In this case, the lower part of the wings of butterflies is usually slightly smaller than the upper, so the two blanks should have a smaller diameter.
Finally, we put together all the parts of the craft and carefully glue them together.
Bright butterfly using quilling technique. Master class » My Diy Ideas
Published 02/24/2018 · Comments: 0 · Views:
Do you want to try something unusual, make a unique and bright craft with your own hands? Then we bring to your attention a quilling butterfly. This is not just a paper applique, but a three-dimensional figure.
Children of primary school age can do this work independently. It will be easy to recognize the insect in the presented craft by its bright color and graceful shape, thin antennae, all made of simple stripes. Thus, only 5 parts are required to create a butterfly.
Let's look at what these fragments are.
Materials for making a butterfly:
- quilling strips of any bright color;
- an instrument with a thin split tip;
- glue.
How to make a butterfly with your own hands step by step
- Choose bright strips of paper to work with. Typically, sets of such stripes are already assembled by shade, and they contain beautiful colors that are in harmony with each other. Sometimes they even follow a certain theme, providing material for creating certain objects.
You need to make 4 blanks for the wings, you can use stripes of different colors. The more contrast the combination, the better. Each wing must be made up of two parts, their sizes must be different.If all the details are done correctly, then we will get a traditional, recognizable figurine of a fluttering insect.
- It is convenient to wind the paper, especially at the beginning, using a special stick. Pre-glue the ends of the strips, especially if they are short. Since the upper parts of the wings are larger, for each shade you can take 2 times longer strips or glue them in pairs. Insert the end of the strip into the tip of the stick, twist in your hands to make a spiral.
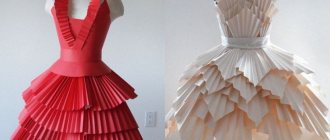
- Wind the strip to the end, seal the outer tip with PVA. But first loosen the spiral a little so that the winding is loose, the whole round piece is as if airy. Press with your fingers on one side, pressing all layers simultaneously. This way you will get a droplet. This angular shape is what is needed to make the wings of the familiar insect. The inside of the wings will be bright yellow, the middle part will be pink and the outside part will be red. They are all different shades. Any bright combination will look interesting in the finished craft. In nature there are completely different butterflies, even black with white or red, yellow with green or blue. So no one limits you in choosing shades.
- As mentioned earlier, you should prepare 4 wings that look like a mirror image. And here you have the opportunity to show your imagination when choosing colors. In the proposed version, both the upper and lower parts of the wings are the same in shade, but make the upper ones larger.
- Now it's time to work on the body and antennae. Additionally, take a thin strip. Fold in half and glue to create an oblong loop. Curl the loose ends using the same wand. You will get antennae.
- Glue the resulting pairs together in pairs, then glue the wings to a thin strip in the place where you marked the body.
- Our quilling butterfly is ready.
Source: https://mydiyideas.ru/babochka-v-texnike-kvilling/
Option 2 filling the base
Suitable for those who are looking for how to make a paper butterfly as quickly and easily as possible. To make such a craft, you only need the ability to roll quilling rolls and creative imagination.
On a sheet of thick paper, draw the outline of a butterfly. Then we take a strip of quilling paper and glue it with the end part along the contour, repeating all the bends.
The body and antennae of the insect can simply be drawn with a pencil or felt-tip pen.
Next, we prepare as many different rolls as possible from quilling strips. We make the spirals different not only in color, but also in diameter.
We place the elements in the mold, trying to place them as closely as possible to each other. When filling the butterfly, we glue the spirals together and glue them to the contour strip.
Schemes for creating a paper butterfly
If you are just a beginner quilling artist, then you will definitely need diagrams for creating a paper butterfly. Explore several options and decide on one that will best suit your taste, inspire and encourage you to make, and is not so difficult to implement. At first, the diagram will serve as an excellent assistant to study this method of paper rolling in detail, gain basic skills, and try out various methods of winding and fastening.
A diagram for butterfly quilling is extremely necessary, because it is difficult to create all the details of perfectly correct and identical sizes without a schematic drawing. Yes, you may really like the design and colors during the craft process, but you risk making asymmetrical wings and an incomprehensible craft in the end. Therefore, it is better to use either ready-made diagrams, or show your imagination and depict your vision of the future butterfly using the quilling method.
- Why do rats dream - interpretation of dreams. The meaning of dreams with rats for women and men
- Pomelo fruit - benefits and harm, how to choose a fruit
- Cake icing: recipes with photos
In office supply stores you can find ready-made diagrams and patterns for creating a butterfly in the quilling style. And if you like to do everything with your own hands, then draw on a regular A4 sheet a beautiful butterfly with a detailed drawing of its wings and use your own imagination in what color scheme to make it, what shapes of details will be present in the drawing. This is not difficult at all, and also provides a good opportunity to simultaneously enjoy an additional drawing session.
Option 3
To make an elegant and delicate butterfly, fans of paper rolling can also use the following simple master class with step-by-step photos and detailed descriptions.
First, prepare pink quilling paper:
- four strips 1.5 cm wide and 5 cm long;
- six ribbons 1 cm wide and 10 cm long;
- two strips measuring 2x20 cm.
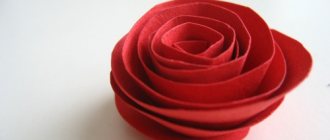
1. We twist the pink stripes into loose rolls and form them into “drops”.
2. We assemble wings from “droplets” of different sizes. We glue the elements of each quilling butterfly wing together step by step. It is important that when gluing, the “tail” of the central element protrudes slightly from below.
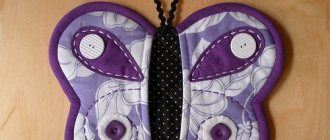
3. We frame each wing with a strip of black paper, wrapping it around the element 2-3 times.
4. Assembling the craft. For convenience, you can use a cork or foam backing and pins. When assembling, place a black strip folded in half between the wings.
5. After the glue has dried, we twist the black ends with a quilling tool to create antennae.
We twist a small black strip into a tight roll and glue it between the antennae. This is the head of a butterfly.
To strengthen the craft, it can be thoroughly coated with glue on the back side.
Option 4
Having gained experience with simple products, you can begin more complex methods of creating a quilling butterfly using the following step-by-step instructions.
This master class uses a combined paper rolling technique (husking + classic quilling).
First, we create the outline of the craft using decorative pins and graph paper. Alternately wrapping the paper strip around the pins, we make several loops of different sizes.
Alternatively, you can use drawings or printed diagrams instead of graph paper. In the latter case, the pins will need to be placed along the contour of the picture, taking into account the planned patterns.
With the remaining free end of the paper, wrap the entire element 2-3 times. If one strip is missing, carefully glue another one to it.
We twist loose spirals from paper of a different color and form “drops” from them. Each “drop” must fit freely into a certain loop of the workpiece.
Inside each “droplet” we insert a tightly rolled roll of 1/8 strip of white paper. We glue all the elements together.
While the wings are drying, we make a body from a paper triangle, rolling it tightly and securing the tip. Add antennae made from small pieces of paper and assemble the butterfly.
If you slightly raise the wings when gluing all the parts, the craft will look like a living butterfly sitting down to rest or collect nectar from a flower.
Simple butterfly for kids
For a child, a correctly presented method of making paper figures will become an exciting game. The baby will acquire a new skill, and in the process he will also develop perseverance, concentration and fine motor skills. Prepare your workplace and reserve some free time so that you and your baby are not distracted from an exciting creative activity.
Step-by-step instruction:
- For the simplest example of an insect, two colors are needed. It is better if the shades are in harmony with each other, but this is at your discretion.
- Cut 3 strips of 5 mm wide from one sheet, and 2 pieces of the same from the second.
- Using an awl, twist 2 spirals.
- If your template does not have round wings, but some other shape, give the blanks the appropriate appearance of droplets, sharp corners, or the like.
- The upper blanks should be larger than the lower ones.
- Secure the wings with glue to prevent them from unraveling.
- Let's start with the mustache. Divide the only strip that is not twisted in half lengthwise.
- Twist each half from only one part - not all the way. Alternatively, use scissors to create the desired shape.
- Fold the blanks into a butterfly and secure it with an adhesive substance to the base.
It is not necessary to use a base. It is enough to glue the components together and, for example, hang the product on flowers, a window, etc. If you are doing paper rolling for the first time, first watch the video tutorial or take training from the masters. There are entire groups on social networks and associations of people who do this all the time and are happy to share professional secrets and convenient templates. Kits are also produced with varying levels of difficulty and can be found in most craft stores.