Crafts from cotton swabs for children
At an early age, a child begins to develop creative abilities. Crafts will help him show his imagination and thinking, diversify his leisure time and surprise him in kindergarten, because using such an ordinary object, you can make amazing things. DIY crafts made from cotton swabs will teach your child to handle objects carefully and appreciate their work.
They can also be used to create a greeting card or gift for family members and friends. The child will be pleased to hear praise for his work. Below are crafts made from cotton pads and sticks with their step-by-step production
Crafts for the New Year
You can make snowflakes from plasticine and cotton swabs. Such simple DIY projects can interest children. They are easy to make, economical, and most importantly, they turn out very beautiful and festive.
The base of the snowflakes will be 2 plastic juice caps; it is advisable that their sides are not high. To make them connect, place a piece of plasticine in one lid and cover with the other on top. There should be a small space between them for subsequent work.
One end with cotton heads on sticks is cut off. Now such blanks are stuck into the gap between the lids into the plasticine so that there is some distance between them, since the next row will consist of shorter cotton swabs. Thus, a figured snowflake is obtained.
If you make several of these designs, you can put them on a string to create a New Year's garland.
Application "Little Snowman"
You will need: cotton pads, cardboard, colored paper, scissors, glue. We form snowdrifts from cotton pads and glue them to the bottom of a sheet of cardboard. We use two disks to create a snowman, and cut out a hat, scarf, hands, eyes, nose and mouth from colored paper. We glue everything.
We recommend reading:
Crafts from isolon - a manufacturing master class, nuances of working with the material and step-by-step instructions on how to make a craft (85 photos)- Crafts from saw cuts: stylish and beautiful options for decorating the garden and interior with your own hands (130 photos)
- Crafts from toothpicks - interesting ideas, manufacturing examples and the best crafts for children (120 photos)
Application "Sheep"
You will need: cotton swabs, cotton pads, cardboard, 2 black beads, 1 white button, colored paper, paints, glue, scissors. We cut out grass, flowers, clouds from paper and glue everything onto cardboard.
The disk will be the sun, paint it yellow, dry it and glue it. If you wish, you can paint everything with paints. We make a sheep from the discs, using cotton swabs to create the legs. The two black beads are the eyes, and the button is the nose. Eyes can also be cut out of paper and glued or simply drawn.
Lamb
When working with a younger child, you can invite him to fantasize, imagine which animal or plant has similar circles in its body. Surely it will be:
- panda;
- owl;
- chicken with chicken after painting the rims yellow;
- monkey;
- sunflower.
An interesting craft for a lamb or ewe. For those who are not lazy, it will not be difficult to make a whole herd, decorating them with multi-colored toy accessories. The step-by-step instructions are as follows:
Let's prepare:
- pieces of felt;
- threads;
- stapler;
- cotton pads;
- scissors;
- glue;
- twine.
If you don't have colored felt, you can use a special fabric dye.
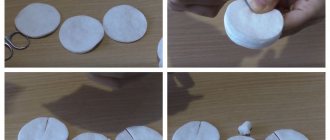
We start by folding the disk in four and securing the resulting shape with staples. We sew each received element and put them tightly on a silk cord.
To complete the work, we give the lace with strung disks the appearance of a ball. The first stage of work is completed.
INTERESTING: We make bullfinches and other birds from cotton wool
All that's left to do is just a simple design of the face. For this, the same pieces of felt are used, cut to the shape and size of the intended animal. Here you can play with colors and use materials of the most unexpected colors, the result will be more fun.
If the idea was to make a lamb step by step, we supplement its head with horns made of wire; if it was a sheep, there is no need for them.
Having attached the horns to the head, for example, with plasticine, and also embroidered the eyes and nose with threads or beads, we finish the work. The result is a skillfully executed, handmade toy that will look original on a branch of a Christmas tree, for example.
The figure of a chicken from yellow disks will be obtained by gluing two circles (one slightly larger than the other), depicting the head and torso. The eyes are black beads, the beak is a red triangle.
Application "Bear"
You will need: cotton swabs, stencil, paints, cardboard, colored paper, scissors, glue. Using a stencil, draw a bear on cardboard.
We paint cotton swabs, dry them and cut off the soft ends. Fill the bear with cotton wool blanks and glue them. We cut out the eyes from colored paper and also glue them on. You can make any animal using this principle. Below are photos of animal crafts made from cotton swabs.
Peacock
You will need: cotton swabs, disposable plastic spoons, cardboard, paints, PVA glue, superglue, scissors. From cardboard we cut out a peacock blank and a circle that will be used to create the tail. We paint and dry chopsticks and spoons.
We recommend reading:
Crafts made from jute - 95 photos, diagrams, patterns and beautiful design options for craftsFoam crafts - how to make decorations and toys? Ideas and options for making crafts from foam plastic (110 photos)
- Crafts from cereals - 75 photos of the most beautiful crafts from cereals for children and adults
You need to choose several bright colors. In order for the paint to adhere better to the spoons, you need to add PVA glue to it. Glue the spoons with superglue to the cardboard circle.
We cut off the soft ends from the sticks and fill the peacock’s head with them. We glue everything together.
Volumetric flowers
You will need: cotton swabs, foam balls, paints, green colored paper, skewers, glue, scissors.
We color the cotton swabs, dry them and cut off the soft tip on one side. We insert sticks and a skewer into the foam ball, having previously painted it green. Cut out a piece of paper and glue it onto a skewer.Do-it-yourself sheep (lamb) from an egg
As you know, the husband of a ewe is a ram. So why not try to make a representative of the stronger half of the flock of sheep?
Necessary materials:
- egg;
- glue;
- plasticine;
- cotton wool
Manufacturing:
The first step is to prepare the basis for the future craft. Wash the egg and make two holes in it with a needle. One hole is at the bottom of the egg, and the other is at the top (see photo).
Allow the contents of the egg to drain out. Now rinse the egg again and after a while, after the egg has dried, you can start creating.
Coat half of the egg (its wider part) with glue and glue a bunch of cotton wool. Do not press too hard with your fingers so that the fur is fluffy and voluminous.
Make two thin sausages from dark plasticine and twist each of them (see photo) - these will be the horns for the lamb. If you decide to make a sheep, then sculpt two ears instead of horns, because sheep do not have horns.
Next, from plasticine of the same color, fashion 4 short thick legs and 2 eyes. Attach all plasticine parts to the craft.
And now the charming lamb is ready. If you want to hang such a lamb on the Christmas tree, then attach a loop to it or tie a thin satin ribbon around the body.
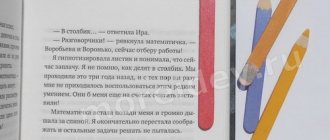
DIY sheep made from ear sticks
Such a cute sheep, made from ordinary sticks intended for cleaning ears, can become not only a souvenir or gift, but also an excellent decoration for the New Year's table. To do this, attach a name plate to the craft, and your guests will know where their place is at the festive table.
Necessary materials:
- cotton buds;
- glue;
- scissors;
- a sheet of thick cardboard;
- clothespins
Manufacturing:
From a sheet of thick cardboard, cut out an oval and a circle (the body and head of the future lamb). Now cut off only those areas from the ear sticks where there is cotton wool on them. Gradually overlapping each other, glue the fluffy parts of the cotton swabs to the body of the future lamb (see photo).
Use the pieces to make a forelock on the sheep’s head, and use two pieces of cotton swabs to make ears. Glue the head to the body of the sheep.
Be sure to draw the eyes, nose and mouth of the sheep with a felt-tip pen or pen, and also tie a cute bow on the top of its head.
Attach two clothespins and now the charming and cute sheep is ready and at the same time very stable.
DIY sheep made from eggs (kinder surprise) and cotton swabs
In those families with small children, there will definitely be more than a dozen plastic eggs from Kinder Surprise. Right now their finest hour has come.
Necessary materials:
- plastic egg (kinder surprise);
- cotton buds;
- glue;
- awl;
- candle;
- threads;
- cotton wool
Manufacturing:
If you want your craft to become a Christmas tree toy, then be sure to first attach a loop to the plastic egg.
Now, heating the awl over the candle, carefully make holes in the plastic egg in the place where the legs should be.
Cut off the fluffy parts from the cotton swabs and thread the plastic tube forward into the holes made from the inside of the egg.
In the end, you should end up with something like this: on the outside there are 4 legs made of plastic tubes, and inside the egg there are 4 fluffy parts. Before you insert cotton swabs into the holes, be sure to soak them in glue.
Now close the plastic egg and start decorating the sheep’s body. Use a heated awl to make holes and insert cotton swabs into them with the fluffy parts facing out.
The sheep's face needs to be made on a base consisting of three cotton swabs. Wrap a cotton ball around the sticks and moisten with glue, give the desired shape. After everything has dried, paint the face.
DIY sheep made from coffee beans
DIY ribbon sheep
Do-it-yourself sheep made of paper and thread
DIY polymer clay sheep
Such crafts can be not only a simple souvenir, but also a refrigerator magnet if you attach magnets to the sheep. These sheep will be an excellent souvenir or addition to a New Year's gift.
Follow the photo instructions and you will get beautiful and bright crafts.
Do-it-yourself sheep made of threads. How to make a sheep?
Children's crafts: Postcard with a sheep
Children's crafts: DIY paper sheep
Source: https://vtemu.by/novosti-v-temu/ovechka-svoimi-rukami-kak-sdelat-simvol-novogo-2015-goda-ovechka-svoimi-rukami/
Vase with callas
You will need: cotton swabs, cotton pads, green cocktail straws, yellow paint, tape, a vase, scissors.
Paint the sticks yellow, dry and insert into cocktail tubes. Wrap the resulting stems in two discs in turn and secure with tape. The number of flowers is limited by desire and the size of the vase.
We recommend reading:
Crafts from natural materials - a step-by-step master class on creating original crafts for children and adults (100 photos)Wood crafts - the best craft options, instructions for beginners and ideas for making wooden crafts (85 photos)
- Fabric crafts - the best ideas and the most practical crafts and toys made from various types of fabrics
About the benefits of the material
Plasticine for children's creativity is the best choice of parents! Let's find out why. As a child grows up, he begins to actively explore the world and reinforce his knowledge with actions. He learns that you can throw a ball and it will jump merrily, and that you can’t touch hot things because you might get burned. All this information is stored in certain centers of the brain. A material such as plasticine will help the baby learn about plasticity, modeling, color and size. In addition, nature has placed the center responsible for the development of speech next to the center responsible for the movement of the fingers. By stimulating your baby's fingers, you stimulate his speech development.
Working with plasticine encourages creativity and instills in the child such qualities as perseverance, attentiveness, creativity, logic, and creative thinking. Modeling various plants and animals will teach your child about the world around him. And by creating any fairy-tale character with your own hands, you will teach your child to realize his creative potential and show imagination.
Related article: People do not come into our lives by chance - every person is a messenger of God
Roses
You will need: cotton pads, PVA glue, paints. We form the center of the rose from the disks, coat it with glue and glue several more cotton disks sheet by sheet, depending on the required size.
It is important to seal the edges of the disc well. This will prevent the formation of lint. After complete drying, the rose needs to be painted and dried again.
The finished flower is usually used to create bouquets, wreaths, baskets and voluminous cards.
Christmas tree
You will need: cardboard, cotton pads, glue, scissors, stapler, various decorative elements for decoration. We roll the cardboard into a cone and secure it with a stapler.
Fold the disk in half twice to form a sector. Gradually moving from bottom to top in a circle, we cover the entire tree with sectors. For decoration you can use beads, rhinestones, ribbons, stickers, cones, buttons.
It is important to remember that when making crafts with your own hands, you can use a wide variety of materials and not be limited to found templates.
Preparation
It doesn’t matter what age the child is, because creativity is not divided by age. All you need is to protect the surface from subsequent mess, which is enough after the inspiring process of making fakes, and, of course, advise your child about the safety of using materials. The smallest children should be kept under supervision and small details should be excluded.
In order to prepare a desktop, you only need a newspaper as a backing or some kind of unnecessary tablecloth. Any polyethylene will work just fine.
The simplest option is to use a garbage bag cut at the seams. To do this, estimate the dimensions of the table and make cuts along lines ❏: bottom ↽, and side ↾. Usually this is enough to make a primitive backing in the form of a rectangle ▭, which can then be conveniently removed.
Prepare the tools your child will work with.
Suitable for this:
- Pencil ✏
- Scissors ✄
Auxiliary tools for fastening can be:
- Glue,
- Plasticine or salt dough (for fakes with children),
- Stapler,
- Needle with thread,
How to make the dough: Mix the required amount of flour and water, add a few tablespoons of salt, knead until the dough does not stick to your hands, but remains extremely moist.
What additional materials can be used:
- Paints,
- Sequins,
- Rhinestones,
- Colored threads,
- Beads,
- Beads,
- Foil,
- Wire,
- Colored candy wrappers,
- Natural materials and so on.
Photos of crafts made from cotton swabs
0