Svetlana Potapkina
Lesson notes on leaf applique “Butterfly”
Direct educational activities
in the preparatory group of kindergarten
(Region
: artistic creativity)
Theme " Butterflies made of natural material"
Goal: to teach children to make crafts from natural materials, to develop creativity and imagination.
continue work on developing skills in working with natural materials, improve gluing techniques: partially spreading glue on parts, creating the illusion of transferring volume;
develop children's sense of composition, develop the ability to beautifully arrange elements of a composition on a sheet of paper , and maintain proportions between elements;
develop the ability to notice shortcomings in your work and make timely changes to achieve greater expressiveness of your work;
encourage creativity in children.
1. heuristic conversation;
2. examination of works made from natural materials;
Tools: scissors, brush rests, glue brushes
Materials: beautiful multi-colored dried leaves , glue, oilcloth, cloth napkins, a collection of butterflies , colored cardboard in the shape of a flower for the background and colored paper for decorating butterflies .
Progress
The teacher greets the children and invites them to sit in a semicircle on chairs.
Teacher: Quite recently, a unique exhibition was held in the museum of our city, its exhibits are amazing and unusual, they reminded us of the warm summer. I offer you a riddle, if you guess it, you will find out who I admired in the museum.
There is a flower sitting on my hand,
Is it possible?
If you come closer to him -
He immediately flies away.
Why can't we see butterflies ? (children's statements)
Why butterflies compared to flying flowers? Why do butterflies land on flowers ? (children's answers)
Look closely at these amazing exhibits (shows a collection of butterflies )
:
What does a butterfly ? (head, body, wings, antennae)
What shape is the head of butterflies ?
What shape is the body of butterflies ?
Pay attention to the wings. How many wings does a butterfly ?
Which pair of wings is larger?
Do you guys think the top wings are the same shape and size? This means they are symmetrical.
Pay attention to the pattern of the wings. Is it the same on both sides? So what is he like?
Do you want to make beautiful butterflies ? Then I invite you to the workshop of young masters.
Go to the tables.
The children sit at the tables.
Teacher: Today we will make a butterfly applique , but not an ordinary one from colored paper or cardboard, but a living one from tree leaves , but where can we get them in the middle of winter, because there is snow everywhere? In autumn, the leaves on the trees turned yellow and became so beautiful and colorful that the guys in my group wanted to preserve such beauty. Together we collected leaves that had fallen from the trees and dried them . They shared the gifts of summer and autumn with you.
So, where do we start our work? (children's statements)
Application "Peacock" from autumn leaves
You will need: colored cardboard, PVA glue, scissors, gold and red autumn leaves, felt-tip pen.
Master Class
- Place 5 yellow leaves in a semicircle on the cardboard.
- Glue them.
- Place 7 smaller red leaves on top of the yellow leaves.
- Glue them.
- Cut out the peacock's body and glue it on.
- Cut out the beak and glue it on.
- Draw the eyes.
The “Peacock” applique made from autumn leaves is ready! I recommend watching this video!
Preview:
Summary of a lesson on application of leaves “Butterfly” with elements of drawing.
Theme “Butterfly made of natural material”
Goal: to teach children to make crafts from natural materials (leaves), to develop creativity and imagination.
continue work on developing skills in working with natural materials, improve gluing techniques: partially spreading glue on parts, creating the illusion of transferring volume;
develop the ability to notice shortcomings in your work and make timely changes to achieve greater expressiveness of your work;
encourage creativity in children.
2. examination of works made from natural materials;
Tools: scissors, brush rests, glue brushes, pencil.
Materials: beautiful multi-colored dried leaves, glue, oilcloth, cloth napkins, white paper, photographs of butterflies for clarity.
Portrait of autumn leaves
You will need: cardboard, paper, autumn leaves, pencils, scissors, PVA glue.
Master Class
- Print the template on cardboard or redraw it.
- Glue leaves as hair.
- Color your face with pencils.
- Cut a strip of paper and glue its ends together.
- Glue as a nose.
A portrait of autumn leaves is ready! I recommend watching the video master class!
On the topic: methodological developments, presentations and notes
Application, types of application.
Tasks. Ø Continue teaching children to cut out rosettes from paper squares folded “twice diagonally” Ø Enrich the applicative technique - cut out petals of different shapes, passing.
Summary of a lesson on appliqué in the middle group on non-traditional techniques Topic: “Birds peck berries on a rowan branch” Program content: To cultivate an aesthetic and moral attitude towards Fri.
Integrated lesson in the middle group Educational area “Artistic creativity” Application “Flying planes” (collective composition) Educator: Elena Sergeevna Kolyhalova Programmatically.
Topic: Let's remember how we did appliqué Goals: 1 To clarify knowledge of the rules of behavior in appliqué classes 2 To encourage people to post images.
How to make a volumetric applique.
The use of non-traditional appliqué techniques in the senior group.
Composition of leaves. Butterfly
Technology lesson on the topic “ Composition of leaves. Butterfly"
1st class
Lesson objectives:
- educational aspect:
teach children to work with natural materials, dried leaves, and to use scissors and glue correctly;
- developmental aspect:
develop imagination and thinking;
- educational aspect:
education of accuracy when working with natural materials.
Equipment:
Samples of finished applications; presentation for the lesson demonstrating the order of the work; colored cardboard, scissors, PVA glue, rags.
During the classes
I. _ Organizing time
II. Introductory conversation. (title slide of the presentation).
Teacher: I would like to start today’s lesson with the poetic lines of S.A. Yesenina:
The golden foliage began to spin.
In the pinkish water of the pond
Like a light flock of butterflies
Freezingly he flies towards the star...
— Tell me, what does the poet compare the leaves falling from autumn trees to?
Children: - With a light flock of butterflies.
U.: - How does the flight of a fallen leaf resemble the flight of a butterfly?
D.: — Leaves also flutter in the air, a light breeze can carry them to the side.
— Butterflies sometimes freeze in the air, and then continue their flight again.
III. Lesson topic message.
U.: The leaves are already on your desks, they have interrupted their flight. But will we have butterflies?
Let's guess the riddle (slide number 2).
There are two petals on a flower,
And there's not even a stem
And besides, he flies
Tell me what they call it?
D: This is a butterfly.
U.: Today in the lesson we will make a “Butterfly” leaf applique.
I V. Sample analysis.
U.: Look at the butterfly (slide No. 3). How does she look? How many wings does she have?
D.: - The butterfly has two pairs of wings. As a pair, the wings are very similar.
U.: What kind of body does a butterfly have?
D.: - The body is narrow and long.
U.: What is located on the head of a butterfly?
D.: - The antennae are thin. The eyes are small.
U.: - Now let’s look at the leaves that you have (slide No. 4).
- We will need 2 beautiful identical leaves for the upper wings, 2 smaller leaves for the lower wings, a narrow leaf for the body, seeds for the eyes, stalks for the antennae (slide No. 5).
- Let's now think about what materials and tools we will need, and prepare a workplace (slide No. 6).
D.: - We will need cardboard for the base of the applique.
— Brush and PVA glue, scissors.
U.: I’ll tell you that we also need a folder where we can dry the applications. It’s even better to put them under a press or press them down with something heavy on top. Then the leaves, having absorbed the glue, will not warp and dry smooth and beautiful.
- Now let’s prepare and fix everything at the workplace. Remind me, what are the basic rules for working with scissors?
D.: - Take scissors in your hands only when they are required to complete the work.
— You can pass or hand scissors to a neighbor only with the rings facing forward.
U.: Remember the basic rules for using glue.
D.: — A small amount of glue should be applied with a brush.
— The glue layer must be even.
U.: To work with dry leaves, it is better to use PVA glue.
V. Explanation of the sequence of work.
U.: Let’s look at the sequence of work (slide No. 7).
Let's choose two of the most beautiful identical leaves for the upper wings, and smaller leaves for the lower wings (slide number 8). A long narrow leaf is suitable for the body (slide No. 9). We will select stems for the antennae, and seeds for the eyes (slides No. 10-11).
All prepared parts must be laid out without gluing on cardboard (slide No. 12), and then each part must be glued in place (slide No. 13). You need to spread glue on the parts on a rough piece of paper or a piece of newspaper. They are on your desks. When gluing each part, you need to press it with a cloth (slide No. 14) so that the cloth absorbs excess glue and better presses the part to the cardboard.
— The finished application should be placed in a folder and then under a press (slide No. 15).
— After the work is completed, you must wash the brush and tidy up the work area (slide No. 16).
- Let's see what kind of butterflies you can get (slide number 17).
VI. Practical work.
Children complete the task. As the lesson progresses, the teacher provides individual assistance to students.
VI I. _ Lesson summary.
An exhibition of the resulting works is made on the board.
U.: — Who would you like to give your applique to?
D.: - Mom, grandmother, friend.
U.: When the applique dries, it can be inserted into a frame and hung on the wall.
Did you enjoy today's work? And in the next lesson we will be able to make a new animal out of leaves. Let's guess the riddle (slide number 18):
The tail is a fluffy arc,
Do you know this animal?
Sharp-toothed, dark-eyed,
Loves to climb trees.
D.: This is a squirrel.
T: At home, prepare leaves for the next lesson, from which we can make a squirrel.
Students clean up their workspaces.
LiveInternetLiveInternet
The butterfly is one of the most beautiful insects on the planet. What shapes and colors of wings has nature not come up with? In the old days, different peoples associated butterflies with the soul, love and rebirth.
For example, the ancient Aztecs attributed these insects to the symbol of the God of vegetation; they believed that a butterfly was a particle of the sky that had fallen to the ground. The ancient Romans claimed that colorful insects were flowers blown by the wind. For the Greeks, the butterfly symbolized the immortality of the soul, and in China it symbolized abundance, longevity and beauty.
Today, even preschoolers know that a butterfly is just an insect, an earthly creature. However, this does not stop one from admiring her beauty and lightness.
In autumn, children enjoy making butterflies from natural materials, colored paper or leaves. Working on crafts and applications is not difficult, but the result is bright, colorful, associated with summer.
Probably no one will be able to make two identical butterflies. And why? Now we will show one of the options for creating an applique of autumn leaves “Butterfly”, which you can use as a basis for making your own pictures.
To work you need:
- rectangular cardboard - autumn leaves - PVA glue - plasticine.
So, all butterflies have an elongated body. It consists of a head, chest and abdomen. We will use long and narrow rowan leaves to decorate the body. 3 pieces are enough. For the head, choose any round leaf (in our case, heart-shaped).
Let's make huge eyes out of plasticine for the butterfly. Now she will notice flowers full of sweet nectar from afar. We will make the antennae from deciduous cuttings or simply draw them in with pencils.
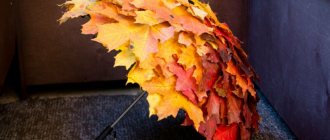
From two maple leaves we will create one pair of wings for the heroine. The orange color harmonizes perfectly with the green body and head of the insect.
The second pair of wings are pointed leaves of wild grapes. If there are no such specimens in the herbarium collection, you can replace them with leaves of ash, oak, and chestnut.
Well, the time has come to decorate the butterfly the way the master’s soul desires. For this purpose, you can use whole small autumn leaves, clippings, berries or dried flowers. If possible, the background around the application is decorated with flowers and herbs.
At this point, we consider the work on creating the application complete. Set the picture aside for about 20 minutes to allow the glue to dry thoroughly.
It remains to wish everyone creative success!
https://vmeste-masterim.ru/applikaciya-babochka-iz-listev-master-klass.html
Photo crafts butterfly
Read here - Crafts for the interior - 95 photos of ideas for beautiful and original interior decor with your own hands
Did you like the article?
0