The first patchwork products were found in Egypt.
Patchwork needlework can be traced in many cultures. The first products using the patchwork technique were found in Egypt, and they date back to -3 thousand years BC. And the French women, not having a lot of money, but having a desire to wear dresses made of expensive materials, sewed brocade pieces onto ordinary fabric, which, in essence, is also quilting. Patchwork does not lose its popularity today. There are various directions and teachings that have developed historically.
Quilting and Patchwork: Craft and Art in One
Quilting and patchwork techniques are often equated with each other. They are interconnected, but have different historical background. A quilt, which translated means “stitch,” was used to connect layers of fabric together when sewing clothes, robes and blankets. And the basis of patchwork is patchwork patching and mending things. Therefore, today, patchwork refers to the technology of patchwork sewing itself. Quilting is a broader creative direction. This is the production of multi-level products.
Most often, things using the quilting technique have three layers of fabric:
- The first layer is the lining or backing layer;
- A compacted layer that gives the product volume;
- Decorative layer made using patchwork, applique or embroidery techniques.
The layers must be quilted together. A well-executed stitch shows the level of skill of the performer, and the play of fabrics and the play of design reveal the artist’s artistic talent.
There are three types of quilting according to execution:
- Hand quilting;
- Machine quilting;
- Combined.
Quilting originated in many countries and absorbed national features and characteristics of peoples.
In this regard, there are two most colorful areas of quilting:
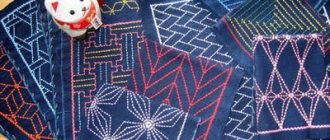
- Japanese. A combination of sashiko, appliques, patchwork.
- Celtic. Celtic patterns and ornaments.
Quilting is a combination of labor-intensive craft and art that requires precision, precision and inspiration.
What is quilting in sewing: mastery of stitches
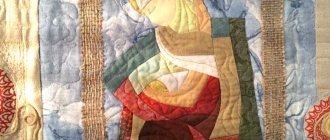
Using the quilting technique, you can realize the most intricate ideas: sew unique clothes, tablecloths, bedspreads, three-dimensional paintings, bags and other home decorations. The beauty and quality of the product depend, first of all, on the fabric.
Rules for choosing textiles and color combinations using the quilting technique:
- The backing layer is made either from a specialized lining fabric or from any dense fabric that is easy to wash and iron (most often these are cotton fabrics).
- The color of the lining can be plain or patterned. It can match any color from the decorative layer or stand out in contrast.
- For the middle layer, padding polyester is most often used. It is convenient to sew, easy to quilt, and does not weigh down the product.
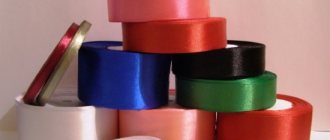
- The decorative layer of the product, which is not washed every week, can even be made from silk, brocade, lace and chiffon pieces of fabric.
- It is desirable that the quilt be made of material of the same density.
- The color scheme should be selected compositionally.
- It is advisable to dilute details with a pattern with plain fabrics.
You can use programs on the Internet that help you choose the right color combination.
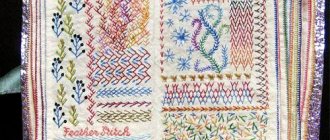
The basis of quilting is the stitch, by which you can evaluate the quality of the work and the level of skill of the needlewoman.
Basic types of stitches in quilting for beginners:
- Straight seam;
- Wavy seam;
- Zigzag;
- Tortuous (free-running seam).
For beginners, you can draw a stitch on paper. Next, the sheets of paper need to be pinned to the product, and a sewing machine is used to stitch according to the design.
It is worth considering what fabrics and colors will be used for the composition, what patterns will be obtained. Such a product can support the interior of the house or create its own flavor. The main thing when choosing fabric and color selection is not to be afraid of experiments and creative ideas.
Basic quilting: master class for beginners
Patchwork is the most labor-intensive creative direction. Beginners don't need to have any talent or special skills to create quilt-style projects. To do this, you need to know the technology of work, the process and sequence.
Necessary and useful tools when working in quilting technique:
- Roller knife or any other cutting tools that will not “chew” the fabric;
- Self-healing mat for cutting fabric with linear markings;
- Transparent wide ruler;
- Seam ripper, needle, pins;
- Matching threads, contrasting threads for stitching;
- Textile;
- Sewing machine;
- Iron.
Tools can only help and speed up the work. The main work is done with a needle and thread. Therefore, you should not stop if you do not have any convenient devices - you can always find an alternative.
Quilting technology:
- Carry out preliminary water-heat treatment of the fabric so that it shrinks before cutting.
- Mark the fabric taking into account the allowances.
- Cut out the parts according to the markings. Alternatively, you can use pre-prepared templates.
- Lay out patterns, form a composition, secure the parts with pins.
- Sew rows in parts or blocks.
- Iron each new seam flat-iron
- Sew together the entire decorative layer of the product
- Cut out the lining and padding polyester (batting) 5-7 cm larger than the front part.
- Sew all three layers together at the edges and finish with a decorative stitch throughout the entire piece.
- Finish the edges with piping.
The technique of quilting patches is available to any beginner who has a desire to create their own designer product. Before starting work, it will be useful to watch any master class, video or other information material on the chosen technique, and select diagrams.
Video
Quilting for Beginners
Quilting for Beginners - Tools
“Well” technique
Edging a quilt master class
Quilting – Art stitch Master class
Japanese patchwork – MK house
Crazy patchwork - detailed master class
Sewing machines for patchwork and quilting: overview of characteristics
There are tools that significantly facilitate the labor-intensive and painstaking work of a master in the patchwork technique. Sewing machines themselves speed up the whole process. But if quilting is a serious hobby, it’s worth thinking about the advantages that certain machine models have.
Advanced features of sewing machines for quilting:
- Increased platform (distance from side panel to needle). Which makes quilting large items more comfortable. This feature is presented, for example, in the 6600 and 6500P models of Janome Memory Craft machines.
- An auxiliary table that increases the surface of the sewing machine. A built-in additional table is available in some models of Janome (6600, 6500P), Jaguar, Brother Innov-is.
- Automatic adjustment of stitch length during free motion stitching. Featured in Bernina machines. The special BSR foot maintains the same length of stitches and signals if the fabric begins to move faster.
- Adjusting the sewing speed. When embroidering or stitching a bedspread, it is convenient to set the speed yourself, which will not depend on the force of pressing the pedal.
- Needle threader. An automatic needle threader is useful when you need to change threads frequently, such as when quilting.
- The presence of an upper conveyor. The upper conveyor helps to move all layers of the product evenly, resulting in no folds or creases. This part is available in the 6600 Janome model.
The Japanese company Janome, which has won the love and loyalty of many craftswomen, has been leading the sewing machine market for decades. Due to the growing popularity of quilting, sewing machines are being modernized and equipped with new parts. For example, the 6500 Memory Craft model has 69 stitches for patchwork and quilting. A large selection of quilt stitches is available in the Quilter Companion models.
Quilt stitching for beginners
All patchwork products have three layers - the main fabric, interlining material and interlining. In order to hold these layers together so that they do not move during use, stitching is needed. It also strengthens the seams of the fabric and extends its life.
But the possibilities of stitches do not end there. The stitch has become the decorative element that complements, enriches, organizes and diversifies the canvas. The importance of the stitch cannot be exaggerated. A properly executed neat stitch gives the canvas a finished look and turns it into a quilt.
Where to start working in the patchwork technique? What materials and tools are needed? You will find answers to these questions in the article “Patchwork for Beginners”
Hand and machine stitching
Which stitch to choose to complete the work, hand or machine?
- Machine quilting has many benefits. This is both speed, and the ability to evenly quilt long lines of a pattern, and a uniform, identical stitch. But there is also a drawback: it is difficult to hold a large fabric on the machine’s work table and to feed the stitched area evenly under the foot.
- Hand quilting, although more labor intensive, is considered more delicate and refined.
An important condition for hand stitching is the same length of stitches on the front and back sides of the fabric and an equal distance between them. The length of the stitch depends largely on the curvature of the design and the nature of the fabric from which the quilt is made.
Soft, loose fabrics require a longer stitch. The stitch is laid with a “forward needle” seam, that is, with small basting stitches. The stitch should cover all three layers of fabric. Check the bottom layer of the fabric often. There should be no creases or folds on it, otherwise you will have to trim the stitching and straighten the fabric.
It is recommended to stitch by hand using a hoop. This makes the whole process much easier. But it is not always possible to purchase a hoop of the appropriate size. Many experienced and novice craftswomen do without them.
Whatever stitching method you choose, machine or hand, there is one immutable rule that should not be neglected.
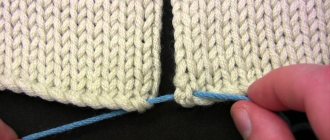
The stitch is always carried out from the center of the fabric to the edges. This is the only condition under which you can avoid distortions and displacement of the layers of the canvas.
The stitch can be laid along the seams of stitching parts and blocks and serve as an additional reinforcement of the fabric. For this stitch, choose threads of a neutral color.
A decorative stitch can run a few millimeters from the stitching seam, or it can follow a applied pattern that does not follow the structure of blocks or parts. This is the most effective type of stitch.
Knot stitch
In addition to the types of stitches described above, there is a less common knot stitch. It is done in separate stitches. The ends of the threads on the front side are tied with a double knot and cut off, leaving a few centimeters. If you pull a double iris thread into the needle, the effect of sticking tails will intensify. In this option, you can use threads of contrasting, bright colors.
For greater decorativeness, small beads can be attached to the ends of the threads. Small buttons can be used as an intermediate piece between the fabric and the knot.
Mark the locations of the knots. Pull a long thread into the needle and baste the fabric. Insert the needle and withdraw it at the marked places, i.e. in the places of the suspected nodule. Pull the thread without tension to the next mark and stitch again, etc. Then cut the threads in between the stitches. Tie the ends and cut to the required length.
Threads and needles for stitching
There are special threads for patchwork sewing; they are stronger and thicker than regular sewing thread. But they can be completely replaced with nylon thread; it practically does not break. Polyester with cotton No. 30-40 is also suitable; this thread is elastic and durable. If the product performs a purely decorative function, then you can use ordinary embroidery threads. The choice of thread color depends on the overall color of the quilt and the purpose you want to give to the stitch.
But remember that threads in dark tones add depth and expressiveness to the design, while threads in light colors dissolve and soften the design.
The needle should be short, thin and sharp, but with an enlarged eye. It is more difficult to pick up layers of fabric with a long needle.
Marking lines stitches
Before marking stitch lines, you must be sure that after quilting these lines can be removed or will not be visible. Otherwise, you may ruin the appearance of the product.
For marking, you can use a sharpened simple or colored pencil, water-soluble markers. Ordinary markers or gel pens will not work; their marks will remain for a long time.
You can use leftover soap. You can put them in the freezer for a while, then grind the surface to a sharp edge and wrap the upper part with a plaster. The soap will not stick to your fingers. Soap marks are easily removed. But the lines drawn with soap cannot be called accurate. Use it only for straight lines.
The clearer the stitch line, the easier it will be for you to make it, and the better its appearance will be. Do not fill the fabric with stitches very thickly.
The more frequently the stitches are spaced, the tighter and less elastic the quilt will become.
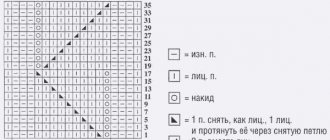
Preparing templates for stitching
If the stitch pattern is not built on straight lines that are easy to draw, but along a complex contour, you need to make a template and apply the pattern to the canvas using it.
- To make a template, it is better to take whatman paper, as it retains the outline of the part well during long-term use and is easy to cut with scissors.
- Line up a drawing on paper or transfer the finished one to tracing paper.
- Carefully cut around the office.
- If the quilt is large and there are too many stitch lines, you can prepare two copies of the template.
- Place the template in the desired places on the canvas and trace it as accurately as possible.
- If the quilt is small in size, you can apply the entire stitch pattern on a sheet of tracing paper.
- Pin the tracing paper to the canvas and sew directly along the lines. Then remove the tracing paper.
Art quilting for beginners
Stitch using a stencil and a disappearing marker
Free stitch for beginners
Stitch patterns
Additional finishing materials
A departure from the traditional principles of creating a quilt allows you to use many decorative elements in your work. The only limitation in this is your imagination. The use of braid or lace diversifies the texture of the fabric. Incorporating beads or seed beads will add a playful and flirty feel to the quilt look.
Beautiful decorative buttons can enliven a monotonous design. Embroidery is widely used in quilts made based on folklore motifs. It can be placed along the stitching seams, covering them, or it can be placed on the details or border of the quilt. But when using additional materials, try to be careful so that your quilt does not become an illustration of all possibilities. Too much variety of decor can turn a product into kitsch.
Note: If you do patchwork, add your finished work to the home textiles section on our website
handity.ru
Quilting foot: features of use
The quality of the stitch depends on the foot. In addition to the standard foot, some models come with special quilting feet. With this foot you can make a seam with a 6 mm seam allowance and sew in a split.
A split seam is one of the types of overlock seams, which is often used in quilting; it is made on the front side and has a clear line and three-dimensional shape.
Sewing feet that help in quilting:
- Transparent applique foot for better stitch control. Used for any quilling work, be it embroidery, applique or patchwork.
- Open foot. When free quilting, this foot allows you to easily move the product by hand.
- A foot with a guide, thanks to which you can sew even, parallel seams without preliminary marking.
Modern sewing machines are equipped with functions for embroidering ornaments, satin stitch, cross stitch, have programs for multiple lines, and contain an alphabet in several languages. And all kinds of decorative stitches make the work of crazy patchwork and quilting very easy.
More about quilting work
A sewing machine can greatly simplify the manufacturing process and reduce its time. You can also use a regular machine, however, it will not be very convenient. Manufacturers offer various modifications of their products, including special ones for quilting. They differ from the usual one in the following ways:
- The kit includes a special “walking” foot;
- The machines are equipped with an additional platform of larger area or the ability to increase the existing one;
- There is definitely a reverse function;
- Because quilting involves a large number of small details, additional installed lighting is required;
- For easier work, it is necessary to have functions for regulating speed and thread tension;
- If the machine is equipped with different presser foot pressing modes, the work will be much easier;
REFERENCE! To choose the right machine for your favorite activity, you can take scraps of fabric with you when purchasing and try out its steps right in the store.
Quilting is a wonderful technique that is like a real art. A properly selected machine will greatly simplify this process and allow you to create real sewing masterpieces.
Subscribe to our Social networks
Quilting ideas for inspiration (photo)
- Author: admin
Rate this article:
- 5
- 4
- 3
- 2
- 1
(11 votes, average: 5 out of 5)
Share with your friends!