Beading is a wonderful hobby that does not require a lot of money. It has been popular for a long time, so new, increasingly complex weaving crafts are constantly being invented.
One of these types is weaving trees from beads with your own hands. These are very large-scale and complex works, as they include a large number of elements. This article will discuss master classes on weaving trees from beads.
General order of formation
The process of creating the base structure occurs in stages:
- The first is that branches with leaves are woven. How does this happen? A certain number of beads are strung on a wire, for example, 10 pieces - they are moved to the middle, a loop is formed by twisting the wire approximately ten times. The next step is to repeat the action at both ends of the wire, while stepping back 1 cm from the twisted loop with bugles. In this way a branch with petals is formed. If it is necessary to add splendor to the tree, then construct 50-100 branches.
- Secondly, the clusters are connected to each other, forming a tree trunk. This happens in a neat one-by-one order, attaching one element at a time, and so on until a complete miniature giant is formed. A mandatory trunk holder inserted between the branches is a thick wire or a strong rod made of something.
- Third, a stand is prepared (deep or not very deep), where the created creation is placed, first filled with gypsum mortar.
Volumetric bead crafts
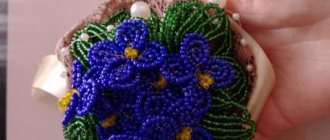
You can make all kinds of three-dimensional crafts from beads - toys, flowers, vases, figurines. Let's look at how to make daffodils from beads.
Material for daffodils:
- orange beads, white, green and yellow;
- green floss;
- thick wire for the barrel;
- white and green thin wire.
Making a flower:
- Conventionally, divide a piece of thin white wire 50 cm long into sections of 5 and 45 cm and make a loop in this place.
- Prick 8 pieces of beads onto the short edge of the wire, forming the axis of the petal.
- Beads are collected onto a long tail of wire and screwed to the axle according to the scheme - the arc wire is placed on top of the axial wire, taken under it and returned on top of the axle. The axis is kept straight.
- The beads are placed again on the long edge and screwed to the axis symmetrically to the previously made arc.
- Make 5 petals in the same way. Each one should have 1 axis of 8 beads and 5 arcs.
- Using the same technique, following the diagram, a core with leaves is made. The flower is collected and shaped.
Weaving technique training
Since there is a huge number of different trees, therefore, the scheme and design of each one is special, individual. Before preparing, let's take a look at what tools and materials are needed for the job!
- Wire (thin for branches and thick for trunk).
- Beads.
- Yarn, tape.
- Acrylic paints.
- Varnish.
- Gypsum.
- PVA glue.
- Scissors, nippers.
- Decorating elements - pebbles, floral moss, figurines, pearl beads, seed beads.
- The container where the structure will be located.
For needlewomen, many creative schemes have been invented, with the help of which you can design whatever you want.
Schemes in the photo
Let's look at different types of options.
Yin-Yang tree made of beads
The Yin-Yang tree is a combination of two colors of beads, white and black, symbolizing the feminine and masculine principles, as well as their interrelation and complementarity. Of course, you won’t find such trees in nature, but with the help of beads it’s easy to convey this idea.
You will need white and black beads, thin wire, a rod and a base.
- Cut the wire into pieces about 70 cm long.
- String 5 white beads onto the wire and form a loop in the middle, stepping back 1 cm on each side, form 2 more loops and continue until you have 7 loops on the branch. Wrap the twig with white thread or ribbon. Collect 50-60 white branches.
- String 5 black beads onto the wire and form a loop in the middle, stepping back 1 cm on each side, form 2 more loops and continue until you have 7 loops on the branch. Wrap the twig with black thread or ribbon. Collect 50-60 black branches.
- From small branches of each color, form larger ones.
- Gather branches of each color into a tree and twist their trunks together.
- Attach to the base using plaster, decorate the top of the base with a Japanese pattern, the Yin-Yang symbol.
Beautiful trees of love and fidelity
There is a sequence of formation and in order to achieve the goal, you must first have patience, perseverance, attentiveness and, of course, not miss the advice of professionals in this matter.
In yin-yang style
It is created by intertwining with each other, from two small intertwined similar options. Moreover, you can come up with two colors yourself, in this case black and white. Its originality lies in the fact that the trunk does not need to be painted or plaster, but only wrapped with threads. Then you need to place it in a round stand, strengthen it with plaster mortar and decorate it with the same beads. The technique is suitable for beginner needlewomen. We invite craftswomen to create a yin yang here by studying a step-by-step lesson.
Happiness made of beads and stones
Such a tree is believed to bring health, happiness, love and prosperity. If you use expensive stones in the structure, beads or beads that attract with their beauty and brightness, you will end up with a tree that attracts good energy and happiness will come in life. The most commonly used stones are rose quartz, aventurine, turquoise, sapphire, granite stone or mother-of-pearl plates.
Let's look at a simplified weaving method. First, 5 pieces of twigs with seven pebbles are created from wire - for the top. For the second tier - 8 branches with nine jewels and the third tier, consisting of 12 branches with eleven stones. Next, the clusters are connected to each other in groups and great “happiness” is formed. The roots are separated to the sides in the form of rays, then twisted for a stand. In conclusion, the created creation can be decorated in different ways: on a wooden stand, decorated with decorative moss, or plastered in a shallow container and the surface decorated to your taste. Follow this link, where you can easily take a master class on weaving a tree of happiness.
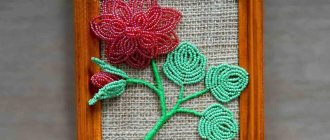
Amazing tree of love
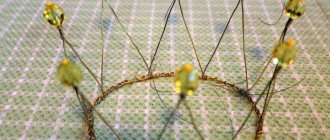
The idea is to make a piece of beads of different sizes in the shape of a heart. Symbolizes the fulfillment of cherished desires. It is woven in the form of flowers, petals using French weaving or parallel, using the loop method. An elastic thick wire is allowed, with the help of which the shape of the heart is formed and fixed. Give free rein to your imagination and you will definitely end up with a unique piece. Follow the link and find a detailed tutorial on how to create a love tree from beads.
Cherry blossoms
Sakura is the national symbol of Japan and the structure of the flower consists of five petals. The Japanese believe that each of the petals has its own purpose - health, prosperity, peace in the family, joy and love.
Sakura made of beads, alluring with its appearance, has never left anyone indifferent. Japanese style will perfectly decorate your home with soft pink shades and add warmth and friendliness to your guests. It can be made using a lush and bright loop method, or you can give it less volume, then the sakura will turn out delicate and fragile, or using French weaving, that is, creating large flowers using circular bead weaving. You can learn about making trees from a step-by-step description of various options for weaving sakura and final arrangement on a stand, decorating it in a variety of ways.
Delicate bride woven with beads
The name already speaks for itself. The bride is created from small branches, using white beads or large pearls. The technique is a loop technique with twisting several turns to create bird cherry inflorescences and petals. The “bride” bouquet, created from wire and beads, decorated with an elegant ribbon, looks very original.
Schemes for weaving trees from beads
There is no general scheme for creating an entire tree, just as there are no two absolutely identical plants in nature. It's more about the elements of a tree: branches, flowers, leaves, trunk. Assembly sequences and barrel processing options can also be described. But the arrangement of the branches should be chaotic so that the tree looks like a real one. The wire frame allows you to bend the branches in different ways, lower and raise them, so the finished work will have to be “combed” in order for it to become a real masterpiece of beadwork. Let's consider what elements craftswomen use to create beaded trees of different ideas.
Money Tree
To complete this work you will need not only beads, but also coins. If there is an imitation of Chinese money with a square hole in the middle, this is the preferred option: attaching the coins to the crown will be easier, since threading the wire into the hole will not be difficult. Many were left with pennies that were practically not used in money circulation. If the coins are shiny, then it is good to decorate the crown with them, but you will have to hang them last, gluing them with hot glue using a gun. It is advisable to degrease the coin so that it adheres well to the barrel. Then drip glue onto the crown and apply it, taking it in tongs, and press the money to this place.
Touching melted polyethylene is dangerous, as you can get severe burns. For the same reasons, you should not press the coin with your hands: metal has high thermal conductivity.
If you know how to solder, you can do it differently: start assembling each branch with a coin. It is advisable to find copper money, as this material can be soldered well. The coin will have to be cleaned, as well as the center of the wire. The center wire is soldered to the edge of the coin. It looks like an aspen leaf. If there are a lot of copper coins, then you don’t have to make beaded foliage. The wire extending from the coin must be strung with brown beads so that a twig emerges. A tree is made from such branches.
When there is nothing to solder with, you can drill each coin from the edge. This way it will resemble a leaf more than being glued flat to the green crown. Hanging by the hole, such a coin will be movable, which will add charm to the finished tree. When the wind blows, the coins will sway like aspen leaves.
Another beaded money tree is assembled without coins at all.
It is enough to have on hand chips or beads from a stone that brings wealth to the house
:
- topaz;
- peridot;
- citrine;
- aventurine.
The chipped stones go into work first, because they will become the ends of the branches and “leaves” at the same time. Stones, sharpened or faceted in the form of beads, are good to use as “fruits” of the money tree. It is better not to entangle a large bead with wire on top. It is better to string a single black bead onto the center of the wire so that it becomes the center of the fruit. Thread both free ends into the hole of the stone bead. Next, you should form sepals or just a twig. To make such a tree look beautiful, you need to make branches without stones, but simply with foliage, and then assemble everything into a single composition. Such a tree should be presented with the explanation that it “bears fruit” with a certain stone, which brings, for example, success in trade or prosperity to the house.
Blooming trees
We looked at one type of flowering tree - sakura - above. Now our task is to create a tree with flowers and foliage. Take for example acacia (mimosa), whose flowers are characteristically different from sakura. It is better to find yellow beads or beads with a matte, velvety surface. A sprig of mimosa flowers is woven like this: a bead is strung, then the green wire is twisted several times until a “leg” is formed. At a distance from it, another bead is strung and is also fixed by forming a “leg”. You need to make several of them, placing them on different sides of the center.
Mimosa leaves look like needles. To create such an element, take one green bead, string it on a wire, and then both ends of the wire are passed through another four to five similar beads. Next, the same number of beads is strung, and the free end of the wire is passed through all but the outermost one. So on the same wire it will be possible to form a whole mimosa leaf of 9-11 elements.
Each mimosa branch is collected from inflorescences and leaves. You need to try to make the flower clusters hang and not bristle, then you will be able to assemble a magnificent tree from them.
You can also collect trees from beads with large flowers. An example in nature is magnolia. The leaf of the plant is large, so we will assemble it from the central part, studded with dark green beads, on the sides of which we will make two arcs with the same beads tightly adjacent to each other.
The flowers of the plant are white; they can be made according to the same pattern, but connecting the arcs closer to the base of the flower. It is good to make branches from flowers and leaves by twisting the wire and wrapping it with brown floss threads. It is important to ensure that the thread turns fit snugly against each other.
Once the branches are ready, it's time to start assembling the tree. The magnolia trunk is solid and thick. For it, you can choose a core of thick wire, onto which you wrap several layers of masking tape to thicken it. The same tape must be used to secure the turns of the inserted branches. It is recommended to start assembling the crown from the top, since the tree trunk there is always thinner. As you move towards the bottom, you will wind more and more turns of tape, so the barrel will become thicker. You also need to tightly wrap brown floss threads over the tape.
Next, you can “plant” the tree in a tub and fill it with plaster, or make “roots” for it from the ends of the wire. To do this, take a small cobblestone that has a decorative appearance. The ends of the wire are from the lower branches, trunk braid, etc. this stone is wrapped around. In this case, the roots that will protrude outward should be trimmed with brown or black beads. It is better to cover the rest of the wire with imitation earth or moss.
Autumn trees
In summer, almost all maples are the same, but autumn paints them in different colors. A riot of yellow, red, crimson, and orange colors can be found in a maple grove, but the most amazing are the leaves, which simultaneously contain three colors: green, yellow and red. We have to weave a maple leaf of a similar species.
The work is done in parallel weaving
:
- one red bead is strung in the center;
- two similar beads are added to its sides;
- both ends of the wire are passed through them, and a triangle is obtained;
- three beads are laid out - red, yellow and red - in a row, where two ends of the wire are passed;
- the operation is repeated, but with two yellow beads located between two red ones;
- the next row contains only three yellow beads;
- then the wire is passed at both ends into two yellow beads;
- the last bead of the sheet is green, and behind it the wire is twisted to secure the work;
- According to a similar scheme, the second “foot” of the petal is assembled, but on the fifth row (of 3 yellow beads) you need to hook the wire to the already finished “foot”, also at the level of its fifth row;
- on the other side, another “foot” is attached symmetrically;
- two more paws are made to get “fives”;
- At the discretion of the worker, two more shortened legs can be made, since in nature a maple leaf sometimes consists of 5 full and 2 reduced veins, and not just 5.
Having understood how to collect a three-color leaf, any craftswoman will be able to make monochrome leaves for her maple grove. For one tree you will need to weave more than a hundred identical leaves. For a natural look, you can give them different sizes.
Twisting the leaves into branches and the branches into the trunk is done using the traditional method. If there is a large amount of wire in the barrel, you don’t need to add anything, but if it seems a little “thin,” then it’s worth introducing a thick wire into its center.
A tree of this scale may turn out to be too heavy to be supported only by plaster in a tub, then it is worth creating something like roots: twist the ends of the wire around a heavy stone, which is placed in a vessel that serves as the base of the work. To fix the stone, it should be filled with plaster or even cement. Treat the surface after the gypsum has hardened.
An autumn tree in nature is surrounded by fallen leaves. You need to take the time to collect a few more leaves to put them at the foot of the work.
Late autumn is characterized by a beaded tree with fruits, but without foliage. This could be rowan and viburnum, caught by frost. Bunches of berries are made of red or orange beads. A single bead becomes the center of the berry. For rowan, a black bead is chosen, for viburnum, a red one. It is strung on a wire, after which both ends are passed into a large bead that imitates a berry. The ends of the wire coming out of the bead are twisted into a stalk. Such stalks are combined into a bunch. Crown it with a well-expressive snow cap, created from white beads strung on wire according to the principle of sakura petals. Their size must be chaotic in order to imitate nature.
It’s a good idea to cover the tree trunk in places with cotton wool, and lay it down the base to imitate snow. The ice base can be created from transparent beads, which will look even more magical than cotton snow.
DIY beads and sequins
A peculiar tree that does not look like a picturesque one, but it looks beautiful and original. The modification is created in different ways, for example, willow, birch, autumn from sequins, sakura looks extraordinary with pink sequin flowers, a tree with red beads and green sequin leaves. As you may have guessed, you can use a fantasy of different figured sequins, which will later become exclusive in your home collection.
We invite you, dear needlewomen, to create according to nature and the seasons.
Autumn mood
With the arrival of autumn, as you know, nature takes on a golden appearance. Therefore, beads of the following shades take part in weaving: yellow, orange, gold, and sometimes light green. All these colors can participate in the creation of a single tree, smoothly transitioning from one color to another. You can use a loop technique for leaves, or you can weave maple leaves, then connect them and shape them in their likeness, planting them in a pot of plaster. You can study a detailed master class by following the link: delightful autumn compositions.
Love tree
Making a heart-shaped product with your own hands and giving it to a dear person, for example, a mother or friend, on Valentine’s Day will be an excellent gift.
A detailed master class will tell you how to create a beautiful decoration and at the same time have a lot of fun. It is very good to involve children in this work; they will not find it monotonous, since the craft is unusual and the process is interesting.
Preparing for work
Before you start beading, I advise you to purchase a bead spinner. This will make your work process easier. You will need the following material:
|
and:
|
Video heart made of beads
Master class on creating a heart from beads
In this process, two colors of glass beads are used - white and red.
Flower
You need to make 7 flowers from white beads.
- Fold the 80 cm long wire in half, but not in half. Make one tip 10 cm longer. We collect seven beads on the spinner, lower them to the fold and twist them into a loop with three turns.2. Next, we collect 17 pieces of bugles and make a loop-shaped grip along the top and twist it three times. The petal is made from two loops.
3. Make the third loop of thirty beads. Look at the bottom photo to see what the petal should look like.
Important! Twist all the loops three times, then the flower will turn out without a large space in the middle. A small hole can be decorated with some kind of bead.
4. We weave the second petal in a similar way. The leg of the twist should be approximately 1.5 cm and only then we form a loop.
5. Connect them so that the second lies slightly on the edge of the first. We weave three more petals in the same way. This is the flower you will get.
6. Using the same principle, we weave 13 flowers from red beads.
Branches
You will need to weave 14 white branches, and 20 red branches.
| We string a rice-shaped bead onto the middle of the 80 cm wire and twist it seven turns. |
| We stretch the pearls from one side of the wire and bend the loop about 1 cm, twist it to the end of the loop. Don’t forget to twist the formed loops with beads between each other in pairs of turns. |
| We do the same with pearls at the other end. The result is this part of the twig. |
| By alternating, we further create small elements of branches from the beaded accessory. We collect about 17 white beads on the spinner and form a loop. On the other side, we will make a loop from a transparent droplet. You can see how it looks in the photo. |
| You can finish weaving a twig with different beads at your discretion. For example, to weave a branch like the one in this picture, add a rice bead, a pearl, and six white beads in the shape of a loop. |
Lay out all the beading pieces in front of you. We will put the whole composition together.
White birch
A woven birch tree, either made of beads, stones or sequins, looks very fascinating.
It is especially beautiful when using different shades of green. The height of the product can vary from 25 cm to 50 cm. Detailed instructions can be found here: white birch made of beads with a diagram and photo. The technique is looped, branches are formed of different sizes. For example, a small birch tree can be woven in this way:
- Thread a little glass bead onto a 60 cm wire, twist a loop four times out of five beads, then form two similar loops.
- You will get a small twig and continue to weave it using a loop method on a segment of 5 cm, picking up five beads for one loop.
- These loops need to be formed in 12 pieces and the third branch is woven on the remaining piece of wire.
- The result will be one branch consisting of three small branches. It follows that a birch tree will look beautiful with such clusters formed on one leg and eliminates excessive thickening.
Video tutorial on Russian birch with beads
It is large in size and is woven using a different technology, with thicker branches. The process is very simple:
- A large number of beads are collected onto the wire and ears are created from seven glass beads, formed in a row of 12 loops or more.
- Then bend the wire in half and twist the loops together.
- A lot of such branches are made (60 pieces) so that in the end you get a lush tree.
- The barrel is made in a very interesting way, painted in an artistic style with white gouache, and finally coated with acrylic varnish.
Glowing tree
A tree with lighting will look very impressive in a residential building or office space. In a children's room it can replace a night light, and in the bedroom it can create a cozy fairy-tale atmosphere. The product should contrast with the interior. In a house with warm walls and floors, a tree made of blue beads with blue or green LEDs will look good. Cool colors in the room will sparkle in a new way thanks to a beaded plant in warm shades with yellow or red lamps.
The DIY glowing tree master class is simple. For this you will need to prepare the necessary materials:
- 250−300 g of beads in different shades of green, blue and dark blue;
- thin strong wire;
- sharp scissors or wire cutters;
- gypsum, containers for it;
- LEDs;
- varnish and paints for covering the barrel.
Blue beads are poured into one container, green beads into another. First, the tree trunk is prepared: fifteen pieces of wire are cut, twisted together and plastered. Gypsum is diluted with water to a liquid state. A barrel is inserted into a candy box, filled with plaster and left for a day. The next day, it is removed from the mold and placed on a stack of old newspapers or unnecessary paper to get rid of excess moisture.
Winter in the snow
The fairytale tree is woven from silver wire with white beads or silver, transparent beads. The technique is a loop, or it can consist of forming sticks by stringing beads onto a wire of about five centimeters, and then using one of the ends to pass through half of the collected pieces of glass. You will get a tight loop in the shape of a stick. And then again with the end of the wire we pass through the remaining part of the beads and two branched branches are formed - one central, the second lateral. In this sequence, we finish the weaving, again picking up a certain number of beads and using this technique we complete the structure, consisting of three or four sticks on a branch. You need to weave a lot of small, medium and large branches. Take two elements of different sizes and twist them together. Finally, the branches are gathered together using thick wire and the crown of the tree is formed. As a rule, the tree is eventually planted in plaster.
We have prepared a training especially for you with step-by-step instructions for making an ice tree.
Tree of happiness made of stones
Let's look at a simple step-by-step master class on how to make a beautiful tree from wire with chips without plaster. The most commonly used stones are turquoise, sapphire, mother-of-pearl plates, rose quartz and others.
Preparatory stage
To work you will need:
- beaded wire 0.4 mm – 0.5 mm (any color);
- ruler;
- pliers;
- pebbles (mother of pearl plates). You can use expensive stones, then your composition will be unique;
- stand;
- glue "Dragon";
- decorative elements for decoration (moss, sisal or transparent crystal glass, figurines);
Video master class on weaving twigs – part 1
Step by step lesson for beginners
We start by weaving the top. It is necessary to make five branches, on each of which there will be seven fragments of mother-of-pearl or other stones of your choice.
| 1. We string ten pieces of chips onto a wire 60 cm long. |
| 2. We measure 20 cm from the edge of the wire (this will be the trunk of the branch, we leave it with a tail on the left side) and from that place we begin to twist the mother of pearl in the form of a loop up to six turns, the length of the twist will be approximately 1 cm. |
| 3. From the loop we made, we step back to the right two centimeters, thread the pebble through and twist in a similar manner up to six or seven turns. With the third chip we do the same technique. |
| 4. The fourth pebble will be the center of the branch. We step back from the loop of the third pin by two centimeters and twist it to the very end. This created a long top. |
| 5. We continue to weave loops with mother-of-pearl, twisting them at the same level as the previous ones. We repeat the process of twisting with the chips, but now heading downwards, forming a bunch. |
| 6. You need to weave 5 such branches for the top. |
7. Now, in a similar way, make the remaining components of the bunch for the composition of happiness in this order:
Place the woven branches in front of you in separate groups and proceed to the next steps. |
Assembling the composition
Let's start forming and decorating the structure. The sequence of assembly is in groups: from the top to the end of the branches we have woven.
Video master class on wood assembly – part 2
Select the most beautiful branch from the top row, position it slightly higher than the rest when assembling in a circle of branches. Carefully apply one piece at a time and twist up to five times, straightening the clusters beautifully.
We take the branches woven for the first tier (we have six of them), twist two of them together in four turns. You will get three pairs.
In a similar way, we repeat the process of twisting from the second and third tiers, it turns out - four pairs of two together.
Let's put it together into a single whole. We apply alternately woven branches from the first tier to the crown, laying them in a circle and twisting the rod up to two centimeters. Arrange the clusters nicely around the top.
Next we draw up the second and third rows of branches, each time going lower along the base of the trunk, using pliers to twist the wire. The branches need to be arranged beautifully, creating splendor. It turned out to be a big tree.
Finally, all that remains is to decorate our composition and place it on a stand.
Happiness tree design
Let's start working with the shoots. They need to be distributed in different directions in the form of rays.
We twist them 2 cm long to form stability. We create an imitation of roots.
Approximately five or six ends of the wire will show the spines. The tree is completely ready for approval on the stand.
The support can be made of stone, wood of any shape - round, oval or square. We plant the tree using polymer glue, which is used for repair work at home. Try to install it evenly and nicely, as the glue dries quickly. Decorate your composition using the decorating elements you purchased. I am sure that your invention turned out to be very original and unlike others.
Decor of a tree of happiness made of stones with figurines
Stay with us and check out the next lesson on creating a tree of happiness from beads and sequins - sakura.
Blooming apple tree
You can create a similar composition in two options, the first is using the loop technique, the second option is circular weaving. Externally, these woven trees are very different from each other and each one looks beautiful. Apples are created from large beads or cold porcelain. In order to learn in detail how beaded fruit trees such as apple, cherry or citrus fruits are made, you need to watch several lessons on our website.
Weeping Willow Beading
This tree has a very interesting and easy technique. The process consists of stringing beads onto a wire and then scrolling them one by one in one row. Many willow branches are made (from 200 to 500 pieces), then they are collected together, the trunk is attached and placed on a stand. You can decorate the pot with artificial moss, grass, pebbles, and flowers. After the work done, our crybaby looks simply amazing. You only need to stock up on green beads, wire, desire and patience to achieve the desired result.
Sakura made of sequins
It is known that the eastern tree is a symbol of love, and where there is love, there is happiness.
Sakura made of sequins and beads
Necessary materials:
- green or yellow beads;
- flower-shaped sequins;
- bead wire;
- three pieces of thick aluminum wire about 40 cm;
- chestnut yarn;
- scissors;
- gypsum;
- tree pot;
Sakura weaving video
Master class on creating twigs
Our branch should consist of seven flowers.
| We string one flower with beads onto a 40 cm long wire. We fold the twig in half and scroll the flower up to seven times. We retreat 1 cm from the twist and bend the wire; the next sequin element will be located there. |
| In this way, we create a branch of seven sequins with beads, alternating the retraction of decorative elements from both ends of the wire. |
| It is necessary to weave 54 pieces to build a tree. |
Step-by-step assembly of branches and forming a tree
- We take three branches (the middle one should be higher), connect them together and twist them. We are weaving three such sketches.2. We twist the wire extensions to the very end. You will get a tight branch if you take two wires together separately and intertwine them with the other.3. Next, we take five branches and connect them together in a similar way. You need to weave five such sketches with sequins.4. The rest of the sketches are composed of four sakura branches, five compositions each.5. You should get three separate bouquets.
Creating a tree from branches
| We take three small branches, consisting of three, and wrap yarn around a trunk two centimeters long. |
| Then we apply three thick pieces of aluminum wire to it and continue to wrap the threads around the barrel. Using this method we create a rod for sakura. |
| We apply the remaining flower bouquets to the tree trunk one by one to completely form the tree. Once all the branches are gathered together, you need to make a thickened sakura trunk using threads, but not completely. |
| We bend the remaining ends of the wire to the sides for a stand. Arrange the branches beautifully before placing them on a stand. |
| Now you need to fix the composition in a pot of gypsum mortar. Make the mixture in a separate container and pour it into a wood mold. As soon as the mixture begins to harden, you need to plant the tree in time and start decorating. |
| You can use paint, artificial grass or small pebbles as a design. Imagine something of your own and your sakura will become especially beautiful and extraordinary. |
Beautiful sakura made of beads and sequins will be an excellent decoration for your child’s nursery.
Beaded money tree
Many people want to create a money talisman from beads and decorate their home. At the same time, hoping that it will subsequently bring good luck and prosperity to the house. It is woven using coins and using green or gold bugles, which will give a special feature to such a work. For you, needlewomen, how to build a money tree, as well as a video lesson on the “golden miracle”.
A wide variety of coins are suitable, Chinese, decorative, real, as you please. Taking real coins, you can drill a hole at the edge; decorative ones are already made with a hole. The technique used is different, because everyone has their own taste and certain weaving skills. For example, branches are woven in a loop (the more branches you weave, the more magnificent the tree will be), looped with turns, and clusters are also created in a parallel way. Or you can even weave it altogether, just by using decorative coins, without beads.
Video lesson on weaving a golden miracle
We create a summer tree from beads. Luxurious cherry with fruits
Do you know, dear friend, that the “cherry blossom garden” has long served as a talisman against evil forces? If there was no orchard growing near the house, they said that devils were walking there. Cherry has always been considered a “divine tree”, and its berries are a symbol of girlish beauty and gaiety.
Let's make an original tree-amulet from beads - let it protect the house from bad weather!
You will need:
- dark green and red beads,
- wire with a diameter of 0.3 mm,
- floral tape,
- flowerpot,
- gypsum,
- artificial moss and decorative gravel.
1. Unwind 90 cm of wire. Pick up five beads and make a loop. Then string about 20 more beads onto the wire and twist the second loop around the first one.
2. Weave two more leaves on the sides. String a red bead from each end of the wire and twist the wire several turns. These are cherries
Pay attention to the diameter of the cherries - the red beads should be slightly larger than the green ones
Make two more pairs of leaves and a few berries. The cherry branch is ready.
3. When there are a sufficient number of branches, proceed to assembling the cherries. Connect several branches together and form them into a tree. Wrap the trunk with floral tape.
4. Place the beaded tree in a solution of plaster and water poured into a flowerpot. Hold it with your hands until the plaster hardens.
A colorful cherry tree will be a wonderful talisman, and also a stylish interior decoration.
And here is a sophisticated lemon tree. And a weeping willow.
May every season be magical, full of inspiration and beauty.
Read also:
- Money tree made of beads,
- Volumetric animals made of beads,
- We weave flowers from beads.
Lush wisteria
It is very beautiful in appearance with sweet scented flowers, with hanging branches like a vine. It grows in China, in the forests of Japan. Shades of purple, pink, and sometimes mixed with yellowish and green leaves are used in beadwork. Our tutorial on creating delicate wisteria will tell you how to make a composition using a completely simple technology. The branches are woven in a looping manner by placing many beads on a long piece of wire, then twisting the process to form a branch. Having made a large number of branches, they need to be fastened together. The more clusters, the more luxurious your craft will look, planted in a stand with plaster mortar and decorated with a unique decor. We suggest following the link flowing wisteria, where you will see photos of beautiful trees with detailed instructions for creating your creation.
Basics of technology
Weaving trees from beads for beginners starts with finding a suitable pattern and purchasing materials. Both can be easily found on the Internet without leaving home. Looking at the catalog, you will be surprised not only by the color range of beads, but also by the variety of their shapes. Naturally, prices will vary significantly. The reason for this is the texture of the material. Beads can be made from:
Beads come in a wide range of colors
In addition to multi-colored beads of any quality, you will need to stock up on what to string them on and special needles for ease of setting. Don't risk taking on a global project right away? Practice the little things. Weave a keychain onto a bunch of keys or as a decoration for your mobile phone.
How to weave?
There are several beading techniques:
- needle-shaped;
- volumetric parallel;
- flat parallel;
- hand weaving;
- French;
- monastic;
- looped;
- mosaic;
- mesh;
- brick stitch.
There are several beading techniques
For those starting their career in this field, it is recommended to use the usual stringing of elements on a thread. To obtain a pattern, you can alternate colors in a certain sequence. A variety of bracelets and other baubles are made using this principle.
Features of choosing a base for stringing
The basis for bead products is thread, fishing line, and wire.
According to the recommendations of MK, beaded wood is woven using the latter, and here it is very important to choose the right thickness. Wire that is too thin will not withstand repeated twisting
Popular articles Magic lantern
Too thick – it will not allow for quality twisting. Experts consider soft copper wire to be the best option. Here we will prepare skeins of it.
Soft Copper Wire for Beading
Schemes and their reading
Most bead crafts are assembled according to specific patterns. However, beginners should not dive into weaving patterns to create trees from beads. There will be more benefit from video lessons than from parsing incomprehensible icons, which will take a lot of time to read, although in the future it will be useful to get acquainted with the symbols.
An example of a pattern for weaving a tree from beads
If you delve into the essence of what is drawn and written, it turns out that there is nothing supernatural in these tables. The numbers indicate the number of the row or element; the outgoing arrows indicate the direction of weaving. Several beads enclosed in one circle are a recommendation for combining them in the next row into one element. It happens that in the diagram two arrows come off from one bead at once. This means that the appropriate number of elements must be added to it. Video programs will help you study all the intricacies in more detail.
To make it convenient
When doing beading on a table, cover the work surface with a linen napkin so that it is not slippery. This will save you from accidentally scattering tiny beads all over your apartment.
Several master classes: DIY bead wood for beginners
“Cherry tree made from beads is the most suitable option for beginners, since the work involves beads of a single soft pink color.”
Beading large crafts is not so much a complex process as it is labor-intensive. In the case of creating a tree, it is divided into several stages. The first of them is preparatory. On it you will prepare the necessary consumables. Next comes the actual work. The beads will need to be strung in a certain sequence on a wire, twisted into various loops from the blanks, formed into leaves, branches, flowers, and decorated with a trunk and crown. Fixing the finished product in the stand will complete the work. Now in more detail about popular trends.
Training ground for beginners
Sakura tree made from beads is the most suitable option for beginners, since the work involves beads of a single soft pink color. To create the first branch you will need a meter-long piece of wire. 7 beads are strung on it so that they are strictly in the middle of the base. Now you need to connect the ends of the wire under the outer beads and twist them so that an element resembling a petal is formed. We separate the ends of the wire on different sides and, stepping back 1 cm from the first petal, repeat the above-described manipulation. Your branch should have 11 petals. Now we put both parts of the wire together and twist the petals in pairs. The end result should be a real twig. One sakura tree requires 90 similar branches.
Dionysus
Where did this name come from? In ancient Greek mythology, it is believed that this is the god of the fertility of vegetation, viticulture, which means that the difference in appearance is the presence of small clusters. In this work you can get creative with the color scheme; usually bright colors are chosen and woven in the form of large berries of any shape. Beading occurs using a loop technique consisting of three blanks with five loops. As a result, these three branches are connected by twisting and a bud is obtained. Then two identical buds must be twisted together and a beautiful cone is formed. The ancient Greek Dionysus is created from two colors, for example, red - cones and green - petals.
Interesting fact
Tradition says that each tree carries a miraculous sign and is a specific talisman. For example, pine is characterized as increasing productivity and prosperity in a career; sakura is a symbol of tenderness, love, devotion and purity; Rowan - protects against negative energy and improves health; monetary – luck and prosperity in the house; yin-yang - peace of mind and harmony of opposites, and so on.
Maybe someone is now learning this type of folk art, and later will reach the professional level. And of course he has an idea about the many different types of trees, all that remains is to choose what he would like to make. The size of the product can range from small to large, it all depends on desire and imagination.