DIY autumn crafts from pumpkins for school
Every student wants to bring a real masterpiece to school that both teachers and children will like. After all, we all love when we are praised. Therefore, before you sit down to make an autumn pumpkin craft for school, consider a selection of works.
With a set of simple acrylic paints, you can create a beautiful and vibrant masterpiece.
Using a regular brush, cover the pumpkin with a thin layer of white paint. This is necessary so that the bright colors lie more easily on the pumpkin.
After the white layer, apply colored paints in stripes so that each strip overlaps the previous one.
School-age children are already familiar with such a holiday as Halloween and want to learn how to make such an attribute as Jack’s scary head. First of all, you need to cut off the stem and remove all the pulp inside the pumpkin. After this, the creative process of cutting out the muzzle begins.
There can be an endless number of options for Jack's face - you can take a sample or come up with it yourself.
You can combine pumpkin crafts and creating a beautiful ikebana. Such a bouquet can be an original and creative gift or work for an exhibition.
Materials:
- 1 pumpkin
- 1 glass of water
- Knife
- Scissors
- Floral sponge
- Natural flowers
First cut off the top of the pumpkin with a knife, and then remove the pulp. We put a floral sponge inside, having previously created the necessary shape.
Place the sponge into the pumpkin and fill it with water. It must be soaked so that the flowers can stand for more than one day, or even more than a week. Trim the stems of each flower.
Such a bright bouquet of crafts can decorate any exhibition or room.
Having a rich imagination and a little creativity, you can make a funny face out of a pumpkin. We cut out details from colored paper - eyes, lips, tongue, and you can attach them with glue.
You can also use acrylic paints to create funny faces.
DIY pumpkin crafts - photo for kindergarten
And these photos of pumpkin crafts on the theme Gifts of Autumn are suitable for the competition; preschoolers will be happy to make them for the exhibition.
Pumpkin snail
Here are two options for how to make an autumn craft for your garden using vegetables and pumpkins, using this wonderful snail as an example.
Kolobok made of plasticine and decorative pumpkin
Pumpkin crafts for kindergarten on the theme of Golden Autumn
Painting a pumpkin with a permanent marker will look bright. This is a marker for CDs. With its help, a DIY pumpkin for a kindergarten exhibition can turn out to be unusual and will not require much time to make. You can complement the pumpkin look with various accessories.
To make such a pumpkin craft for a kindergarten for an exhibition, we don’t need much.
Materials:
- Pumpkin of the desired shape
- Carrot
- Parsnip
- Cutting board
- Knife, glue, marker
- Toothpicks
- Black paper
- Accessories (glasses, hat)
Vegetables need to be cleaned of dirt, so wash them thoroughly. Trim off the thick edge of the parsnip. Insert a toothpick into the middle of the cut and use it to attach the spout to the pumpkin.
The carrot spout can be attached in the same way to another pumpkin.
Use a marker to draw a smile under your nose
You can cut a mustache out of black felt and glue it to the pumpkin to create the look of Mr. Pumpkin.
It will be interesting for kids to create a cartoon character from a pumpkin with their own hands.
One of the favorite cartoons of kids is the story about Thomas the Tank Engine. So we’ll make it out of pumpkin.
Materials:
- Pumpkin
- Acrylic paints
- Brush
- Glue
- Eyes
- Colored paper
- cotton wool
- Scissors
- Toilet paper roll
The pumpkin must be cleaned and dried. Paint the surface of the pumpkin with blue paint. Most likely, you will have to paint in two stages.
We cut out a large circle from black paper, and another circle from white paper, but a little smaller. We glue the eyes to the white circle, and draw the nose and eyebrows.
Cover the sleeve with black paper. Glue the black circle onto the pumpkin.
We made a chimney out of the sleeve, stuffing some cotton wool into it to simulate smoke.
Pumpkin crafts for kindergarten and school exhibitions
We'll start with products that the little ones can do. Of course, you can’t do it without the help of your parents. But how great and valuable it is when mothers and fathers work with their children. Remember, joint creativity not only develops your baby, but also strengthens your entire family.
Probably the easiest way to make autumn souvenirs from such a sunny vegetable is to draw faces on it and decorate it with additional attributes. Look how cool the boy and girl turned out. Just take two good fruits, one smaller, the other larger, and draw eyes, a nose, a mouth and hands. Complete everything with a straw hat and your work is ready.
You can take not a whole pumpkin, but half of it. Draw a shell on top like a turtle, and make legs and a head from potatoes. Your Tortilla Turtle is ready!
Don't forget that orange carriages are especially popular. For this product you will need a small fruit. You need to cut out the windows in it and pull out all the pulp. Make the wheels out of carrots.
Or you can make a house like this, decorating everything with autumn leaves. And the residents will have small peeled onions. Cool idea!
How do you like this house for a spider made from potatoes? It’s just cool. Make a web from ordinary woolen threads. Collect herbs, rowan branches and decorate everything as you wish.
Now I propose to make you such a beautiful snail. Moreover, you will need not only pumpkin, but also yellow zucchini. Plus sparkles, sequins, ribbons and other decorations.
If you have your own garden and the harvest was successful, then select two large fruits and create such a graceful owl. The only work involved is cutting out the wings, muzzle and gluing them.
Or just do some cutting. Draw what needs to be removed directly on the pumpkin and proceed. This is what a cat can turn out to be!
I also really liked the composition with leaves. You can make a very cute chicken. Just little children can cope with such a task.
Or make a whole family of pumpkin men with your child.
Now I suggest you watch a master class on making a candlestick in the shape of a cat. Such work will deserve a lot of applause, and after the competition do not rush to throw it away. After all, Halloween is coming, so the candlestick will look very cool in the country house or in the fence of your home.
Candlestick in the form of a cat
You will need: a large pumpkin, black gouache, a brush, a spoon, a knife, cardboard for the ears and tail, a pen, fishing line for the antennae.
Work process:
1. Take a pumpkin and cut off the bottom so that your craft will stand stable in the future.
2. Using a spoon, scrape out all the insides of the fruit.
3. Now use a pen to draw the cat’s face.
4. Carefully, using a knife, cut out the muzzle along the contour.
5. Paint the pumpkin black.
6. Cut out ears and a tail on black cardboard. Attach the pieces to the pumpkin using glue or toothpicks. Cut out a mustache from the fishing line and glue it to the face.
7. Well, place and light a small candle inside.
Well, isn't it beauty? Simply a masterpiece!
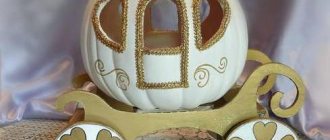
DIY pumpkin carriage: step-by-step master class
Pumpkin is not only a tasty, healthy and medicinal product, a material for school crafts, but also pumpkin has long been the hero of the fairy tale about Cinderella. Everyone remembers how at midnight the girl’s carriage turns into a pumpkin.
When you mention pumpkin crafts for a school competition, many people will see a pumpkin carriage before their eyes. Let's look at how to make a craft for an exhibition below.
Materials:
- Pumpkin
- Wire
- Plasticine
- Paper
- PVA glue
- Paint – gold or silver
- Knife
Let's start with the wheels. To do this, we make wheels and spokes from wire, fixing them with plasticine. We cover the wheels with white paper. The wheels are connected to each other with wire and painted.
Before proceeding to the cabin, cut off the top of the pumpkin and take out the insides. The carriage can also be pre-painted in any color. When the paint dries, draw windows on the pumpkin and, if you like everything, cut it out.
Using a golden outline we create a rich look for the carriage.
Let's attach the wheels to the carriage cabin and put a candle inside.
Some pumpkin carriages amaze you with how much skill and imagination the craftsman has.
Photos of pumpkin crafts
Read here - Crafts for the little ones - an overview of creative ideas and features of learning the skill. 115 photos and videos on how to make the simplest ideas
Did you like the article?
0
DIY autumn pumpkin composition
Decorating your home interior in autumn style is not at all difficult. Autumn is associated with yellow leaves, pine cones and, of course, harvest. But potatoes are unlikely to become a beautiful decoration, but pumpkin is exactly the vegetable that can be used for decoration.
The principle of creating compositions from pumpkins is the same, but the results are completely different, because the main point in this craft is the presence of flowers and imagination.
Materials:
- Pumpkin
- Floral sponge
- Scotch
- Scissors
- Flowers
- Leaves
Cut off the top of the pumpkin and clean out the insides.
You can additionally remove excess moisture inside the pumpkin using paper napkins.
Take the required size of sponge and soak it in water
Putting a sponge into a pumpkin
Wrap the pumpkin in foil using tape to secure it.
Tip: if you decide to use artificial flowers, then you don’t need to use a sponge or do not wet it.
When the base is ready, you can begin the most exciting part - decorating with flowers.
In this place you can use all kinds of decorative elements - flowers, twigs, leaves, spikelets. The result should be bright and unusual.
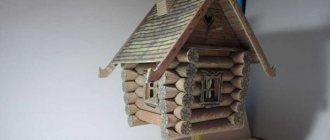
DIY pumpkin crafts for school exhibition
This healthy vegetable comes in a wide variety of shapes, colors and sizes. Thanks to its half-empty internal cavity, the pumpkin looks like a house in which various small rodents can live.
Let's study the photo together and understand how the craftsmen made such wonderful decorative houses out of pumpkins.
Pumpkin houses
Did you notice? Dreamers used simple materials at hand, all sorts of twigs, blades of grass, toothpicks, and added small exquisite details to more complex models.
The other master went further. He created a pumpkin box using scraps of fabric and his indefatigable imagination. A large vegetable served as the basis for an unusual craft, and small pumpkins, with the help of additional details, turned into funny, touching kittens.
Pumpkin box
Imagine, you can create a real pumpkin princess from two orange “heads” and a bunch of bright rags.
Pumpkin Princess
Don't believe me? Look at the photo! Also, take note of the idea of how to use the garden gift to create a real house for Princess Cinderella.
House for Cinderella
Oh, what a wonderful fantasy! The cheerful snail was made from an orange pumpkin and half a zucchini.
Pumpkin for Halloween
Making a pumpkin for Halloween is a standard use of a vegetable as garden or home decor. It's very easy to do:
- Cut off the bottom or top and remove the inside with a spoon.
- Draw a face with a felt-tip pen.
- Along the contour of the picture we cut out the eyes, nose, and mouth with teeth.
- At the holiday, for greater effect, a small candle is placed inside the pumpkin head.
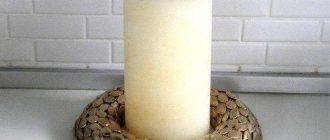
Candlestick
- The tail needs to be removed. We trace the candle with a felt-tip pen to know the diameter of the hole.
- Cut a hole on the top of the head for the candle. It should fit tightly into it. Remove the insides of the vegetable if desired.
- We glue decor to the future candlestick: leaves, cones, berries on the branches.
- Insert a tall candle (to prevent the decor from burning).
pumpkin vase
- Cut off the top and remove the pulp.
- Since the cup will be inserted inside, we cut out a recess for it.
- Insert a glass and pour water. The unusual designer vase is ready.
- You can put not only cut flowers in it, but also potted flowers. Succulents look very original. You can also place artificial flowers in pastel or natural shades. White, yellow, orange bouquets with bright juicy greenery are especially impressive.
We wrote about the varieties of succulents in this article.
It is appropriate to place such a composition in a banquet hall, on a festive table, or to decorate the yard. Vases made from a rare variety of white pumpkins are very impressive. They are very simple in execution, but at the same time they look noble.
In the same way, you can make a box or container for pepper, salt, and cereals. They can be decorated with ribbons, lace, pieces of fabric or even simple twine. Try to choose a fruit that will be as stable as possible. Symmetrical vegetables look best. Ideas for vases, boxes and other containers can be drawn from the decor of your room or simply indulge in a flight of fancy.
Pot
This is a good way to serve food:
- Cut off the cap. Clean out the middle.
- We leave the walls of medium thickness.
- Pour any dish into a saucepan. It can easily withstand heat treatment.
- When serving, don't forget to cover the dish with a cute lid with a tail.
Spectacular pumpkin carriage
Such pumpkin decorations look elegant, stylish and even fabulous. A vehicle for a princess can be easily made without spending a lot of effort and money. The result will delight you and your loved ones - the magic carriage on which Cinderella went to her first ball will be located in the house or on the plot.
- You need to take a round, slightly flattened voluminous berry. It should be almost perfect in shape.
- Cut off the top. We remove the entrails.
- We draw and cut out windows and carriage doors.
- An important element of this craft is wheels. These can be small round pumpkins, or you can make wheels from wire.
Snail
Using long toothpicks, connect the parts together, and then complement the picture with all sorts of decorations and a laughing face. Don't forget to give the snail a soft bedding of fallen leaves.
The kids love the fairy-tale character from the movie about Pinocchio - the kind turtle Tortilla. It's easy to create! To work you will need half a pumpkin, four potatoes, a hat, glasses and other small additions. Look at the photo, get charged with positivity, create your own cartoon turtle.
Pumpkin turtle
To bring the next idea to life, you will have to invite your dad or grandfather to your desk. Using one knife, you can create a carriage for Cinderella out of a pumpkin, and then complement the main part with four wheels made of watermelon rinds.
Pumpkin carriage
A large hollow pumpkin can turn into a beautiful basket in 3 minutes. Cut out an openwork handle with a knife, fill the empty space with fruits or gifts of autumn, and a natural basket will become a bright spot at the school exhibition of handicrafts.
Basket
Kids love Smeshariki. One of my favorite characters is the funny grumpy Kopatych. Watch how the young master made a cartoon character for presentation to his own kindergarten.
Kopatych
The following craft is made by the hands of a real artist. An oval pumpkin was turned into a pineapple, and natural leaves and a candle turned an ordinary vegetable into a decorative lamp.
Applique of pumpkin seeds on the theme of Autumn
If you are going to make a craft from a pumpkin, then most often you have to free it from the insides, then the question may arise - where to put the seeds. And since we often feel sorry for throwing something away, we can consider how to make an applique from pumpkin seeds. Wood can be a great applique idea.
First you need to rinse them thoroughly and dry them.
The seeds will look beautiful on the applique if you paint them with different colors.
If you need a small number of seeds for work, you can color them individually.
But if the number of seeds is large, then place them in a bag, add paint or dye to it and mix. Paints can be anything - acrylic, gouache, oil. When the seeds are sufficiently saturated with paint, place them on paper and let dry.
The tree applique made from pumpkin seeds looks beautiful.
Making such a panel is quite simple - draw a tree trunk on a sheet of paper, or make it out of colored paper. Place pre-colored seeds on the branches of the tree.
Add a few seeds under the tree, simulating fallen leaves.
In addition to wood, you can come up with other themes for creating an applique from pumpkin seeds.
Small pumpkin crafts
Kids and their mothers love to make crafts from such a small pumpkin for kindergarten; with their own hands, children will create wonderful and original works on the theme of Autumn.
Craft from a pumpkin and a tank - a steam locomotive
Beautiful animals
Vegetable spider for competition
Kitty
Decorative pumpkin mushrooms
Pumpkin clock
Gifts of autumn - crafts for kindergarten
DIY pumpkin house: craft for children
Pumpkin houses turn out beautiful. Depending on the shape of the vegetable, you can make two-story mansions, or you can simply make large houses from a large, flatter pumpkin. Crafting a house is painstaking work and not as quick in time as it might seem. After all, you need to think through every detail. You can make a pumpkin house with your own hands in different ways, but in all of them, first of all, you need to remove the insides and dry the vegetable.
Materials:
- Pumpkin
- Chestnuts
- The base for the house is plywood or thick cardboard
- Green corrugated paper
- Acrylic paints, hot glue
- Foamiran
- Satin ribbons
- Cotton swabs, scissors
- Dough
- Wire – aluminum, floral
Prepare a square base and wash the pumpkin.
Draw out details on the pumpkin with a felt-tip pen - windows, doors
Let's make a template out of paper so that we can then transfer it to the foamiran. We decorate the details from Thomas - you can draw or make appliqués.
We make salt dough according to the classic recipe: salt, flour, water. Mix everything in one container.
We need to make a stork from salt dough. First we sculpt the body and head, and connect them together using wire, which we also cover with dough to hide. We make wings, a tail and steps from the dough. Let's also cut out a rectangle for the bench. Place all the elements in the oven at 100 degrees for 3 hours. The pumpkin needs to be glued to a board and covered with corrugated paper.
Cover the backing with green paper and attach the pumpkin to it. We will paint the place of the window on the pumpkin black and glue the parts from Thomas. In the meantime, the elements of the craft have been cooked in the oven; they can be taken out and cooled. Attach the threshold in front of the door.
We attach long legs to the stork and paint the feet.
We will place the stork on the pumpkin and paste chestnuts around it. We make a flower from pieces of red ribbon: we scorch the edges with fire and glue the parts onto a cotton swab. We use a chestnut instead of a vase. We continue to decorate our composition. This way we will have a flower and a bench. We'll use an acorn to make a lantern over the door.
All that remains is to work on the details and finalization - we will paint the path and threshold. We make a fence out of chestnuts, connecting the chestnuts with skewers.
You can make a romantic pumpkin house craft.
Pumpkin cat house for Halloween
This unusual idea to make a house for a cat out of pumpkin came to me quite unexpectedly when we were harvesting at the dacha.
I came across one of them, large in size and oval in shape - well, it’s like a real mink if you cut out a hole and clean out all the pulp from the pumpkin.
And then my thoughts caught on to the fact that Halloween is coming soon, and pumpkin is the main attribute of this holiday. However, along with the pumpkin, one of its main symbols is also the black cat.
I found information on the Internet that on the night of October 31 to November 1, that is, on the eve of Saints' Day on Halloween, cats are given gifts - bells around their necks. They deserved such honors for protecting their home and family from the evil eye and damage all year. Read more about the holiday here.
Bells for cats
According to legend, a cat with such bells is considered a strong talisman against all evil. And it is also believed that if a cat runs away from home, then peace and prosperity will leave the house with it.
And I got the idea to make a pumpkin house for a cat. There are so many beautiful photos of pumpkin crafts on the Internet that it’s simply dizzying.
But I was in a hurry and made the main mistake - I didn’t fully familiarize myself with the technology of drying pumpkin! And this is the most important thing if you want to make a long-lasting pumpkin house for your cat with your own hands, and not just a decoration for a few days.
But at that moment I was so carried away by creative ideas for coloring and decorating the house that I didn’t think at all that the pumpkin needed to be dried and only then started carving, that is, cutting out holes and designs from the pumpkin.
So, for everything to work out for you, you must first dry the pumpkin and only then do with it whatever you want! This craft will be very durable and strong. And remember that pumpkin takes a long time to dry – six months.
How to make a pumpkin house for a cat - master class
Of course, first you must choose a fruit - a pumpkin of a suitable size and shape without mechanical damage, otherwise it will rot. The color doesn’t matter, as you can then paint it or decorate it.
Cut the pumpkin with a sharp knife and never twist it. Leave the stalk 20 centimeters, do not trim too much. This way the pumpkin will dry better and this cutting can then be used for decoration.
Then the pumpkin must be dried - about six months (the rind dries for several weeks, and the flesh dries out within several months). You can tell that a pumpkin is dry by the sound inside the fruit when you knock on the pumpkin. The rustling of dried seeds will be heard.
How to dry a pumpkin
- The selected fruit must be inspected to ensure there is no damage.
- Then wash, dry and wipe the surface with alcohol or vodka (so that the moisture evaporates faster).
- The pumpkin is stored in a dry, dark and ventilated place.
- Then all you have to do is monitor the drying process, periodically turning it over so that drying occurs evenly.
- Ideally, it is better to hang the pumpkin.
Now you can start getting creative - pumpkin decor
You don't need any special tools. All this you can find in the kitchen:
- A long knife with a thin edge;
- Large spoon to remove pulp;
- Awl for drawing the outline of holes;
- Scotch tape, acrylic paint, pieces of textiles, wire, rhinestones, decoupage, etc.;
- Newspapers for drying.
The outline of the hole on the pumpkin can be applied either using a stencil drawing or by hand. Then use an awl to perforate this outline of the design to make it easier to cut out later.
Now you can cut holes along the intended perforation. It is better to cut at an angle, that is, hold the knife at an angle.
Then pull out the cut out outline and start scraping out the pulp. Some can be removed by hand, but some will have to be peeled off with a spoon. The wall thickness should be 2-3 centimeters.
After this, the inside of the peeled pumpkin must be wiped with a swab dipped in vodka or alcohol. And then dry it a little with a hairdryer and stuff it with newspaper paper.
Change newspapers more often as they get wet to speed up the drying process. Of course, your future cat house should be in a ventilated area and not in the sun.
While the pumpkin is still in a “half-dried” state, you can apply a tattoo - a pattern - to it. Attach the design template with tape to the pumpkin, and use an awl to prick the outline at a distance of no more than 5 mm. Now carefully cut out the outline with a sharp knife, then press your finger on the cut out silhouette and remove it.
If you need to remove a large fragment, but it is not removed, then cut it into several parts and remove it piece by piece.
After this, you can decorate the pumpkin (video above). This can be decoupage, you can paint the pumpkin with paints, stick on autumn leaves, buttons, rhinestones or textiles. In general, everything that your imagination can use.
A few more tips:
- It happens that the pumpkin is too dry and this causes difficulties in processing it. Then, before removing the seeds and pulp from it, pour water inside to soften it a little, and then pour it out;
- To apply a design to a pumpkin, use carbon paper;
- It is good to apply a design to a dried pumpkin using a conventional wood burning device;
- To paint pumpkins, it is best to use acrylic paints;
- The pumpkin should not be varnished - it must breathe, and the cat’s sensitive sense of smell is unlikely to like this smell;
- Dry several pumpkins at once in case something goes wrong or you want to make a similar house to order.
Well, that's all. Be patient while the cat house pumpkin dries. In the meantime, practice on smaller specimens and think about the design of a future pumpkin villa for your cat.
You can also make a pumpkin house for cats from wool.
Pumpkin house for cats made of wool
You may not be able to make a durable pumpkin cat house this year, but next year you will definitely succeed. Good luck in your creativity. I hope to share your feline design masterpieces someday. You can also organize a competition. What do you think ? I read that such pumpkin crafts are becoming a real mania.
And of course, a gift for Halloween would be very appropriate - a collar with a bell so that the cat will scare away evil spirits all year long.
cats-burg.ru
Autumn crafts made from pumpkin seeds
Kids love to get creative using natural materials for creativity. You can make original and fun crafts from simple pumpkin seeds.
This chicken is made from plasticine and seeds. First, we sculpt the body of a chicken from plasticine, and then stick the seeds into it.
You can make a cute hedgehog in the same way.
Chickens made from pumpkin seeds can turn out very beautiful. This chicken can be made from two foam balls of different diameters. Glue them with seeds using PVA glue or a hot gun.
DIY pumpkin owl
The shape of the pumpkin itself can tell us what kind of craft we can make from this vegetable. And the simplest craft option may be an owl. It can be in two versions - from one pumpkin, or take two pumpkins for the head and for the body.
An owl made from pumpkin and seeds is quite simple. The pumpkin can be cleaned of the insides in advance. And we decorate the outside using a variety of materials - felt, paper, seeds.
Materials:
- Brush
- Felt
- Paper
- Felt pen
- Pen
- Glue
- Scissors
- Eyes
Wash the pumpkin first. The stalk must be cut off. If you find a light-colored pumpkin, you can pre-paint it with orange paint. We make a pattern of parts from paper.
We need to make a blank for the eyebrows, face, beak, wings. Then draw circles for the eyes. We transfer the details to felt; it is better to choose a material in brown tones. For example, we will cut out the largest ones from purple felt, and two more from blue felt. Let the smallest ones be yellow or orange. We make the wings from gray or light brown felt. At the top you can attach some light details in the form of rectangles to imitate feathers. We make a beak from a diamond-shaped part. First fasten all the parts of the owl's face together.
It is better to make the beak voluminous. To do this, make a cut at the top and bend it into a gutter shape, tucking in the corners.
The owl's face is almost ready. We place the wings at the same level on the sides. Let's attach a face to the pumpkin. And at the end we glue the eyes.
You can make an owl using pumpkin and seeds, which can be used white or pre-painted.
DIY pumpkin seed panel
You can make a panel of pumpkin seeds with your own hands as a gift or for an exhibition at school.
Materials:
- Glue, twine
- Seeds
- Threads
- Leaves
- Letochka
- Sackcloth
- The basis
- Varnish
We cover a piece of cardboard approximately 30*35 in size with burlap.
Cut out circles from cardboard and cover them with seeds in a circle.
We place flowers on the base in any shape and glue them. We lay a green thread or twine between them
Glue bay leaves between the flowers.
You can use more dried flowers in creating panels.
Pumpkin seed tree: how to make a craft
Pumpkin seeds are an interesting material for creativity. You can use them to make both an applique and a three-dimensional craft. A craft tree made from pumpkin seeds is made in the form of a topiary.
For the base of the topiary, take paper. We make a ball out of it and wrap it with masking tape. We make a hole at the bottom and insert a stick or a broken felt-tip pen. Apply PVA glue to the ball and paste it with seeds to completely cover the surface. Instead of a base, you can use a foam blank in the form of a ball. You can complement the ball with other elements - beads, ribbons. Cover a jar of a suitable size with twine.
Fill the jar with alabaster and insert a stick with a ball into it.
Flowers made from pumpkin seeds: DIY craft
Pumpkin seeds are an easily accessible material and can be found without problems even in winter. Therefore, if you need to make a craft for school from pumpkin seeds with your own hands, it will not be difficult.
Flowers made from pumpkin seeds are unusual and easy to create.
Materials:
- Pumpkin seeds
- Peas
- PVA glue
- Sackcloth
- Compass, pencil, ruler
- Jute
- Brush, acrylic paints
- Scissors
- Cardboard
- Hot glue
Soak the burlap in glue in advance so that it does not fall off. Pre-mix the glue with water 1:1. Dry the burlap and iron it. For the base of each flower, we cut out round blanks from cardboard. Glue the seeds in layers in a circle.
Turn the flower over to the reverse side and glue a row of seeds on the reverse side. We will cover the petals of our pumpkin seed flowers with white paint.
Let's make parts from cardboard - a circle with a diameter of 6 cm and a petal 7 cm high and 4 cm long. We transfer the cardboard blanks to burlap. You need 3 circles, and 6 petals. Glue the round burlap pieces onto the back side of the flowers. Glue a jute thread along the edge of the burlap petals.
We make flower stems by wrapping floral tape around a wooden skewer. We make a hole in the center of the round flower blank and attach the stem. Glue yellow peas in the center of the flower and fill it with PVA.
Glue two petals to the stem.
Three beautiful pumpkin seed flowers will take their place in a beautiful little vase in the kitchen.
Flower design may be different. You can also paint the edges of the seeds and make a bud that has not yet opened
DIY crafts from decorative pumpkins on the theme of Autumn
You can make various crafts from a decorative pumpkin - for an exhibition, a competition for school or garden, as well as a lantern for Halloween. Decorative pumpkins differ in shape and size. Most often they are small and neat.
You can make a candle stand out of pumpkin. To do this, you need to cut off the top of the head and make a hole to insert a candle. You can decorate the candlestick as desired.
You can make a variety of animals from a decorative pumpkin with your own hands. It is enough just to fit the required shape.
By painting a pumpkin gray or orange, you can make a baby fox and a raccoon.
Felt and glue will help you create such an animal.
Such crafts are easy to make and kids will enjoy working with felt, and space lovers can make a robot.
What beautiful and realistic donuts can be made from small decorative pumpkins of the same size.
DIY pumpkin crafts for school
If you don’t yet know how to make pumpkin crafts with your own hands for school, take note of these pictures. Even a 3rd grade student can cope with such work.
Funny pumpkin men
Pig
Frog
Bunny
I don’t have pumpkin carriages, I didn’t offer banal options, I think these are much better.
How to make a turtle from a pumpkin with your own hands
In autumn, pumpkin is considered one of the most popular vegetables. If the autumn exhibition season begins at a school or kindergarten, then it would be a great idea to make a turtle out of a pumpkin with your own hands. parents will have to help the baby, as they need to use a knife.
From half a pumpkin you can make the body of a turtle - a shell. For believability, draw a shell. Potatoes will help make the turtle's head and legs.
The principle of creating a turtle from a pumpkin is the same. There is only a difference in design. You can use cucumbers or carrots to create the legs and head.
DIY crafts from decorative pumpkin photo
Vegetables, including orange pumpkin, make great fall craft supplies for school and other educational settings. Now I will show you a few photos, there is no point in describing them step by step, everything is clear from the drawing.
Baby in a crib
See what original pumpkin craft on the Autumn theme you can make. For this work you will need not only a zucchini, but cabbage, some greens, a string and a pacifier.