A vase of flowers can lift your spirits even on the gloomiest day. Surely, every home has one or more vases, but there are never too many of them - after all, it’s nice to change and alternate them from time to time, and not use the same one from year to year. A wonderful solution to replenish existing supplies would be a vase made by hand from plastic bottles.
- 1 5 advantages of vases made from plastic bottles:
- 2 Vase spray painted
- 3 Vase in decoupage style
- 4 Vase made of bottle and threads
- 5 Set of vases
- 6 Hanging vase for the garden 6.1 Another option
Spray painted vase
Necessary materials:
- plastic bottles
- primer
- spray paint (color of your choice, we used gold and black), ask the seller so that it sticks to the plastic
- scissors
- insulating tape
Step-by-step instruction:
Step 1: Preparing the Bottles
- Make sure the bottles are clean.
- Cut off the top of the bottle.
- Cover the cut edge with electrical tape so that when using the vase, the top edge does not cut the flowers. Make sure it stays firmly on the bottle.
Step 2: Primer
Prepare the bottle for painting by first applying a layer of primer to it. This way the paint will adhere better and last longer.
Step 3: Painting
Spray the bottle with spray paint and leave until completely dry. Do this procedure outside, or cover the floor with newspapers to avoid getting dirty.
TIP: If you want to make a vase using multiple paint colors (like gold and black, like in the photo), apply one of the colors first, let it dry completely, and then apply tape over the area where you want to add the second color. and spray, also leave until completely dry, remove the electrical tape.
Be sure to wait for the first paint to dry, otherwise the duct tape will ruin it and then they will come off together.
These are such wonderful vases!
ATTENTION: If you use bottles made of thicker plastic (yogurt, for example), then the top edge does not need to be covered with anything. Carefully trim the top, and if there is a hangnail sticking out, just file it down a little.
Openwork vase made from a plastic bottle
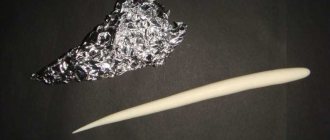
You will need: a plastic bottle, a soldering iron or nail, a can of paint, a marker.
Master Class
- Cut off the neck of the bottle.
- Draw a pattern with a marker.
- Heat the soldering iron or nail.
- Carefully work with the soldering iron, making a hole according to the pattern.
- Paint the vase and wait until it dries completely.
The openwork vase made from a plastic bottle is ready!
Vase in decoupage style
Another way to decorate a plastic bottle is to use decoupage napkins. They make it possible to apply a huge range of designs. Also, as an option, we suggest making this vase hanging.
Necessary materials:
- napkins for decoupage
- materials for attaching napkins (brush, glue)
- scissors
- decorative braid with pompoms
- hole puncher
- glue gun
Step-by-step instruction:
Step 1: Trimming
- Trim and discard the top of the bottle, leaving only the bottom.
- Using decoupage materials, attach the napkin of your choice to the bottom of the bottle.
Step 2: Attach the rope
In order for the vase to be hung, a rope must be attached.
- First, use a hole punch to make two holes near the top edge, they should be located diametrically opposite each other.
- Take a rope of the required length and tie it to both holes.
Step 3: Pompom Braid
All that remains is to make the final decorative element. Using a hot glue gun, attach the pom pom string to the top edge of the vase.
All is ready! Hang it in your apartment or garden, place flowers inside and enjoy!
Original vase made from a plastic bottle
You will need: a plastic bottle, scissors, a stationery knife, a colored napkin.
Master Class
- Cut off the neck of the bottle.
- Cut the top of the bottle into equal strips.
- Bend the strips outward from class=”aligncenter” width=”722″ height=”512″[/img]
- Fold the strip in half and turn it to the side so that the strip crosses the next two strips and reaches the middle of the third.
- Do this process with each strip.
- Insert a tissue paper into the vase for color.
The original vase made from a plastic bottle is ready!
Vase made of bottle and threads
This method is suitable for making vases for dried flowers, flower pots or just baskets. It turns out quite unusual, and it is not at all clear that a plastic bottle was used here.
Necessary materials:
- wide plastic bottle
- Knitting
Step-by-step instruction:
Step 1: Trimming
Cut the bottle in half, leaving only the bottom part. Cut the sides of the bottom half into an even number of equally sized strips. We will weave layers of yarn onto them.
Step 2: Weaving
It is better to use thick yarn, it looks more beautiful and weaves faster. Braid the stripes one at a time: the first in the front, the next in the back, and so on. Continue until you reach the top. You can use one color, melange threads, or alternating several different colors.
Step 3: Finishing the Top Edge
You need to attach a strip of fabric (or braid) on top so that the edge does not prick and the threads do not fall apart. To do this, first wrap the end of the thread in the middle of the vase under a layer of woven threads, and then sew a strip of fabric onto the edge of the vase using large stitches. Now the vase is ready to decorate your home interior!
How to make a vase from a plastic bottle
An empty plastic bottle is the basis of a future vase, so you need to choose a container of the appropriate size and color. Bottles with a capacity of 0.5 l and 0.75 l are suitable for making small vases. From containers of 1.5 liters and 2 liters you can make medium-sized vases. To build large floor structures, you will need 10 - 15 plastic containers.
Attention! For manufacturing, you need to select containers made of dense plastic without dents, cracks or visible abrasions.
The color of the plastic matters in cases where the walls of the vessel will be visible in the finished craft. Then it is necessary to take into account the purpose of the vase, the features of the surface decor and select the most organic option.
The list of tools and materials depends on the manufacturing technique, the shape of the product, and the method of decoration. You can make classic vases and extraordinary designs from a plastic bottle.
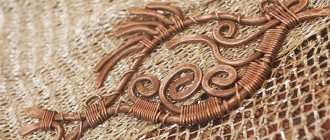
Openwork vase made from a plastic bottle
You can make an elegant vase with a lace edge from an ordinary plastic bottle.
Air lace requires patience and accuracy, but the result is worth it
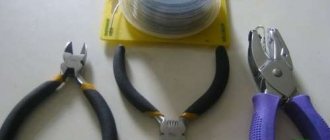
To make an openwork vase, you will need the following tools and materials:
- stationery knife;
- marker;
- scissors;
- soldering iron or awl;
- acrylic paint in an aerosol can.
Advice! It is more convenient for novice craftsmen to use a large bottle. A small pattern will require painstaking work. Drawing with large details is easier to master.
Step-by-step manufacturing instructions include the following steps:
- Trimming the top of the bottle. The top is cut along the line where the body narrows towards the neck (“to the shoulders”). This is convenient to do with a stationery knife or scissors.
- Drawing a pattern using a marker. The openwork is distributed over the top of the workpiece. In order for the product to perform its main function and not allow water to pass through, the lower segment is left unchanged.
- Burning out the design with a soldering iron or the metal tip of an awl heated over a fire. Movements should be smooth and careful.
- Coating the product with acrylic paint.
Light pastel shades are suitable for openwork products, emphasizing the lightness and curves of the ornament.
Using this method you can make unique objects with three-dimensional patterns. Vases made from transparent, colorless containers do not always need to be painted. The result is products with a crystal effect.
To make the pattern three-dimensional, parts of the pattern are not burned out completely, the edges of the elements are folded outward
The openwork design will become an unusual and sophisticated interior decoration.
Vase made of plastic bottle and twine
Handmade products made from twine (jute) embody style and originality. Using this technique, you can make a structure of any shape.
Jute transforms an ordinary plastic bottle beyond recognition
To make crafts from a plastic bottle and jute, you will need:
- stationery knife;
- leg-split;
- glue;
- decorative elements.
Advice! For working with plastic, universal polymer glue is suitable. The transparent composition dries quickly and has no toxic properties.
The top of the container is cut off with a knife. Glue is applied to the surface. From bottom to top, wrap the container with jute and decorate the product.
Each subsequent layer of twine should fit snugly to the previous one.
The upper edge can be disguised with a strip of fabric or lace
Making a vase from a plastic bottle and yarn
Thick or medium yarn is suitable for this craft. The threads should be tightly twisted, without excess lint.
To work you will need:
- stationery knife;
- yarn for knitting;
- polymer glue.
The blank for the craft is a plastic container with the top part cut off.
Advice! To make the edge of the product even and smooth, the workpiece is carefully melted with a heated iron.
The cut of the workpiece is leaned against the heated sole of the iron to align the edge
The workpiece is evenly coated with glue and the threads are carefully wound in dense layers.
When using fine yarn, there may be several layers
A decorative vase for dry compositions can be made without using glue using the weaving technique.
The work takes place in the following order:
- Mark the walls of the workpiece with a marker into vertical stripes of the same width.
- Make cuts with scissors along the marked lines.
- Pass the thread around the strips of plastic. The weaving should be tight, but not deform the workpiece.
A bright product is made from yarn of contrasting colors
How to make a floor vase from plastic bottles
The flooring product is large in size. This can be a wide, spacious vase for large bouquets or a design of regular diameter with high walls for flowers and displays from 80 cm.
A wide vase can be easily made from a plastic container with a nominal volume of 5 liters or more.
The top of the bottle is cut off with a knife
Strips of fabric and braid become an unusual decoration
To make a high floor structure for dry compositions, you will need from 15 to 20 identical plastic bottles. One of them will look like a standard blank with a bottom and a trimmed top. This part will become the bottom tier.
The remaining containers will require a middle part without a bottom and top. Such blanks form like a pyramid. The tiers are inserted one into the other, and the joints are fixed with tape.
The outer surface can be decorated with jute, burlap, thick yarn or knitted cover
Beautiful vase made from a large plastic bottle
A bright vase on a leg can be made from a capacious plastic container with a volume of 2 liters or more.
The decoupage technique is widely used to decorate plastic crafts.
For production you will need:
- scissors;
- acrylic primer;
- acrylic lacquer;
- napkins with a pattern;
- PVA glue;
- glue gun and hot glue.
The bottom of the container is cut off and used as a base for support. To do this, thin strips are cut out in the grooves between the convexities of the relief and melted. The finished part is coated with a primer.
The remaining part is primed, dried and glued to the support blank turned upside down.
Attention! To ensure reliable adhesion of the parts, before applying glue, the joints are treated with sandpaper.
The image from the napkins is applied to the surface, covered with a layer of PVA glue and allowed to dry. Then 2 layers of acrylic varnish are applied to the product.
How to make an original vase from a plastic bottle
To make an original vase you will need the top and bottom of the bottle. A support is made from the neck, and a bowl is made from the embossed bottom. The shape of the design resembles a candy bowl.
Products in the form of a bowl with lace look festive
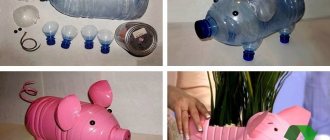
Set of vases
From small square plastic bottles you can make a whole set of vases. And here you don’t even have to cut anything.
Necessary materials:
- 6 identical small square plastic bottles
- Scotch
- Multi-colored ribbons
Step-by-step instruction:
Step 1: Putting the Bottles Together
Take six identical clean bottles and place them side by side in two rows of three. Now wrap them all together with tape to secure them tightly together.
Step 2: Decoration
- Wrap the structure of bottles with multi-colored ribbons, in several levels on top of each other.
- Insert evenly small amounts of flowers into each bottle to end up with one large bouquet.
Hanging vase in the garden
You can not only put cut flowers into plastic bottles, but also grow live plants. We suggest making a small hanging pot that can be attached to a tree in the garden, fence or veranda.
Necessary materials:
- Plastic bottle with thick material (for example, shampoo, detergent)
- Stationery knife or scissors
- Marker
- Hole punch or awl
- Soil and plant
Step-by-step instruction:
Step 1: Trimming
You need to cut the bottle as shown in the photo, not just horizontally. This way we leave room for fastening.
Step 2: Hanging Hole
- Using a hole punch or awl, make a hole on top of the protruding side of the bottle.
- Using a marker (preferably a permanent one, so that the design does not deteriorate after the first rain) apply patterns to the top edge of the bottle (or paint completely, to your taste).
Step 3: Plant the plant
All that remains is to plant the plant in the newly made pot and attach it to a nail in the chosen place.
Another variant
We also offer another option, which is done in a similar way.
Two liter Sprite bottles were used here. Since the plastic is thinner than that of a shampoo bottle, make two holes for hanging (one may simply not support the weight of the pot with soil). Can also be used as vases for wildflowers.
DIY vase with flowers from a plastic bottle. Master class with step-by-step photos
Vase with flowers from a plastic bottle. Master class with step-by-step photos
Master class: Vase with flowers from a plastic bottle
Author: Ekaterina Davidoglu 9 years old, studying at the “Children’s Art School named after A.A. Bolshakov”, Pskov region, Velikiye Luki Teacher: Natalya Aleksandrovna Ermakova, teacher, Municipal budgetary educational institution of additional education children "Children's Art School named after A.A. Bolshakov", Pskov region, Velikiye Luki
We thought about the gift for a long time: Everyone looked at the goods... And only one seduced us - We won’t win among others!
I decided to make a vase - so that I would be delighted right away! She is beautiful and slim... She looks so much like you! Accept it from us quickly, We love you, you understand, Put flowers in it quickly, so that there is more beauty! Description: the work can be done with children 8-10 years old. The material may be useful for additional education teachers and teachers. Purpose: gift for mom, interior decoration. Goal: creating a decorative vase from a plastic bottle with embossed paper flowers. Objectives: -introduce the creation of a vase from a plastic bottle and toilet paper; - teach how to sculpt flowers from toilet paper and glue; -develop a sense of composition and color scheme of work, imagination and creativity; - foster family values. We will need materials and tools: - a 1.5 liter plastic bottle - PVA glue - a roll of toilet paper (cheap-hard) - water-based paint - gouache - nail scissors - brushes a jar for diluting glue, water for paints (you need a wide neck so that the hand fits, I use mayonnaise jars) -varnish (any)
Progress of the master class:
First, we need to cut off the neck of the bottle with small scissors. Then dilute the glue with warm water, the consistency resembles cream (I stir with my hand so that you can feel the material).
And, we cover the entire surface of the bottle with toilet paper (except for the bottom). We spread glue on a small section of the surface, put on a small piece of paper and also coat it with glue (small folds are formed - the relief texture of the vase).
Next we will sculpt the top decoration of the vase from leaves. tear off a small piece of paper and fold it into three or four layers.
Dip the folded paper into glue, then squeeze it out lightly.
We assemble it into a leaf shape and glue it to the neck of the vase. And so on all around.
Then we start sculpting flowers, we also fold the paper, and then crumple it, as if crushing it from all sides inward - we form a bud.
Dip it in glue, squeeze it lightly so that the shape does not deform, and glue it to the vase.
We create a composition from such buds.
The work is very painstaking and requires patience, since the flowers may fall off due to the heaviness of the glue, but in principle it is not difficult. Then you need to wait for the molded elements of the vase to dry completely. The back of the vase was left empty.
After drying, it is necessary to coat the vase with water-based paint. This is necessary to level the surface of the vase (holes, small folds), and will make it easier to work with gouache. It is better to use elastic brushes; very good synthetic brushes are now sold, sometimes even better than core brushes.
The vase has dried and we begin painting. We tint with the chosen color, yellow gouache mixed with white.
We select a gentle green shade for the leaves on the palette, and ruby mixed with white.
We draw leaves around the flowers and complete the composition. We draw the leaves with the same color as above, and along the edges we introduce shades of more saturated green.
We also add volume to the upper leaves using dark green shades, and outline the leaves of the bouquet with a thin green outline.
The dark green contours need to be slightly blurred with a clean brush with water, and then we draw white animated contours. We draw them as if with a trembling hand.
And the last stage of work, we enliven the flowers with a more saturated shade of ruby. Slightly blur the color, making smooth transitions from one color to another, draw the cores. When the vase is dry, it is necessary to coat it with varnish for practicality of use, so that you can put fresh flowers in the vase.
No matter how beautiful the flowers are, they look worse without a vase. And in a vase you will select the light and background for them - And anyone will be amazed by their beauty. Thank you for your attention!
We recommend watching:
DIY tree made from plastic bottles. Master class Bookmark for books made from a plastic bottle with your own hands Butterfly made from plastic bottles with your own hands. Master class with photo DIY vase with stucco decoration. Master class with step-by-step photos
Similar articles:
DIY summer bouquet made from waste material
DIY flowers from plastic cups
DIY bottle vase
Flowerpot
Everyone loves cats (or at least most of them). Decorate your apartment with this cute vase and it will bring a smile to your face every time.
Necessary materials:
- Large plastic bottle (2 liters)
- Stationery knife
- Spray can with white paint
- Markers (black and light pink)
- Flowers
Step-by-step instruction:
Step 1: Cleaning the Bottle
Remove the label from the plastic bottle and wash it thoroughly (so that there are no traces of sweet water in the middle or glue from the label on the outside).
Step 2: Mark the location of the drawing
Mark how tall you want your vase to be and draw a horizontal line around the entire bottle. It should not be too high for the cat to turn out nice.
Step 3: Draw a cat
On one side of the bottle, above the horizontal line you just drew, draw two ears, as shown in the photo.
Step 4: Cut it out
Now cut out the bottom of the plastic bottle along the outlined contour. Be especially careful with the ears so that they are even and uniform.
Step 5: Preparing for Painting
- Cover the floor with newspapers or boxes to avoid getting dirty while painting.
- Before painting, you can apply a coat of primer to help the paint adhere better.
Step 6: Painting
Apply white spray paint to the bottle. Make sure that the layer is uniform and there are no transparent areas left.
Step 7: Draw the cat
Now the fun part: drawing the cat. You can copy from a photo or come up with your own.
All that remains is to put the flowers in the vase; it is low, so a small bouquet of short-cut flowers will do. You can also add soil and plant a houseplant.
Look how beautiful it turns out, I am absolutely delighted with this vase!