Simple topiary for beginners
Basic principles for realizing your plans:
- choose a solid base for the trunk,
- take care of a stable base,
- paint and glue should not smell after drying.
There are many creative ideas and means for their implementation.
Step-by-step instructions for beginners will help you understand the principles of how to make topiary.
- The first step is to choose a stand for the future structure. Traditionally, a flower pot or similar container is used.
- For the trunk, you can find a tree knot, twist it from wire, take a metal rod of a suitable diameter (in short, any durable part that is suitable in shape and size).
- The barrel is decorated and secured in a stand using silicone, rubber, or foam.
- To form a crown, you can take an object made of plastic, rubber, or foam. It can be round, star-shaped or heart-shaped, depending on the master’s idea.
- The base is attached to the leg and complemented with decorations in accordance with the design.
An original tree can decorate a room, fill it with a pleasant aroma, serve as a talisman that attracts prosperity to the house, and is also a good gift option.
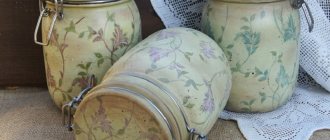
Beautiful topiary made from coffee beans
Another common topiary option is a candy bean tree. In addition to the fact that such a craft looks very impressive, it also has an indescribable aroma. This will definitely appeal to a coffee lover, to whom such interior decoration can be safely gifted.
Necessary materials:
- Coffee beans - they should be fairly even, large and smell good;
- Satin ribbon;
- Double sided tape;
- Glue gun;
- Scissors;
- Plastic tube 25 cm long and 1.2 in diameter (or approximately);
- Plastic plant pot;
- Ball for the base with a diameter of about 8 cm;
- Alabaster and a container where it can be diluted;
- Nylon tape.
Subsequence:
We take our base and glue coffee beans over its entire surface.
We glue them with the convex side up. It will turn out more beautiful.
The result will look something like this:
Now we apply the second layer, on the contrary, gluing the grains with a strip up.
Then we wrap our tube (the future trunk) with double-sided tape, leaving 3 cm at both ends.
And we put a satin ribbon on the tape.
Next, pour water into the pots in such an amount that it does not reach the edge of about 3 cm.
We again pour this water into the container for diluting the alabaster (in the step above we measured the amount we needed in this way) and, in fact, dilute it.
Pour the resulting mass into the pot and, before it hardens, insert the tube.
We are waiting for it to dry completely. It is important!
We paste the frozen solution with grains in two layers in the same way as we did with the ball.
Now we lubricate the free end of the barrel with glue.
And we attach our ball to it. Make sure everything is level. We decorate our tree with a bow made of translucent ribbon.
You can decorate such a tree in completely different ways.
Look, for example, what an interesting topiary is made from coffee beans with coins!
Even the combination of colors is beautiful in itself.
The crown of the tree does not have to be spherical. It could be anything. For example, the heart. By the way, coffee’s constant companion is cinnamon. And this is also used here.
Artificial flowers also look nice.
And here’s a video, by the way, catch it. But it is not simple, coffee-colored and with fabric flowers.
How to make a topiary Christmas tree
To create a New Year's atmosphere, you can make a topiary Christmas tree in a couple of evenings.
The technique for making such a topiary differs slightly from the classic design, but is also simple to perform.
For work use:
- cardboard,
- newspaper base
- mesh,
- plastic base.
The base for the topiary Christmas tree can be purchased at a craft store or glued together from cardboard. The appearance of the product will depend on the shape of the base. The Christmas tree can be a classic or non-standard design.
Instructions for Beginners
Before you begin to implement a creative idea, you need to stock up on all the necessary materials.
To work you must have:
- cardboard,
- cotton wool,
- base pot,
- trunk,
- mixture for fixing the product,
- glue,
- paint,
- brush,
- scissors,
- decorative elements.
Step-by-step instruction.
- It is rational to start the work by making the base of the Christmas tree. It can be a voluminous classic spruce, a cone made of cardboard or plastic, or a product of an unusual shape.
- The finished base is attached to the stem-leg.
- Decorate the pot.
- The Christmas tree is secured in a pot using a building mixture.
- After drying, the decoration of the spruce is completed, decorating it with ready-made elements in accordance with the plan.
This way you can make an excellent decorative element to create a festive mood.
Alternative topiary trees
The beauty of home creativity lies in its freedom from traditional boundaries. Topiary in the form of a New Year's tree can be made of various materials.
Coffee trees, products made from glass Christmas tree beads and tinsel look unusual. An original solution would be a topiary made of twine, decorated with bright ribbons and miniature toys.
There are so many ideas for making decorative trees that it is impossible to list them all. Any idea, executed carefully, will look like an original product.
https://youtu.be/8r7bCzI9t88https://youtu.be/jB_7Vtu-uus
_
Funny people are the most common crafts made from flower pots
You should start your “career” as a gardener-sculptor by creating simple structures.
You can decorate not only a garden or a playground with such funny little people, but also the porch of a house or a flowerbed near a multi-storey complex. Similar figures are made according to the usual pattern:
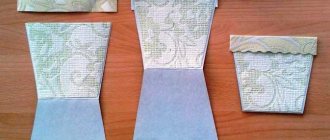
- one pot is used as a “head”, so it is filled with fertile soil;
- the second tank is turned over and a torso is made from it;
- the bottoms are secured with ropes or wire through the drainage holes;
- the threads are fixed with foam in the form of “floats”, as shown in the photo;
- two additional strands are pulled through the “neck” of the product;
- The other 2 ends are lowered down to attach the shoes;
- Flower pots are strung onto each segment, securing the holes with plugs.
The number of pots for assembling the figurine's arms and legs depends on their size. The smaller the diameter, the more rows there will be.
In other cases, neat holes are made in the area of the arms and legs. Thick ropes are threaded through them, and small shoes are attached to the end of them. After this, the people from the flower pots are painted with acrylic paints. Some people use a waterproof marker or special stickers for this. Before painting, the surface of the product is carefully sanded with sandpaper to remove all irregularities.
Original Halloween-style lamps are sometimes made from the “head” of a man. Using a special device, eyes, mouth and nose are cut out on the front wall. A flashlight, candle or LED bulbs are installed inside the object, which is turned on at night.
Agricultural and decorative side of the issue
Ordinary vegetation will help breathe life into crafts made from flower pots. The container, which acts as a “head”, is filled with soil substrate.
In this fertile soil with a drainage “cushion” the seeds are planted:
- onion or garlic;
- arugula;
- peas or beans;
- basilica;
- parsley or cilantro;
- petunias;
- lavender;
- fuchsia;
- Achimenesa;
- Surfinia;
- pelargonium thyroid;
- Columnae.
Hand-shaped pots often provide an excellent place to grow hanging flower plants. Crops that grow upside down will also be an ideal option for such crafts.
Each type of plant is a prototype of a certain “hairstyle” of the created man. Curly varieties will create the effect of lush curls, but flowering varieties will add contrast to the “image” of the figure. At the same time, green feathers of onion or garlic will become the prototype of a “fashionable fade” on the head of an unusual sculpture. Unusual crafts from flower pots for the garden are often decorated with straw or hay. The hair and wrists of the figurine are made from dry grass. If desired, wear a hat or braid yarn.
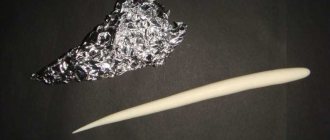
Christmas tree trunk
The trunk can be a wide branch of a durable type of tree.
It will easily hold the rest of the branches and will not break when attached to the base. Read here - How to make a painting with your own hands: we draw with paints, modular paintings, photo printing, from buttons, panels. 110 photos of amazing painting ideas for inspiration