We already have articles about autumn crafts. But every year I try to update the collection of works so that you always have fresh ideas at hand. So, autumn: leaves, cones, chestnuts... hands themselves ask you to collect more of this goodness and bring it home. But what to do with it then? What interesting works can you come up with and how will plasticine help us in design? Let's answer these questions.
And yet, this collection of ideas is more aimed at children of different ages. But I tried to make it interesting for kids with different interests. Adults can actively help the little ones, they can add a touch of play to this “serious” activity and arrange a mini-competition. Or they can use the ideas from the assembly themselves to decorate their home.
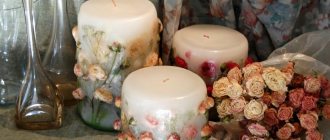
Autumn bouquet of leaves and cones
This bouquet is easy to make. You can take any leaves, just pay attention to their color. After all, the beauty of the bouquet will depend on how variegated the leaves are.
- A stick is fixed to the wide part of the cone using green plasticine.
- The lump is colored. And sprinkled with glitter.
- The stick turns green.
- The bouquet is collected in a vase. Or, it can be tied with ribbon.
As options, I’ll show you 2 more ways to make “flowers” from a pine cone.
- Colorful flowers.
- Bouquet in beige tones.
These flowers can and should be combined with tree leaves to get a beautiful bouquet. Learn how to paint pine cones here.
And here you will find various wreaths and topiaries made from leaves and cones.
Collection and preparation of cones for work
You only need to collect intact, undamaged, fully opened specimens - they make the most believable “flowers.” If during wet weather the fruits of coniferous trees close their scales, they can be easily returned to their previous state by drying them in the oven at home.
Cones collected in the spring are already freed from seeds, which tend to spill out at the most inopportune moment. In addition, they hold their shape better.
The stored “gifts of the forest” should first of all be washed, remove resin, if any, and clean from insects. Small stains are scraped off with a stiff brush; more complex stains are removed by keeping the material under running water. Insects that like to settle between the scales are expelled with a solution of 6% vinegar. It is mixed with water in a 1:1 ratio and the natural raw materials are soaked for about 30 minutes.
The resin can be removed by wiping the scales with alcohol, or by boiling the “forest harvest” in a highly diluted detergent. If the material will subsequently be painted, it is recommended to bleach it. This procedure is optional, but after it the finished products look neater.
To bleach pine or spruce cones, they are first cleaned and then thoroughly dried. Next, immerse it overnight in any pipe cleaner, half diluted with water. Wash again and dry again. As soon as the fruits open, they are dipped into undiluted “Whiteness” and after 7–8 hours they are thoroughly rinsed, after which they are kept warm until the moisture is completely removed and their shape is restored.
Read also: Brama partridge chicken breed description
Sometimes half-opened specimens are required for work. In this case, they are dipped in wood glue, which “preserves” the scales in the desired position.
Drying methods
It is very important to completely get rid of moisture to prevent rot and mold from appearing in the future.
You can do this in 4 ways:
- Naturally - that is, in the air. The raw materials are laid out on newspapers in 1 layer and left in a dry, well-ventilated room for 2 - 3 weeks.
- In a frying pan. The method is fast, but unreliable, since moisture may remain at the base of the scales. Reduce the heat under the frying pan to a minimum; there is no need to cover it with a lid. Turn the fruits periodically to prevent them from burning.
- In the oven. The cones are placed on a baking sheet covered with foil and dried at 120ºC for an hour. The door can be opened slightly to slow down the dehydration process and increase its efficiency.
- In the microwave. This option is only suitable for limited volumes. Fruits - no more than 3-4 pieces are placed on a glass plate covered with a paper towel and kept at full power for 1 minute. If the microwave chamber then smells unpleasantly of burnt wood, wipe its walls with vinegar.
Quick and beautiful DIY crafts from pine cones and acorns for kindergarten
Simple crafts that can be prepared quickly are also included in this collection. Such products may be of interest to little ones.
Birdie.
- A small foam ball is glued to the bump.
- Pieces of paper cut into a triangle in the shape of wings are glued to the sides.
- At the back there is a paper tail.
- Branches are glued to the bottom of the cone. The twigs must first be collected in the shape of bird legs.
- The craft is painted.
Dinosaur.
- In fact, everything is very simple. You will need to connect a certain number of acorn caps. You need 6 such blanks: a neck with a head, 4 legs, a tail.
- All this is attached to the cone: the head - to the wide part, respectively, the tail - to the narrow part. And the paws are below.
Mammoth.
This craft is done exactly the same as the previous one. The only difference is that it is not the neck and head that is attached to the wide part, but the trunk.
Autumn fantasy craft made from pine cones
I have already said that from pine cones you can make not just one craft, but a whole picture or composition. Here are these compositions on the theme of fantasy about autumn.
Bears on a walk.
- Bears are a connected cone and the cut off wide part of the cone.
- The bears are located in a clearing covered with grass.
- The composition includes a Mouse and an Owl.
- In a clearing there is a house that can be easily assembled and built from thick branches.
Autumn came.
- Yellow autumn leaves are glued to the cardboard.
- There are cones on the leaves. They are like trees that have shed their leaves.
- In addition to cones, the composition contains dried twigs and flowers.
- And you can make mushrooms from plasticine.
Each composition may contain those elements that you yourself invent and make.
Support for flowers
For work we will need:
- cones;
- thin wire;
- plastic bottle;
- varnish
We begin to make the bottom of the vase by tying the cones with wire. First we wrap one cone, the central one, then we glue it to it and also wrap six more cones with wire.
We fasten the second row with the same wire, not forgetting to fasten the cones together with thermal glue for strength, attach them at a slight angle to the bottom, forming the walls of the vase, as in the photo.
Related article: How to sew a textile mouse
We weave the third and subsequent rows and glue them perpendicular to the bottom, raising the walls of the vase upward to the height you want the vase to be.
If you want to give the vase the shape of a ball, then, starting from the 5th or 6th row, tighten the wire and add additional cones. For the very last row, it would be better to choose small cones and tie them together as tightly as possible with wire.
We place a cut bottle of water inside the finished vase, and place a beautiful bouquet in the water! The vase is ready!
Of course, if you don’t put an additional container of water in a vase of pine cones, it will be problematic to put fresh flowers in it. But for dried flowers or ornamental plants, such vases are perfect.
In addition, if you have a tin can or an unnecessary tall container that can serve as a vase or basket, you don’t have to throw it away; you can use hot glue and cones to give it an interesting look: cover the outside of the can with cones, add ribbons or twine, and the original vase is ready!
All new crafts made from cones and chestnuts
Separately, you can make many interesting crafts from chestnuts without cones. For example, a spider or a ladybug. Simply paint the chestnut in the desired color and attach legs and antennae from wire or a toothpick. But there are also more complex works, consisting of several chestnuts, twigs, leaves, etc.
But this work, in which there is both a chestnut and a cone.
But what gorgeous deer.
Snail (pictured on the right).
- You need to connect 3 and separately 4 chestnuts with toothpicks.
- Connect these two blanks at right angles.
- On top of the workpiece, which consists of 4 parts, you need to attach a cone.
- All that remains is to attach the eyes to the snail. They are located on chenille wire.
In addition to the snail, you can do:
- Goblin
- Fairy
- little man
Chestnuts are a very good material that can be easily combined with other natural materials. So, thanks to a little manipulation you can make a number of interesting crafts.
And here are funny animals made of plasticine and chestnuts.
Owls made from acorns and chestnuts.
And here are caterpillars and snails made from cones, chestnuts and plasticine.
Daisies and gerberas
Another step-by-step master class on creating a bouquet of pine cones. This time you will have to work hard and use pliers to remove the upper scales, up to about half of the fruit. The resulting core is cut with scissors, forming a beautiful hemisphere. The preparation for daisies or gerberas is ready. It is better to handle its processing by an adult, but children will complete the remaining stages of the process without much difficulty.
You will need the following tools and materials:
- bamboo skewers or floral wire;
- tape;
- acrylic paints;
- awl and heat gun.
Use an awl to make a hole in the flower blanks and insert the tip of a skewer into it using glue. We paint the “petals” white and the core yellow. For gerberas we choose a wide variety of shades, focusing on the natural color of the flowers.
Read also: Gray oatmeal planting and care
We tape the skewers with green tape so that they resemble stems. Now the bouquet can be placed in a vase, complemented at your discretion with beautiful dried flowers or live plants. The second option involves using a floral base, since if you simply put the skewers in water, they will begin to rot.
Crafts from pine cones and plasticine for children 4-5 years old in kindergarten
What can a toddler be able to do at 4 years old? A lot if we help him! Here are simple ideas for kindergarten:
Chicken.
- The cone is pre-painted. And on it there is a small decoration of small dots.
- The following are molded from plasticine: neck and head, scallop, beak and paws.
Squirrel (pictured left).
- The cones consist of three parts: tail, head and body.
- Ears, paws, muzzle, eyes and nose are molded from plasticine
Red squirrel.
- But there is another simple option to make a craft from a pine cone and plasticine. In this version, you only need one bump - the tail.
- And the body, head, front legs, eyes and nose are made of plasticine.
- But there is one more material in this design - acorns. The hind legs are made from them.
The crafts are very simple. But don’t forget that little ones need to be explained and helped a lot in order for them to cope with the task.
Video description
About decorating ideas using pine cones in the following video:
Home decor
Decor made from pine cones for the home does not fit into every style, but it will add coziness to many modern trends. Outside of the winter holidays, your home interior can be diversified with interesting designer items:
- Candlestick. Use a glass or small glass vase. The candle is placed in the center, along the edges there are several cones without any decoration. Simple, stylish and all-season.
Grace in simplicity Source 1.bp.blogspot
- Decorative jar. Choose a jar of unusual shape and fill it with pine cones, painted in the color palette of the room - white, black, gray. A container of a more original shape (for example, a vintage candy bowl with a lid) can be filled with pine cones painted in an acid color. Option: the jar is filled to a third with pine cones, a skein of garland is placed on top, which is powered by a battery hidden at the bottom.
For owners of glass containers Source i.pinimg
- If you are lucky enough to get a particularly large specimen of a cone (for example, from a Coulter pine), no additional decor is required. Designers prefer to use such specimens in their natural form - natural motifs are now in trend.
- Frame. Small cones of cypress or larch can be used to frame a photograph or a child’s drawing, and hang the finished composition on a ribbon. The craft is left in its natural form, or painted in a suitable color - it will be cute and original.
Particularly large specimens Source media.angieslist
- Decor in a pot. The pot is filled with moss (or, for example, straw). Cones are laid out in rows on top and secured with glue for reliability. The structure can be given any shape - spherical, elongated, cone-shaped.
Simple and elegant Source xn--80afdb0cbapl
Crafts from cones and leaves on the theme of autumn, grades 1-2
Now I'll make you happy! I found this simple craft that is easy to make but looks amazingly cool!
Owl
- We load a regular plastic bag with dry leaves, cones, and acorns.
- We tie the edges of the bag on both sides so that the leaf stalks peek out.
- Glue the “eyes”, “paws” and “beak” of the bird onto the bag.
Now I’ll show you some work where there are both leaves and cones.
Fairies made of pine cones and nuts.
The nut is glued to the wide part of the cone. The nut is the head. Therefore, we immediately draw up all the necessary details of the head: eyes, nose and mouth.
We tie the “neck” (the junction of the cone with the nut) with a ribbon.
Glue the branches-handles. We make “hairstyles” from threads or moss.
We glue wing leaves to the back. There are twigs on the sides of the handle.
Author MK
Owl.
- On the wide part of the cone we place the huge eyes of the owl, cut out of cardboard paper or from the caps of acorns.
- Between the eyes is a beak (can be made of felt, paper or tree bark).
- We make ears from the leaves on top.
- You can decorate your owl with a hairstyle made from thuja branches.
- The same branches are located around the owl.
- Don't forget to glue the owl's paws.
The work looks as if it is very difficult to do. But, in fact, they are very light.
Video description
About the New Year's wreath made of natural materials in the following video:
For the New Year holidays
Homemade New Year's decor is a common thing in all countries where family holidays are valued. Cones occupy one of the main places in it; many original decorations are made from them:
- Fairy lights. The main condition for an excellent result: the denser (more crowded) the cones are collected, the more impressive they will look. To collect the garland, use a thread or fishing line; the holes at the base are pierced with an awl or needle. The finished ribbon is decorated with snow. Garlands are used to decorate the upper part of the room (beams, hangers), where they have a solemn appearance and do not disturb others.
Garland at the entrance Source hgtvhome.sndimg
- Christmas decorations. An owl, a hedgehog, a mouse, a gnome and Santa Claus, sprinkled with sparkles and equipped with loops, will take their rightful place among purchased toys. Your children will remember fabulous evenings spent decorating the Christmas tree for the rest of their lives.
For the forest beauty Source modernplace
- Wall decor. The easiest way to organize decor from pine cones in the country is to hang them in clusters of five to ten pieces and decorate them with everything that is at hand: ribbons, serpentine, fabric bows.
It couldn't be simpler Source xn--80afdb0cbapl
- Christmas wreath. A traditional decoration for the front door in Catholic culture, it has also taken root in our country. As a frame, choose strong branches, cardboard or wire twisted into a ring (the base can be purchased at the store). Balls and cones are strung on a fishing line and wound onto a base. Optionally add ribbons, figures, sweets, dried fruits.
Wreath with fir and pine cones Source dizain
- Single decorations. If you don’t have time at all, hang individual cones, painted and covered with artificial snow. To make them look truly festive, coat them with a thin layer of gold or silver spray paint or glitter varnish.
- Candlestick decor. The combination with sprigs of pine needles, beads and glass balls looks festive.
New Year's candlestick Source mirlandshaft
- Three-dimensional star. Five pine cones are placed around the sixth, secured with glue and fishing line. The star can be painted at any stage and hung in a doorway or on a chandelier.
- Holiday table decor. Cones on a ribbon are useful for decorating the back of a chair (from the outside), decorating a napkin, a candlestick, or a small gift (for example, in combination with a candy cane).
Table decoration Source web-studio.pp
- Composition. One of the fastest ways to decorate your interior. The basis will be a tray, box, dish or three-tier candy bowl. An attractive art object is obtained from a combination of candles, balls, tangerines, fir branches and, of course, pine cones.
There is never too much gold Source tapeciarnia
Hedgehog made of natural material and cones
What should we use as a base to which we will glue the cones? You can cut a large “droplet” from dark fabric. Sew it and stuff it with padding polyester, cotton wool or something else, for example, baby socks from which the baby has outgrown. The main thing is that the base has a flat surface and does not bulge from different sides. Or you can take foam plastic and paint it black. Or maybe even a bottle.
- Stages of work:
- The narrow side of the “droplet” is the nose and muzzle. We attach a nose, antennae and eyes to it.
- We cover the entire wide side with cones.
- We fix berries, mushrooms, leaves and fruits on top of the cones.
It should turn out to be a real cutie!
How to make an owl from pine cones
The “Owl” craft is very popular. And it’s so easy to make it from a pine cone!
First option.
Cut out 2 circles from cardboard.
Cut jute, hemp or wax rope into small pieces.
We glue the circles with this rope using PVA so that the threads of the rope diverge from the middle to the edge, like rays of the sun. Moreover, you need to leave a hole in the center, into which we will then insert an eye - a button.
Trim the edges of the ropes to make an even circle. Align the two circles, placing one next to the other.
In the circle, we insert ready-made plastic eyes into the hole in the middle.
We cut dry twigs into small shelves. These are eyelashes.
Glue the eyelashes to the back of the eye using hot glue.
These are the real owl eyes we got.
If the pine cone does not have a branch protruding, which was used to attach it to the tree, then you need to glue the beak in the middle of the wide part of the pine cone.
We place the eyes around the beak.
We wrap a thick twig on both sides with thick wire. It should look like an owl's toes.
We pass a thin wire between a thick one.
With this wire we will tie a twig with “paws” to the “body” (bump) of the owl.
Such an owl can be hung by attaching a loop of rope to the back of the bird.
Author
The second version of the winter owl.
We push the cotton wool into the spaces between the scales of the cone. The cotton wool should stick out a little!
Glue ready-made plastic eyes (can be made from plasticine or felt) to the wide part of the cone. Glue both the wings and the nose.
It's so simple that even a child can do it!
Did you like the collection? Then come visit us for new ideas for creative inspiration. To do this, subscribe to new articles on the site!
More on the topic of autumn crafts that we did last year:
The best plasticine crafts on the theme AUTUMN
Have a fun weekend with fall crafts.
How to make crafts from autumn leaves that won't spoil
13 unusual crafts with children on the theme of autumn
Original floral decor made from scales
You can also make flowers from fir cones, although using a slightly different technology. In this case, the fruits are disassembled into scales, from which the buds are glued together. A circle of felt or thick cardboard is used as a base. In the future, the products can be used to decorate panels and boxes, New Year’s balls or vases, as well as flower pots in eco-style.
To begin, cut the scales from the bottom of the cone with pliers or scissors. They are wide and allow you to create large and expressive inflorescences. We also stock up on the top - it will turn into a closed core.
Glue the scales onto a cardboard or felt circle, starting with the largest.
Each subsequent layer is placed in a checkerboard pattern in relation to the previous one and slightly shifted towards the center. At the end we put in the prepared middle.
The flower is ready and can be used for its intended purpose. For better preservation and protection from moisture, it is coated with 2–3 layers of transparent varnish.
Inflorescences collected from pre-bleached scales turn out to be very beautiful.
You can create a huge number of crafts from cones. Cones are a natural material and also have a pleasant pine aroma. In this article we will look at how to make crafts from pine cones with your own hands.