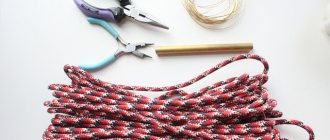
Tools and materials
To create unique beaded jewelry, special tools and materials are required.
If you decide to engage in this type of creativity, prepare the following tools, materials and equipment:
- tongs - necessary for pulling a needle that does not pass freely through the bead;
- scissors;
- nail file – used for filing sharp edges of metal fasteners;
- pencil.
If you are going to create your own beads, necklaces or earrings, you will need nylon thread.
Different types of beads can be used in the jewelry making process.
The following types of beads are known depending on the material used in their production:
- glass;
- plastic;
- ceramic;
- metal.
Considering the shape of the beads, they come in the following types:
- simple - ordinary beads with holes for stringing;
- bugles – is a modification of beads in the form of elongated tubes with holes for stringing;
- cutting - short tubes with a hole for stringing.
Based on size, this handicraft material is divided into 8 numbers. The appearance of the product depends on the size of the beads used. Beads come in matte and glossy, mother-of-pearl, in a variety of colors and shades.
Craftswomen use bead needles to create jewelry. Such devices are thin flexible needles 5 cm long. Known numbers are 10, 12, 13, 14, 15 and 16. Most often, needlewomen use a bead needle No. 12, as it is ideal for almost any type of bead. When the product is almost ready, you will need beaded fittings to connect its elements together.
Selection of threads, tools
One of the important stages of preparation for the embroidery process is the choice of material. Among them should be:
- beads of different shades. When purchasing, it is important to select beads that match each other in color.
- Rhinestones, stones.
- Special needle for beads.
- Scissors, threads, ribbons.
To prevent the design from slipping, it is recommended to use a hoop.
When choosing beads, it is recommended to pay attention to the manufacturer. The best beads are those made in Japan, followed by the Czech Republic and Taiwan. The beads have 18 numbers. For needlework, number 11 is best suited.
You might be interested in: Ideas for embroidered bags: how to make them yourself
According to their shape, beads are classified into several types:
- beads are round beads;
- bugles are chopped glass tubes ranging in size from 3 to 20 mm;
- cutting is glass beads, but smaller. Its length is about 2 mm.
Embroidery with glass beads and cutting adds a bright shine. But this type of beads has a disadvantage: they have sharp edges that can break the thread. Therefore, it is recommended to combine them with simple round beads.
In order for the embroidery to be not only beautiful, but also durable, you need to sew the design very tightly. For this, special threads are selected:
- kapron 33 and 50;
- cotton-lavsan;
- polyester;
- linen-lavsan.
You need to sew in two threads to ensure strength.
Required materials and tools
Bracelet and ring
DIY beaded jewelry for beginners and inexperienced craftswomen are distinguished by their simplicity. If this is your first time deciding to weave a necklace or bracelet, you will definitely need a DIY bead jewelry master class.
Using this master class, you will get a magnificent piece of jewelry - a bracelet and a ring, connected to each other by a beautiful beaded chain. When creating such a product, not only beads are used, but also beads.
You will need the following materials:
- large pink beads;
- 2 large pearls;
- scissors;
- silicone thread.
Making this decoration from beads and pearls with your own hands consists of the following steps:
Cut the silicone thread for the bracelet and ring. It is easy to determine the length of the required segment: measure the girth of your hand and finger, and add a few centimeters to connect the jewelry.
Now start weaving the bracelet: string white and pink beads onto a silicone thread, alternating 2 different colors.
You need to string the beads until the desired length of the bracelet is reached.
Next, take a large pearl and thread the two ends of the thread through it. They need to be folded in such a way that they meet halfway to each other, simultaneously creating the effect of connection and fastening. You can move on to the next stage of creating the decoration.
Place beads on the two ends of a silicone thread that reaches the length of your middle finger in the same way as for a bracelet, placing a large pearl in the middle of the ring.
Do-it-yourself finished bead decoration in the photo below:
It will become a worthy decoration for graceful women's hands. It should be noted that it is more suitable for young fashionistas; mature ladies should choose more luxurious and elegant jewelry.
Earrings
Tassel earrings are suitable for creating both a casual and formal look.
To make such a simple bead decoration with your own hands, you will need the following materials:
- ear wires;
- pins;
- caps;
- beads of silver and blue colors No. 10;
- bead thread;
- two blue crystal beads;
- tape 7 mm wide;
- bead needle;
- round nose pliers;
- pliers.
Making decoration:
Cut the ribbon approximately 6.5 cm long. To prevent it from unraveling, you can melt its edge with a lighter.
Take a bead thread approximately 50 cm long. Tie a tight knot at one end and thread the other through a needle.
Next, start stringing beads in the following sequence: 15 silver, 5 blue, 5 silver, 15 blue.
Use a needle to go through the entire row of beads in the opposite direction, except for the last bead, as it will be the anchoring one. Pierce the ribbon, fix the bead row, retreat approximately 1 mm, and begin the next row.
Complete the second row in exactly the same sequence as the first. In total, you should get 15 of these low beads; when they are collected, you can begin to design the beaded decoration.
Take a pin, use pliers to make a double eyelet on it so that it is durable and reliable. Using this eyelet, sew the pin to the ribbon and continue twisting it, piercing it along with the pin.
When you twist the ribbon all the way and stitch it, the beaded bottoms will take on a tassel shape.
Put a cap and one of the blue beads on the finished tassel, attach the wire.
The sequence of making this bead decoration with your own hands is shown in the video below:
Even a novice craftswoman can make such tassel earrings on her own.
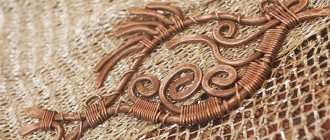
How to make a pendant from wire. Master Class.
I usually take large pieces of 1 mm wire for the base (40-50 cm). You can always cut off the excess.
I usually don't give detailed descriptions of photos but try to take more detailed photos. So, don't be offended. But watch the video tutorials on how to make braids.
Watch all the “Wire Pendants” master classes on this blog.
Come visit our Online School!!!
Neck decoration
DIY silk and bead decoration looks original, luxurious and elegant.
To make it you will need the following materials and tools:
- Shibori silk ribbon – 7 cm;
- Czech beads No. 10;
- soutache of three colors;
- glass cabochon;
- large beads;
- cutting;
- felt;
- cardboard;
- artificial leather;
- glue, thread, scissors, pencil.
This decoration from beads and felt is made with your own hands in the following way:
Sew the edge of the ribbon to the felt using regular stitches. You can lay the shibori silk ribbon in any way you like. It lays down in beautiful waves, it can be bent and even twisted. Trace the tape laid and fixed on the felt with a pencil.
Now sew the shibori ribbon to the felt along the contour, using simple stitches. Glue the cabochon at the top next to the ribbon.
Soutache of three colors - depending on the chosen color of the ribbon, so that they look harmonious, sew them together to form a tight cord. Wrap the soutache around the cabochon and sew it to the felt.
Next, beautifully cover the seam on the ribbon on all sides with beads. Cut off the excess felt so that it is not visible at all behind the ribbon and beads.
Fold the ends of the soutache onto the back side of the felt and sew them so that they are not visible.
Sew the trim, beads and beads to the silk ribbon, laying them out in random order. At this stage of decorating, you can lay the ribbon in beautiful waves.
Make a loop from the suraj and sew it to the wrong side of the felt. The pendant should hold its shape well; to do this, attach it to the cardboard, trace it with a pencil, cut it out and glue it to the felt.
Cover all edges of the finished pendant with beads using the “American” method.
You can hang this beaded neck decoration on your own on a chain or leather cord.
Souvenirs and gifts
Despite the fact that now you can buy any item in a store, handmade gifts are valuable. A good gift idea would be beaded jewelry. There are many options, here are just a few ideas:
- applique on a beaded cosmetic bag for March 8th for mom or friend;
- a brooch in the shape of a funny animal with multi-colored sequins or drops for a child;
- monogram with initials on a handbag for a teenage girl.
Other options for homemade gifts are possible:
- Decorating Easter eggs with beads. It is not recommended to heavily braid the eggs; it is better to make a removable decorative mesh or glue several beads onto the shell, emphasizing the previously applied pattern.
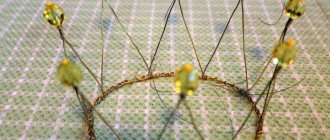
- Making a crown for dolls. Wire, golden glass beads and a little time, and the result will delight the girl, because her favorite doll will have a real crown.
At first glance, it may seem that it is difficult for beginners to create various crafts using beads, as well as other auxiliary materials. You just need a little skill and imagination, and you can make an original present.
For hair
DIY beaded hair jewelry is not only original and beautiful, but also pleasant and very interesting. A tiara with a flower will perfectly complement a ball gown; it can also be worn even with a wedding dress.
To make a beaded tiara, prepare the following materials:
- thin metal hair hoop;
- wire – 1 mm and 0.4 mm thick;
- beads – golden and silver;
- beads of different sizes;
- pliers.
You can make this decoration using beads and wire yourself by following these step-by-step instructions:
Making a tiara should begin with the formation of the flower itself. To do this, cut a wire approximately 0.8 m long. At the end of the wire, fix a large bead and form a loop.
Under the bead, twist the wire into a spiral and form flower petals, there should be five of them in total. Try to keep all the petals the same shape and size.
Twist the remaining wire and decorate it with a large bright bead, this will be the middle of the flower.
Now you need to braid each petal with beads. To do this, start stringing beads onto a thin wire, alternating them with glass beads and small beads. Tightly braid the petals with this wire. Make two more flowers using the same pattern, but slightly smaller.
When three flowers are ready, start decorating the hoop with beaded flowers. First, fix the small flowers on the hoop, then attach the large ones.
A beautiful beaded floral tiara is ready.
Bracelet
To make such a decoration from beads and stones with your own hands, prepare the following materials:
- Czech beads No. 10 – about 10 grams;
- chipping of natural stones - about 25 cm low;
- bead needle, bead thread and scissors;
- accessories – pins, caps, clasp;
- round nose pliers, wire cutters.
Decoration creation process:
Cut the bead thread to a convenient length - up to 1.5 m, and pick up the material in the following sequence: bead, pebble, 3 beads, pebble, two beads. Close this set into a ring and tie it in a knot, this is what 1 rapport looks like, there should be three such repeats in one row.
The second row and all even numbers must be woven without stones, they should consist only of beads. Cast on 5 beads, then thread a bead thread through the third. Repeat this action two more times.
Complete the set for the third and all odd rows in the following sequence: 3 beads, a pebble, a bead. Pass the needle through the second bead of the arch of the previous row. Close the row and go through the second bead of the arch of the first row.
Repeat the second and third rows alternately until the bracelet reaches the desired size. Now you need to attach the fittings. Unfold the ring and pass it under the first woven row. Using pliers, close the ring.
Place a cap on the ring, a bead on top and bend the free end of the pin at a right angle.
Use wire cutters to remove the tip of the pin. Twist the ring with pliers and put on the lock. Repeat these steps with the other end of the bracelet. Your DIY beaded jewelry in the form of a bracelet is ready!
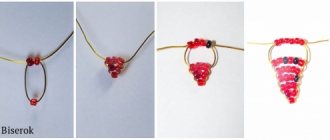
Beaded beads
For the decoration to acquire its own zest, it is enough to complement it with airy beads. They can be used as a decorative element for any product (to decorate a bracelet or make a pendant for a necklace).
The next master class will be devoted to the technique of weaving volumetric beads. Let's look at it using the example of the Blackberry beaded necklace.
What you will need:
- pearl beads 3 mm blackberry shade;
- large pearl beads;
- thin fishing line;
- needle;
- scissors;
- clasp.
When weaving, it is important to tighten the line well each time so that the product keeps its shape.
Main stages of work:
- We string 5 beads onto a fishing line, tie them into a ring with a knot, which we hide inside the beads.
- We string 4 more pieces onto the monofilament thread and thread the needle from bottom to top through the first (closest) bead of the first ring.
- We bring the fishing line into the second bead of the first ring.
- We collect 3 beads, thread them through the last bead of the second ring and through the bead from which the fishing line comes out.
- We pass the needle through the nearest bead of the first ring and repeat the technique described in point No. 4 twice.
- We again thread the needle through the nearest bead of the first ring, as well as through the nearest bead of the second.
- We collect 2 more beads and pierce with a needle 3 things standing in the same row. Along the edges you get paired beads.
- We pierce one of the nearest paired beads from top to bottom and collect 3 more, after which we pierce the second bead from the top pair and the one with which we started this point.
- We thread the fishing line through the next two beads standing along the edge.
- We string 2 beads, pass through the nearest bead of the ring we just made and through the next 2 beads located along the edge.
- We repeat points No. 9 and 10 twice.
- We thread the next 3 beads in a row in a row, string 1 bead and pass the fishing line through the fourth and first beads of the ring.
- We bring the needle up and thread the fishing line through all the beads standing on the edge, tightening them into a ring.
- We complete the composition by combining freshly woven airy beads with large pearl ones.
- Install the clasp on the necklace.
After completing the weaving of the air bead, you need to re-secure all loosely stitched elements with fishing line.
Watch a master class on making a Blackberry necklace. It turns out very stylish. Together with the right outfit, it is quite suitable for both a summer cocktail party and an important business meeting.
Necklace
The Mylene Farmer fashion necklace can be seen at many fashion shows in the collections of famous designers, and they often adorn famous TV presenters and actresses.
True, if you wish, you can make such a fashionable decoration from beads with your own hands. The necklace is perfect for brides, and if it is made of light beads, the product can also be used as a wedding decoration, complementing an open dress.
To make a necklace you will need the following materials:
- small beads with a diameter of 3 mm;
- medium beads – 5 mm;
- large beads – 6 mm;
- "rice" beads;
- beads;
- needle;
- a thread;
- scissors, rings, clasps, caps.
Progress:
To make such a fashionable necklace, you need to weave eights out of beads. Make this bead decoration with your own hands according to the diagrams below.
Make crosses from large beads, then add two bead links on each side - this will be the middle of the figure eight.
Continue to weave the figure eight chain, alternating different sizes of beads, as in the diagram below.
Connect the top section of the figure eight to the middle. Beads should be inserted between the beads in the figure eight.
Assemble all the parts following the diagram below, attach the fittings.
In the form of an insect
Beaded insects are among the most popular handmade jewelry.
Make your own beaded insect decorations like this:
Place 35 blue beads on the wire. Pass one edge of the wire through the beads again to form a ring.
Cast on 16 more beads, thread the wire through 11.
Form the third ring by stringing 14 beads onto the wire and threading it through the outer five. Repeat again: put on 9 beads, thread the wire through 6. You should have one butterfly wing.
Now make the body of the insect. Collect 4 beads and thread the wire through the 4th one. String a bead on each end of the wire and pass them through the third, repeat 3 times.
Connect all parts of the butterfly together with wire, removing its ends with scissors. Make a loop of beads at the top by stringing 6 beads onto a wire.
Make a chain by stringing the required amount of beads onto a fishing line, thread the butterfly so that it is in the center, and connect the ends of the chain together.
From ribbons, beads and beads
This DIY decoration made from ribbons, beads and beads will add femininity and elegance to your look.
It can be worn not only by girls, but also by women, because it looks really expensive and luxurious.
You will need:
- beads;
- large beads;
- a narrow ribbon approximately 80-100 cm long;
- fishing line or strong thread;
- needle.
Instructions for performing the work:
Make a small loop from the ribbon, leaving about 20 cm on one side for the ties, pierce it with a needle and fishing line.
Thread a bead, a bead, and another bead onto a needle. Repeat these steps until the bracelet is long enough for your hand.
Secure the fishing line: pass the needle back under the loop of the ribbon and tie a few knots.
Tie a knot on the ribbon, closer to the beads.
Such simple ideas as making bead jewelry with your own hands give all fashionistas the opportunity to create their own individual look and always look feminine and unique.
0 Comments
How to make a pendant from wire and beads with your own hands. Tools.
In order to make jewelry from wire and beads, we need a small set of hand tools.
I recommend using pliers with nylon tips for working with wire. You can tighten the braid and bend the wire without fear of damaging it. I bought pliers with red handles - HERE. Pliers with replaceable jaws (yellow handles) can be bought in the Russian online store Sapphire.
To work with wire you need the “correct” wire cutters. On the outside there should not be a chamfer on the cutting edges, as on ordinary electricians' pliers. I bought the correct small wire cutters for working with wire using the wire wrap technique in China - here . I bought the correct large wire cutters – here
To work with wire using the wire wrap technique, all pliers must have smooth jaws, without notches, like regular pliers. It is advisable to grind off sharp edges with a file or needle file and sand them with fine sandpaper.