One of the most popular types of needlework is weaving bracelets from beads. This craft has a long history: the first wickerwork appeared before our era. Modern designer baubles delight even the most sophisticated fashionistas and are quite expensive. Therefore, making such jewelry can be a good source of income.
What materials are required
When doing beadwork, you need to be extremely focused. Therefore, immediately prepare everything you may need:
- beads of suitable colors, shapes and sizes and compact organizers for them;
- a roll of fishing line/spool of nylon thread;
- needle and hook;
- scissors;
- decorative elements;
- clasp.
Before starting work, it is useful to familiarize yourself with the recommendations of specialists:
- It is better to immediately purchase the material in the required volume. This way you can avoid a situation where there are not enough beads, but the store no longer has them.
- Beads from Japan and the Czech Republic are of higher quality. Therefore, if the evenness and accuracy of the product is your priority, you should choose products from these countries.
- Beginners can use beads from China. It's quite cheap. After developing skills, you can move on to using more expensive material.
- It is necessary to select suitable beads, sequins and other blanks for the selected beads in advance if there is a desire to make changes to the pattern.
- For the base, you need to stock up on strong threads (lavsan, nylon, polyester) or fishing line. You also need to remember about fasteners and thin needles.
Types of bracelets
There are many types of bracelets. In addition, using your imagination, you can come up with your own design and weaving for any occasion. However, for beginners it is advisable to start with simple variations. Bracelets are:
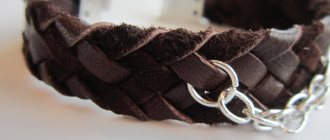
- Simple. This is the most primitive method of making jewelry. Its peculiarity lies in the specificity of bead weaving - multi-colored beads are strung on 9 pieces of strong thread, then a braid is woven from the pieces using any method. Then a button is attached at one end, and the other is formed into a loop. Bead bracelets made using this pattern cannot boast of a complex design, but they still look very beautiful.
- Named. The beads are woven so that they form the letters of the name. This product is slightly more labor-intensive to create, since it will require a long piece of fishing line.
- "Flowers". The finished accessory is a composition of beaded flowers.
- Tourniquets. In appearance, this decoration resembles a fairly wide hollow beaded cord. If desired, you can add an ornament or give it an original configuration.
- On memory wires. All you need to make is to string the beads and make a lock.
If you are already an experienced master, then you can try to realize yourself in more complex models:
- Openwork version with beads and other decor. The highlight of such products is the repeating pattern, made so that the skin of the wrist is visible. This technique gives a lace effect.
- Volumetric option. This is the most difficult thing that has been invented in this craft. Volumetric bracelets are made both single-layer and multi-layer. They look more massive and expensive, but they also require a lot of effort to create.
Useful tips
First, master the patterns of beaded bracelets without complex patterns. Once you learn how to make plain, simple decorations, you can complicate the task and even add your own elements to the design. If you immediately start mastering patterns for advanced masters, the result will not be very impressive, and the inspiration to do something will disappear.
One day is enough to master a simple pattern. Then you can experiment and make a bracelet out of beads using a rope or come up with your own design.
Take measurements in advance to understand the length of the bracelet. Do not take measurements close to the wrist, but leave a small space. Especially if the bracelet does not have a clasp - it should fit on your hand, but at the same time not sag.
For studying, you can use cheap beads made in China. But the beads in it often crumble, and their color is not the same. Therefore, they are not suitable for selling or creating beautiful jewelry.
Czech-made beads are considered to be one of the highest quality. Jewelry made from it looks great and lasts a long time.
Color combinations and combinations of different materials in bracelets
Homemade beaded bracelets can be of any color. You can make a product of either a single-color design or bright rainbow colors - it all depends on individual taste.
Here are the most popular combinations:
- cornflower blue, silver, snow-white;
- ruby, golden, black;
- orange, lemon.
Speaking of additional decorative details, beads can be safely combined with beads, glass beads, pendants, ribbons, copper and bronze arches. It is only important to show a sense of proportion.
How to weave a bracelet with a name. Nuances
This type of weaving is often used by craftswomen. It is easy to use, so it is usually recommended for creating a beaded bracelet for beginners.
To make a stylish personalized item, you will need:
- a piece of fishing line or strong synthetic thread;
- beads of different colors.
The technique used is a monastery cross.
Instructions:
- Take a notebook sheet in a cage and schematically depict the future decoration.
- Color the sketch, create a name and background.
- Sort the beads.
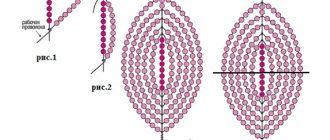
- Bend a piece of fishing line/thread in half and string four beads onto one of the resulting pieces. Pass the second segment through the last one and tighten, forming a cross.
- Place two beads on the left end of the fishing line and one on the right. Pull the right end through the 2nd bead and tighten again. For work, use beads for the background. The text is formed in the same way, but beads of a different color are used.
- Proceed according to the given scheme until the required length is reached.
To expand the product on the left edge of the fishing line, you can collect not 2, but 3 beads. In this case, the thread is threaded through the 3rd bead. Then the workpiece is turned over - 2 beads are collected on the right end, 1 on the left, passing the right fishing line through it.
The left piece is inserted through the side beads of the right line and the threads are tightened. Next, string 1 bead on both threads and insert the right line through the left bead and the side bead of the previous row. The threads are tightened again.
Making a personalized bracelet or accessory with an ornament requires strict adherence to the scheme and adherence to the sequence of colors.
how to make a beaded bracelet for beginners
How to make a clasp for a beaded bracelet.
Beginners and experienced craftswomen love weaving using the mosaic technique. Beginners quickly master it, and craftswomen can create real masterpieces from beads using this weaving. The mosaic weaving technique is really quite simple. If you have certain skills, it provides great opportunities for realizing the most daring ideas in beads.
Wide mosaic bracelets with various ornaments and designs are especially popular among needlewomen. Such a bracelet always looks great on the hand and emphasizes the individuality of its owner. It can depict absolutely any design: a geometric pattern, your own portrait, various animals, flowers and much more. You can search for a weaving pattern on the Internet or create it in a special program. To make a wide bracelet you will need very little free time, as well as high-quality materials and a beautiful design. This will be enough to get to work.
Weaving a clasp for a bracelet.
Weaving a mosaic bracelet usually does not cause any difficulties. It is much more difficult to come up with a clasp that will look organic on the jewelry. You can purchase ready-made fasteners in the store. For example, a toggle clasp. If you don’t have one at hand, you can make a beaded clasp yourself.
When weaving a clasp, you cannot do without beads. The colors of the beads are selected in accordance with the main range of the bracelet.
At the first stage, we collect an odd number of beads on a transparent fishing line.
If the width of the bracelet is 26 centimeters, then for the base of the clasp you need to collect 21 beads.
For a wider bracelet, the number of beads must be increased. It should be remembered that the number of beads should always be odd.
We connect a chain of beads into a circle and alternate debele weaving with mosaic weaving.
The result should be a triangle. The edges of the triangle should be equal to the width of the bracelet.
We connect the finished triangle to the bracelet.
At the other end of the bracelet we attach a small round button.
As a result, we get a bracelet entirely made by hand!
Using a similar pattern, you can make fasteners of any shape and color. For example, weave not a triangle, but a square. To do this, we use Ndebele weaving to decorate four edges instead of three.
miracle.pro
How to create an openwork decoration
Having mastered the basics of working with beads, you should move on to mastering more complex techniques in order to make exquisite massive things. Volumetric openwork bracelets will certainly not leave anyone indifferent.
Here there is a wide scope for the imagination of needlewomen. Beads can be selected smooth or faceted, spherical or ovoid. The main thing is to maintain harmony in the color palette.
To create a bracelet you will need:
- pearl beads;
- fishing line;
- clasp;
- beads in the color of the beads;
- bicones;
- needle.
Sequencing:
- Fold the fishing line in half, securing one part of the fastener with a knot.
- Collect 2 large beads for the base, then 6 beads, a bicone and again 6 beads. Pass the needle through the large beads and pull away.
- Repeat on the other side.
- Next, string 1 bead, 6 beads, a bicone, 6 beads and pass the needle through the newly collected bead and the last one from the previous row.
- Do the 2nd fragment on the other side in the same way.
- Weave to the desired length of the bracelet and secure the 2nd element of the lock.
There is nothing complicated about making bead bracelets with your own hands. The main thing is to have a desire, an idea and available materials. And the Internet is full of video courses to help beginners.
options made of cord, paracord and beads
For every modern fashionista, original jewelry and accessories are a common and necessary thing. In order to look modern and fashionable, you can use the most unusual and exclusive bracelets and jewelry. You can create such accessories yourself using a wide variety of materials and techniques. You can also make such an important and significant element as a clasp for a bracelet with your own hands. In our article, craftswomen will be able to find detailed information about the process of making an accessory with their own hands.
Rules for choosing a clasp for a bracelet: recommendations and tips for craftswomen
When choosing a suitable clasp for your elegant bracelet, you need to be guided by several rules and recommendations. One of the important and determining factors is the convenience of the bracelet clasp. Also, the lock must be strong enough and reliable. Otherwise, your jewelry may be lost, and this is very unpleasant. The second very important factor in choosing a lock for a bracelet is its appearance. The lock of your hand jewelry should harmonize well with the main composition of the accessory. It should not stand out too much from the general background of the decoration surface.
There are several main and common types of locks for hand bracelets:
- Carbines;
- Hooks;
- Screw locks;
- Toggles;
- Clamps;
- Locks for cords;
- Multi-row fasteners.
Choose the most suitable clasp option for your bracelet.
Making a bracelet with a clasp with your own hands: detailed description and step-by-step master class
We offer readers a detailed and step-by-step description of the process of making a bracelet from a cord called “shamballa”. This bracelet is very popular and fashionable in recent decades. It is for these reasons that we invite readers to learn the process of making it.
You need to tie the edge of a waxed cord to one nail. Pull it to another nail, leave another five centimeters, then cut it off. String existing beads or sequins onto the cord in the order you like best. Start all manipulations after ten centimeters from the beginning of the nail. Next, pull the lace very tightly and tie it to the second nail.
After this, you need to cut off two and a half meters of lace. Step back two centimeters from the nail and tie through the center of the cut material. Along the edges of your structure, there should be an equal distance from the node throughout the material. It should turn out so that the left side is located higher from the node. This is where you need to start your weaving. Pass it under the main thread and then place it above the right thread. Pass the right part over the main thread and under the left thread. Tighten firmly and gently. You will get a knot that will be used throughout the entire work of making a bracelet with your own hands.
After this, you need to make sure that the right piece of lace passes under the main thread and over its left part. The left side should be located above the main and below the right waxed lace. Now tighten all the material tightly. Weave twenty knots according to the manipulations we described. Now add a decorative bead to the usual formed knot. Braid it with waxed cord. After three basic knots there is one more with a bead. Continue the steps we described until you run out of beads. Weave another fifteen basic knots. Remove your bracelet from the machine. Stepping back five centimeters from the base knots, form two simple knots on the main lace. Remove the rest with scissors. Lubricate the last knots with ordinary varnish. This will prevent the edges of your lace from fraying. It is thanks to this little trick that your bracelet will last much longer.
To form a comfortable and adjustable clasp in your homemade accessory, you need to close the edges of the main lace into a circle. Direct the ends of the cords with knots towards each other. Using the ropes that formed the main work, make five basic knots. Form ordinary knots on the remaining lace and cut off the remaining threads. Lubricate the ends of the structure with varnish. Now your bracelet with the original clasp is ready!
Selection of videos for the article
We invite you to watch a small selection of video materials on the topic of the article. In the material presented you will find a visual demonstration of the process of making bracelets with various types of clasps. Enjoy watching and exploring.
sdelala-sama.ru