It is generally accepted that women are more inclined to use accessories when creating an image. But men, as in ancient times, also love jewelry. The only difference is that men's accessories are designed to emphasize the masculinity of the owner, and can also be functional, while women's accessories emphasize the tenderness and beauty of their owner. To please your man and give him an interesting accessory, you don’t have to buy one ready-made in a store. Making a men's bracelet is very simple with your own hands.
We make a men's bracelet with our own hands from paracord
One of the common types of bracelet weaving is bracelets made of paracord, a durable special cord that can be unraveled into thin threads in tourism conditions and these threads can be used as fishing line or for their intended purpose. This cord bracelet turns out to be quite massive, tough, and is perfect for men. The finished bracelet can be used as a watch strap, and if you weave a long enough piece, you will get a magnificent belt.
Materials needed: cord, tape measure or ruler, clasp, scissors, lighter.
Cord length is calculated simply, 1 foot (30.5 cm) of cord per 1 inch (2.54 cm) of bracelet knot. Therefore, if your wrist is 8 inches (20.32 cm), you will need 8 feet (244 cm) of cord.
To weave a bracelet you need to follow these steps:
2.The cord is wrapped around the wrist and the length is marked. The resulting segment is measured with a tape measure - this will be the size of the wrist.
3.The ends of the cord are connected together, the center of the cord is found. The loop resulting from bending is pulled through the buckle of the lock. The ends of the cord are pulled through the loop.
4.The free ends of the cord are threaded through the second free element of the buckle. It is necessary to measure the distance between the two buckles at the ends of the bracelet and relate them to the size of your wrist. Approximately 1 inch is added to the wrist length to make the bracelet easier to wear. The length of the bracelet is measured from the end of the buckle to the end of the second buckle, not taking into account the length of the teeth.
5.The knot that is used for the bracelet has several different names: “cobra” “stitch”, “Solomon bar”, “Portuguese” and “sinnet”. The principle of knitting it is simple: the end of the left cord is placed in the center under the main strand. The end of the right cord is placed over the center of the strand, and into the loop on the left side. The ropes are tightened so that half of the knot that is formed is located near the buckle. Again the right end of the cord is placed in the center under the main strand. The end of the left cord is inserted into the loop formed by the right cord. The finished knot is tightened.
6.Knitting continues until all the space between the buckles is filled.
7.The excess end of the cord is cut off and melted using a lighter. Using a match or toothpick, the melted cord is glued to the bracket.
DIY modifications of leather bracelets
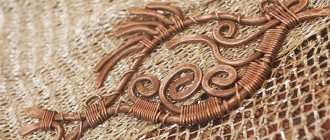
Photo 1. Men's leather bracelet.
You can make a beautiful leather men's bracelet with your own hands in several variations. Below are several modifications that may help you find and choose your own method of making leather bracelets for a man.
- Method 1: stylish eights made of leather, suede or felt
To create such a decoration, you will need a piece of thick leather fabric and a figure-eight stencil, drawn and cut out of paper by hand. Next, this stencil is transferred using a pencil or pen onto the fabric.
When the required number of elements is drawn on the fabric, the “eights” need to be carefully cut out. Upon completion, all the parts are assembled in a chain (links) into a finished decoration in compliance with a certain technology.
- Method 2: from pendants and leather laces
In the proposed version, as a rule, flat natural leather laces, ring connectors, button fasteners, as well as connecting rings and ends for ribbons and leather laces are used.
The easiest option is to attach a strong thread (leather cord, ribbon or cord) to the pendant you like (for example, an inscription or a simple pattern in the form of flowers, twigs, birds, fish, etc.). The ends of the bracelet are decorated with clasps or simply tied with a bow on the wrist.
A more complicated model includes several selections at once, that is, many bracelets are assembled into a single composition using a wide end and one clasp. For example, a very original and stylish men's leather bracelet can be made for the summer with an anchor pendant.
- Method 3: personalized leather bracelets from an old belt
This strict men's bracelet is very suitable for those who want to make a memorial inscription for a man with wishes or mottos with their own hands. To make such a bracelet, you will need a strip of old leather belt corresponding to the size of your wrist, a sharp knife, brown leather paint and snap clasps.
So, an inscription is written on a strip of leather with a pen, then it is carefully cut out with a knife. The recesses are made in such a way that they are not too large, but can be read clearly and legibly. Next, the finished letters are painted with a special paint, and at the end of the work, the bracelet is decorated with rivet buttons. A simple wide strip of genuine leather, decorated with ordinary push-button clasps and studs, will look stylish on a man’s hand.
Trying to make a stylish leather bracelet for every day
A simple but effective woven bracelet is made from a strip of leather.
To make a leather bracelet, you will need a piece of leather at least 21 cm long and about 2 cm wide, sharp scissors, a ballpoint pen, a ruler, a thin and thick awl, tweezers, and glue suitable for gluing leather.
On the wrong side, 3 stripes are drawn with a pen. Using a sharp knife or scissors, cut through the skin so that about 1 cm remains to the end of the piece of skin.
Weaving consists of repeated four steps. For convenience, you can number the strips of leather.
Step 1. Carefully unscrew the existing lower part of the bracelet between cords 2 and 3.
Step 2. Then carefully straighten the cords in order to be able to weave: 1st to 2nd, 3rd to 1st, 2nd to 3rd.
Step 3. Turn out the bottom of the workpiece. Make it so that it goes from front to back between cords 3 and 2.
Step 4. Straighten the weave very carefully upwards, the result should be the original arrangement of laces 1, 2, 3.
Repeat steps 1 to 4. Repeating the sequence of actions twice allows you to weave a cord of such length that you get a neat, finished braid. Finally, use your hands to straighten all the cords evenly.
Using scissors, try to round the edges of the workpiece, and with an awl, make holes for fastening the ribbons for the leather bracelet on each side. To connect the lock, you need a very thin cord made of leather: for this you need to cut a strip of leather about 20 cm long and about 3-4 mm wide with scissors. Now for the lock-connection you need to glue the resulting workpiece from a small number of small pieces of leather (size no more than 1.5×1.5 cm).
When a pack of leather pieces is glued together, you need to trim the edges in a circle. To give the work the most neat appearance, you can process the edge with coarse sandpaper (sandpaper). Make a hole in the middle with an awl. And then thread the ends into the prepared round piece of leather in the same way. Before work, you should measure the required length of the future cord, and only then cut and tie knots at the ends of the cord.
You don’t have to intertwine the strips of leather with each other, you’ll get an unusual decoration.
Using macrame weaving you can make an interesting bracelet - shamballa. To do this, beads of different sizes are put on the cord during weaving. The result is an interesting decoration that also serves as a protective amulet.
Leather wrist bracelets for men
Bracelet from an old belt
Sooner or later, a leather belt will wear out. In order not to throw it away, we suggest you make a vintage bracelet.
We will need:
- Old leather belt
- Hammer
- Nail
- Scissors
- Pencil
How to do:
- Wrap the belt around your wrist 3 times
- We put a mark on the end after the 3rd time
- Trim off excess with scissors
- Using a nail and a hammer, make a hole so that the bracelet can be closed with a clasp.
All! Just a few minutes and the bracelet is ready!
But no, here’s another thing, such a bracelet can be made for a girl using her old belt
Creative bracelet with iron clasp
This creative leather bracelet is made quite quickly and is perfect for practicing the first steps in working with leather.
We will need:
- Leather
- Metal clasp (you don’t have to use exactly the same one as ours, any one will do)
- Hole puncher
- Hammer or button inserter
- Rivets
- Scissors or breadboard knife
- Ruler
- Varnish (optional)
- Glue (optional)
How to make a leather bracelet for men with an iron clasp?
Step 1
Cut a strip of leather 5 cm larger than the wrist. The width should be 2 cm larger than the fastener. To do this we use a knife or scissors.
Step 2
We bend 2.5 cm of leather on each side (we cut off the excess, so we ended up with a larger fold). You can glue it, or you can leave it as is
Step 3
We wrap the wrist, attach the clasp and put marks on the place where it is attached
Step 4
Punch holes using a hole punch (as a last resort, you can use a knife) and insert rivets, driving them in with a hammer
*The main thing is to choose the required diameter of the rivets so that they are larger than the hole in the fastener
Step 5
We repeat the same thing on the other side.
Step 6
If desired, the bracelet can be varnished
How to make a men's bracelet yourself, ideas with photos
From wooden beads
- Place small beads on the base ring, two dark and two light.
- Slightly short of the middle, put on two larger beads.
- Place the largest wooden bead in the center of the composition.
- Next, assemble the bracelet completely in reverse order.
From the cord
- Take two cords, one smooth, the other braided. Place both ends of the cord in the end cap and press with pliers.
- Thread the end loops of both cords into the connecting ring.
- Place beads on a smooth cord in the order shown in the example.
- Decorate the edges of the cords by connecting the rings and the hook.
Simple leather
- Cut off unnecessary parts from the belt.
- To find the required length, use any ready-made bracelet as a template.
- Using an awl, mark the hole where you will insert the button.
- Replace the buttons.
- Round the edges on the leather.
When choosing the best bracelet option, make sure that it does not interfere with your work. As you can see, a beautiful bracelet does not always require a lot of money and time. You can make a cute bracelet from simple materials without spending a lot of time.