You will need
- - Whatman paper or thin cardboard;
- - thick cardboard;
- - pencil;
- - scissors;
- - foil;
- - PVA glue;
- - flexible wire;
- - wire cutters;
- - white or silver beads;
- — decorative elements (beads, artificial stones, rhinestones, etc.);
- - white fur or tinsel.
Instructions
Draw a sketch of a crown on cardboard or a piece of Whatman paper. The length of the cardboard blank will be equal to the head circumference of the future owner of the masquerade accessory. Be sure to leave an allowance of approximately 1.5cm each at the two ends of the back of the piece. They will be needed for subsequent gluing of the crown.
Cut out the drawing very carefully along the drawn pencil lines, and then close the finished part into a ring. Now you need to glue the crown along the back seam with PVA glue.
Consider spectacular relief patterns on the royal accessory. To create a three-dimensional decor, glue small elements made of thick cardboard to the outer surface of the product along pre-designated lines. For example, along the perimeter of the workpiece you can place circles or hearts of the same size, a beautiful, neat wavy line.
Glue gold or silver foil over the cardboard pattern elements. Carefully straighten the metallized decorative layer so that every relief pattern and tooth appears. Be very careful not to tear the metallized sheet.
Decorate the front side of the masquerade accessory to your taste with artificial stones, beads, rhinestones or sequins. Don't forget about the main attribute of the snow queen costume - a silver or white snowflake, which is recommended to be attached to the central tooth of the crown.
Make a snowflake from flexible wire and beads of a suitable color. Arrange a dozen wire pieces in the form of symmetrical cross-rays, and form a ring from one piece. String beads onto the entire wire and fasten all the elements of the decorative element together. Place one segment in the form of a ring in the center of the figure. You can use any other, easier or more labor-intensive method of making a snowflake, or you can do without this decoration altogether. If desired, cover the bottom edge of the royal crown with a strip of white fluffy fur or silver Christmas tree tinsel.
Video on the topic
Helpful advice
The crown can not be covered with foil, but trimmed with beautiful fabric and lace braid. To reduce the time it takes to make a New Year's accessory, look for a ready-made snowflake in the Christmas tree decorations department.
Every girl dreams of being a queen. Even if not for long, even if only for the duration of a wonderful ball or a fabulous holiday. Chess or snow - it doesn’t matter. And what queen can do without such an important part of her outfit as a crown? Moreover, making it with your own hands is not at all difficult, and any little heroine who dreams of appearing at the holiday in all its splendor will cope with this task with the help of her mother.
Instructions
The crown for the Snow Queen is made as follows: a frame is bent from thick white wire using pliers, which is then simply wrapped with silver tinsel. The shape of the frame can be any - just call on your imagination to help. Just make sure that the frame matches the size of the head.
If the young lady is preparing to play the role of the Chess Queen, help her make a classic cogwheel. The frame for such a headdress is made of cardboard; you can even use several layers of this material, connecting them with glue or a stapler.
Every girl dreams of being a princess. To do this, she needs special attributes: a beautiful dress and shoes and, of course, a real royal crown. A crown or kokoshnik will also be useful for a children's New Year's party, a fun New Year's party, a birthday celebration or a family performance.
Motherhood.ru reveals the secrets of making a real crown and kokoshnik for a little princess. We will look at different materials and manufacturing techniques: frame, knitted, models made from ribbons, plastic, fabric, birch bark and straw, beads, cardboard and even food.
Let's start with the easier-to-make royal headdresses for the festive masquerade, gradually moving towards more labor-intensive masterpieces.
Crown made of paper, cardboard and cardboard cup
A simple and quick crown to make is made from a piece of flat cardboard.
In this case, you can use colored and holographic cardboard. We apply the image of the crown, cut it out, and glue it along the edge of the joints. We decorate with sparkles, paints, rhinestones, beads, and nail polish. We thread it with a thin hat elastic. Now the small crown will rest securely on the little princess’s head. The same model can be made from a leftover toilet paper roll. Then it will not need to be glued.
Using a pressed paper seedling cup can make a stronger crown. Cut out the top of the cup to create teeth. Paint the base white. Then use a scouring sponge to lightly apply gold paint using a dabbing motion. There is no need to paint with solid “gold”. Light white gaps will give the crown more elegance and transparency. We decorate the crown with rhinestones and “precious stones”. We glue a hairpin holder on the bottom side. Now you can pin it directly to your hair!
You can glue together a lightweight crown design from colored paper. Cut equal squares of paper. We make diagonal bends. Now we glue the resulting triangles together, as in the image. Even small children can handle this simple option. Get crafting together!
Making a crown from paper
Glue is used for this. You can also add rain if decoration is required for the New Year holiday. Products decorated with paints look beautiful. Hairspray with glitter will give the accessory a finished look.You need to cut out a blank from cardboard according to the template, and then carefully glue it together. They decorate it with bright beads, rhinestones, sequins and other elements.
Royal lace crown
To make such a crown you will need:
Beautiful carved lace braid 40-45 cm long. The length depends on the desired diameter of the final product. PVA glue. Wax paper. Gold, silver, bronze or other colored spray in a can. Or acrylic paint. Glue Crystal-moment or hot melt glue. A sponge or cloth for applying and wiping off excess glue.
We place our lace on wax paper and coat it with PVA glue 2-4 times until completely dry. After complete drying, paint the workpiece in the desired color. Each layer of paint must dry well. Glue the crown along the edge, matching the pattern. We use hot melt glue or Crystal Moment glue. We decorate the crown as desired. It can be gold or silver:
Or match the tone of the royal outfit: soft pink, yellow, blue.
Let's make an openwork lace crown: tips for craftswomen
A crown made of openwork lace will look very beautiful and impressive. This royal crown is very easy and quick to make. Even a novice craftswoman can handle this process.
For work, prepare all the necessary materials and tools:
- lace ribbon of the required length (depending on the circumference of your child’s head);
- starch or special spray to stiffen your royal crown;
- acrylic paints;
- sharp scissors;
- needle and thread;
- glue "Moment";
- brush;
- three-liter glass jar;
- decorative elements: beads, rhinestones, seed beads, sequins and much more.
First, cut the openwork lace to the length you need and roll this strip into a circle. Stitch very carefully so that the threads are not visible on your crown. After you have sewn the frame of the product, you should starch it well. After this, straighten your crown and put it on a three-liter glass jar. Leave your structure in this position until it dries completely.
After the entire crown structure has dried, begin painting it with a brush and paint. The paint can be applied only to the edges of the crown or to its entire surface.
When the paint is completely dry, use glue to attach beads, rhinestones, sequins, stones or beads to the crown.
Your lace lace crown is ready.
Crown and kokoshnik using quilling technique
You can make a crown entirely using the quilling technique - from intricate paper curls.
At the same time, you can use colored paper and a variety of designs: winter flowers, snowflakes, curls. It is very beautiful and unusual, although the work is quite labor-intensive. You can make your work a little easier without reducing the originality of the product. We cut out the base of the kokoshnik from colored cardboard. We make fastenings from satin ribbons or bows of a suitable color. Now we decorate the dark kokoshnik with a snow-white pattern using the quilling technique. The result is a kind of frosty design.
Look what they wear with this kokoshnik. This is a “winter” snow-white fluffy cape, decorations in the Russian style.
When choosing a kokoshnik uniform for a carnival costume, you should be inspired by ancient paintings and photographs of Russian beauties in rational clothing.
Royal crown
You will need: foam board, stationery knife, corrugated paper or newspaper, red velvet, beautiful fabric, candy, double-sided tape, decorative ribbons, needles, beads, foam plastic, threads, glue gun, skewers, cross, decorative stones.
Master Class
- Cut blanks for the crown from polystyrene foam and polystyrene foam, as shown in the image.
- Wrap the foam in corrugated paper and wrap it with thread.
- Cover the crown blanks with fabric and cover the edges with shiny ribbons.
- Cover the sides of the crown with velvet and create a drapery using beads, needles and glue.
- Assemble the crown in this way: glue the middle onto the base of the crown, then the small side parts, using skewers and glue. At the end, glue the voluminous red blanks.
- Glue the candies to the crown using double-sided tape.
- Glue a cross to the top of the crown and decorate it with stones and other decorations.
The royal crown is ready! I recommend watching this video!
>
Royal crown made of wire and ribbons
We make a wire blank in the shape of the crown of the Russian Empire. We decorate it with white and gold ribbons, braid, large stones and pearls. Use the basics of the macrame technique to weave ribbons and braid. Such a masterpiece will be remembered for a long time by all participants of the New Year's holiday!
Birch bark or straw crown
Products made from birch bark and straw are not only bast shoes, hats, boxes, but also crowns.
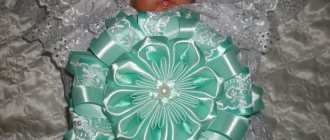
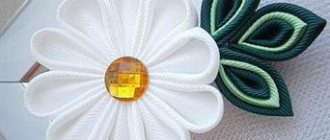
Here, for example, is a luxurious crown in eco-style! The essence of the kanzashi technique is the production of masterpieces from fabric “petals”. Petals are often made from satin ribbons, which are cut into 5x5 cm squares. They are used to make round petals, simple sharp open petals. Watch a step-by-step master class on making a red satin crown using the kanzashi technique.
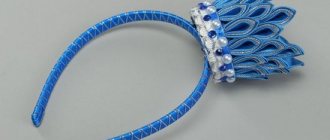
The kanzashi technique produces delicate winter flowers that can be used to make hairbands, small or large crowns.
A kokoshnik for the New Year's holiday using the kanzashi technique is made from satin petals fastened with wire and threads. They are attached to the rim. Look how beautiful it turns out!
Wooden crown
You will need: a thin wooden board, a pencil, a knife, paper clips, a bucket and a saucepan, hot water, glue.
Master Class
- Mark the links (teeth) of the crown on the tree.
- Cut them out.
- Fill a bucket with hot water and soak the wood in it for 10 minutes.
- Fill a saucepan with hot water, remove the crown from the bucket and place it in the saucepan for 10 minutes.
- Drain the water and leave the crown in the pan overnight until completely dry.
- Glue the ends of the crown together, securing them temporarily with clamps.
- Remove the clips and decorate the crown to your liking.
The wooden crown is ready! I recommend watching this video!
Crowns made using macrame technique
We all remember flowerpots, funny dogs and owls made using the macrame technique.
However, this is far from the limit of skill. You can make a crown from macrame for a little or big princess. The simplest option is to weave a headband for the crown using the macrame technique and decorate it with additional details. This can be a ready-made flat crown, a wire model with ribbons and beads.
Real craftswomen will be able to create truly royal works with gold threads, woven stones and beads, and figured designs.
Wire crown
The crown can be made from “gold” or “silver” wire. At the same time, it is not at all necessary to overload it with decorations. It is enough to make an ornate lace pattern and decorate it with several large stones. It turns out concisely and tastefully. But do not forget about safety - all ends of the wire must be perfectly bent.
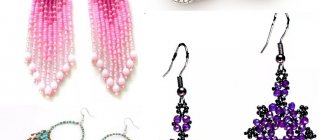
Crowns made of beads and stones
The royal crown can be made from “golden” beads.
To do this, we string it on a wire and give it the intended shape. The crown can be literally “studded with precious gems.” Abundant decoration made of beads, bugles, beads, and pearls will create an atmosphere of royal luxury. The crown can be made in accordance with the color scheme of the festive dress.
A crown made of beads and stones can be soft snow-white. This is a great option to complement a New Year's carnival costume and for a wedding ceremony. This way, once you make a masterpiece, you can use it over and over again.
The crown can be monochrome, like in chess. You can organize a party-tournament on this topic: “Whites versus Blacks.” Come up with various competitions: active and intellectual, comic tasks. This New Year's Eve will be remembered for a long time! Make the crowns in a fancy shape.
Such black and white crowns will also be useful for creating the image of Odette and Odile from Swan Lake.
Crown made of beads and wire
You will need: thick and thin wire, 8 large beads, beads of different colors and sizes, ruler, pliers.
Master Class
- Make the base of the crown from thick wire with a diameter of 12 cm.
- Wrap thick wire around the base of the crown.
- Attach 8 links of thick wire.
- Thread the bead and seed bead onto a thin wire, then attach it to the top of the link. Decorate all the links of the crown in the same way.
- String beads onto a thin wire and decorate the crown, wrapping each link in a chaotic manner.
The crown made of beads and wire is ready! I recommend watching this video!
Frame kokoshniks
We make the frame of the kokoshnik from wire, wrap it with tape, and sew on a transparent fabric base. For example, tulle or tulle. We apply a Gzhel style ornament to it. This painting fits perfectly with the winter theme. But you can also use other folk paintings. We color the ornament, decorate it with a ribbon of beads along the edge, and make a fastening in the form of a half-cap or satin ribbons. Large rhinestones can be glued to the fabric base.
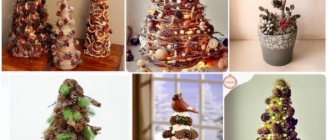
An original kokoshnik hat in the shape of a green spruce is an excellent themed accessory for celebrating the New Year. Extravagant, stylish and to the point!
You can make a kokoshnik professionally according to the following scheme: make a frame from wire, cover it with a base fabric, glue brocade to it using paper clips, decorate the kokoshnik with pearl thread, sparkles, rhinestones and bugles, and tulle.
You can combine a frame kokoshnik with a cardboard one. Make carved designs in cardboard and glue translucent fabric over it. Decorate to your liking and the kokoshnik is ready!
And this kokoshnik would look great on the head of Nastenka, the heroine of the fairy tale “Morozko”.
We make a real costume for the Snow Queen from a wire base and fabric decor. We decorate the outfit in the same style. The stand-up collar with large “cold” decorations is especially chic.
Crown of food
You can decorate the cardboard base of the kokoshnik with almost anything.
There would be a desire to create! Small, “grainy” products are perfect: peas, corn, lentils, rice, beans, buckwheat, millet. We glue our future “stones” to the base. We color it with pearls and precious stones. Now let's get down to business! After all, before the New Year you need to have time to build your own crown or kokoshnik design. We wish you creative inspiration and good mood!
Photo sources:
The Snow Queen Elsa is one of the most attractive modern cartoon heroines. Surely your little one also dreams of feeling like a snow queen. What is a queen without a crown? Of course, to create the image of a snow queen, you will have to work extra hard on at least the shoes, and ideally also on the shoes.
Of course, you can always buy Elsa's crown in the store, but it's much more interesting to make it yourself. Moreover, you can call your princess for help, who will certainly happily participate in its creation.
If you cannot find a ready-made Elsa crown in the store, you can buy some other one, even a silver one. And repaint it yourself gold with spray paint and glue on a blue stone.
How to make a paper crown with your own hands
A paper crown is the easiest and fastest way to make a crown. You just need to print it on paper, cut out and glue the parts. Next, decorate to your taste: cover it with beads, rhinestones or sparkles.
The templates presented above can be used to create a paper crown, or can be used as a stencil. And make a delightful crown from foamiran.
If you don’t find foamiran, but want to make a durable crown, use cardboard. A headband (option in the photo on the right) is suitable as a basis for a crown made of cardboard, or print out the second option and connect the edges with a stapler or glue them.
In addition, for greater strength, you can glue paper to fabric.
DIY foamiran crown
It’s easy to create incredible low openwork tiara crowns from foamiran. A wide range of colors will definitely allow you to choose the most suitable one. Silver and shiny are suitable for the role of the ruler of winter. The raw materials are dense, high quality, and easy to process.
Popular articles Crafts flowers: master class on how to make artificial flowers with your own hands (105 photos)
The process of creating such beauty is very simple. A pattern will be needed. You can simply draw it or print a diagram. Then cut and apply the shape directly to the raw material. Then, using thin-tipped scissors, carefully make a shape.
As a fastener, you can take a rim or bend it yourself from copper. If the second option is chosen, then the metal should be disguised by wrapping it with satin ribbon or bright wrapping. The length depends on the size of the child's head.
We fasten the parts with glue or “put them on a gun”. When it dries it's time to start decorating. We cover the edges with braid and jewelry. We attach large glass or beads to the main element. This will become a colorful accent. Adding a few small details.
The charming crown for the girl is ready!
Felt Elsa crown for girls
The felt crown looks nicer than the last option. However, you can do it quickly. Print out the stencil and use it to cut out a crown from felt. Cut out decorations from felt in a contrasting color and sew them on. Next, sew a couple of ribbons for ties - you will get a beautiful crown for the little snow queen.
You can make the crown denser. Cut out the “background” from white felt and more accurate contours from blue felt - sew them together. To make the crown comfortable to wear, insert an elastic band at the back.
By the way, you can also use a headband to make a felt crown.
Moreover, you can even take a thin bezel.
Felt is very convenient to work with; it can be completely embroidered with sequins and beads. To give rigidity to such a crown, generously coat the inside of the felt with PVA glue and fix the crown on a glass or jar until it dries. Then sew an elastic band to it and you can delight your princess.
Crown on the rim
You will need: shiny pink foamiran, white felt, tulle, crown template, wooden skewer, scissors, glue gun, Moment-Crystal glue, superglue, ruler, white threads, needle, headband, pieces of textile elastic, 7 rhinestones.
Master Class
- Print and cut out the crown template.
- Trace the template with a skewer on the back of the foamiran, then cut it out.
- Make a slit as shown in the image so that the crown can be assembled.
- Gather 7 small pieces of tulle onto a thread and attach each of them with superglue to the back of the crown.
- Apply Moment-Crystal glue to the side of the crown to which the tulle is attached, then glue it to the white felt and cut it out.
- Assemble the crown and secure the joint with glue.
- Use a glue gun to glue the rhinestones to the top of each crown tooth.
- Measure the rim and glue a strip of foamiran onto it, 3 cm longer and a few millimeters wider.
- Cover the ends of the headband with textile elastic.
- Glue the crown onto the headband, slightly away from the center.
The crown on the headband is ready! I recommend watching the video master class!
Unusual crowns of the snow queen
First, let's look at the wooden crown. You wouldn't think so - it's made of wood. True, you will have to work hard to create it. You will need a jigsaw, wood (you can take plywood), sanding paper, paint and rhinestones for decoration, plus a husband with golden hands won’t hurt.
So you can make your own sketches or
We glue the sheet with the design to the wood and cut out the details.
The result is a rather original snow queen crown.
Don't forget that you can always use available materials, for example, plastic packaging for sour cream or yogurt. Cut out the crown according to the template and paint it.
In addition, the lace deserves attention. Choose some beautiful lace - the length should correspond to the desired circumference of the crown. And you will need a pan or can (paint) with a suitable circumference. Generously coat the lace with pva glue, wrap it around the jar, closing the edges, and leave to dry. Next, paint and decorate it to your taste.
And finally, hot glue. Print on paper and place parchment on top. Apply hot glue to the parchment along the outline and let it dry. Next, cover the dried glue with gold paint, and glue the bead on the wire from the inside out (as shown in photo No. 5). Glue the scallop on the bottom. That's it, Elsa's beautiful crown is ready.
There is another option for using glue. This time you will need a base. We use hot glue to make strips of different lengths (wide at the bottom, tapering towards the end). Sprinkle glitter onto the strips until they dry.
It is better to use multi-colored sparkles.
When the strips are dry, glue them to the base.
It turns out to be a very impressive crown for a girl - worthy of a real snow queen.
Our small selection of ideas has come to an end. I hope we have inspired you to take on the idea that you like as a basis and create your own masterpiece! Good luck with your experiments!
At the New Year's carnival celebration, girls often play the role of a snowflake or snow queen. If for the first case it is not difficult to choose an outfit, then in the latter case the problem of finding an appropriate headdress may arise. Unfortunately, a beautiful crown for the snow queen is rarely found in stores. Therefore, you usually have to make it yourself.
Cardboard crown
You will need: cardboard, tape measure, scissors, glue.
Master Class
- Cut the cardboard into 2x2cm squares. To find out how many squares you need: measure your head circumference, multiply by 2 and add 6 squares as a reserve.
- Fold the squares in half diagonally to create triangles.
- Apply glue to the edge of the triangle and place it in the middle of the other. Thus, glue all the blanks together, creating the desired length of the crown.
- Apply glue to the two edges of the triangle and attach it inside the chain. Thus, glue the triangles, placing them in a checkerboard pattern.
- Press down on the fold line of the entire crown, fixing the triangles in the desired position.
- Try on the crown and glue its ends.
The cardboard crown is ready! I recommend watching this video!
Ice accessory
This crown has a “candy” effect due to the use of non-standard material.
To work on the product you will need:
- transparent PVC film or plastic (you can take old document covers);
- tulle with silver pattern;
- cardboard;
- shiny fabric (silver look);
- thread, needle;
- scissors;
- thin wire;
- silver braid;
- elastic band 2 cm wide;
- hot glue;
- decorative elements (for decoration).
First of all, the circumference of the head is measured. Based on the obtained measurement, you need to calculate the width of the base of the vertices of the future crown. There are seven of them in the product.
The height of the triangles is selected individually. You just need to take into account that the central triangle will be the highest. The parts adjacent to the central part are cut 2 cm shorter than the main part. The next two triangles are 2 cm lower than the previous ones, etc. Based on the principle described above, 7 triangles are cut out of PVC film. The same parts are cut out separately from tulle.
A corresponding tulle detail is applied to each workpiece. A wire is sewn along the edge of the blanks using an overcast stitch. All triangles are framed with silver braid. It is advisable to bend the figures slightly so that they hold their shape better. The finished transparent parts are assembled with elastic. The most convenient way to do this is on a sewing machine. The ends of the product are connected into a ring.
To create a volumetric effect, you need to complement the crown with opaque elements. To do this, two triangles are cut out of cardboard. Since these parts will be located on the front of the crown, their height should be slightly lower than the transparent triangles.
Cardboard blanks are covered with shiny fabric and secured with safety pins to the front “ice pieces” of the crown, as in the photo.
Dense and transparent parts are attached to each other. All that remains is to decorate the crown to your own taste. You can use rhinestones, beads, sequins, and lace elements in your work.
The royal ice accessory is ready.
Icy Splendor
This decoration turns out to be truly royal. Here are the step-by-step instructions:
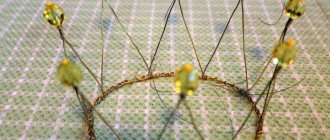
- We make teeth. For the base we take PVC film or a thin plastic sheet (unnecessary covers for documents). We make the central element relatively high, and all the side ones are slightly lower than the previous one. As a result, there are 7 of them.
- We glue fabric with a silver pattern onto these teeth.
- We reinforce the edges with wire to keep the structure straight. This can be achieved by sewing the frame with a wrap stitch.
- We glue it with beads and rhinestones.
- We decorate the outline with pebbles.
- Several more opaque teeth should be assembled using the same type. This solution allows you to achieve a 3D effect.
- We measure the circumference of the child's head - this will be the length of the strip. Add 1 cm to the gluing.
- We hook the first triangles onto an elastic strip.
- We add additional details along the back surface. For convenience, sewing pins are used.
Quick option
Advice! It is quite possible to make a crown faster if you do not cut out each tooth of the product separately, but use the continuous pattern technique.
To do this you should prepare:
- cardboard;
- fabric packaging for flowers;
- scissors;
- elastic band;
- silver braid;
- silver paper;
- threads;
- glue;
- sequins in the shape of snowflakes.
A crown template is drawn on cardboard. The workpiece is cut out. The pattern is placed on the fabric and traced taking into account the allowances.
The fabric part needs to be cut out, then placed on a cardboard mockup. The allowances are folded over to the reverse side and glued to the cardboard.
Glue is applied to the underside of the workpiece, after which the crown is glued onto silver paper. This hides unsightly allowances on the back of the product.
The crown is carefully cut out. The product is decorated with large sequins in the shape of snowflakes.
The outline of the crown is framed with silver braid. Depending on the quality of the braid, you can glue it with hot glue or sew it on yourself.
The crown is ready. If the holiday is just around the corner and you urgently need to acquire a “snow” crown, then you can try a simplified version – a product made from cardboard. To prevent the crown from looking like a “hurried craft,” it is advisable to replace the cardboard with a piece of light wallpaper with a pattern.
A model of the crown is drawn on it. The template needs to be cut out.
Then the workpiece is painted with silver spray paint. Since the aerosol tends to be sprayed in all directions, it is recommended to provide for this moment and carry out painting in the corridor, having previously covered the floor with newspaper or polyethylene.
First you should paint the back of the product. On the front side you need to carry out two stages of staining. After applying the first layer, you need to dry the product and repeat the coloring.
When the crown has completely dried, you can begin decorating it. The edges of the product are decorated with edging with rhinestones or any silver braid. The crown is decorated with additional elements corresponding to the theme of the carnival costume.
The final step is to sew a wide elastic band along the edges of the product. You need to measure the elastic so that the crown fits tightly around your head.
The carnival headdress is ready to delight its owner. Any proposed master class will allow you to create an accessory not only for a child, but also for an adult. This is especially true for kindergarten teachers and directors of theater clubs.
DIY crown for the snow queen: master class with photo in photo
DIY crown for the snow queen: master class with photos in photographs.
At the New Year's carnival celebration, girls often play the role of a snowflake or snow queen. If for the first case it is not difficult to choose an outfit, then in the latter case the problem of finding an appropriate headdress may arise. Unfortunately, a beautiful crown for the snow queen is rarely found in stores. Therefore, you usually have to make it yourself.
Ice accessory
This crown has a “candy” effect due to the use of non-standard material.
To work on the product you will need:
First of all, the circumference of the head is measured. Based on the obtained measurement, you need to calculate the width of the base of the vertices of the future crown. There are seven of them in the product.
The height of the triangles is selected individually. You just need to take into account that the central triangle will be the highest. The parts adjacent to the central part are cut 2 cm shorter than the main part. The next two triangles are 2 cm lower than the previous ones, etc. Based on the principle described above, 7 triangles are cut out of PVC film. The same parts are cut out separately from tulle.
A corresponding tulle detail is applied to each workpiece. A wire is sewn along the edge of the blanks using an overcast stitch. All triangles are framed with silver braid. It is advisable to bend the figures slightly so that they hold their shape better. The finished transparent parts are assembled with elastic. The most convenient way to do this is on a sewing machine. The ends of the product are connected into a ring.
To create a volumetric effect, you need to complement the crown with opaque elements. To do this, two triangles are cut out of cardboard. Since these parts will be located on the front of the crown, their height should be slightly lower than the transparent triangles.
Cardboard blanks are covered with shiny fabric and secured with safety pins to the front “ice pieces” of the crown, as in the photo.
Dense and transparent parts are attached to each other. All that remains is to decorate the crown to your own taste. You can use rhinestones, beads, sequins, and lace elements in your work.
The royal ice accessory is ready.
Quick option
To do this you should prepare:
A crown template is drawn on cardboard. The workpiece is cut out. The pattern is placed on the fabric and traced taking into account the allowances.
The fabric part needs to be cut out, then placed on a cardboard mockup. The allowances are folded over to the reverse side and glued to the cardboard.
Glue is applied to the underside of the workpiece, after which the crown is glued onto silver paper. This hides unsightly allowances on the back of the product.
The crown is carefully cut out. The product is decorated with large sequins in the shape of snowflakes.
The outline of the crown is framed with silver braid. Depending on the quality of the braid, you can glue it with hot glue or sew it on yourself.
All that remains is to try on the crown and calculate the length of the elastic band on your head. The elastic is sewn along two edges of the product.
The crown is ready. If the holiday is just around the corner and you urgently need to acquire a “snow” crown, then you can try a simplified version – a product made from cardboard. To prevent the crown from looking like a “hurried craft,” it is advisable to replace the cardboard with a piece of light wallpaper with a pattern.
A model of the crown is drawn on it. The template needs to be cut out.
Then the workpiece is painted with silver spray paint. Since the aerosol tends to be sprayed in all directions, it is recommended to provide for this moment and carry out painting in the corridor, having previously covered the floor with newspaper or polyethylene.
First you should paint the back of the product. On the front side you need to carry out two stages of staining. After applying the first layer, you need to dry the product and repeat the coloring.
When the crown has completely dried, you can begin decorating it. The edges of the product are decorated with edging with rhinestones or any silver braid. The crown is decorated with additional elements corresponding to the theme of the carnival costume.
The final step is to sew a wide elastic band along the edges of the product. You need to measure the elastic so that the crown fits tightly around your head.
The carnival headdress is ready to delight its owner. Any proposed master class will allow you to create an accessory not only for a child, but also for an adult. This is especially true for kindergarten teachers and directors of theater clubs.
Video on the topic of the article
A video selection will help you better understand the process and make the product faster.
Review DIY crown for the snow queen: master class with photos.
Did you like the post? Share it with your friends!