Cattail plates
Tools and materials
- cattail stems – 2 bunches;
- scissors – 1 pc.;
- tightening – 1 pc.;
- hammer – 1 pc.
Step-by-step making of a cattail plate
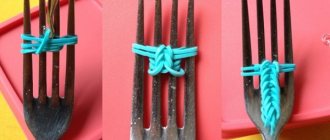
- We tie a bunch of cattail leaves into a knot, leaving one leaf free.
- Using a puff, we thread a loose cattail leaf into the loop of the knot, moving it in a circle.
- We bend the free tail of the sheet under the base.
- We take another sheet of cattail and, using a puff, repeat the same circular weaving pattern.
- We weave until the beam is long enough.
- We make the last 3 rows with a side, raising the base to the top and weaving it into the overall composition.
- We trim off the excess edges of the product and weave the last pattern.
- Lightly go over the wicker plate with a hammer.
Video instruction
We invite you to watch a video through which you will learn how to weave reeds correctly.
Cattail rug
Tools and materials
- reed stems - a bunch;
- ropes – 60 pcs.;
- ball of thread for knitting – 1 pc.;
- hook – 1 pc.;
- scissors – 1 pc.
Step-by-step making of a cattail rug
- Soak the reeds in the bath for 10-15 minutes.
- We tie 6 stems and begin to weave a braid 60 cm long from them.
- When the stems become too short, we weave a few more into them.
- We tie the end of the braid and cut off unnecessary tails from it.
- We braid 30 braids in the same way.
- We tie 8 threads to the braid and gradually weave the remaining pieces into them. We cut off the remaining threads and the ends of the braids.
- We decorate the finished mat and mask its ends using yarn and a hook, making a regular cape weave.
Video instruction
We invite you to watch a master class with which you will learn how to make cattail weaving. You will learn how to make a beautiful floor rug from ordinary natural materials.
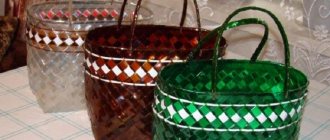
Cattail basket
Tools and materials
- cattail stems - 3 bunches;
- cylinder – 1 pc.;
- twine – 1 pc.
Step-by-step making of a cattail basket
- We put 6 cattail stems in one bunch.
- Gradually weave additional stems into the bunch until you get a piece in the shape of a small square.
- Using additional stems, we weave a few more rows, forming a circle.
- We weave a circle until it is equal to the diameter of the cylinder.
- Trim off unnecessary ends of the cattail.
- We tie the cylinder to the workpiece with twine.
- We place the workpiece on its side and begin to weave around the cylinder, placing one stem under the other.
- We stretch out the cylinder and cut off the unnecessary ends on the basket. We tuck the ends of the basket, weaving them into the loops.
- Insert a bunch of 4 stems into the top hole of the basket.
- We fold the stems in half and begin to weave handles, shifting the cattail every 2 stems.
- We fix the end of the handle on the other side of the basket.
- Trim off unnecessary ends.
- Using the same principle, we weave the second handle of the basket.
Video instruction
If you are wondering what can be made from reeds, we invite you to watch a video that demonstrates in detail weaving by hand from natural materials. You will learn how baskets are made from reeds, and you will be able to repeat the proposed master class yourself.
Wicker furniture made from natural materials has always been and will be valued higher than factory furniture. DIY crafts made from reeds, photos of which you see, are a separate form of art.
Masters made such products many years ago, and now you can join this business.
Tell us which version of the craft did you like best? How long have you been doing cattail weaving? Don't forget to share your opinion in x.
Loading…
Source: https://1igolka.com/hend-meyd/podelki-iz-kamyisha
Basic techniques
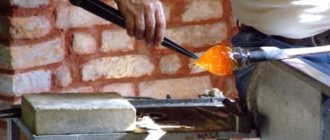
Any reed weaving workshop involves preparing stems and leaves using a sharp knife. The leaves are cut lengthwise into 3-4 parts. The stems are freed from small leaves.
The easiest way is to weave strips of leaves or stems at right angles. It is convenient to braid some solid base. This way, you can adjust the density of the weaving and make it easier to maintain proportions.
There are several basic reed weaving techniques for beginners:
- A bow is a method of weaving with one working stem around 2 warp stems. The working stem covers the stems of the base in turn with an S-shaped loop, moving along them. This weaving method is suitable for making voluminous products. You can weave not only lengthwise, but also in a circle. Weaving with a bow looks very impressive.
- Rope is a method of longitudinal weaving. This technique is ideal for making baskets because it requires vertical supports. Long stems intertwine with each other and with the stems of the vertical base.
Both techniques are easy to learn, but require practice.
Reed weaving for beginners at home
Reed weaving is the oldest handicraft known today. The art of pottery began with it, namely, the first pots and bowls were created from twisted stalks of reeds, which were coated with clay. For beginning needlewomen, the cheapness and availability of material for work is very important.
Reed is an ideal plant for weaving, because it can be found in any damp place and prepared without special skills. To weave reeds for beginners, you need to know some subtleties about this material and its preparation for the product.
Having studied this type of craft in detail, you will know how to weave a fence, a mat and many other interesting things.
Preparation of material
Reeds and other marsh plants are harvested in June-July or September. The stems of this plant are very fragile, so it is better to harvest them in small bunches.
Cut and harvested stems must be dried before storage, for example, hung under a canopy or stacked in bunches in the attic so as not to expose them to sunlight.
If the sun's rays hit the stems, they fade, lose their natural color and become too fragile.
Please note that in plastic bags they become covered with black spots and become unusable.
By choosing reeds for crafts, you can easily build not only baskets and hats, but even slippers. The world of crafts made from this material is very diverse, so you don’t even need to think about it, but just start making them! Numerous master classes and schemes for performing work are not uncommon for modern needlewomen and craftsmen. Here are some inspiring photos:
Next we will learn how to weave a basket for small items with our own hands. This master class was created to teach you how to use simple little things to make crafts and learn a lot of new and useful information. If you correctly follow all the recommendations, you can perfectly master the technique of making products from reeds and cattail leaves.
Cattails are often called rushes, although the only similarity between them is that they are perennial herbaceous plants.
To make a basket for small items from reeds you will need:
- Reed;
- Glue;
- Accessories;
- Stationery knife.
Read this: DIY men's bracelet made from rough materials
Basket weaving: step-by-step instructions.
- First, weave the bottom of the basket in a circle;
- Then, when the bottom is ready, proceed to the sides of the basket;
- After the sides, weave the walls;
- Use a utility knife to cut off all excess particles;
- When the product is completed, you can decorate it with accessories. This will give the basket uniqueness and zest.
Your small change basket is ready! Enjoy using it!
The manufacture of a fence made of reeds deserves special attention. It will have an attractive appearance, at the same time - inexpensive and very easy to prepare materials. Let’s look further at how to weave a fence from reeds.
Features of work
A reed fence is a natural and quite original fencing.
We start with preparing the material. Reed grows almost everywhere near rivers and is harvested in September-October. During this period, the plant reaches its optimal height, which is important when constructing a fence. Before you start weaving, you need to make a simple workbench for making mats.
The length of your table should match the height of the future fence. We spread the material on the table in a thick layer ranging from 15 to 20 cm. Then we lay boards on it, with the help of which the plant stems are fixed. Next we perform the firmware. It is very similar to the firmware of a regular broom.
Features of work
A reed fence is a natural and quite original fencing.
We start with preparing the material. Reed grows almost everywhere near rivers and is harvested in September-October. During this period, the plant reaches its optimal height, which is important when constructing a fence. Before you start weaving, you need to make a simple workbench for making mats. The length of your table should match the height of the future fence. We spread the material on the table in a thick layer ranging from 15 to 20 cm. Then we lay boards on it, with the help of which the plant stems are fixed. Next we perform the firmware. It is very similar to the firmware of a regular broom.
Read this: Floss bracelet: weaving the legendary bauble
Before making a wicker fence from reeds, you should think about the fastening system of the fence. You can use various materials, for example, wooden beams. But better and more reliable are metal poles or pipes. We attach the finished, stitched mats to the posts using wire. The fence must be treated with a special protective fire-fighting agent, since reeds, under certain conditions, flare up like a match. There are various variations in manufacturing. For example, you can make a fence using alternate sections, as well as using branches and mats. An excellent option can be made using a mesh - chain-link.
How to make reeds from paper? Simple idea for kids
Interested in the question of how to make reeds from paper? Check out the simple idea presented with step-by-step photo instructions.
We used:
- Brown cardboard;
- Double-sided green colored paper;
- Green corrugated paper;
- Kebab stick;
- PVA glue;
- Felt pen for creating a rocking chair;
- A milk cap and plasticine to secure the craft in a vertical position.
How to make reeds from paper?
Making a rocking chair
For it you will need a triangular piece of brown cardboard. It should be quite long so that the rocking reed turns out to be quite voluminous, and not thin, like a kebab stick. Based on the size of the kebab stick, the approximate dimensions of the triangle can be as follows: the narrow side is 8 cm, and the two long sides are 25 cm and even across the entire length of the A4 sheet.
Using a felt-tip pen, pencil, pen, or any thin tube, make a rocking chair, turning the triangle into a paper-like bagel. Simply wrap the marker in paper until you reach the very tip. Start from the side where 8 cm.
Remove the rocker, if necessary, release it a little to make it freer and secure the tip with glue.
Paper reed stem and leaves
Cut a long strip of green corrugated paper, place a drop of glue on the blunt tip of the stick and begin to wrap the corrugated strip around it, periodically securing it with glue. Glue will also be needed at the very tip of the stick.
If you don’t have kebab sticks or corrugated paper, you can make a stem from a sheet of green paper, rolling it into a thin roll.
Glue a reed rocker to the resulting stem, not forgetting to leave the tip of the stick sticking out on top. If you want the stem of the reed to be in the center of the rocker, and not on the side, wrap a little more paper at the top of the kebab stick, apply glue to this thickening and put the rocker on top.
This way the sides of the rocker will be at the same distance from the stem.
Cut out two long leaves from green paper, almost the size of a kebab stick.
Glue the leaves, securing them with glue at the bottom. The leaves can be corrected with a pencil, a beautiful curve or even a fold can be made on one sheet.
Now you know how to make reeds from paper, all that remains is to place the craft in a vase. Alternatively, glue plasticine into the lid and stick reeds there.
Source: https://tratatuk.ru/materialy/podelki-iz-bumagi/kak-sdelat-kamyshi-iz-bumagi.html
Crafts made from reeds - decorative vases and animal figurines
Very unusual crafts, as well as home decor items, can be made using simple natural materials such as reeds.
They have a very recognizable specific structure. Many people who often played near water as children will immediately recognize it.
Crafts made from reeds - vases
You can make interesting crafts from reeds and decorate objects not only by using the stems of this plant, but also many others that grow along the banks of reservoirs - in the shallow waters of ponds, rivers, lakes, swamps.
It can be reed, cattail, calamus. The stems of marsh plants are also widely used for weaving - they braid vessels, weave baskets, coasters, make souvenirs, mats, even wicker furniture.
Sitnik
Cattail is sometimes mistakenly called reed. Its leaves are pointed, and a velvety brown “sausage” appears at the end of the stem.
There is also such a marsh plant - rush plant, it loves to grow in water meadows and wetlands. It can also be used to create crafts.
Harvesting reeds
The reeds rustled, the trees bent, and the night was dark...
Reeds are harvested for crafts in the summer, from the beginning of its flowering until the beginning of autumn, because the shoots are still relatively tender and juicy, but have already become elastic and durable. The plant is cut close to the ground with a knife, sickle, or simply cut off with scissors, immediately separated from unnecessary leaves, collected in small bunches, sorted by size and diameter, and then dried.
Be sure to dry in the shade, without heating devices, otherwise they will lose their natural color. The attic is the perfect place for this. Dried stems cannot be stored in plastic bags - they will become dark spots. Reeds should be stored in a dark, cool room.
Decorative vases - reeds
Immediately before starting work, dry reed stems are slightly soaked in water and wrapped in a wet cloth. They cannot be kept wet for a long time, only for a short time, about a day.
It should be noted that marsh plant blanks lend themselves well to coloring, for example, with aniline dyes. Take dyes that are used to dye fabrics. You can also bleach raw materials in a hydrogen peroxide solution.
This reed decoration can be used to decorate anything, in this case it will be decorative vases. The most convenient way is to take something as a basis. It can be either porcelain or glass, even plastic.
Decor with natural material - reeds
Crafts “Gifts of Autumn” for school and kindergarten, photo 2018-2019
Are you now also making crafts on the theme “Gifts of Autumn” for school or kindergarten? After all, soon competitions and exhibitions of crafts made from natural materials (branches, cones, leaves, straws, shells, pebbles, vegetables and fruits) will begin in schools and kindergartens. Many parents immediately have a question about what they could do with their own hands that would be so beautiful and original.
See photos sent by our readers in 2021, get ideas and come up with something of your own. Send photos of your autumn crafts made from nature materials, vegetables and fruits (more details here), and we will be happy to publish all the new items. A big request to all participants of the competition: do not send copies of works already available here.
Hedgehogs made from seeds, deer made from cones, caterpillars made from apples and other crafts that are repeated from year to year are no longer accepted! Send your new and original crafts, show your imagination! The form for submitting work is located under this article - here.
Do not forget also that even the most magnificent work can be spoiled by a low-quality photograph... Not all photographs are published, but only those that took 1st, 2nd or 3rd place. The rest are sent diplomas of the competition participants.
New crafts “Gifts of Autumn - 2019”
Are there any little entertainers in your family? Then you are familiar with their constant desire to invent, make, create something. For such dreamers, various activities with plasticine bring great pleasure. And if you try to combine plastic materials with natural ones, you can get extraordinary crafts.
“Small bird” made of almonds and plasticine
Try to make a small bird of unprecedented beauty from almonds and plasticine - and you will be surprised how simple things turn into miracles in your hands! Master class by Anastasia Batina.
For creativity, prepare:
- almond; wet wipes;
- plasticine;
- simulation stacks;
- plastic board.
We create a magical little bird from plasticine and almonds
Select large, unopened almonds. Wipe with a damp cloth to remove dust and degrease the surface.
Roll two black balls of the same size. Press down with your finger and press it to the bird's head. Add small white spots at the corners of the eyes.
Connect the wings to the body of the bird.
What a tiny bright bird we have. It’s as if she came to us from the pages of fairy-tale books, or maybe even from someone’s magical dreams! Such a small bird will complement the festive composition and turn into a decoration for a flower in a pot, a Christmas tree or a wreath.
"Forest Dwellers" Samoilov Valera. Cones, acorns, nuts, birch block, fabric.
"Owl in the forest." Nagornaya Natalya.
Owl consists of maple and ash seeds. The different structure of these seeds made it possible to achieve the effect of different types of plumage. The frame is made of viburnum stems. For decoration, spruce branches and cones, an oak branch with acorns, viburnum, and maple leaves were chosen. The work was secured with a glue gun. For rigidity, a plywood base was chosen.
Source: https://podelki-doma.ru/podelki/iz-prirodnyih-materialov/podelki-daryi-oseni
Crafts from reeds: photos, do it yourself, master class, how to make
Back in the fall, we placed a bouquet of reeds in a large vase on the balcony. He stood there for a long time and was already fed up with it. It was a shame to throw it away, so my daughter and I decided to make a painting using plant stems and dry inflorescences.
To make crafts from reeds you need the following materials:
- thick sheet measuring 25x30 cm;
- blue gouache paint;
- fine salt;
- Wheat groats;
- stems and inflorescences of reeds;
- other dried plants;
- scissors;
- tube with PVA glue.
We decided to make our country house, which is located by the lake.
Our house is small, one-story. The walls were formed from different sections of reed stalks. The windows were made of straw. The roof is made up of pieces of lake grass inflorescences. All parts are easily attached to cardboard using regular PVA glue.
To make the long lake we used salt. First we painted it with blue gouache, dried it and glued it on with glue.
We have built a bridge across the lake from reed stems. And on the banks of the reservoir various herbs grow - these are all kinds of dry plants.
There is a narrow path leading from the lake to the house. We formed it from wheat groats. You can also use river sand, it will also look beautiful.
- There are also trees growing nearby: a poplar made from a reed inflorescence, a fir tree made from a dried twig of thuja.
This is such a beautiful picture - a do-it-yourself craft made from reeds, made from natural material.- It hangs in our hallway and in winter, when we don’t go to the dacha, it reminds us of summer vacation.
You can take this idea on board and create some interesting landscape with your children. The plots of fairy tales or poems will look interesting and unusual.
You can also weave baskets, pencil boxes, bread boxes, vases and boxes from the stems and leaves of reeds. This is a very interesting natural material that is used for needlework.
Mikhail and Tatiana
Source: https://ostrovokpodelok.ru/podelki-iz-kamysha-svoimi-rukami/
Basketry
It is advisable to start weaving reeds with your own hands with simple products: napkins, small baskets, bread bins. For such products, cattail or reed leaves, cut into 3 strips, are best suited.
After mastering the principle of weaving, you can move on to more complex products. Braided bottles or vases look beautiful and unusual. Such products are most often made from thin reed stems. Having a solid base will make the job easier.
As your skill increases, you can move on to making boxes, sugar bowls, hats, and handbags. These items will require mastery of several weaving techniques.
A fence or hedge made of reeds will require a minimum of knowledge of weaving techniques, but maximum effort in properly preparing the material. The prepared sheaves of reeds are trimmed evenly, pulled together and woven into rectangular blocks. A fence is formed from them. In order for the fence to fulfill its function, a base in the form of metal posts or chain-link mesh is required.
Weaving from stems and leaves is a useful and exciting hobby. Design elements made of reeds, reeds or cattails are very popular and relevant. They serve not only as decoration, but are also quite functional. Constantly touching natural materials and going out into nature to gather materials are very beneficial for health.
Crafts made from reeds
My birthplace is the Lower Volga. The peculiarity of that area is reed thickets with no visible edge. I think the reed is an amazing plant. It was previously used by local residents, who were mainly fishermen, to build houses. The buildings being erected were called “mosaics”
Do-it-yourself weaving from reeds and reeds for beginners
It’s not at all difficult to master weaving techniques and learn how to create exclusive products from natural materials. Each stage of reed weaving is interesting and exciting: collecting and preparing material, mastering weaving techniques, creating exclusive products. It’s worth a try and perhaps it will become a real hobby or the basis of a business.
You can make reed weaving yourself
Weaving materials
Lake reeds, reeds, and cattails are suitable for reed weaving for beginners. These plants are similar, but each has its own characteristics:
- Lake reed is a plant of the sedge family. Grows along the banks of small bodies of water. Tall grass of bright green color. You can recognize such a reed by the panicles at the ends of the stems. Good material for weaving. Does not require slicing, as it has smooth, thin stems.
- Common reed belongs to the cereal family. Tall flexible stems are crowned with a dense panicle. To make cane, the lower part of the stem and leaves are used. Depending on the idea and type of product, the leaves are cut into strips. You can find ordinary reeds along the banks of rivers, canals, and ponds.
- Cattail is often confused with reeds. After all, it is cattails that have dense brown seed heads at the ends of the stems, not reeds. Cattails have both stems and narrow and long leaves that are suitable for work.
In this video you will learn how to make a rug from reeds:
Collection and preparation
Material collection occurs from August to October. It is important to cut the selected plant species directly from the water. Plants from a dry bank will be fragile and brittle. The most convenient way to cut plants is from a boat using a long-handled sickle or by climbing into the water in wading boots.
The stems are tied into small sheaves and dried in a vertical position, preferably in the shade. But you can also do it in the sun. The type of drying affects the color of the plants: in the sun they become lighter and more golden.
It is best to store the prepared material outdoors under a canopy or in the attic in a horizontal position. It is important not to store them in plastic bags. This leads to the formation of mold.
Before starting work, it is recommended to soak the required number of stems and leaves in water.
But if the material is collected in the right, damp place, it is enough to simply spray them with water. And also, if necessary, you should spray them periodically during work. The plants themselves will indicate that this needs to be done when they begin to crack slightly when bent.
Basic techniques
Any reed weaving workshop involves preparing stems and leaves using a sharp knife. The leaves are cut lengthwise into 3-4 parts. The stems are freed from small leaves.
The easiest way is to weave strips of leaves or stems at right angles. It is convenient to braid some solid base. This way, you can adjust the density of the weaving and make it easier to maintain proportions.
There are several basic reed weaving techniques for beginners:
- A bow is a method of weaving with one working stem around 2 warp stems. The working stem covers the stems of the base in turn with an S-shaped loop, moving along them. This weaving method is suitable for making voluminous products. You can weave not only lengthwise, but also in a circle. Weaving with a bow looks very impressive.
- Rope is a method of longitudinal weaving. This technique is ideal for making baskets because it requires vertical supports. Long stems intertwine with each other and with the stems of the vertical base.
Both techniques are easy to learn, but require practice.
Collection and preparation
Material collection occurs from August to October. It is important to cut the selected plant species directly from the water. Plants from a dry bank will be fragile and brittle. The most convenient way to cut plants is from a boat using a long-handled sickle or by climbing into the water in wading boots.
The stems are tied into small sheaves and dried in a vertical position, preferably in the shade. But you can also do it in the sun. The type of drying affects the color of the plants: in the sun they become lighter and more golden.
It is best to store the prepared material outdoors under a canopy or in the attic in a horizontal position. It is important not to store them in plastic bags. This leads to the formation of mold.
Before starting work, it is recommended to soak the required number of stems and leaves in water.
But if the material is collected in the right, damp place, it is enough to simply spray them with water. And also, if necessary, you should spray them periodically during work. The plants themselves will indicate that this needs to be done when they begin to crack slightly when bent.