The idea of using a pumpkin as a material for crafts first came to the mind of a fairy from a fairy tale by Charles Perot. But seriously speaking, wild varieties of this berry in dried form have served as dishes, a vessel for water or a lamp since ancient times.
Today, there are still craftsmen who create various decorations for the home or elements of holiday decor from vegetables. For example, the “Pumpkin Carriage” craft will bring a lot of fun to your children. In the fall, you can also make other decorations from leaves, pine cones, acorns, bunches of berries and other gifts of nature.
What you will need
First of all, you should decide on the choice of pumpkin. It should be as regular as possible in a round shape and with a clearly defined surface relief. Depending on the type of craft, the pumpkin can be white or bright orange.
You will also need:
- sharp long knife;
- glue gun;
- paper towel;
- old newspapers or other waste paper;
- spoon or scraper;
- paints (aerosol and acrylic);
- awl;
- elements for decoration.
Material for making wheels
In order to make an absolutely fabulous pumpkin carriage with your own hands (see the master class below), you may also need squash or large zucchini. They are suitable for making wheels. In addition to them, some craftsmen use metal lids, bottoms of plastic bottles or other round objects for their work. To make wheels for a pumpkin carriage, wire or flat canned fish jars, such as containers for sprats in oil, are also suitable. In the latter case, they should remove the front wall, and cut holes on the back in order to fit the wheels onto the axle.
Preparing the pumpkin
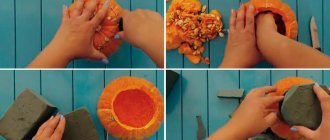
First of all, you should dry the fruit. To do this, you need to carefully open the pumpkin by cutting off the “lid”. Then use a spoon to scrape out the pulp as thoroughly as possible and stuff the pumpkin with crumpled newspapers.
No matter how hard you try, you can never know for sure whether the fruit will rot or not. This is why experts advise drying 2-3 pumpkins at once.
Newspapers need to be changed from time to time, as they will absorb moisture from the walls of the fetus.
If you don’t have time to dry the pumpkin, you should try to scrape out the pulp as thoroughly as possible.
How to prepare a pumpkin for a carriage craft
The pumpkin must be properly prepared before work. First, wash it well in soapy water using a soft sponge. Afterwards, the skin is wiped dry and treated with alcohol. Next, start cleaning the pumpkin.
How to peel a pumpkin for the “Carriage” craft:
- Using a sharp knife, carefully cut off the top of the vegetable and remove the seeds.
- You need to clean it thoroughly, leaving as little pulp as possible so that the craft can be stored longer.
- Treat the inside of the fruit with lemon juice to prevent it from darkening.
- Dry the prepared vegetable in a well-ventilated area away from sunlight.
The pumpkin for the “Carriage” craft takes a long time to dry under natural conditions. Moreover, you need to dry it with the stalk so that the juice does not leak out, otherwise everything will go down the drain. The entire procedure takes 2-3 weeks, during which time the shell should change color and become darker. You can determine that the pumpkin is ready for use by the thickness of the peel. It should harden well.
You can speed up the process with the help of modern equipment. Dry in the oven at a temperature of about 80 ° C, constantly turning the vegetable so that it does not burn. Small fruits can be placed in a 600 W microwave oven. Drying in a convection oven at a temperature of 80° is allowed.
You need to store pumpkin for crafts in a dry room, where the temperature does not fall below +10°C and does not rise above +30°C.
Another way. The pumpkin is first cleaned of seeds and pulp. Next, stuff the vegetable with newspapers and put it in a well-lit place. The paper is changed several times a day as it gets wet. Drying is continued for 2-3 days. The room temperature should not be lower than +25°C. You can put the workpiece on a kitchen cabinet, where the air is warmer. In the cold, the process is delayed.
How to make a pumpkin carriage with your own hands: a master class on making wheels
Let's proceed to the most interesting stage of creating a vehicle for Cinderella. So:
- if the pumpkin is small, use toothpicks as an axle for the carriage wheels, and if it is large, use skewers;
- depending on the chosen material for the wheels, a hole is made in the middle of the metal lids; the same is done with squash or circles 2 cm thick, cut from ordinary large-diameter zucchini;
- place the resulting “parts” on the “axles”;
- create the basis for installing the carriage (see photo);
- For greater stability, it is recommended to supplement the design with two crossed toothpicks.
Drying the pumpkin correctly
But before we start creating the masterpiece itself, let's find out how to properly prepare the material so that it can please us for a long time:
- It is worth choosing small pumpkins, it will be easier to dry them, the most optimal weight is 100-500 g;
- The selected pumpkin must be whole and without scratches, must be ripe, it is advisable that it be suspended on the bush, not in contact with the ground;
- The selected pumpkin must be washed well in soapy water, dried well and wiped with alcohol;
- It is necessary to store it in a well-ventilated area, away from direct sunlight and preferably in a suspended state, so there is a greater chance that the pumpkin will reach the desired condition and will not fester.
Having prepared the material according to all the rules, you can begin making a masterpiece. By the way, if you don’t have a ready-made dried pumpkin, and you need to do the craft urgently, then you can take a fresh one, although then you will have to come to terms with the fact that your creation will not please you for a long time.
Related article: Plush fabric is not only for toys and furniture
Decoration
When making a pumpkin carriage with your own hands (the master class is presented above), it is very important to decorate it correctly.
For example, using a glue gun, you can cover the perimeter of the carriage windows with gold braid or metal decorations. Craftsmen can also paint Cinderella's vehicle and paint it with bronze paint.
If squash is chosen as the material for the wheels, then they should be “silvered” or “gilded” using an aerosol can.
Shabby chic style option
If you don’t know how to make a pumpkin carriage, then pay attention to the original craft using music paper. This decor element is suitable for a shabby chic wedding. It will work if you decorate a pumpkin, prepared in the same way as described in the previous master class, using music paper. Having finished pasting the entire surface of the pumpkin, you need to make wheels or remove them from a children's toy car of a suitable size, and then paint them with white paint. Then the craft should be decorated with artificial flowers in bed colors, as well as lace, organza or tulle.
Video instruction
In this video tutorial you will learn how to make a carriage out of a pumpkin for kindergarten or school. The author of the story tells in detail how to prepare and decorate the pumpkin, wheels, and mice. This story will definitely help you with choosing an idea for your craft.
Dear readers, have you asked your little daughter or son to bring a craft made from natural materials, papier-mâché, plasticine, etc. to school? We suggest making an original pumpkin carriage craft according to the instructions from this article. The result is a very beautiful composition that your child will be proud of. Write your ideas for decorating, as well as making mice and Cinderella. We are waiting for your feedback and comments.
"Carving" carriage
Those who have skills in carving shapes from vegetables and fruits can create an original vehicle for Cinderella from a pumpkin. The answer to the question of how to make a pumpkin carriage in this way depends entirely on your imagination. You can decorate it with fine carvings or depict a figurine of a princess and a prince in the window. It is also possible that the wheels are carved from a pumpkin, as is the coachman’s seat.
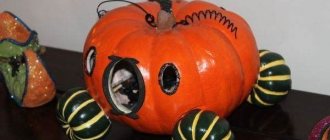
Pumpkin carriage - ideas with photos
What makes this carriage different is the elegant design of the door and windows and the wheels made of small white pumpkins.
Pumpkin carriage with pumpkin wheels
The elegant white pumpkin carriage exudes a fairy tale and a dream.
White carriage with graceful wheels
You can choose any option, the main thing is that your child likes it.
From this article you will learn how to make such a beautiful and original craft as a pumpkin carriage. By following the step-by-step instructions and having tools and materials for creativity in stock, you will be able to make a real masterpiece. This craft will definitely take first place in the competition and will delight both your child and the rest of the children in school or kindergarten for a long time.
Other fall crafts
A pumpkin carriage, the step-by-step instructions for making which you already know, is not the only option for home decoration made from materials that can be found in huge quantities after the harvest and the beginning of leaf fall. For example, you can make:
- Door decoration. It's very easy to create beautiful wreaths for your home. To do this, you will need an armful of colorful fallen leaves, naturally dried, bunches of berries and squash. First you need to cut out a wheel of the required diameter from thick cardboard. Then leaves and berries are glued onto it with a glue gun. The squash is placed on pieces of wire and secured to a ring. At the end, the composition is supplemented with dried bunches of berries and intertwined with a satin ribbon, for example, bright scarlet. If you want the wreath to be more festive, you can first paint the squash pumpkins with bronze paint. This door decoration can be made in another way. For example, a cardboard ring can be tightly covered with acorns, and the edges can be decorated with multi-colored autumn leaves ironed with an iron. Bunches of berries or bright ribbons will help complement the composition.
- Hedgehog. If you are going to make a craft with your child, it is better to choose a simpler option than a magic pumpkin carriage. It’s better to take a funny hedgehog made from blossoming cones to a kindergarten or an exhibition of children’s works. To make it you will need a dark brown plastic bottle. It should be cut in half (crosswise) and pasted over with cones, leaving the narrow part free. Then circles-pupils made of black paper are glued onto two white lids. The resulting “eyes” are fixed on the “face” of the hedgehog. A black spout cap is placed on the neck of the bottle. To make the craft even more natural, use a papier-mâché apple or a real one attached to the back of the hedgehog.
- Deer. For such a craft you will need elongated cones, a cut of wood 3-4 cm thick, an acorn and twigs. You should also have a glue gun and three beads on hand for the eyes and nose. The cones and acorn need to be fastened in such a way that they represent the neck, head and body of a deer. Then you should glue on the horns and legs, which can be imitated using twigs. When the figurine is ready, you need to install it on a piece of wood coated with colorless varnish using pieces of plasticine and glue on the eyes and nose.
Now you know how to make a fairytale pumpkin carriage with your own hands. You also know a master class on creating other autumn crafts, and you will be able to please your children and decorate your home.