Often, decorating ideas require the use of a regular paper bow. There are various options and techniques, but today this article discusses two master classes, after studying which you can choose an origami paper bow for yourself. The diagram, template and folding video are provided below. Thanks to this material, we will step by step assemble an origami bow.
Today, decoration in the form of a bow is a symbol of any gift. Also, this element symbolizes a certain style that has come since ancient times; it is used not only as a women's, but also as a men's accessory. Some peoples believe that a bow is a symbol of love, since when it is tied with ribbons, it forms an inverted figure eight, which symbolizes infinity. So how to make a bow?
Folding an origami bow with ribbons
Let's look at the step-by-step instructions for making an origami bow, the lesson is not complicated, the description is simple even for beginners. With this bow you can decorate a box for a cake, sweets or a postcard.
Before starting work, you need to prepare the material. Moreover, it is not necessary to use special paper for the origami technique - take sheets of bright pages from any glossy magazine, this will give the decorated craft a special flavor. Even a regular newspaper page will do.
Single-sided or double-sided colored paper is used; the best sheet size is considered to be 8 by 8 cm, although other sizes are possible. Let's move on directly to the step-by-step master class, which will teach you how to make an origami bow. The folding diagram is provided below.
- Place a piece of paper with the colored side facing down.
- Fold it in the middle.
- Fold it in half again, but crosswise.
- Unfold the leaf. The resulting figure is divided into four equal elements.
- Next, roll the workpiece diagonally. We got a crease on paper in the form of the letter “x”.
- Bend the leaf along the creases as shown in the photo.
- Bend the top corner one centimeter towards you.
- Unfold the product again. From the inside of the paper sheet, a figure in the form of a small square was obtained.
- Iron the folds and diagonals of this workpiece thoroughly.
- Next, bend the square inward to get the shape as in the photo.
- The result was a two-layer workpiece.
- Bend the sides at the top, pointing them towards you.
- Turn the product over and repeat the same thing.
- Turn it over to the wrong side and carefully cut the sheet of paper as shown in the photo. The result was a bow ribbon.
- Slowly unfold it, you will get something like this, folding it was not at all difficult.
- Then fold the top tape towards you, look at the photo to see how to fold the side parts. Do this on one side and the other.
- Cut the tail of the bow in the center, bending the edges.
- Turn the product onto your face.
- Fold the edges of the bow ears into the center and insert them into the square.
- You can cut the ribbons at your discretion, if you leave it this way, it will also be nice.
The first craft of the origami bow master class is ready! You have seen for yourself that with detailed instructions and step-by-step photos, making it from paper is not difficult, quick and easy.
Video MK crafts origami bow
Think about the last time you had to make something out of paper. Probably, as a child, you folded paper airplanes and boats, and that’s what your skills were most likely limited to. When there are small children in the family, then, willy-nilly, you have to do various crafts with them. Invite them to make a voluminous paper bow to decorate the gift. The idea is simple, but a beautiful bow can be used to decorate gift wrapping. And it is easy to make using the origami technique according to the proposed master class.
To create a voluminous bow we will need:
- square of paper (we used size 15x15cm);
- scissors.
First of all, we fold our lilac square diagonally.
Then you need to make another diagonal fold.
The next folds on our lilac square will be located in the transverse direction. To do this, fold our workpiece in half.
After this, we perform another addition across. This is what the blank for our future lilac bow should look like.
The folds we have made allow us to fold the lilac square into a small double square.
Let's arrange our workpiece so that the open cuts are located at the bottom and the folds are at the top. After this, bend the top corner a little down.
When expanded, our square will look like this. In the center of it we see the core of the future bow.
The folds located in the center must be done all in one direction so that they form a small square.
After this, we fold our lilac blank as follows.
Fold it again in the form of a double square, but without a visible upper corner.
We bend a narrow strip on the upper right side.
Let's turn this layer of the workpiece over to the left.
Now again on the right we must make the same fold.
So we need to make folds on all four layers of the workpiece on the right side.
We begin to carefully unfold our lilac blank, trying to straighten the middle and give it the appearance of a small square.
For further work, turn the lilac sheet over to the wrong side again.
Here you need to use scissors. Using them, we begin to make cuts in place of previously made folds.
So you need to go with scissors in four places.
Now we begin to form the corners of our bow. To do this, bend the right edge on the wrong side of one of the four blanks.
After this, we bend the left side symmetrically.
Using the same principle, we form the remaining three blanks for the future bow.
Let's turn the lilac blank over to the front side.
All we have to do is bend the corners of our workpiece and place them under the square core. If necessary, you can additionally fix these bent corners with glue.
When all four corners are tucked under the middle, our origami paper bow is ready.
Making a bow tie according to the diagram and video tutorial
This MK is also not complicated and is intended for beginners. Let's get started.
We will make a bow tie from a paper rectangle using the origami technique. For work, we will take a strip measuring 21.5 by 9 cm. If a longer strip is used, but the same width, then the “ears” of the product will be a little longer. If the sizes are right, then make the bow larger or smaller, but change the sides proportionally. In addition, you can experiment with different pieces of paper; there are no rules here.
For step-by-step instructions for this master class, watch the video provided below:
The finished paper craft origami bow in the shape of a butterfly is colored using paints, pencils or felt-tip pens. Also, as an idea: wrapping paper with all sorts of colorful prints, bright, themed, is used - you get an original thing, and if it is also shiny, then it is elegant.
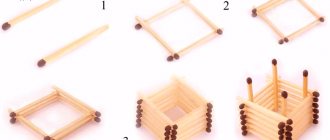
Master class No. 1
Choose the paper you like and cut the sheet into strips approximately 2 cm wide. To create a bow you will need:
- 6 strips 30 cm long;
- 4 strips 27.5 cm long;
- 1 strip 25 cm long;
- 1 strip 12.5 cm long.
Set the 12.5 cm long strip aside, and mark the middle on all other paper blanks with a pencil.
1: Take one strip, turn it white side up, pinch the middle with your finger, then carefully fold each loose end into a loop. You should now have a paper eight. Secure each end of the strip in the middle with double-sided tape. Of course, you can also use paper clips or glue, but the good thing about duct tape is that it's flat and less noticeable.
It is very important not to pull the paper loops too tight! If the loop is too tight or too small, the paper bow will look flat no matter how many layers you glue together.
In the same way, fold all the other strips except one (12.5 cm).
2: Take three large loops and place them on top of each other as shown in the picture. Fasten them together with a paper clip.
Make another similar “flower” from three other large loops and then fasten both parts together with glue.
Now take 4 shorter loops, fasten them together and glue the resulting part to the middle of the bow. After this, glue the shortest loop.
3: Take a strip of paper 12.5 cm long, roll it into a ring and secure the ends with double-sided tape. Place the ring in the center of the bow and glue. And our bow is ready:
How to make an origami bow
For the bow you will need a square sheet of any color. The size also depends on how big the bow you need. I take a square with a side of 10 cm. Use thick paper, you can use special paper for origami. The optimal density is 80-100 g/sq. m.
To begin, mark vertical and horizontal folds on the sheet. Then fold it diagonally. The result will be a markup like this. It is needed to easily fold a double square - this is one of the basic forms of origami, which is often used for different models, for example, for a crane.
To get the desired shape, remove the side sectors inward along the marked lines. Bend the top of the resulting rhombus down, stepping back slightly from the edge. For ease of assembly, iron the fold in two directions.
Move the top inward along the marked lines. To do this, first unfold the sheet and then fold it again, but it will no longer have a protruding upper tip. For the resulting figure, bend the sides that are closer to the top, hidden inside. Do the same on the second invisible surface.
Next, unfold the sheet again and turn it over to the other side. A small square forms in the middle. Four folds divide the figure into four equal squares.
Flatten the sheet again. Along the convex folds, make cuts in four places, not reaching the center. The central square will help you navigate. Assemble the figure again so that the central square appears - this is the front side. Turn the workpiece inside out.
Now we work with the side squares. Fold the sides of one of them towards the center to form a triangle at the end. Do the same with the second one. Point the top square down so that it connects with the bottom one. Turn the bow over to the front side.
Cut the bottom piece in half lengthwise to create two equal pieces. Remove the side sections from the wrong surface. Turn it back over and check that everything is neat.
There are a few finishing touches left. Place the side ends of the bow into the holes in the square center. The lower ones can be cut to give them the desired size and shape. A beautiful bow using the origami technique is ready!
If the article was useful to you, subscribe to new ones. I wish you creative success and good mood!
Published in Various
Source: https://dodim.ru/prostoe-origami/raznyie/bantik-iz-bumagi/
A method of making flowers for the patient
Many craftsmen individually cut out the petals and shape the curves of the flowers, trying to bring them closer to the original. So, for calla lilies, a wide leaf is cut out, a bend is formed and the stamens are wrapped. In many flowers, each inflorescence is collected separately. Let's consider this process using the example of mallows.
How to make paper flowers: instructions
- Draw a flower template on thick paper in the form of a circle cut in a spiral. Only the lines are not straight, like those of a rose, but wavy.
- Now each petal needs to be bent using a pencil or scissors, like a lupine. At the same time, the petals look “away from themselves.”
- Next, wrap the flower around the pencil and glue the core.
You form such heads on the panel into inflorescences. If you need a bouquet, then attach them to the stem on all sides.
According to the same plan (formation of each petal) lilacs and lilies of the valley are created. Only the paper tape is cut into long strips, which are folded into lumps with a pencil. From a distance, the illusion of small details is created. And to emphasize shades of the same color, two different ribbons are wound onto the stem.