What is a bead lariat?
Lariat is a woven transformable rope made of beads with beautiful clasps or tassels at the ends. It can be worn in different ways.
This original decoration is often worn around the neck. It will effectively decorate not only everyday clothes, but also an evening suit.
The lariat is a universal piece of jewelry, loved by many women, which can be worn every day in a variety of forms.
Lariats. How to wear lariats?
Modern fashion these days is democratic and multi-vector. This fact affects almost all attributes of additional accessories to the main outfit. New fashion trends are emerging in the design of bags, shoes, belts, scarves, hats, and, of course, jewelry.
One of the most popular and stylish jewelry, loved by craftsmen of designer jewelry, are transformable jewelry called lariats or necklace-belts.
What are lariats and how to wear them correctly?
Lariats are long pieces of jewelry with open ends that can be worn as beads, necklaces, belts, etc. Typically, lariats are tied in a knot, and their ends are traditionally decorated with tassels.
The name “lariat” comes from the English language “lariat” - lasso or lasso, i.e. a rope with a loop at the end, designed to be thrown around a target and then tightened when the rope is pulled. This is the most famous attribute of American cowboys.
Classic lariats are a long strand of beads (120 - 180 cm) with tassels at the ends. The design of the ends of the harness can have an infinite number of options. Tassels can be made in the form of grapes made of beads, in the form of leaves, flowers, or simply pendants made of large stones. The rope itself can be crocheted or made using the “American rope” knitting technique on a fishing line. The main requirement for a tourniquet is that it be flexible and elastic, suitable for tying many types of knots.
There are a lot of options for wearing lariats. This is their main advantage. Below we will look at the main ones.
The first and simplest option is a scarf . You just need to wrap the lariat around your neck, leaving the ends hanging freely.
Option two - asymmetrical necklace . In this case, the loop prevents the necklace from slipping, securing the tassels.
In the picture below you can see how it is done:
Option three – pendant necklace . A similar necklace can be made by simply folding the lariat in half and inserting its ends into the resulting loop.
Option four - tie . In this case, you can tie various knots on the lariat. At the same time, the lariat will always look different.
In addition, lariats can be worn as a bracelet or a belt - it all depends on you and your imagination.
Any lariat will not only emphasize your individual style in the choice of accessories, but will also allow you to diversify your “menu” of jewelry and add that zest to your clothes that you often cannot do without. You will always be in the center of everyone's attention and on the crest of a wave of fashion trends and trends in the world of modern designer jewelry.
Lariats are out of season. They can be successfully worn both in summer and winter. This decoration will look great in the off-season, on a sweater, if the jacket or raincoat is worn unbuttoned. Lariats can be selected based on its shade, so that it successfully complements a certain outfit or is universal in addition to any clothing. If the lariat is made in an “evening” style, then it will perfectly decorate your “ceremonial” outfit.
Below are the options for tying knots:
You can tie a lariat with a simple knot.
If you want something more sophisticated, then there are several more complex options. All you have to do is experiment.
Macrame knots - in this case, the knots are knitted with one end of the lariat, and the other remains straight, so when the knot is ready, the length on the lariat can be adjusted like on a tie:
Pigtail knot - this involves both ends of the lariat, so it cannot be adjusted like the previous knot. Just keep in mind that it shortens the lariat quite noticeably.
The simplified braid knot is a smaller knot than the previous ones.
* Copying site materials is possible only with an active link to the source.
How to wear a beaded lariat?
You can have one single piece of jewelry, but change your wearing methods every day:
- necklace;
- short necklace;
- bracelet;
- sotoir;
- belt.
Reference! A sautoir is a beautiful decoration on a long chain (cord) with decor or a tassel.
Let's figure out how to tie a lariat to look irresistible and present a new image every time.
A necklace is the simplest option to wear around the neck. We wrap the decoration around the neck twice, and fasten the third turn on the side, the decorations at the ends of the lariat will hang beautifully on the chest.
Simple knot. Place the tourniquet around the neck and tie it with a regular knot, leaving the ends 7-10 cm long hanging.
There are other lightweight harness knots.
Necklace pendant . Fold the tourniquet in half and thread the loose ends of the decoration through the neck into a loop.
More complex knots.
Twisted necklace. We place it loosely on the front of the chest, bringing the ends behind the neck. We wrap each end around the middle part lying on the chest, towards the center, leaving the ends of the tourniquet with tassels hanging beautifully.
You can create a more complex version.
With additional tassel earrings . If the braid has beautiful tassels at the ends, and in addition to it there are earrings in the shape of the same tassels, the designers offer an original solution.
First, we draw a tourniquet folded in half around the neck, leaving a fold in front. On the second turn, we lower the remaining two ends of the decoration into the loop. We hang the tassel earrings on the side with double strands. It looks very impressive.
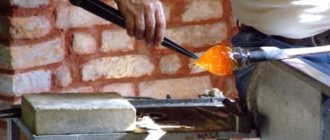
How to make a lariat yourself
In order to make a decoration, even the most experienced needlewomen will need more than one hour of time. For beginning craftsmen, first of all, it is worth mastering the technique of knitting a smooth rope. For these purposes, you will need to prepare beads of two colors, threads and a hook (size up to 1 mm). The thickness of the threads should be such that the beads fit tightly enough and at the same time move with ease. The hook is selected according to the thickness of the thread and personal convenience.
Editor's Choice: Hair hoops and hairstyles with them
The essence of the technique is to perform the following steps step by step.
- Alternating colors, you should collect the required amount of beads on the thread. The color of the first and final beads must match.
- Make 2 air loops (without beads).
- Move the required number of beads to the completed loops (there can be 4,6,8, it all depends on the desired thickness of the future decoration).
- The third air loop is already knitted with the first bead. In this way, you should knit the advanced number of beads. You need to knit moderately tightly.
- Next, the ring should be closed. To do this, a hook is inserted into the second air loop (which is without beads), the thread is pulled through both loops on the hook and tightened tightly.
- Move in the required number of beads again (equal to the number in step 3).
- You need to insert the hook on the left into the loop with the first bead.
- Move the next bead, which lies on top of the first. Then pull the yarn through both loops on the hook.
- Then move the next bead. It should lie on top of the second one (their colors match). Knit.
- This is how the entire harness is knitted. If everything is done correctly, the beads lie vertically (the holes are directed upward). Only the last ring is an exception.
- To change the position of the beads from the last ring and finish the strand, you need to knit the last row in the same way, only without beads.
- The thread should be cut and the loop tightened.
Editor's choice: How to wear sunglasses correctly: in what situations and what doctors say
You can learn how to weave a rope directly through bead weaving classes, as well as through numerous master classes presented on the Internet. When the technique is thoroughly studied and its practical application does not cause difficulties, you can make a rope of the required length and color and start decorating it.
Using macrame knots
With Josephine knot. An extraordinary option is to tie a spectacular Josephine knot.
It is better to place it near the clasp. Here is a pattern for knitting a knot.
Other knots can also be made following the diagram.
Pigtail. We fold the transforming tourniquet in three and weave a braid of three “strands”. Let's focus on the diagram. We only have one end, so we must not forget to free it when weaving by removing it from the loop.
We try it on so that the braid covers about half of the product. We bend it slightly in a semicircle, and at the end we thread the free end of the tourniquet into the formed loop. If you have brushes it looks very nice.
Tue oroi riant. You can also braid the braid completely up to the clasps. It will also turn out original. The braid can be loosely tied or tightly - this way we get different versions of the necklace.
We carry out the third version of the nodes strictly according to the scheme.
Other node options.
Transformable decoration
The word "lariat" means lasso or lasso. This item originally had only a household purpose, but today it has turned into an original decoration. Its popularity is due to its versatility and versatility of use: it can be worn around the neck as a chain, on the arm as a bracelet, or on a belt. It is a long rope that can be decorated with various figures in the form of pendants (for example, flowers).
This is a transformable piece of jewelry that can be worn in different ways depending on the look. By choosing one accessory, you can transform it into long beads, a short necklace, or a multi-layer bracelet. It is equally suitable for young people (they can choose bolder accessories, including harnesses with metal inserts and spikes) and adults. In the second case, it can be gold cords around the neck for men and women. Gold strands are similar to woven chains, but more massive. Another option is jewelry cords , which are long, smooth gold chains.
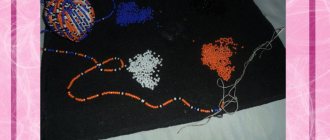
DIY beaded lariat harness
First of all, many novice needlewomen are interested in the question, how many beads will be needed to weave a lariat? The answer to this is quite simple - it all depends on the length of the product you want to get in the end.
Our master class will tell you how to make a lariat harness with a length of 90 cm. But, before you start work, you must prepare all the necessary tools and materials. So, you will need:
- small hook (0.5 - 1 mm);
- fishing line or threads of matching color;
- a needle (it will only be needed if you will be working with threads);
- pins;
- chipped stones;
- beads No. 10: 5 gr. dark brown and 30 gr. light brown.
Having prepared everything necessary, we can begin the master class.
The process of knitting a bead rope
First you will need to take threads with a hook and make 2 air loops. Here are diagrams that clearly show how to do them correctly:
Here's what the finished loops look like in the photo:
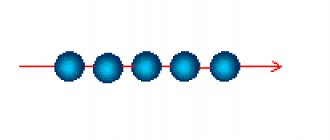
Then you will need to string 6 beads onto the thread and move them to the resulting loops. In the photo you see beads of a different color, but in reality this does not play a significant role, because you will still choose the combination of colors that seems most interesting to you.
After this, you will need to knit another loop, but you will need to grab the first bead:
You need to knit the remaining beads in the same way.
Try to crochet quite tightly, so that the beads are located as close to each other as possible.
You will then have to form a "ring". To do this, you will need to crochet a connecting post. Photo diagrams will help you understand this simple process. As a result, you should end up with a “ring” like this:
Next, you will need to string 6 beads onto the thread again. Having done this, you will need to insert your hook into the loop under the first bead. Now you will need to move one of the new beads closer and, placing it on top of the first bead of the previous row, pull the thread through the two loops you have created.
In order to make it easier for you to understand how to weave a rope of beads correctly, we suggest that you further study the patterns of its weaving:
Next, without changing the weaving pattern, you will need to crochet a rope of the required length. We remind you that our master class tells you how you can independently tie a lariat harness with a total length of 90 cm:
Having finished weaving the rope, you will need to shape its ends. To do this, you will need to crochet one more row, but without beads.
Then, after tightening the thread tightly, you will have to hide it inside and cut off the unnecessary tip.
At this stage, we can say that the lariat harness is almost ready. However, in order to make it look more rich and beautiful, our master class will tell you how to decorate it with chipped stones.
Cord decoration
First, you need to sew a piece of pebble and a bead onto the edge. Then you will again need to pick up the bead and chip on the needle, in order to step back a little and pass the working thread through 3 beads of your strand. Using this method, you will need to decorate the tip of the strand to a length of approximately 7 cm.
After this, you will need to “turn around” and, without changing the pattern, embroider the lariat harness in the opposite direction:
Having secured the thread and cut it, you will then have to decorate the other end of the lariat in the same way.
Next, you will need to twist the rope with dark brown beads. To do this, you will first have to arrange the decoration so that its ends are at different heights, and then you will need to secure it with pins.
After this, you need to fasten the thread to one of its ends and string the required number of beads onto the needle.
Next, you will need to twist the ends of the rope diagonally.
This is what it looks like in the diagram:
After making a couple of such twists, you will need to secure the thread and “switch” to one of the ends.
You will need to twist the selected end of the tourniquet 3-4 times.
Once you've finished wrapping, you'll need to decorate it. To do this, you will need to thread a piece of stone and a bead onto a needle, and then, passing the needle through the chip, push it through 3 beads on the wrap.
Next, you will need to sheathe the lariat strictly according to the scheme:
This is what it will look like “live”:
At the end of the work, all you have to do is fix the chip at the tip of the rope and trim the thread that has become unnecessary:
The exquisite and noble lariat is ready! Now you just need to “tie” it beautifully around your neck and you can confidently go and conquer men’s hearts.