May 9 is one of the happiest and most joyful days for our compatriots. After all, on this day our country got rid of fascist power, defeated Germany and returned such long-awaited peace and tranquility to the space of the Soviet Union. The symbol of victory is the St. George ribbon, by wearing which we express our gratitude and respect to those people who defended our country many years ago. The St. George ribbon is not just a piece of fabric, it is a symbol of victory, which also needs to be worn appropriately. After all, she expresses the entire spectrum of experienced emotions and memories. It is customary to tie it on Victory Day, symbolizing recognition and love for the homeland.
How to beautifully make a St. George ribbon in kanzashi style?
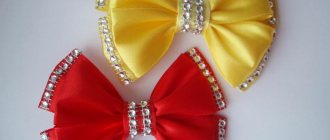
Of course, the most popular method of decoration is the kanzashi technique, which came to us from Japan and immediately won our hearts.
Therefore, I propose to design our symbolic strip in this style. We will make a tender spikelet.
You will need:
- St. George Ribbon;
- satin ribbons in black and orange, matching the tone;
- tweezers;
- black beads for decoration;
- glue, you can use a hot glue gun;
- scissors;
- lighter, candle or small gas burner.
Work process:
1. Take satin ribbons and cut them into squares with a side of 5 cm. In total, you need to make 7 squares from black ribbon and 14 from orange. Treat the edges with flame to prevent them from unraveling in the future.
2. Take an orange square and bend it diagonally.
3. Fold the resulting triangle again, forming a sharp-shaped petal. Fix the element with tweezers.
4. Now trim the edge with scissors and flame it. Next, take the workpiece lengthwise with tweezers, cut off the bottom side, and treat it again with a flame.
Make 13 more orange petals in the same way.
5. Take a black square and fold it diagonally. Take the orange petal and wrap it in a black triangle. And on top of the black element, place another orange petal. You should have a piece made from three layers of satin ribbons.
6. Trim the bottom and flame until all edges meet each other.
7. Repeat with other black squares and orange blanks. You should end up with seven sharp petals. Collect them into a beautiful spikelet, securing the petals to each other with hot glue. And form the central line from decorative black beads.
8. Take the St. George ribbon and make a loop out of it. Glue a spikelet on top of it.
You can make a fastening element at the back and you will get a brooch, or you can decorate a gift with such a product.
How to make a brooch for May 9
Each of us associates the month of May not only with the beginning of warm days, the last sunniest month of spring and the greening of nature, but also with the wonderful holiday of Victory Day, which we all remember with respect. Even children know that May 9 is the main holiday for the country, that this is the day that reminds us of the great feat of our grandfathers and great-grandfathers. Even though many children may not have seen their veteran grandfathers alive, they will definitely go to the parade and proudly carry a photograph in the Immortal Regiment. You need to attach a St. George ribbon to your chest. We offer you a detailed and understandable guide to creating an unusual version of such a victorious accessory.
How to crochet a St. George's ribbon?
For those who know how to crochet, it will not be difficult to make such an interesting brooch. For this purpose, you will need a standard set for this knitting technique and some free time.
- We cast on 70 air loops using black thread and knit in stitches in one row without crochet
- Then we knit one air loop and turn around
Now you need to replace the black thread with orange and knit two rows of each color
- At the end of the row you need to make increases
- We knit two stitches into the last loop
- When all the strips are ready, you should end up with a ribbon like this:
- You can decorate such a St. George ribbon with a flower in the traditional tricolor. To do this, we knit three blanks in white, red and blue.
- We form a loop from the tape and place the white blank on it first, then the blue and red ones. For beauty, it is better to move the flower petals relative to each other.
- You can sew a bead or any other beautiful brooch fittings into the center
We decorate the St. George ribbon easily and simply 2021
It has long been known that such a ribbon denotes two states, death and resurrection, or rather these two colors, orange and black. There are several ways to tie such an attribute; it dates back to the reign of Catherine II. It was then that soldiers and wars were awarded such a gift and this is how you could tie this detail on your attire. I think you will be surprised now when you see this picture, but at the same time you will know, and perhaps practice at home in advance.
The most popular methods are presented before you, you can do it using the easiest way, you can also tie it with a tick, in the form of a tie, or even with a scarf. Yes, this image shows everything perfectly. But that’s not all, it’s not enough to be able to fold the tape this way, you also need to know where and in what places it can be placed. There are prohibited areas of the body where, according to new recommendations, this attribute should not be applied. Look at the picture and remember.
St. George's ribbon with a spikelet of Kanzashi made of sharp petals
You have already learned how to make sharp petals, and now we will master the technique of creating multi-layered petals.
How to assemble complex (two- and three-color) petals from simple sharp petals, see this “Cross” master class
Using hot glue or thread, two-layer petals can be joined in the form of an orange-black ear to match the St. George ribbon.
Anzhelika Leshchenko clearly shows how to make a spikelet in her master class :
Rhinestones will cover the junction of the petals and give the ear greater solemnity .
A bow and a red star made of ribbons will perfectly complement a brooch with elements of a spikelet:
The colors of the Russian flag can also be used when creating a spikelet:
Three tiers - three colors
Each petal is a tricolor
Several different options
You can see how to make such complex brooches here.
You can also make a voluminous ear from a satin ribbon, in which the petals are laid with the back side out. The “antennae” of the ear are made according to the same principle as the stamens for Kanzashi flowers.
Original car pendant for May 9th
We have already made various original brooches for the Great Victory Day, today I propose to make an original pendant for a car from a St. George ribbon with a voluminous thematic flower made using the kanzashi technique. This handmade souvenir for May 9th will festively decorate your car. You can also make an elegant brooch from such a voluminous flower from the St. George's ribbon, and you will only need to glue the petals to the base on one side, and attach a clasp to the other side. In this case, we will need almost 2 times less St. George ribbon than for a car suspension. Choose your version of a holiday craft and get creative!
Making a brooch with St. George's ribbon
To make a brooch for May 9, you need to be patient, and you will also need a base for the brooch, a ribbon with stripes, an orange satin ribbon, a piece of black felt, decor, scissors, a lighter, and a glue gun.
Stages of work:
- We described above how to make a flower. In this version of the brooch you will need 7-8 petals from an orange ribbon. Cut out a small circle from black felt and glue the petals with a glue gun to make a flower.
- Place the decoration in the middle of the flower. Attach the base for the brooch with a pin to the wrong side of the felt circle.
- Glue the felt with the flower to the St. George ribbon folded crosswise.
You can make a double petal from ribbons of different colors. Petals can be of three colors: blue, red and white. Instead of a flower, you can collect a laurel branch, decorating it with a bow and beads. In general, experiment, use your imagination and create!
How to make a St. George ribbon from beads
The great holiday Victory Day, which is celebrated annually on May 9 not only in Russia, but also in many countries around the world, is the greatest day for everyone. On this day, the memory of the fallen soldiers who defended the country from fascist troops is honored. An integral symbol of Victory Day is the St. George's ribbon, which with its color means smoke and flame. It was awarded to warriors for bravery and loyalty. We invite you to weave a St. George ribbon from beads for the Great Victory Day.
Beautiful bead decoration
Making your own St. George ribbon from beads in the form of a bracelet is a great idea for someone who wants to emphasize their individuality.
For weaving we need: • Beads. Black and orange glossy, silver metallic. Bead size 10/0. • Needle for working with beads. • A thread. • Scissors. • Clasp for bracelet.
Agree, bead weaving is a good meditation. At the very beginning, we secure the silver bead by passing the thread several times with a needle through the hole. Leave 10 cm of thread.
We string 9 more beads of the same color.
We thread a needle with a bead into the 9th bead of the formed first row. The thread needs to be tightened.
We repeat the steps for 7 and 5 beads of the first row. The thread needs to be tightened every time.
We weave to the end of the row. If you do not tighten the thread, the beads will dangle and the geometric shapes of the product will be disrupted. We tighten the thread every time.
Take the next silver piece and repeat for row 3.
We weave the fourth row with colored beads according to the diagram. Black, orange, then repeat the alternation again and finish with a black bead at the end.
We weave the fifth row similar to the previous one.
We weave repeating the order of beads similar to the previous rows. For a bracelet, the number of rows should correspond to the size of the hand. For example, if the diameter of the wrist is 15 cm, then we weave five fragments (between the white stripes), plus the beginning and end of the bracelet. The length of one fragment is about 2.5 cm.
We fasten the clasp by hiding the ends of the threads.
To make the bracelet wavy, we pass the thread along the diagonals as shown in the diagram.
We get this beautiful handmade St. George ribbon.
DIY St. George ribbon ideas
The St. George ribbon appeared long before such an event as the Great Patriotic War (WWII) of 1941, with which we associate the Great Victory Day - May 9, on which it is customary to wear a ribbon.
The orange and yellow symbol is pinned onto clothing, worn as a patch, or used as decoration on vehicles during the May holidays. It is at this time that Victory Day falls. People who wear such a ribbon keep the memory of the fallen and surviving soldiers of the Patriotic War. In fact, the St. George Ribbon was a valuable reward for participation in hostilities, which took place before 1941. Therefore, it is worth taking into account the earlier merits of soldiers.
Over time, the St. George Ribbon has undergone changes. Now it looks like a brooch, but previously it was worn as a separate award over the shoulder. The length of the tape has become shorter and the width much narrower, but the color still remains yellow and black. This color refers to the Russian coat of arms, which depicts a black eagle on a gold background.
Brooch or medal for Victory Day: making commemorative symbols with your own hands
Brooch or medal for Victory Day: we make commemorative symbols with our own hands. Ekaterina Gunkova
Victory Day is celebrated not only by veterans of the Great Patriotic War. This is a holiday for everyone - children, grandchildren and great-grandchildren.
The St. George ribbon, which is attached to clothing to express gratitude to veterans, has already become a traditional holiday attribute on May 9th.
But how can you turn a simple St. George’s ribbon into a beautiful accessory corresponding to the symbolism of the holiday - for example, a brooch or a pendant in the form of a medal? Birobidzhan needlewoman Ekaterina Gunkova tells readers of the news agency EAOMedia about this.
To make a brooch or pendant using the kanzashi technique you will need: a St. George ribbon, satin ribbons 4-5 cm wide in orange and black, a middle cap for kanzashi, a paper picture matching the size of the cap, glue, scissors, tweezers, a lighter or candle, cardboard , a piece of felt, optional accessories (brooch pin, bead, pins, wire rings).
Basic materials. Ekaterina Gunkova
Progress:
1. Assemble the middle of the brooch. We find a thematic picture on the Internet and adjust it in size to the middle cap for brooches and kanzashi hairpins purchased in craft stores.
We print the picture on the printer and attach it to the lid using glue. You can stick an epoxy layer on top (it is sold in the same hobby stores) to make the middle look more noble.
If it is difficult to find such a cap, you can use a beautiful cabochon or badge.
The middle of the brooch is assembled. Ekaterina Gunkova
2. Cut into squares from orange and black satin ribbon. We will make 8 petals from them. To do this, fold the square diagonally. We bend the corners of the triangle to the top as shown in the photo.
Making petals for a brooch. Ekaterina Gunkova
3. Cut off the tip of the petal by 0.5 cm and solder it with a lighter.
We cut off the tip of the petal by 0.5 cm and solder it with a lighter. Ekaterina Gunkova
4. We make other petals in a similar way. There should be 16-18 of them in total (8/9 black and the same number of orange).
We make other petals in a similar way. Ekaterina Gunkova
5. We insert one petal into the other, having first dropped a drop of glue on the edge of the petal that should be inside.
We insert one petal into the other. Ekaterina Gunkova
6. Glue all the petals together. We connect the latter with the first, and half the job is done.
Glue all the petals together. Ekaterina Gunkova
Glue all the petals together. Ekaterina Gunkova
7. Glue the middle cap to the resulting flower.
Glue the middle cap to the resulting flower. Ekaterina Gunkova
8. You can finish the job by gluing a felt patch and a pin to the back side. This way you will get a beautiful brooch for the holiday.
Brooch for May 9th. Ekaterina Gunkova
9. Or you can make a pendant in the form of a medal from such a brooch. We take a piece of St. George's ribbon 13 cm long and 2 cm wide. Cut out a template from cardboard in the form of a pentagon, where the top part is 3 cm long, the side part is 4 cm, and the bottom is 2.5 cm.
Making a blank for the pendant. Ekaterina Gunkova
10. Glue the St. George ribbon to the cardboard pentagon, as shown in the photo.
Making a blank for the pendant. Ekaterina Gunkova
11. In a way convenient for you, attach the pendant to its upper part; for me these are two rings attached to both parts of the pendant and connected to each other by a wire-pin on which the bead is located. A satin ribbon is attached to the top, on which the entire pendant should hang. I found a chain to this place.
We assemble two suspension blanks. Ekaterina Gunkova
That's it, the pendant is ready!
Finished pendant. Ekaterina Gunkova
162734
Source: https://eaomedia.ru/news/690078/