Tassel earrings continue to be a trend in fashion shows; when chosen correctly, they allow you to create a unique look and give a special charm to their owner. Stylish and fashionable jewelry is easy to make with your own hands. Accessories, necessary materials and special tools for the job can be purchased at any sewing store.
…
How to make tassel earrings with your own hands: master class
The basis of the decoration is the earring to which the pendant is attached. As a rule, earrings have decorative elements and a long tassel, for which different materials are selected - beads, beads, rhinestones, semi-precious stones, threads and leather.
The earrings are attached to a loop, which is held in the lobe due to its curved shape and due to its own weight. For light models, clips in the form of studs (studs) are provided. Expensive gold items are fastened using an English clasp; it is the most reliable and safe.
Tassels can be of different lengths - reaching up to the shoulders or even lower. They usually don't come in small sizes. The design of the jewelry takes the form of a lush bundle of threads, a composition of several tassels or beaded threads. The elongated shape of accessories can visually lengthen the neck line and correct an oval or square face.
Material requirements
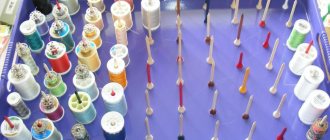
To make the product look beautiful, you need to choose the right threads for the tassels. First of all, they must be bright, durable, have a soft shine, and keep their shape when finished.
Earrings are the main part of earrings; with their help, the accessory is inserted into the ears, so you need to take the material from which they are made very seriously. Ear wires made of medical steel, silver or copper are best suited. Nickel and cobalt alloys can be hazardous to health.
The wires differ in design:
- hooks - are a curved wire, held by the weight of the earring;
- hinges – have a round or oval shape, equipped with a lock;
- carnations - fixed at the back, the base is decorated with rhinestones or decorative elements;
- clips – no need to pierce your ears to secure them.
DIY thread tassel earrings: master class
First way
The simplest version of the decoration can be made from silk threads .
The following materials are required for work:
- scissors;
- silk threads of different shades;
- accessories - beads, hooks for earrings, hat;
- pliers, wire cutters;
- transparent adhesive moment;
- thin wire.
Silk threads are cut into 20 cm pieces and folded in half.
The prepared sections are fixed in the center, tied with thread and the excess ends are cut off. The wire is threaded through the cap, its inner part is lubricated with glue and the head of the brush is secured. The bead is strung on a wire, the end of which is bent into a small hook using pliers. Excess parts of the wire are removed with wire cutters. The hook for the earring, in turn, is hung on the hook from the cup. The tassel fringe is trimmed and the product is ready. Second way
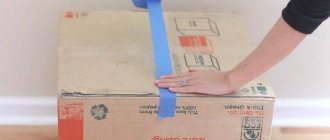
To make a tassel, you will need a piece of cardboard with a side of 10 cm, on which silk or any other thread is wound. Approximately 200 revolutions are made, after which the thread is cut.
A floss thread 15 cm long is passed under the wound threads, pulled together and tied in a double knot, on the other side of the cardboard the bundle is carefully cut with scissors.
The next stage is the formation of the brush. Stepping back about 0.5 cm from the knot, wrap the top of the tassel with floss. After several turns, a knot is made and the thread is cut. Glue is applied to the winding and a rhinestone ribbon is secured on top in two turns.
Decorative insert. A jewelry pin is threaded onto the bead, the tip of which is bent at a right angle. Using pliers, the rod is folded into a loop, and the excess part of the pin is removed with wire cutters. The insert with the bead is attached to the tassel by the loop and the earring is put on. You can make the earrings more decorative by tinting the thread fringe black with an alcohol marker. To do this, press the brushes tightly with a ruler and, stepping back about 4 cm from the end, paint the fibers of the threads on both sides.
Master class on making jewelry from cord
Necessary materials:
- thin orange cord;
- golden cord;
- accessories – rings, earrings;
- scissors;
- glue moment.
The orange cord is cut into pieces of 10 pieces, 18 cm long. The prepared cords are threaded into a ring, to which the hook is attached.
The formed tassel in the upper part is wrapped with a gold cord, at a distance of 8 mm. The end of the cord is fixed with glue.
Finished products must be trimmed with scissors so that the length of the threads is the same.
Bead brush earrings: master class
For work you will need the following materials:
- beads, beads;
- pin with ring;
- decorative hat;
- nylon thread 110 cm;
- bead needle.
Take a special needle and string beads to a length of 5 cm. Pass the last bead and thread the thread through all the beads in reverse order.
The resulting thread for the brush is secured to the pin ring. 20 strands of beads are collected in this way and attached to a pin. A decorative cap is put on the resulting tassel. A bead is strung on top of the pin and the tip of the rod is bent into a ring using pliers. The earring is attached to the tassel, and the earring is ready.
Leather tassel earrings: master class
Materials and tools:
- thin genuine leather;
- cord end;
- decorative elements;
- accessories - ear wires;
- glue;
- disk knife;
- ruler, scissors.
Cut out rectangular pieces of leather of the required size, cut them into thin noodles with a circular knife. You should leave 1.5-0.5 cm at the edge of the part, depending on the size of the brushes.
Roll the strip of skin cut into noodles into a tube and secure it in the cap with glue. A hook is attached to the finished brush. The earring can be decorated with any bead or decorative element made of beads.
How to make tassel earrings from threads with your own hands
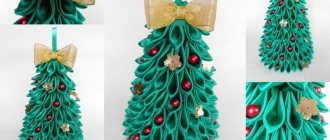
Good afternoon everyone. My name is Yana, this master class is dedicated to tassel earrings, or rather to the tassels themselves and two options for their execution. The first option for making earrings - tassels - is classic, and the second option - with a different top, with a recess in the middle. This version of tassel earrings is less common, but it also has its admirers. To be honest, I have not seen master classes on creating just such brushes. We recently had a review of the threads I use to make tassels. And after this review of threads, I received a lot of questions regarding the manufacture of this particular option. Therefore, today I will show you both options for making tassel earrings.
So, to make tassel earrings we will need: tools, earring fittings, some beads, Swarovski bicone, a piece of corrugated cardboard (7 cm wide), cotton thread, Doli viscose thread, fishing line or monofilament, blade, scissors and needles.
Well, the first thing we need to do is wind threads on a piece of cardboard to get a tassel for making earrings. I do not use various plastic or bank cards. For me, cardboard is the most convenient option. Its width is 7 cm. We will need to make tassels 6.5 cm long. Therefore, a margin of half a centimeter is quite enough for us. On one side and the other we need to divide the cardboard in half. On this side we will tie it exactly in the middle, and on the other side we will trim it, that is, this line will help us do it all smoothly and neatly.
And we begin winding the threads for the tassel, I make exactly 700 revolutions, I do it on a count. I grab the thread with my left hand and begin to wind it with my right. I wind it evenly and carefully, all the threads are parallel to each other, try to keep each thread close to each other, then you will get an even tassel. The width of the winding should not be more than one and a half centimeters in order for the tassel earrings to be smooth and fluffy. That is, to make tying convenient for us in the future, there is no need to wind threads over the entire width of the cardboard. We wind it about a centimeter and a half evenly. And so we do a full 700 turns of thread.
After we have done this, we need to insert cotton threads into the needle and secure the brush. I use a thick needle, it’s convenient to grab all the threads and crawl under them. This way I tie several knots. Exactly in the middle, at the mark that we have, we tighten it, pressing it with our finger, and make another knot.
The threads are not yet securely fastened enough, but we leave them in this position and turn them over to the other side. Here we will use a blade to cut in the same way in the middle, where our marking line is located. Using a sharp blade, we simply press from above a little from side to side, draw it with the blade, and all the threads are cut.
Next, carefully remove the cardboard. On the other hand, we grab the short edge of the thread with our hand, and with the long edge, a long piece, we make another 3-4 turns. We hold it tightly so that all these threads do not move. And exactly in the same place where we have the first turn, we make three more. Next, we intercept, find the short end and here we hold it well with our left hand so that nothing comes loose there, and we make 2-3 more knots. That is, in this way we completely secure the brush. We don’t cut the thread - we will steam it in the future and cut it later. You need to leave some part, cut off only a needle. That is, we will not bandage it here, because we will hide this entire part in the cap. Therefore, we do not need to tie it at this place. It is also not particularly important what color our threads will be. Most often, of course, it is better to match them absolutely to the color of viscose, but in our case, the threads will also be all hidden.
The next stage is steaming the brush for the future earring. After the kettle boils, we need to place the brush over the steam using some kind of stick (for me it’s a sushi stick). This is how we will steam the earring tassel.
As you can see, it only takes a few seconds for our brush to be completely leveled. Now we need to trim it carefully.
In one of the previous videos, I already told you that I trim the tassels using heat shrink tubing. It is sold by the meter in this form. I cut exactly six and a half centimeters, that is, the length that I need, and place the brush inside. That is, for the thread that we did not cut, I completely skip the tassel.
We cut off the excess with a blade. The blade must be very sharp, then the process will be fast and accurate. This is how I cut off all the excess, and the edge turns out absolutely perfect.
If you don’t have such a tube (by the way, it can be found in any electrical goods store), then you can use, like many needlewomen, just a piece of paper. That is, we need to place the brush in paper, wrap it (without a tube, of course) and cut it around the edge. Next, we take the tassel out of the tube and cut off the excess thread. Anyone who wants can drop a drop of glue or nail polish here, but I don’t do that.
Now we need to attach a pin here. I cut off the eye that is on the pin - it is big enough for me. And I make a very small loop - on the very edge of the pliers. I do this so that our trailer gets used to the brush as best as possible. That is, there is such a small loop - I press it back a little. And under the strings I insert it here, like this. We close the loop.
Next I put on the end cap. That is, in this way it is attached to the brush. I place a beautiful decorative bead on top. Next, I need to bend the pin ninety degrees and trim it (leaving about 7-8 mm). And we make a loop again. The tassel earring is almost ready.
That's it, all that remains is to attach the wire. Here I already bend the loop on the earring, hook it to the pin and return the loop to its place. The tassel earring is ready!
The second version of the earring tassel is a little more complicated. We wind the threads, tie and cut the tassel in the same way. Next, we need to take one part and throw the second on top so that, like a palm tree, it is in the middle. We look for the center and help straighten it with a needle.
And then comes the crucial moment. We need it to turn out evenly and all the threads to lie evenly. That is, we correct it several times with all our fingers and bring it to perfection. Sometimes it takes quite a long time. We completely straighten everything out the way we need it. And when we achieve the desired result, we need to tie the tassel. If the tassel lies almost flat, but some threads stick out in the other direction, you can pick them up a little and throw them to the desired side. It is really very important here that this recess is exactly in the center, and all the threads are distributed evenly. Sometimes this is not very easy to achieve, but I still really like this version of brushes.
Next we need to hold it all together. I took a small piece of thread and folded it in half. Now we need to tie it like this. I also go through and tie knots several times - 3-4 times.
I cut off the excess thread. There is another small difficulty here - this is to make the second brush exactly the same as the first. Well, it’s not so easy to carefully insert a pin here, because it’s quite thick, and it pulls the strings along with it. I first do this with a needle. That is, I insert the needle straight from the top, as if punching a path for the pin, and turn it over - there it is, the needle. I pull out the needle, remembering where to insert the pin, and push the pin into that place.
Here you don’t have to cut the loop - it won’t be visible. The pin will stay much more secure this way. So he came out about in the middle and caught the strings behind him. I carefully remove them from the pin and push it all the way through. And these threads can be easily corrected. I pull the thread up and look for it here - where it came from, and pull it back. I pull up the next thread in the same way. I catch it from this side and pull it up. And so we return all the threads that came out to their place.
After we have perfected the tip, we need to steam the brush in the same way. Here we have a pin sticking out, so you can grab it with pliers and hold it over the kettle in the same way. By the way, I tried to insert the pin before tying it, that is, with its presence already forming the tip, but, unfortunately, it always turns out sloppily. That is, it’s easier for me to form the tip without a pin and insert it later. You may find it easier to do it differently. I steamed and trimmed the brush. Now we need to place a decorative bead here in the same way. It fits very well into the recess that we made. In the same way, bend the pin 90 degrees, trim off the excess and form a loop.
I deliberately do not pay attention to how I fasten, how I make loops. We have a separate video on working with pins. And today we are talking about brushes. That's why I'm showing 2 ways to make the brushes themselves. And the formation of tassel earrings is everyone’s business. Everyone can have their own.
This is what the almost finished brush looks like. If you carefully bandaged it here, you can leave it like that if you wish, but I usually always decorate this place.
I took Swarovski crystals of the same color, bicones, and with the help of fishing line I will now make a headband in this place. I collect a number of beads. It will be different for everyone, so I don’t focus on this, I try it on so that it’s all even. That is, the headband should sit tightly on the tassel.
And I just tie knots. I always make 3-4 knots. To make the knot invisible, I will pass the needle through 2-3 beads and tighten the knot a little there. Next, very carefully, I use a blade to cut the threads right down to the spine. This is what the headband looks like. I had these large beads on hand, but you can make them smaller. You can use beads of the same color. I will make another headband with gold beads number 15.
We do everything the same. I select the required number of beads, try them on and tie the ring. Everything is the same - I tie knots and cut off the excess.
Well, this is what the second version of the earring looks like. I don't know which option you'll like better.
I like both. I often make both this type of brush and this one. Of course, it’s up to you to decide, but I advise you to try both options - and then decide.
I hope this master class on making tassel earrings with your own hands was useful to you. If so, ask questions, write comments and reviews. We will definitely answer them. You can purchase Lux accessories for jewelry and Doli threads, which were used in this master class, in our online store with delivery to your door. If there was anything unclear to you from this master class, you can watch the video master class, in which I show and explain everything in detail:
What can you wear with tassel earrings?
Such accessories are more suitable for everyday clothes: sundresses, jeans, suede or leather jackets, shorts, etc. Jewelry looks good with retro-style suits, ethnic motifs or art deco. Clothing can be of a simple cut with complex draperies.
For the look you choose to be perfect, the shape of the jewelry must match the main lines of the clothing. For example, earrings with single tassels resemble a triangular shape, so an A-line silhouette would be more appropriate in an outfit. Chandelier earrings suggest full skirts, flared pants and peplums. The flat shape of the tassels in the decoration corresponds to the straight lines of the costume.
Master class step by step: earrings - DIY brushes
After complete preparation of the components necessary for the operation, you can begin the technological process. There are 2 methods suitable for creation, which differ significantly from each other at the initial stage.
Option 1:
The threads are carefully straightened and wound onto a cardboard blank. The number of revolutions depends on the desired thickness and volume of the brushes themselves. After winding, you need to form a knot using regular threads that match the shade. The knot is tied at the level of the mark on the cardboard. The thread is placed under the main winding using a needle, the remainder is carefully trimmed. To fix the remaining knot, use clear nail polish. A small amount of cosmetic product is applied to the thread and carefully pressed against the brush. On the reverse side, the threads are cut to the level of the vertical mark on the workpiece. The brush is ready.
Addition: if desired, you can use silk threads of several shades. It is important to ensure that the shades are correctly combined with each other.
The second stage is its straightening. The resulting brush should be held over a container of boiling water for several seconds. The steam flow helps to quickly straighten the threads.
Attention: when working, it is recommended to use tweezers in order to avoid possible injury and burns.
The base for the earring is ready. The final stage is the location of the fastening and decoration. Stepping back about a centimeter from the main fold, several knots are made with threads. The ends of the knot can be secured with clear nail polish. The resulting head is necessary for the location of the fastening and decoration. A similar procedure is carried out with the second brush.
After this, you should straighten the ends, making them the same length. To do this, the brush is placed on a landscape sheet, the threads are carefully straightened. The tips must be placed outside the paper. The leaf is rolled into a tight tube. The threads are carefully cut to the same uniform length.
Tip: As an alternative to paper, use heat shrink tubing to trim the ends of your brushes.
The ring required for fastening is inserted directly into the previously prepared head. To make the process easier, it is recommended to carefully straighten the threads and fix the bend of the ring using wire cutters or pliers. A fastener is inserted into the ring, which will fix the jewelry in the ear. Decorate the knot itself with rhinestones, a small ribbon of beads or stones. The tassel earrings are ready.
Many girls prefer an accessory with two tassels in one earring. When preparing one workpiece, you will need half as many threads. The second part is spent on creating the second brush. When purchasing mounts, you should choose products that are suitable for placing two decorations. The procedure itself is carried out in a similar way.
Option 2:
The second method is a little more complicated at the initial stage. Preparing brushes takes longer. To create them, the threads are cut into pieces of equal length. After preparing the necessary blanks, the thread is folded in half, and a thread for fastening is fixed in the middle. Several tight knots will help with additional fixation. The resulting brush is straightened over hot steam (if necessary). The excess is cut off using paper. The rest of the process follows the steps described above.
Tip: to make the process easier, it is recommended to cut one thread of the desired size, which will serve as a base. The rest of the coil is folded along a length equal to the workpiece.